June 21, 2011
By Steve Martin
Ripple Training Apple Pro Video Series: FCP X Tutorial
Download the ePub iPad/iPhone version of this article.
Final Cut Pro X is here. The speculation, the rumors, the misinformation and the hand-wringing can now mercifully stop. The hype machine is now inert and we can all get back to work. As is my custom each time a new version of Final Cut Pro is released I set about writing an article for Ken explaining what the new features mean to the rank and file editor who will be cutting with it in their day to day operation. Therefore, this article's primary focus will be to address how FCP X's new editing paradigms are most likely to impact your workflow.
The Media Command Center
FCP X gives you a number of different ways to import your media. You can import directly from a camera or memory card or you can import a file or folder from the Mac's Finder. Before you import any media, an important first step is to tell FCP how you want your media organized, optimized, and analyzed . These settings are handled in the Import Preferences window (Command-Comma).
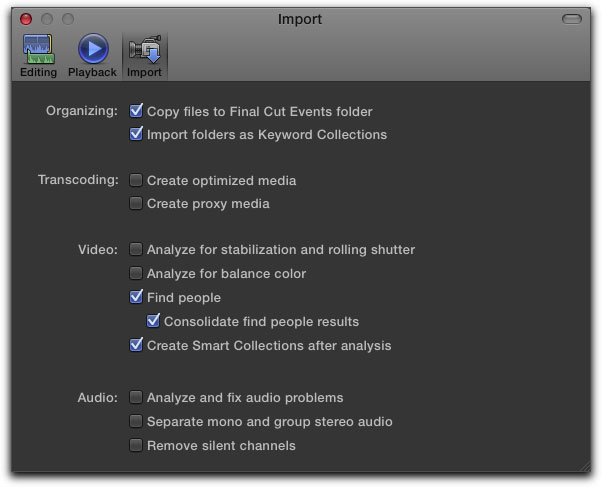
If you're a seasoned FCP user, opening preferences for the first time and seeing how minimalist it has become might be alarming. Preferences in FCP X are much more about controlling how media is handled and less about how the user interface can be customized as it was in legacy versions of FCP. I therefore like to think of preferences as FCP X's media command center.
In the section labeled "Organizing" you can have Final Cut Pro automatically copy your media into dedicated folders called Events which makes managing, organizing and deleting your media very efficient (more on Events in a bit). In the Transcoding section you can have your media automatically optimized during import. For example, if the footage you are importing is not a video editing friendly format such as h.264 or some MPEG variant, you can have FCP encode your footage into one of two Apple ProRes flavors for optimum playback performance.
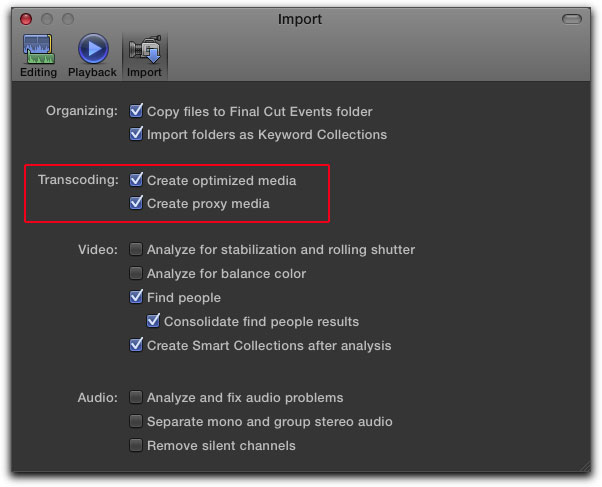
Checking "Create Optimized Media" will create standard ProRes media, and checking "Create Proxy Media" will create ProRes Proxy media. Here's the cool part; you don't have to wait for the files to finish transcoding, you can work with the original camera media (even directly off the card) while your media is transcoding in the background. Once the transcoded media comes online, FCP will reference the transcoded media, so as you work, you'll notice editing and playback performance increase.
In the sections labeled "Video" and "Audio" your media will be analyzed for content and for potential problems with your footage. The items under "Find People" and "Create Smart Collections after analysis" are checked by default. When your footage imports, an algorithm determines if there are any people in the imported clips then intelligently places them into Smart Collections labeled One Person, Group, Wide Shot, Close Up, and so on.
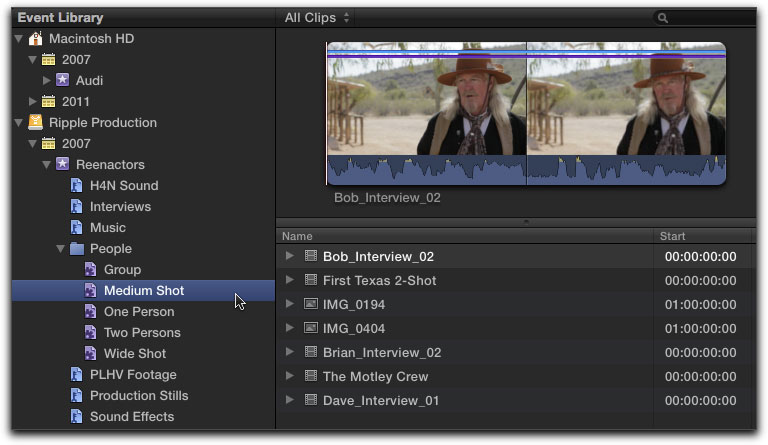
Having FCP do this for you automatically is like having your own assistant editor go through your footage and sort it before you even begin working with it. As an aside, organizational intelligence not new. It's built into the Mac's Finder, iLife, Aperture, Mail, and any number of apps that have huge data bases that must be managed and organized. For those of you not familiar with smart folders, smart playlists and the like, this may take some getting used to.
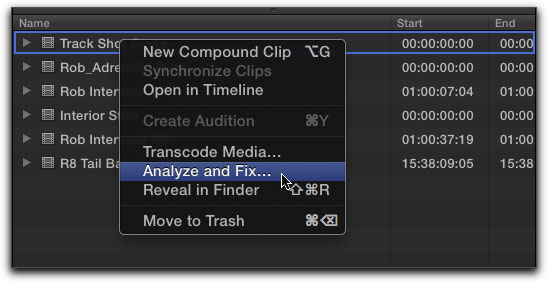
Where FCP X really excels is in the "analyze clips for problems" department. During import, if the appropriate items are checked, you can have FCP look for camera shake, rolling shutter problems (an issue peculiar to CMOS sensor cameras that produce a warping artifact on the image) and color balance problems. With regard to video, I want to point out that the footage is only analyzed for these problems and will not actually be Fixed or Corrected until you add the clip to the project then enable the appropriate feature in the Inspector. The advantage of having your footage pre-analyzed, is that you don't have to think about analyzing it later (which of course you can do at any time during editing) by simply right-clicking on the imported clip and choosing "Analyze and Fix"
Sometimes when shooting on location you end up with audio that is not loud enough, has too much background noise, or has 60 cycle hum generated from improper grounding of your audio recording gear. By checking "Analyze and fix audio problems" FCP X will look for these common problems. Severe problems will actually be fixed during import, while problems that the algorithm determines will need human judgement and skill to fix, will be flagged.
Because all of the organizing, optimizing and analyzing happens in the background, you can bring up the background task window if you want to monitor the progress during import. Just click on the circular graphic on the left side of the Dashboard (the widget-looking window in the center of the Toolbar).

The New Lexicon of Final Cut Pro X
If you're a legacy Final Cut Pro editor, one of the things you'll have to readjust your thinking to is Final Cut Pro X's new lexicon of workflow and editing terms. Lets go through some of the terminology changes.
It's Importing not Ingesting
In the past we referred to bringing in media from a tape-based camera or file-based camera as "capturing" and "ingesting" respectively. Now, we simply refer to all methods of FCP media aggregation as "importing".
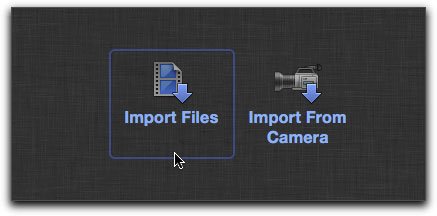
As the screen shot indicates, you would choose one of two import options depending on whether you are importing media from a file on your Mac or a connected camera. One of the rumors that cropped up on the blogosphere was that FCP X would no longer support tape-based cameras. The screen shot below is the import window from my connected Sony HDV camcorder. As they say on my favorite cable show Mythbusters: "busted." The feature that will be noticeably missing for professionals is that there is currently no way to log offline clips from tape, then capture (import) them as a batch. You can only perform a "capture now" operation by clicking the "import" button, then pressing the Escape key to end the import operation. Everything that was imported up to the point Escape key was pressed will become a QuickTime file in your Event Library.
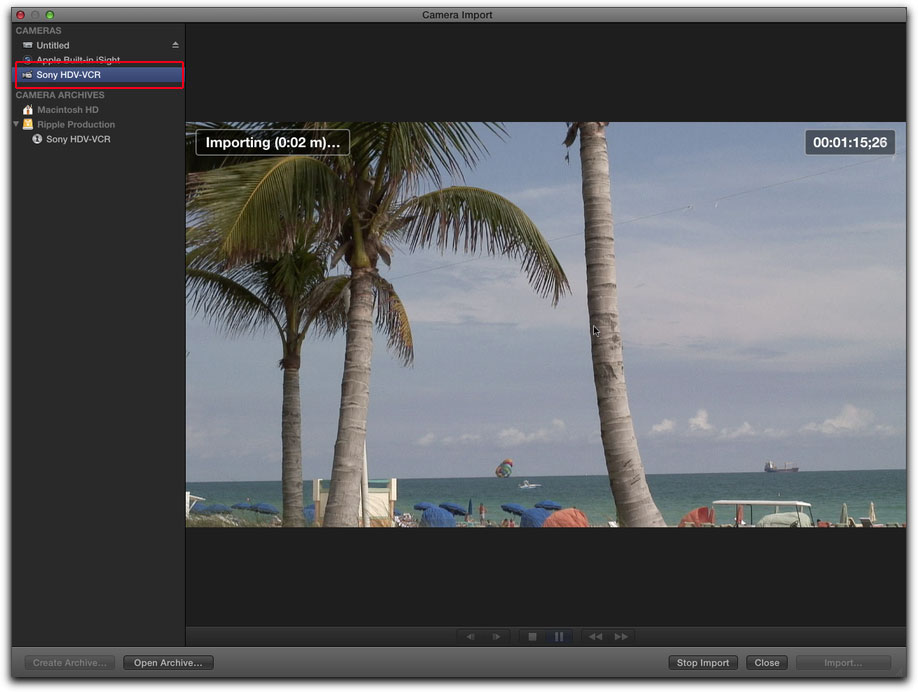
FCP X supports most firewire based DV and HDV camcorders so you can continue to use these devices for importing. Importing from professional VTRs will most likely come from third parties, but at the time of this writing I have no information on this.
It's an Event not a Capture Scratch
In legacy version of FCP, your media was imported and managed from within the Project window. Media was available within a project only if you explicitly imported, captured or transferred media into it. In FCP's new Event Library scheme, all the media you've ever imported is available all the time. The Event Library is therefore like a giant personal media catalog that's always accessible. That's why its called a Library. The only time you wouldn't see your footage is if one or more of your drives containing an Event is offline. From a professional standpoint, this means that all the media from every event loads each time FCP is launched including material that might be client sensitive or not meant for others eyes. The only way to prevent this is to make sure the drive with the material you don't want to appear in the Library is not mounted before launching FCP X.
The thinking behind Events is that imported media always has a creation date associated with it and should be grouped accordingly. For example, if you imported video from your scuba trip to the Florida Keys, this material would be much easier to locate if it was grouped by the year it was recorded and placed into an event named "Vacations".
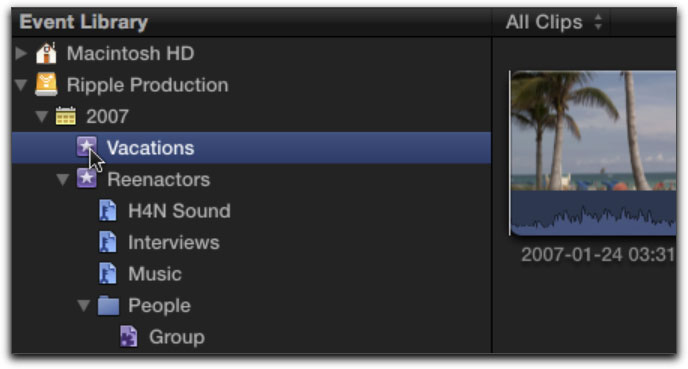
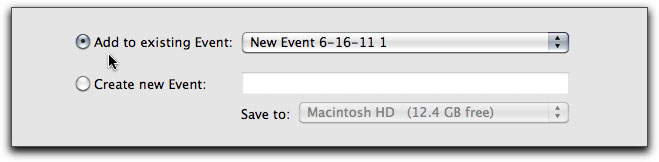
However you might think of Events, at the end of the day, they are simply an organizational convention much like a folder on your Mac desktop. And because Events are date sensitive, FCP gives you some great tools for viewing and organizing the media within them. If you are coming from iMovie, you are already familiar with the concept of Events. When you import media you are asked to either create a new Event or import into an existing Event.
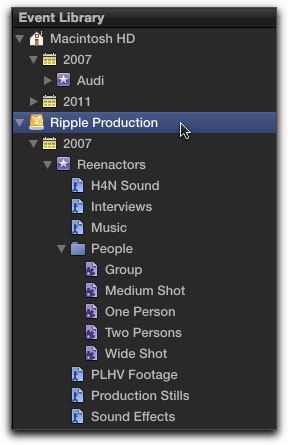
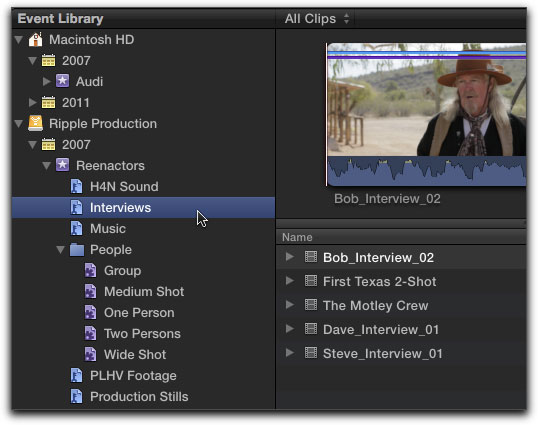
Like iMovie, Events are located in the Movies folder of your home user directory. As you see in the screenshot below, all your media resides in user-named Events folders inside the main Final Cut Events folder.
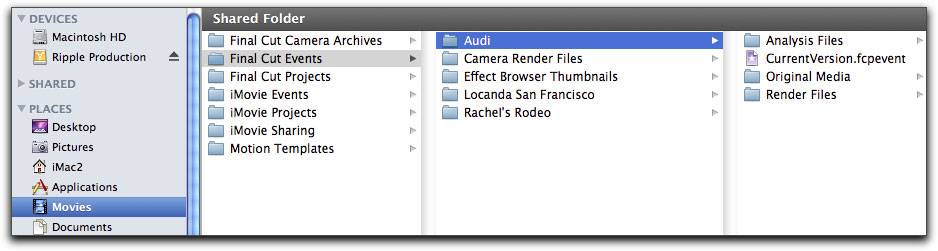
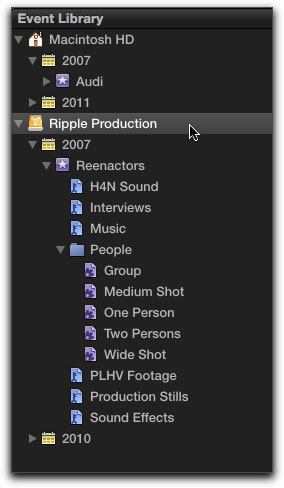
You can save your Events to any drive you like, however, your media must reside in the Final Cut Events folder in order to appear in Final Cut Pro. Each time you launch FCP X, all mounted drives are scanned for this folder and will appear in the Event Library in the upper left of the interface.
When creating an Event you are given the option of storing the Event media on your boot drive or another drive. If you have a history with FCP like I do, you have it drilled into you from day one, that you want to avoid storing your media on the internal drive because a) its' not as fast as dedicated media drives, and b) your operating system is on this drive and the constant reading and writing of video files introduces disk fragmentation that could affect the drives performance. Therefore, it's always a good idea to target a dedicated media drive for your Events folder.
It's a Smart Collection not a Bin
In Final Cut ProX, the metaphor of Bins as an organizational feature has been done away with. Bins have now been replaced with "Smart Collections" A Smart Collection is a clip grouping based around meta-tags. As one example, a Smart Collection can be created around useful Keywords. Let's say that you wanted to group all your interview clips together. Just select the clips you want to include in the group, then click the Key icon in the Toolbar to bring up the Keyword Editor. In the example below, I typed out "Interviews" in the input field.
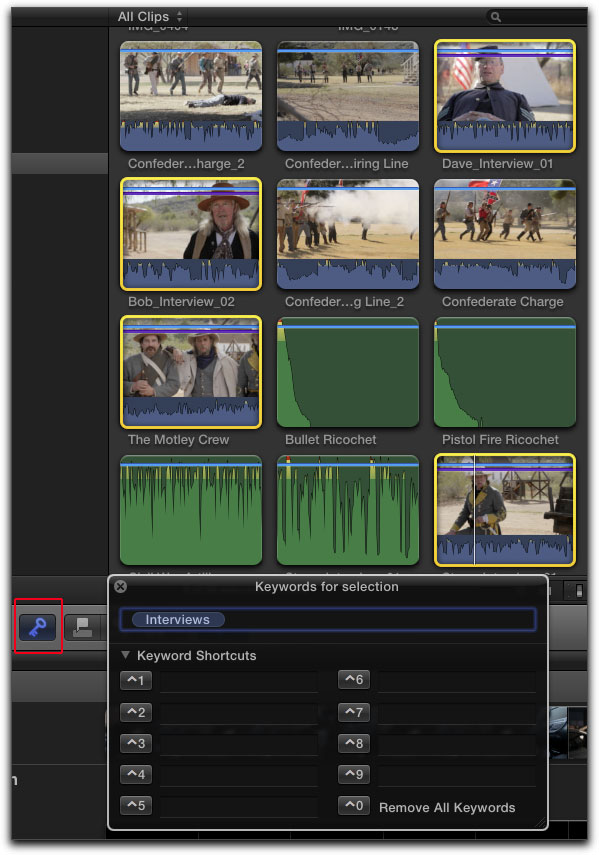
Pressing return applies that keyword to all the selected clips. In the Event Library, and new Smart Collection called "Interviews" appears. Selecting the smart collection reveals all the clips you selected and tagged with the "Interview" keyword.
If you ever needed to add a clip to the Interview smart collection, just drag the clip over the icon. A plus icon will appear and the new clip (or clips) will be auto-tagged with the name of the smart collection you are dropping it into.

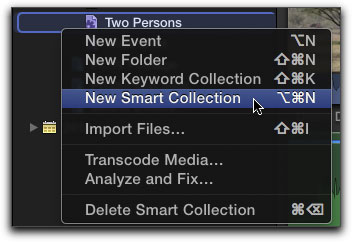
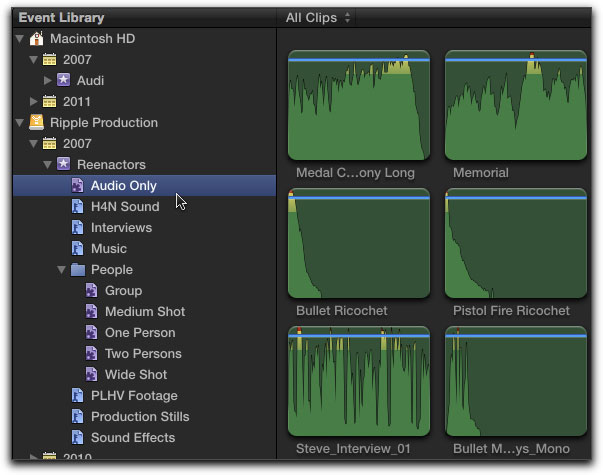
There are many other things you can do with Smart Collections that are immensely timesaving. For example you can create a Smart Collection that will automatically group clips that around media types such as graphics, photos or audio files. Just right-click in the Event Library and choose "New Smart Collection". Name the Smart Collection "Audio Only Clips".
Double-click on the smart collection to bring up the Filter HUD. Click the "Plus" pop-up and choose "Media Type"
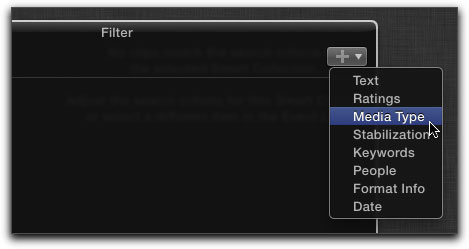
Choose "Audio Only" and close the Window.
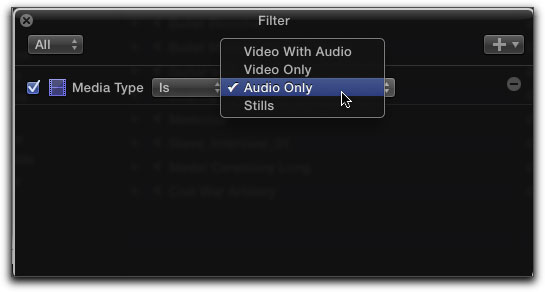
When you select the Smart Collection, only audio clips will appear in the group. Even better, each time you import new audio-only clips, they will automatically appear in this collection.
It's a Selection not a Marked Clip
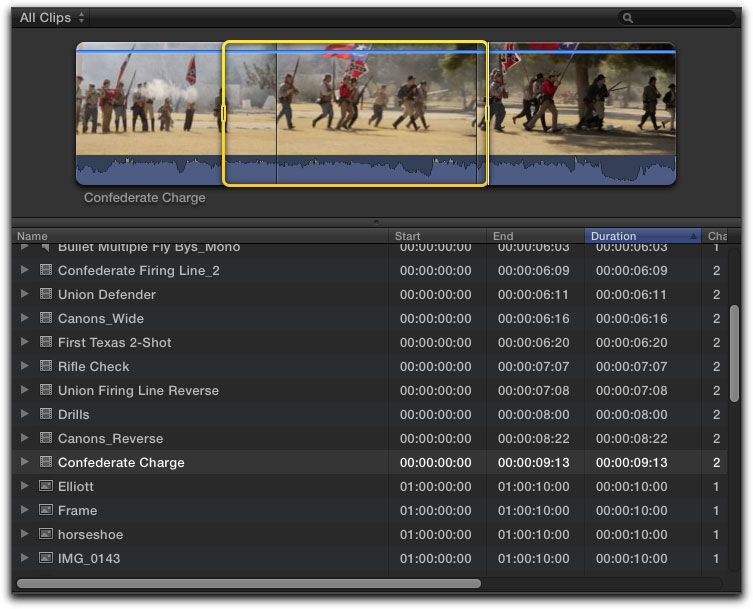
Once your media has been imported, you're ready to make clip selections in preparation for adding them to your Project. In legacy versions of Final Cut Pro you would "Mark" your clip using In and Out markers. In FCP X, you create "Selection Ranges" just like in iMovie. Where FCP X has stepped it up a notch from iMovie, is that you can navigate and create selection ranges using familiar FCP keyboard shortcuts (I and O to mark the beginning and end of the range, and JK & L for shuttling back and forth to name a few). You can also adjust the selection range by dragging on either end of the yellow boundary.
When looking for material to use in your project, FCP X employs a Skimmer - like iMovie - for quickly traversing your clips. I think the Skimmer is a great addition to FCP, but it can be confusing because the Apple designers also included the legacy Playhead (more on that later).
It's a Project, not a Sequence
Before we get into the nuts and bolts of editing, I need to discuss what Final Cut Pro calls a Project. Projects are the primary containers for your work in Final Cut Pro. They are created and managed from within the Project Library in the lower half of the interface.
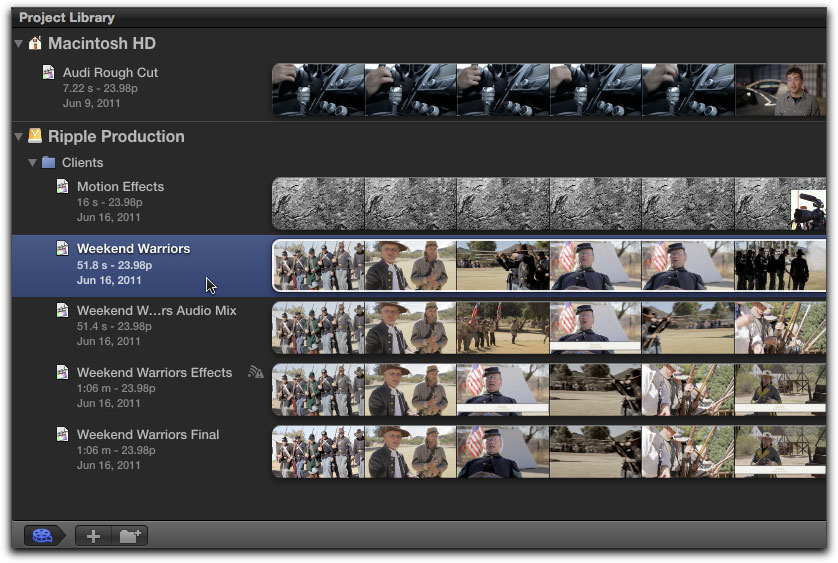
Moving your mouse pointer into any of the project filmstrips and dragging left or right will allow you to skim the contents of your Project. Projects represent the sum total of your work in Final Cut Pro and include all edited video and audio clips that makeup your story, including titles, transitions and any applied effects. Projects are also associated with user-specified drives. As you can see from the screenshot, I have projects on both my internal HD and an external media drive called Ripple Production. Projects for each drive can be hidden or revealed by clicking the disclosure triangle next to the drive name.
Now, to answer that nagging 100K question asked by many in the Blogosphere: Will I be able to open my legacy Final Cut Pro projects in FCP X? The answer is a resounding no. FCP X is built on an entirely different foundation; from it's 64 bit architecture, to its' trackless editing paradigm, there is no way to translate a FCP 7 sequence into an FCP X Project. Which brings me to my next point: In FCP 7 and earlier, Projects were the master files for the sequences that represented your work. You could therefore have multiple sequences within one project. In FCP X however, the concept of sequences has been done away with as the Project itself now functions as your sequence.
Like Events, Projects are stored in your Movies folder in a folder labeled "Final Cut Projects". And like Events, as long as the media drives are mounted that contain a Final Cut Project folder, all the projects are loaded into RAM each time you open Final Cut Pro. As a professional, I am not crazy about how the Project Library functions as you must keep drives "unmounted" if you don't want certain projects loaded when the app launches. I think this must be addressed in future versions.
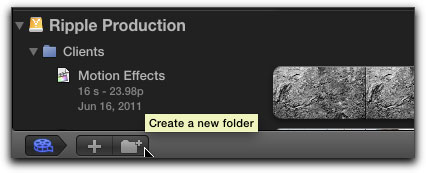
As you can imagine, having all these projects open and available all the time, will soon make your Project Library visually cluttered. To clean things up, you can create a folder by clicking the "create a new folder" button then drag related projects into it. You can even name the folder to remind you of the project content. Creating folders is something I highly recommend in FCP's new Project scheme.
To create an new Project, click the "Plus" button next to the folder button. A window will appear asking you to name your Project. Also, Projects are always associated with Events. As you can see below, this Project will be linked to the media in the Reenactors Event.
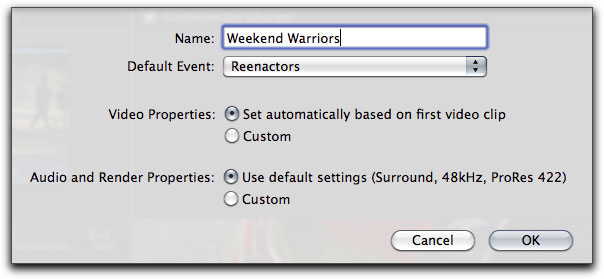
When you add the first clip to your Project, the Project's video properties inherit properties of the clip you are adding to it. For example, If the first clip you add to the project is a 1080p 23.98 clip, then the Project properties will be 1080p 23.98 and any subsequent clip whose video properties differ from the Project properties will be auto-conformed to this standard. This feature essentially allows you to work with any clip regardless of format, in real time, during editing.
It's a Timeline, and a Storyline
When adding clips to the Timeline you can use the familiar "drag and drop" method, or use the 3 dedicated editing buttons on the Toolbar.

The 3 editing buttons allow you to add clips by connecting, inserting or appending them into the Storyline which begs the question; what is a Storyline? In a traditional timeline you would edit your clips into tracks. No doubt, this is the visual metaphor you are familiar with if you've used previous versions of FCP or other non-linear editing programs. However, in Final Cut Pro X, there are no tracks. For example, the clips that currently occupy the timeline in the screenshot below are not sitting in a track - you do not see the familiar accoutrements of track based editing such as track labels, visibility toggles, patch panels and the like.
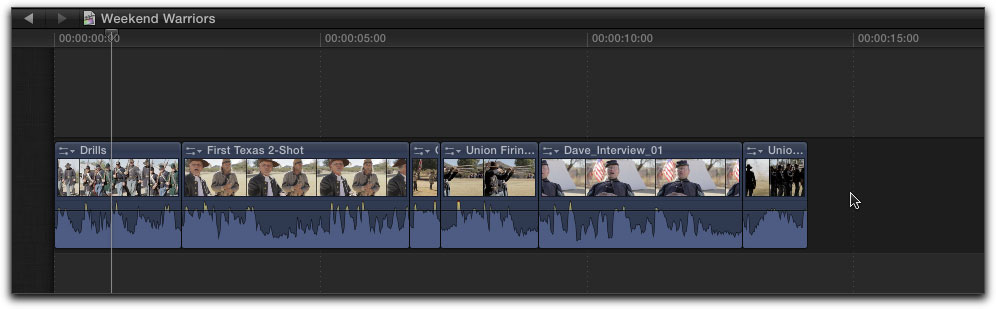
When clips are added to the timeline, they are added to the Primary Storyline which is represented visually by the dark horizontal strip. A Storyline is therefore much more like a container for video and audio - but it can also contain just video or just audio and even text and graphics. In terms of workflow, let me draw an analogy. The track paradigm is much more akin to traveling along a multilane U.S highway. You can only drive so fast; you must stay in your own lane until its' safe to change lanes, and you must always be mindful of where other vehicles are to avoid collisions. FCP's new Storyline paradigm on the other hand, is much more like traveling along a single lane highway of the future where the traffic auto flows around your car and the lane itself prevents collisions with other cars - kind of like traveling in Tom Cruises' Lexus in the movie, Minority Report.
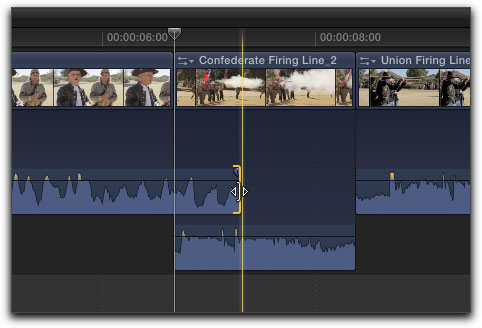
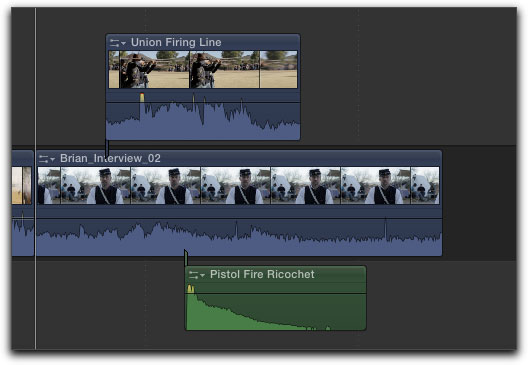
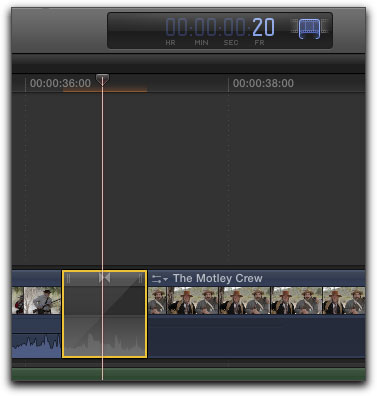
With a FCP's Storyline construct, it's much easier to trim and move clips around without having to worry about other clips getting in the way. Apple calls this feature the "Magnetic Timeline." In the image below the audio from an interview clip is being extended into the next shot of a civil war battle scene. The audio from this shot automatically moves "lower" to accommodate the longer audio from the interview. In practice this feature will save you a lot of time performing in one gesture what would normally take several steps to accomplish in track-based editing apps.
Final Cut Pro also allows you to connect clips above and below the Primary Storyline. The most common reason to connect a clip is to perform a B-roll cutaway or to add sound effects or music clips. The value of a connected clip is that whenever you perform a trim, the connected clip (or clips) stay anchored, so you don't have to worry about them losing their alignments during editing.
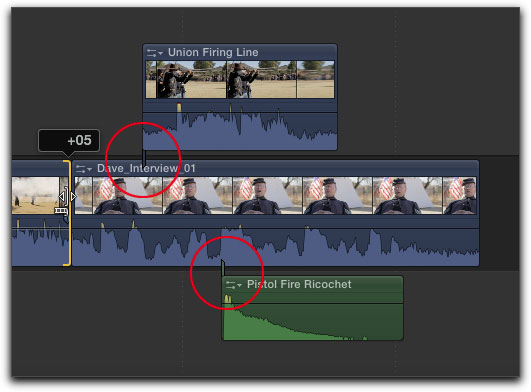
One of the huge "gotchas" of connected clips is that if you delete the clip it is connected to, the connected clip (or clips) get deleted too. The best way around this is to right-click on the clip and choose "Replace with Gap".
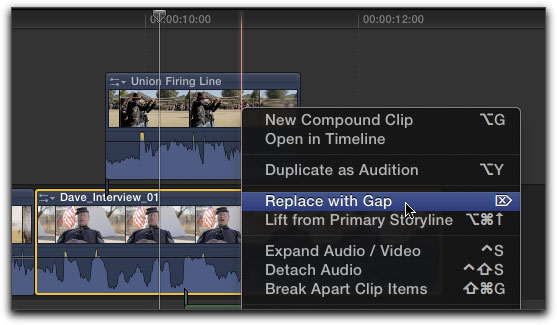
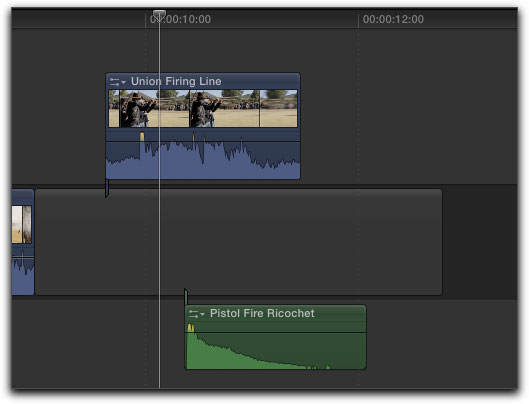
The clip in the Storyline is replaced with a Gap Clip and the connected clips stay "connected" at their original timecodes.
Alternately, you could simply replace the original clip with another one from the Media Browser. Just create a selection range, then drag the clip on top of the clip you want to replace, release your mouse, and a menu with 3 Replace options appears.
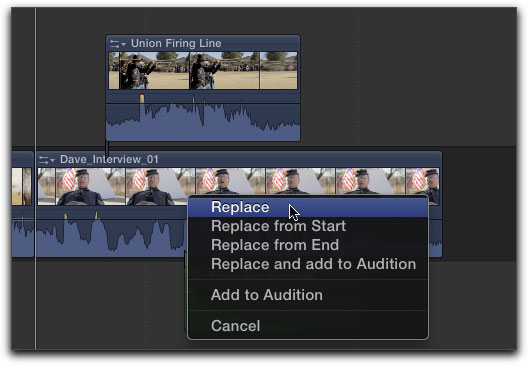
By choosing "Replace" the duration of the clip from the Media Browser is honored, and by choosing either Replace from Start or Replace from End, the duration of the clip in the Storyline is honored. In the screenshot below, I wanted the clip replaced from the beginning of the selection range in the Browser to maintain the Storyline clip's original duration.
Navigating in the Timeline
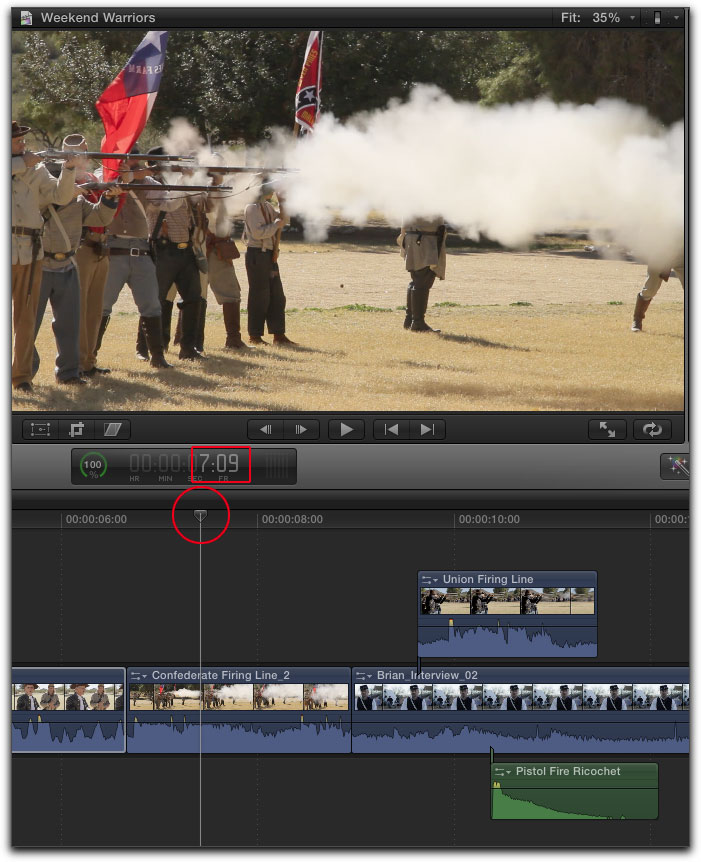
To navigate in the Timeline you can use the familiar JK & L keys for shuttling and jogging back and forth over your Timeline clips. You can use the Up and Down arrow keys to move the Playhead to edit points, and you can enter precise timecode values. To do this, press Control-P and the Dashboard will appear with a blue Playhead icon. Enter a timecode value. You can use the period key for leading zeros. In the example below, I typed two-period-one-five to jump the Playhead to 2:15.

You can also move the playhead by relative amounts. After pressing Control-P enter a "+" or "-" before entering the numbers and the playhead will move in a positive or negative direction from its current location.
A completely new navigational feature is the Timeline Index. By clicking the button in the lower left of the interface a pane will appear listing all the clips in your project including video, audio, graphics and titles. Simply click on the item you are looking for in the list and the Playhead moves to the clip and it becomes selected. There's even a search field for quickly locating clips by name and you can search by keywords (tags).

It's a Skimmer not a Playhead (and Vice Versa).
Like previous versions of FCP, you can use the Playhead to scrub through your timeline to view your clip content. The Playhead is represented by a thin vertical white line with the down-facing arrow at the top. You can either click and drag on the arrow, or you can click anywhere inside the gray time ruler to move the Playhead to a new location. The Viewer updates with the frame at the current Playhead position and the Dashboard displays the current timecode.
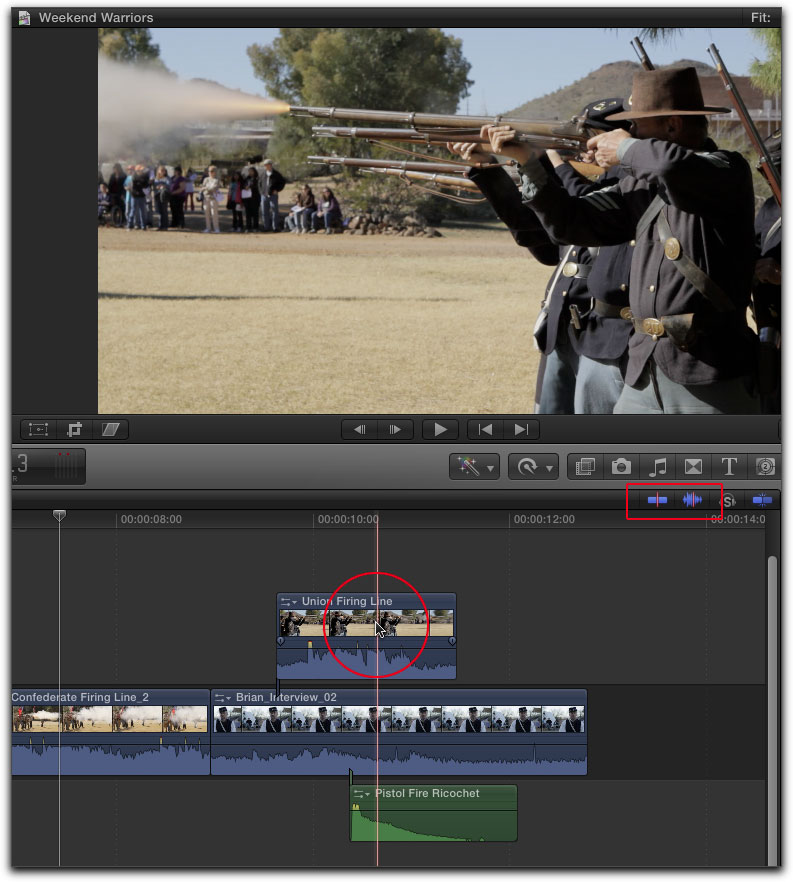
However unlike previous versions of FCP, you can also use the Skimmer to view your clip content. The Skimmer is represented by a thin vertical pink line that also allows you to move through your clips to view them, but does not require you to click before you drag - you simply drag. You can skim from anywhere in the timeline making it extremely fast to locate video content. One additional difference between these viewing methods is that skimming will allow you to hear your audio as you skim, whereas scrubbing the playhead will not. You can turn off skimming and audio scrubbing by clicking one of two buttons in the upper right of the Timeline.
If you are coming from previous version of FCP, the relationship between the Playhead and the Skimmer may take a little getting used to. The Skimmer is fluid, allowing you to freely and quickly traverse the clip content in your timeline; whereas the playhead is somewhat fixed until you click and drag on it or play back your project. Often the Skimmer position and the Playhead position are one and the same. If you skim to any frame, then click with your mouse, the Playhead will jump to the Skimmer position. You would primarily use the Playhead when you wanted to set up an edit, then execute the edit using one of the 3 edit buttons in the toolbar. The Playhead position is used for the edit in point. However, if you are using keyboard shortcuts to execute an edit, the Skimmer position will be used as the edit in point, not the playhead. This is why some people coming from legacy versions of FCP will want to turn off skimming until they are fully comfortable with how the Skimmer and Playhead compliment each other.
Trimming is still Trimming
Ask any professional editor and he or she will tell you that when it comes to working fast and efficiently when shaping your story, the trimming features of an editing app are paramount. In fact, some of the most welcome changes in FCP X have come in the trimming department. The tools for making refinements to your clips are located in a menu on the Toolbar. If you are a legacy FCP user most of these tools and the keyboard shortcuts to enable them are the same.
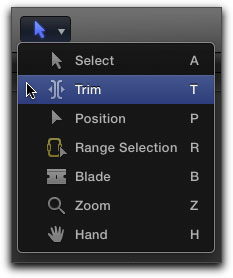
Trimming can be performed using the Select Tool (A) or the dedicated Trim Tool (T). In legacy versions of FCP, the 4 main trimming operations (ripple, roll, slip and slide) were performed using 4 separate tools. In FCP X, the Trim tool performs all 4 operations.
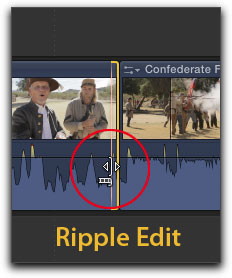
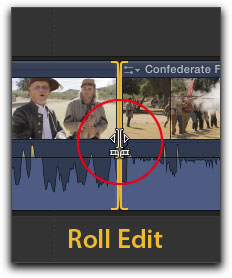
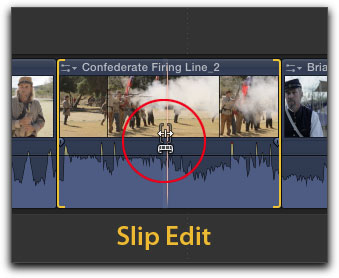
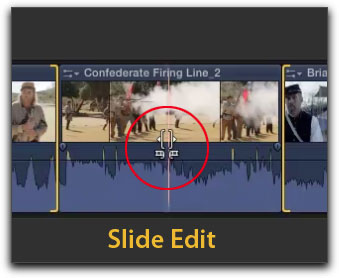
Trimming can also be performed using a new editing modality called the Precision Editor. Actually, this feature is not really new - iMovie users have benefited from it for some time. To reveal the Precision Editor, double click any edit point. Visually, the Storyline is presented as a split view with the outgoing clip appearing on top and the incoming clip appearing on the bottom. What is especially helpful about this view is you can see the unused portion of your clip media (often called handle frames).
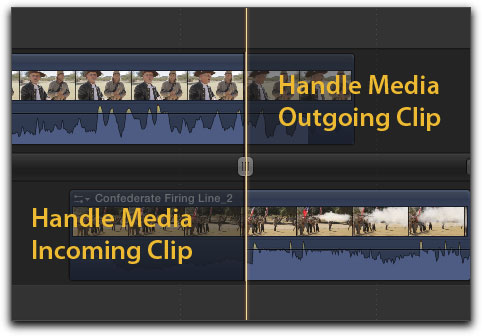
You can skim this area looking for a new frame to cut on, then when you locate it, you simply click with your mouse and the edit point adjusts to the skimmer position. It's both fast and intuitive. You can perform both Ripple and Roll edits in the Precision Editor. Pressing the up or down arrow keys moves the Playhead to the next or previous edit so you can continue making trims within Precision Editor. To exist the Precision Editor, press Escape.
Sound Editing
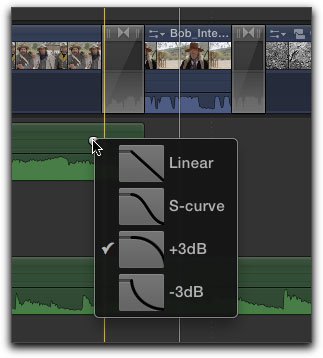
There have been some significant improvements in the audio editing arena as it relates to sweetening your projects. At the same time there is a key deficiency that many post production professionals will decry. Let's look at the positives first. Creating fades on your clips is now easier than ever. Simply drag on the handle in the upper corners of any audio clip to create a fade.
Even cooler; if you right click on the fade handle, you can choose between one of four fade types.
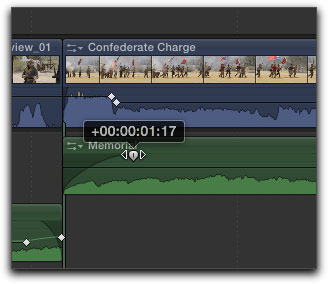
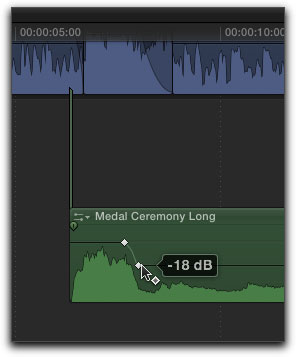
As with previous versions of FCP, you can drag on the thin black line called a Volume Bar to control the overall clip level. You can also add keyframes to control the clip volume over time by Option-clicking on the volume bar then dragging the keyframe up or down, left or right to affect the rate of change.
You can also make your audio adjustments using the Inspector. Whenever you select a clip and press Command-4 a pane will appear giving access to the property controls for the video and audio portions of the clip. Obviously, if you've selected an audio-only clip, you the Inspector would only reveal audio properties and the same holds true for a video-only clips. As you can see in the screenshot below, the audio inspector gives you access to volume, panning, audio analysis and channel configuration.
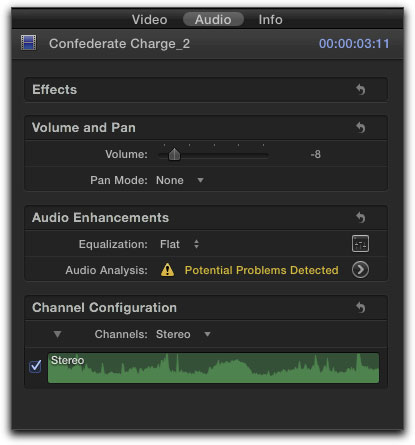
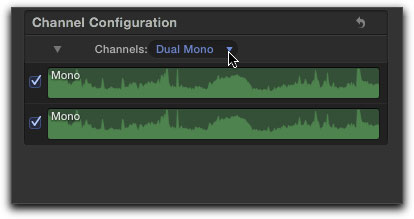
If you click the disclosure triangle next to Channels, a mini waveform graphic of the audio file will appear. With skimming turned on you can scrub the audio. If you've selected a stereo file, the word "Stereo" appears over the graphic. To view your audio as a split track, also called "dual mono" click on the channels pop up and choose "dual mono". Choosing this option would be important if you captured your audio using 2 different microphones into 2 separate channels during the shoot. The check boxes will allow you to choose which channel is the preferred channel when editing. Just turn off the channel you don't want to hear by clicking the appropriate checkbox.
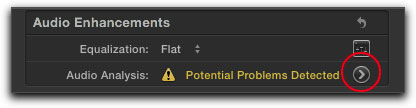
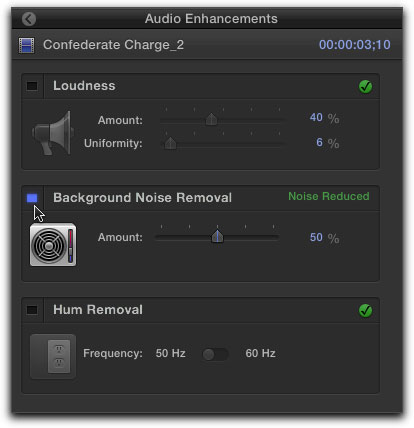
Earlier I mentioned that during import you can have FCP analyze and fix common audio problems such as excessive background noise, audio that was recorded too low and 60 or 50 cycle hum. If the analysis algorithm returned a problem that it determined needs human intervention, a yellow warning icon will appear. To view the problem and make the fix, click the arrow to reveal the Audio Enhancement Inspector.
As you can see in the screenshot, the analysis shows excessive background noise in this clip. The other items, Loudness and Hum Removal have green check symbols indicating no problems were found.
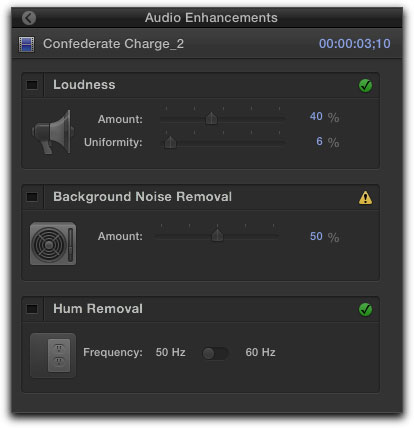
To fix the flagged problem, click the square to the left of the Enhancement name. A blue light will appear and the words "Noise Reduced" appear to the right of the enhancement. The amount slider allows you to control how much of the enhancement you want applied to the clip.
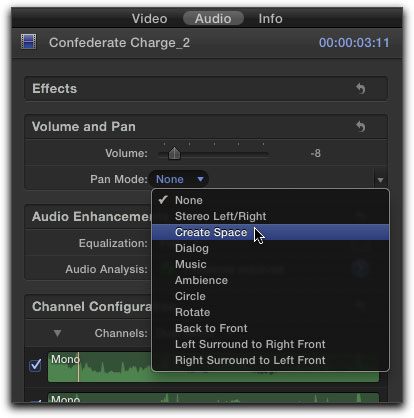
Surround Panning
If you want to mix your project in Dolby Surround you can do this using the Surround Panner. With the clip selected, choose "Create Space" in the Audio Inspector.
Clicking the disclosure triangle next to Surround Panner reveals a circular graphic with speaker icons around the perimeter that represent the virtual surround space. Moving clockwise from the top, the speakers are as follows: Center, Right, Right Surround, Left Surround, and Left. The gray dot in the center is called the "puck" and you use it to focus your audio to a specific speaker.
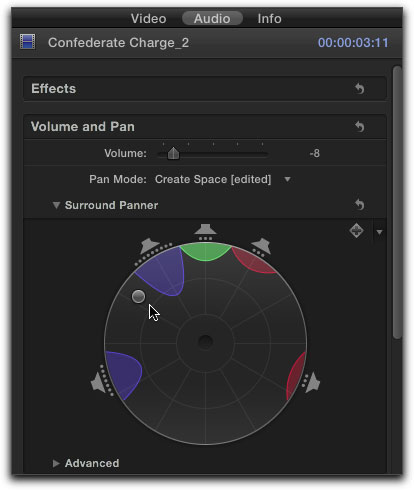
The larger the colored graphics appear for a given speaker or speakers, the more the audio will be focused to those speakers. So if for example, we wanted the audio to be focused out the left and right surround speakers, we would drag the puck to the 6 o'clock position on the circle. Similarly, if we wanted the audio to be focused to the left side of the surround space, we would drag the puck between the 9 and 11 o'clock position.
All audio is internally processed using a Dolby surround output matrix. This simply means that you now have the ability to control where in surround space you want your audio focused. If your final movie is destined for stereo output, FCP will properly down-mix the 6 channels to 2 stereo channels. Keep in mind that unless you have the proper hardware connected you cannot monitor the surround image. Also, the speaker focus can be animated over time so you can have a bullet ricochet travel from one side of the surround space to the other.
So that's the good news. The not-so-good news is that you cannot output your sound mix to industry-recognized file formats such as OMF, AAF or XML. This means that with regard to having someone else professionally sweeten your audio, you are stuck in your own sandbox. Fortunately, Wes Plate's Automatic Duck is working on, if not already has, a third party solution. Visit www.automaticduck.com for product information.
It's a Color Board not a Color Wheel
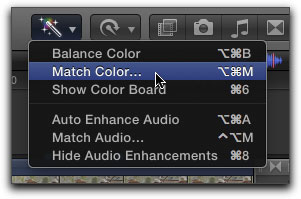
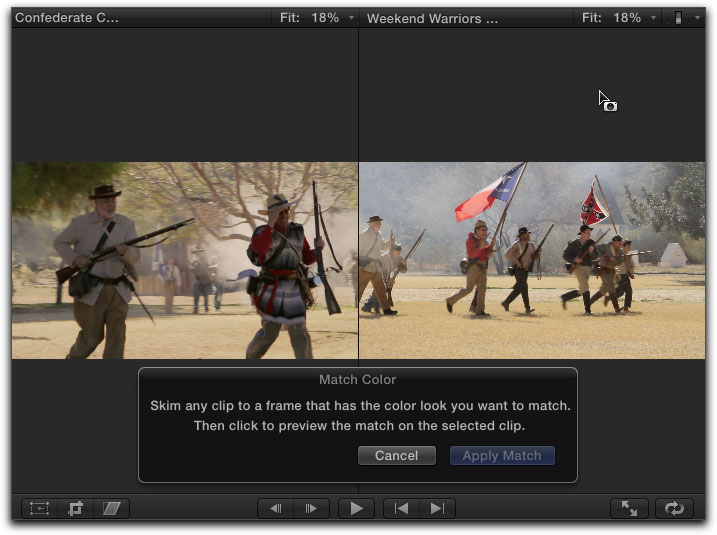
No doubt you've seen the "unauthorized" videos of Apple's FCP X demo at this year's NAB convention. Of all the features that were shown, the biggest audience grabber was Final Cut's Color Match feature. With 3 clicks you could match the look of one shot to another. The technology behind this feature is truly amazing. You simply select the clip in the Timeline you want to match with another clip, then from the enhancements menu on the Toolbar (magic wand icon) choose "Match Color"
Then you skim to the frame of the clip you want to match and click to create a preview. If you like what you see, click "Apply Match." It doesn't get any easier than that.
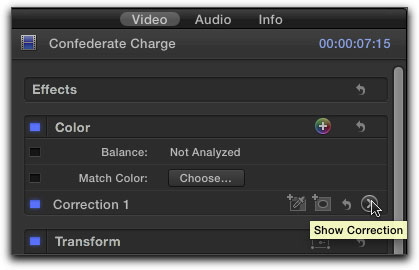
With all this creative intelligence built in, it might be easy to forget that you can enhance the shot further or color grade from scratch using FCP's manual color correction controls. With the clip you want to color correct selected in the Media Browser or Timeline, open the Inspector by pressing Command-4. In the Color section, click the arrow next to "Correction 1" (or press Command-6)
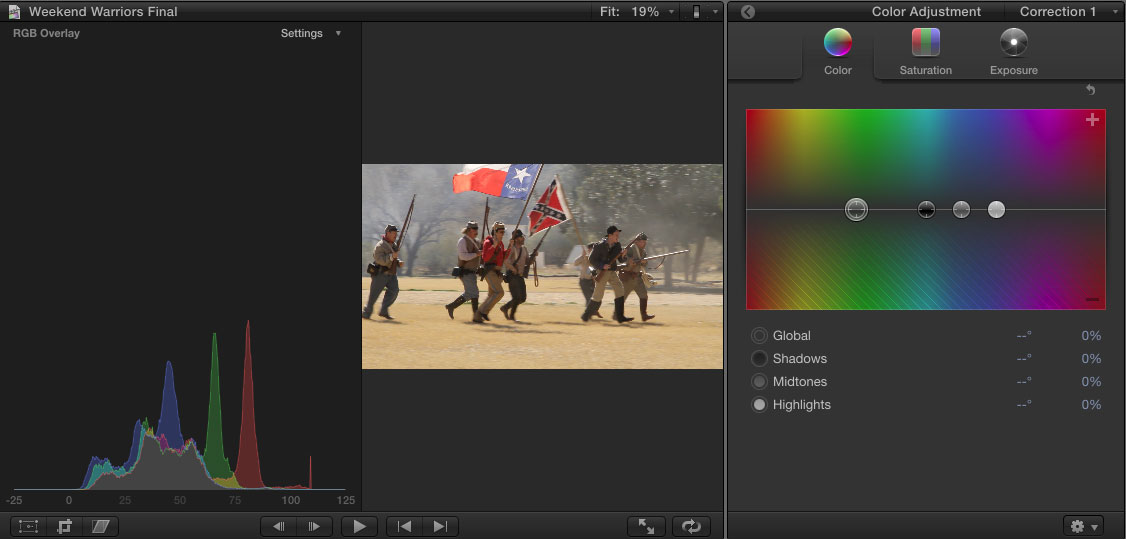
The Color Board will appear.

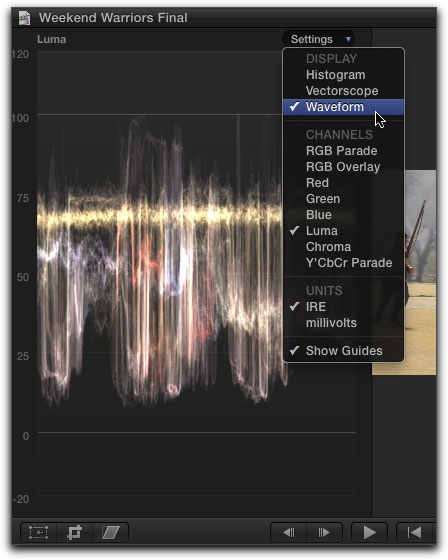
While you could make color adjustments using the Viewer alone, often it's helpful to see the image represented objectively using Video Scopes. From the Window menu, choose > Show Video Scopes, or press Command-7. The first scope that appears is called the Histogram and it shows you the relative distribution of your light and dark pixels. As you can see from the red spike, the majority of the brightness is around the 80 percent range. The red spike tells you that of all the colors in the image, red is the most dominant.
You can also change the scopes to a Waveform, or Vectorscope display using the Settings menu. One thing that has significantly changed from previous versions of FCP is how responsive the scopes are. If you playback the project and watch the scopes they react instantaneously to the changing pixel data.
The Color Board presents 3 primary controls for color correction along the top of the interface. You can adjust the Color, Saturation and Exposure of your video or still images. Often the best place to start when enhancing or correcting your video is exposure.
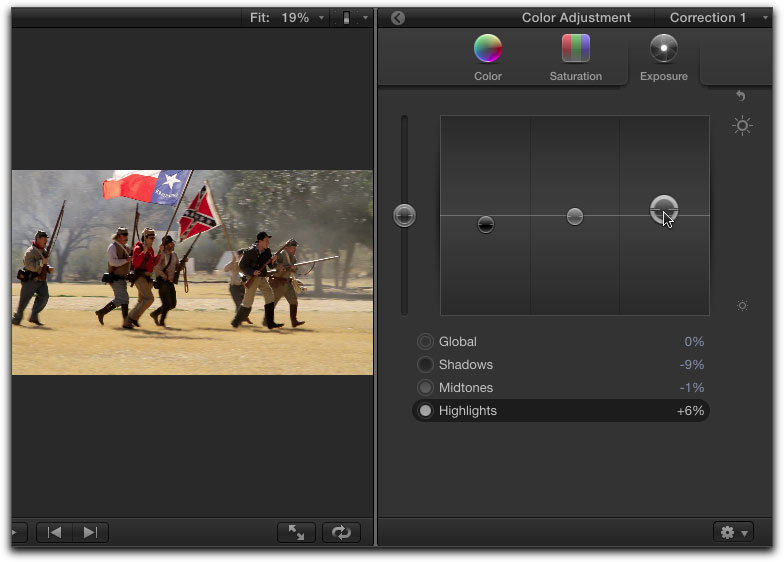
This control allows you to darken and lighten parts of the image to improve the overall contrast. Contrast can best be defined as the ratio between the darkest pixel and the lightest pixel. Improving the contrast will give your images more punch by increasing the tonal range. The slider on the far left is a global control which is to say that the entire range of pixels from light to dark are effected at once. Using the 3 separate sliders on the gray board will allow you to adjust the brightness values in the shadows, midtones and highlights
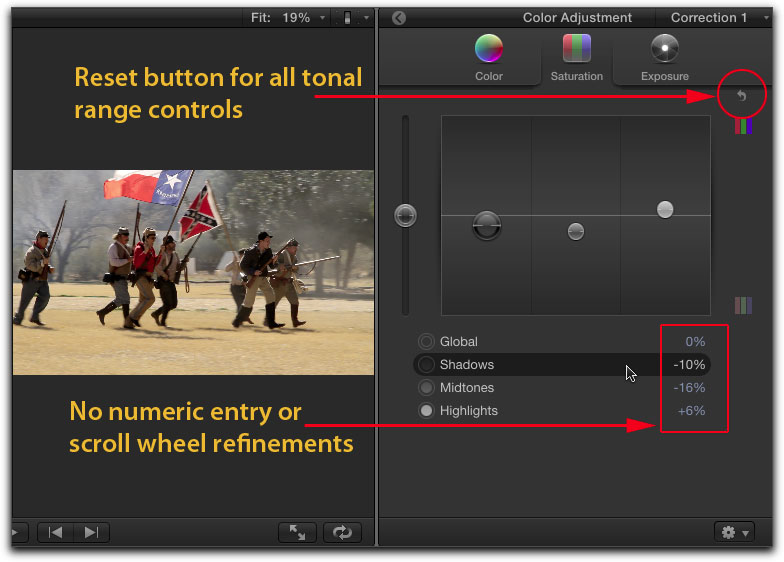
Once you're satisfied with the contrast, you can move to the next button - Saturation. Like the exposure control, you have a global slider for affecting the overall image saturation and individual saturation control targets for the Shadows, Midtones and Highlights. The one feature that is notably missing is the ability to enter numeric values for these controls. Often color correction is approached subtly in small increments not by broad sweeping mouse adjustments. This is something that must be addressed if the color board to be taken seriously as a professional color grading tool. Also, there's one other deficiency that video professionals will find wanting - there's no way to reset individual tonal range controls. The reset button resets the all the controls to their defaults.
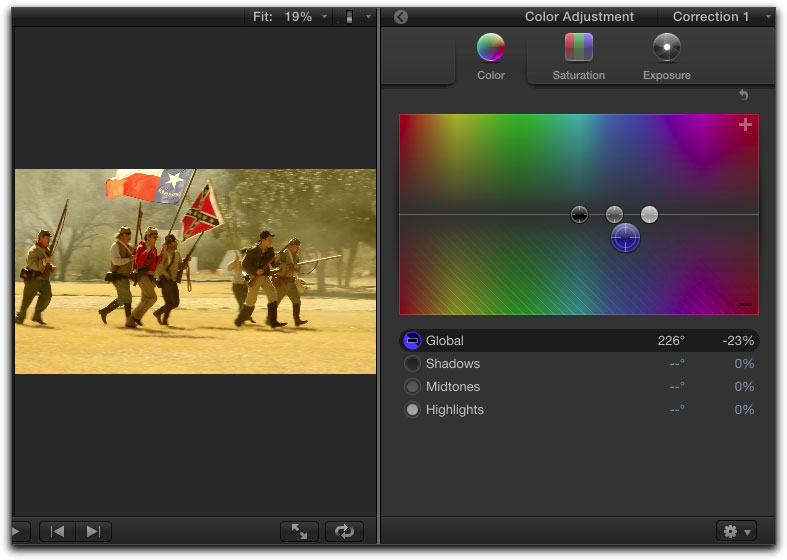
Once you've tweaked the exposure and saturation to your liking, you can make changes to the overall color balance of your image. The color board is a radical departure from the familiar color wheels found in most color finishing applications and it may take some getting used to. The gray control on the far left is a global color balance control. In other words, this control affects the color balance in all 3 tonal ranges - shadows, midtones and highlights. The control itself is sitting on a white horizontal line separating the color board into positive and negative color regions. For example, this global control is currently sitting over the green color field. By dragging downward with the control (in the negative direction) you'll be removing the green from the image. Removing green results in more red being introduced into the image.
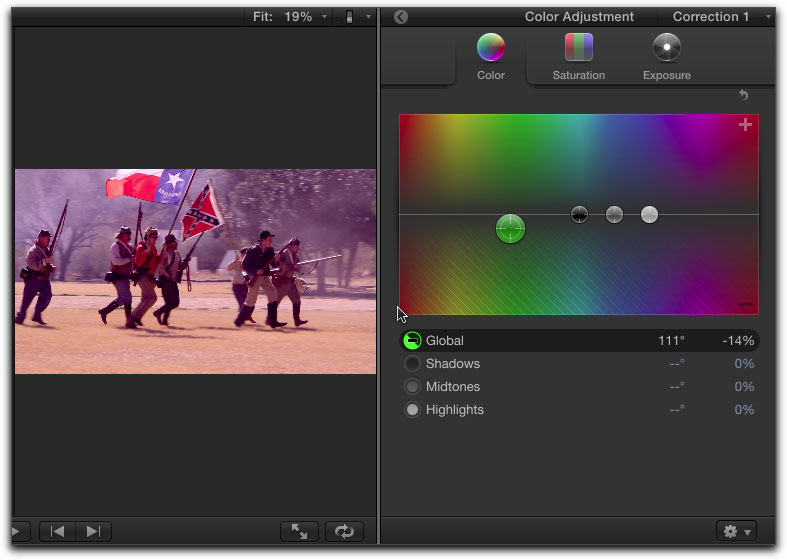
If you wanted to add more blue into the image, drag the global control to the right until it's over the blue color field, then drag upward. Dragging below the white line of course, removes blue and adds the opposite color, which is yellow. (By the way, the negative colors are not arbitrary - yellow is the opposite of blue on the color wheel - you can see this on the tiny color wheel button at the top of the Color Board. I guess Apple couldn't completely abandon the concept of color wheels - but I digress..
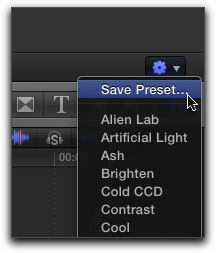
If you want to save your correction adjustments as a preset that can be applied to other clips, click the Gear icon to bring up a menu of color presets. Choose "Save Preset" then give your preset a name.
Applying Effects, Transitions & Titles
The way transitions, effects and titles are accessed, applied and modified in FCP X has been greatly simplified from earlier versions of FCP. In keeping with iLife simplicity, Apple has given us a simple row of buttons on the toolbar for one-click access to a huge library of visual content. While there is more content than I have time to cover in this article, I'll just focus on the 3 items you are most likely to work with on a regular basis - effects, transitions and titles.

Clicking the Effects button brings up the Effects Browser (Command-5). To preview any effect make sure the clip is selected in the Timeline then skim over the effect thumbnail. To apply the effect just double-click the thumbnail. Alternately, you can drag the thumbnail out of the Media Browser and drop it on a clip or group of clips.
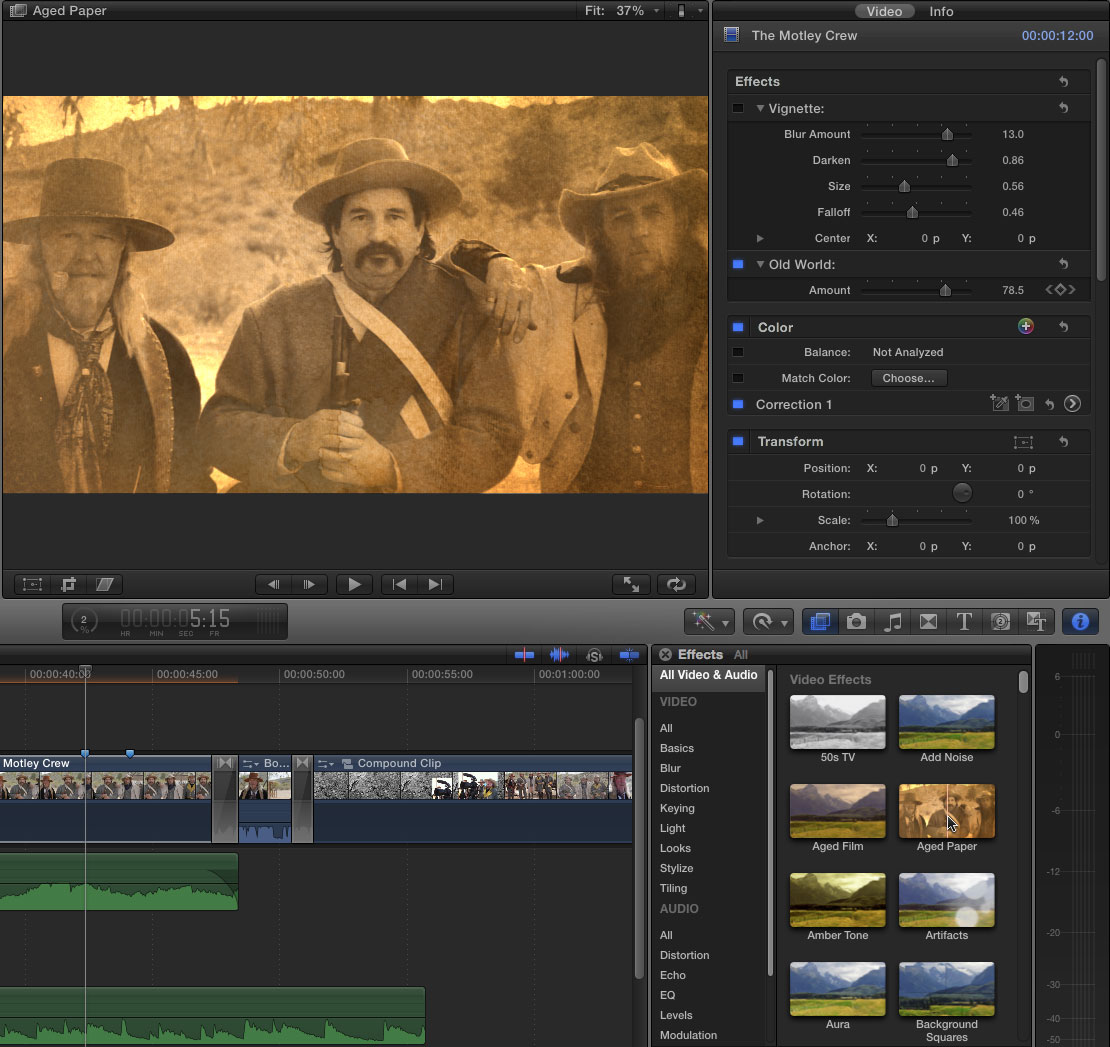
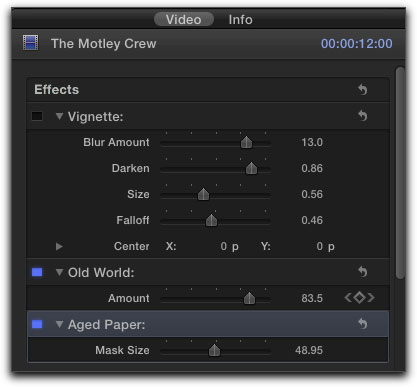
To change the properties of the effect, press command-4 to reveal the video inspector then use the various sliders, hot scrubbers and input fields to modify the look of the effect. Effects can be enable or disabled by clicking the square to the left of the effect name. You can change the order the effects are applied by dragging up or down on the gray bar for each effect. Effects can also be animated using keyframes in the Inspector. In FCP X, all effects play back in real time, even if an orange bar appears over the clip to indicate the clip needs rendering for full quality playback. The good news is, the effect is automatically rendered in the background, so you don't even have to think about it.
An alternate way to work with effects is directly on the clip itself. Click on the small triangle next to the clip name to bring up a menu. Choose "Show Video Animation" or press Control-V.
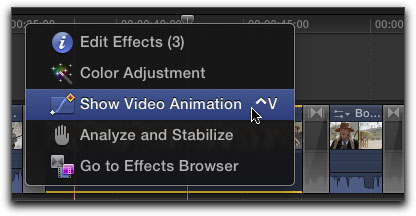
Using the Video Animation Controls you can enable and disable effects, add and delete keyframes and reorder effects.

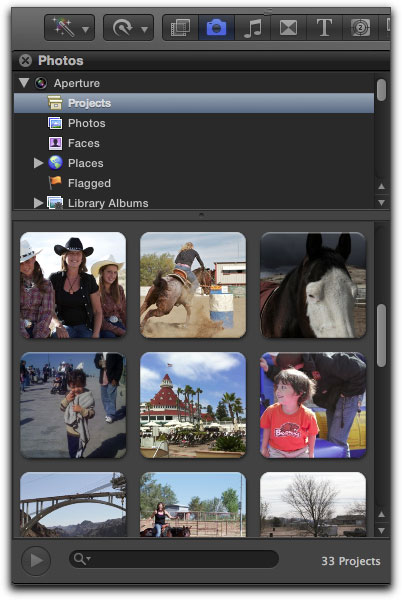
Clicking the camera button brings up a Photo Browser that's linked to Aperture and iPhoto. In the image below my Aperture Projects and Albums are readily accessible. Just drag a photo out of the Browser and drop it into the Timeline.
Applying Transitions is also a snap. Just select an edit point you want to apply a transition to, then double-click any of the transition thumbnails to apply it.
To change it's duration, drag on the edge of the transition. To enter a precise duration, select the transition and press Control-D. Enter a duration using your keypad and press return. The duration appears in the Dashboard of the Toolbar.
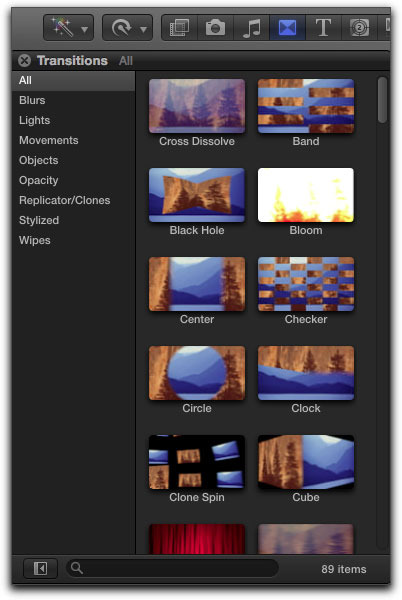
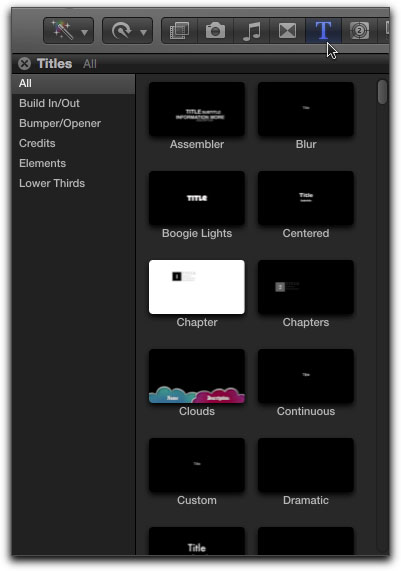
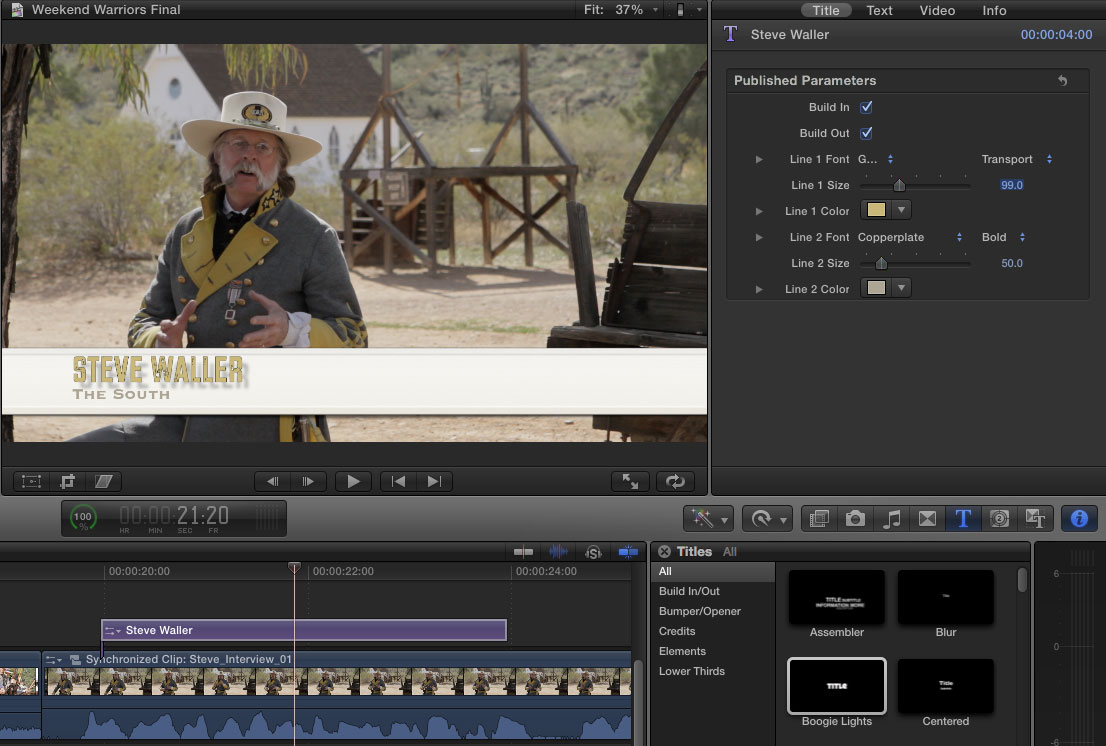
Title are found in the Titles browser by clicking the "T" button. Like effects and transitions, you can preview their animations in the Viewer by skimming over each thumbnail.
To apply a title, park the Playhead over the clip where you want the title to start, then double click the title thumbnail. The title clip is applied at the playhead location above the clip. To make changes to the title appearance use the Title and Text buttons in the Inspector.
Speed Changes
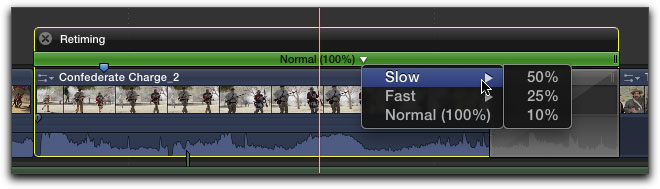
Both variable and constant speed changes can be applied to your clips. In FCP X, speed changes are called retiming effects. Select the clip you want to retime, then from the Retime menu on the toolbar choose a Slow or Fast speed option.
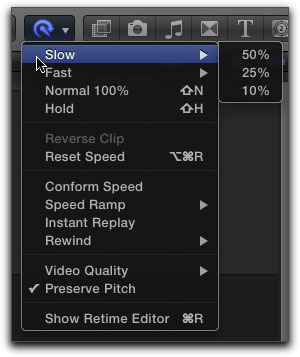
An alternate option is to reveal the retime editor on the clip itself. With the clip selected press Command-R. Click the triangle on the speed bar to bring up the same set of speed options found in the Retime menu.
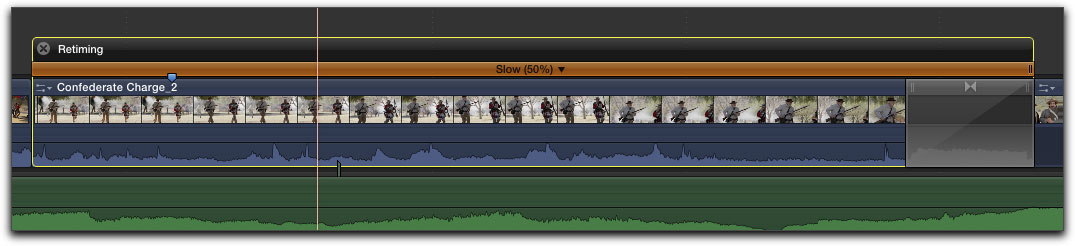
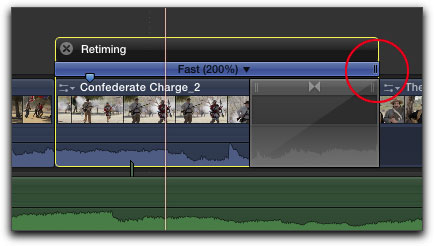
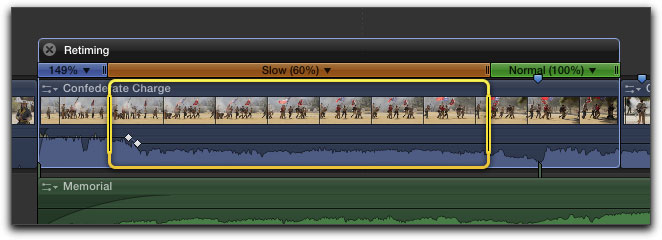
If you apply a Slow retime effect (defined as any speed less than 100%), the clip timing bar will appear orange.
If you apply a Fast retime effect (defined as any speed greater than 100%), the clip timing bar will appear blue. You can adjust the speed of the clip by dragging on the handle at the right edge of the speed bar.
To apply a Variable speed effect to a clip, call up the Range Selection Tool by pressing R. Drag out a selection over the portion of the clip you want a speed change applied to. Using the Retime menu in the Toolbar, select a speed (either fast or slow). Only the frames within the selection range will have the speed change applied to it. In the example below, I changed the speed of 3 different segments of the clip.
Transforming, Cropping & Distorting Your Clips
Working with video, photos and graphics sometimes requires manipulation of the image's scale, position and aspect ratio in order to correct problems encountered on the shoot, or create interesting visual effects. Using FCP X's 2D transform, crop and distort tools, you can re-frame your shots, create picture-in-picture effects, split screens, animate photos using the Ken Burns effects and many others. You'll find these editing mode buttons in the lower left of the Viewer.

Clicking the left button will turn the transform 2D functions on or off. You know you're in the Transform 2D mode, when blue dots appear around the image.

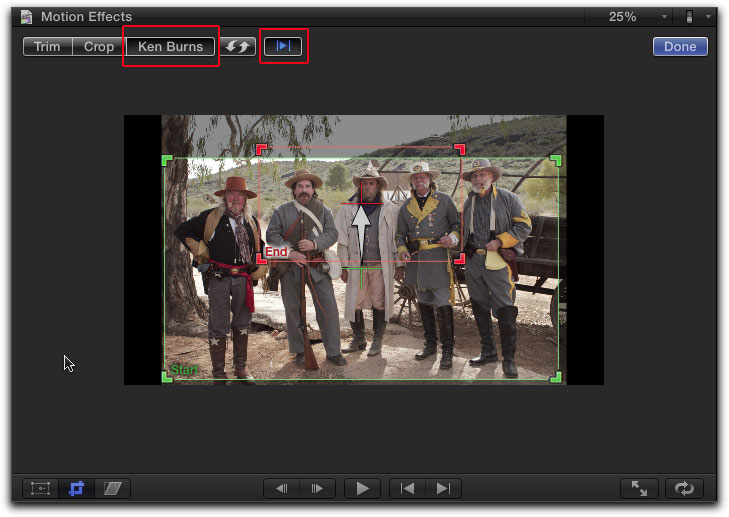
The middle button reveals the crop mode. You know you are in this mode when a dashed outline appears around the image. Within the crop mode are 3 different crop functions - trim, crop and Ken Burns.
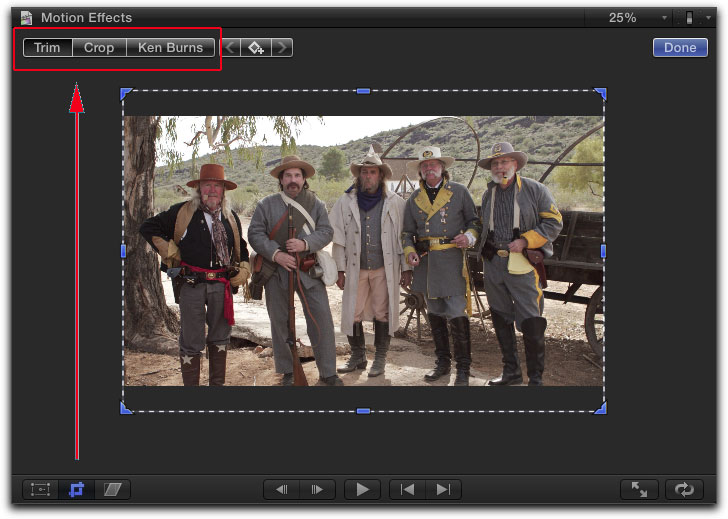
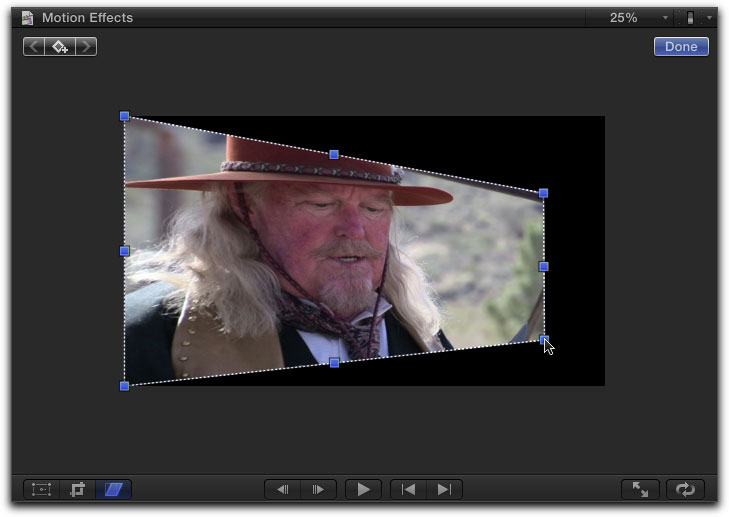
The third button reveals the Distort mode. You know you're in this mode when blue squares appear around the image.
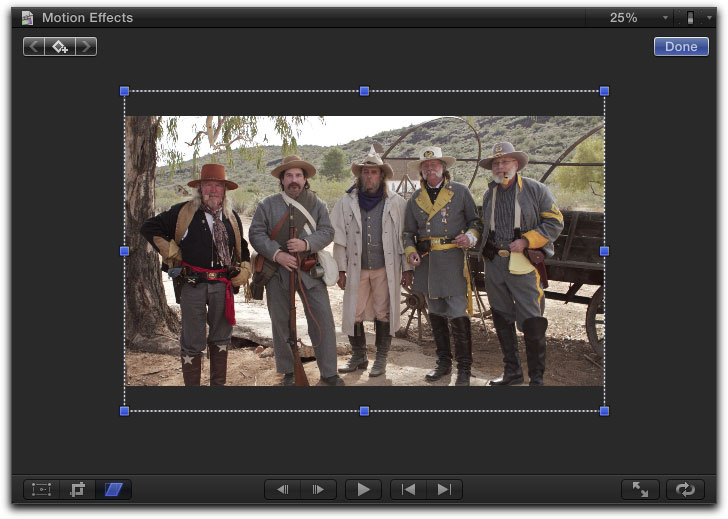
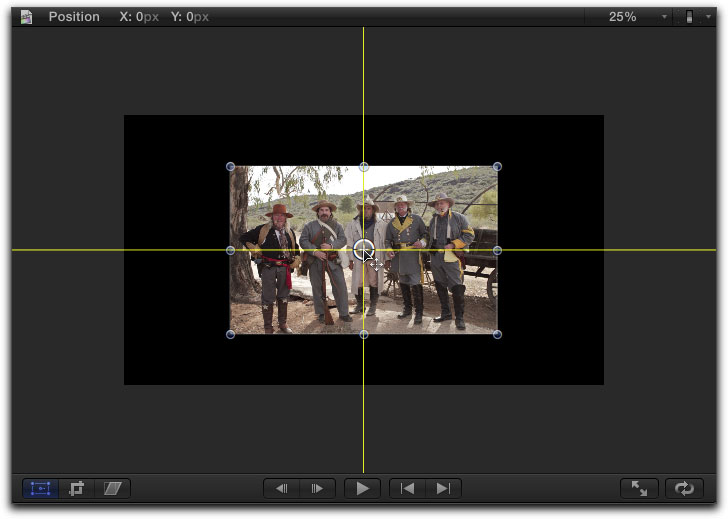
There are 2 ways you can transform an image - either directly in the Viewer or in the Inspector. The most intuitive method is directly in the Viewer. With the Transform button enabled, drag on a control point. As you drag, the scale percentage appears in the upper left of the Viewer. You can also drag to reposition the image. If you drag from the center, dynamic alignment guides will appear to help you precisely center the object or align it with other objects.
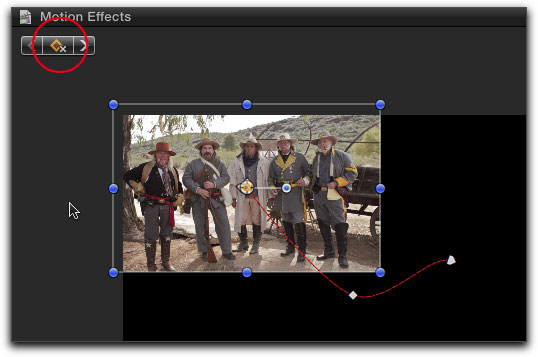
You can animate the path of a clip over time using keyframes. The animation path can also be shaped using Bezier curves
Normally one wouldn't associate cropping with Ken Burns, but if you think about it, Ken Burns is simply a trademarked name for animated cropping. (Ken Burns by the way, is a celebrated filmmaker who pioneered the use motion control cameras to create movement on vintage photographs in his seminal PBS documentary, "The Civil War"). With the crop button enabled, click the "Ken Burns" button at the top of the Viewer. In the Viewer you'll see two cropping rectangles - a green "start" rectangle, and a red "end" rectangle. Click inside the red crop boundary and the Playhead jumps to the end of the clip. Click inside the green crop boundary and the Playhead jumps to the beginning of the clip. What this behavior is telling you, is that the cropping will change over the duration of the clip. All you need to do is adjust the start and end rectangle size and position to create the animation - Final Cut does all the rest. Click the play in to out button to preview the effect in real time.
The final tool will look at is the Distort tool. With the image selected in the Timeline, click the Distort button to bring up the controls. Distort pretty much does what it advertises - by dragging on a control point you can shape the image like a piece of rubber. Distort is most often used for creating a faux 3D perspective or simulating depth. If the image needs to be matched in perspective with another image, the effect is often called "corner pinning".
Sharing Your Movies
Sharing your finished projects across a wide variety of delivery platforms is now easier than ever using Final Cut Pro's Share menu. In the past, creating video for the web, Apple devices, or DVD, required more than a basic knowledge of codecs, data rates and bandwidth limitations. With Final Cut Pro's share menu, you can now export pristine quality video to your medium of choice without ever having to think about the underlying technology that makes it all happen.
With your project selected in the Timeline or Project Library choose your delivery option in the Share menu. You can publish your movie to Apple Devices (iPhones, iPads, iPods and Macs), Optical Media (DVD & Blu-ray) and Video Sharing Sites (YouTube, Vimeo and Facebook).
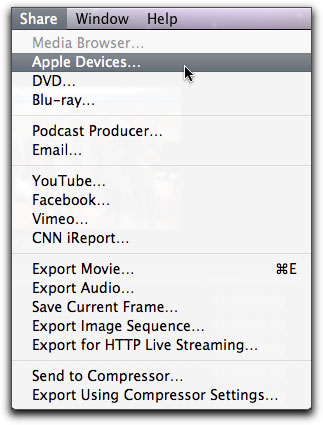
Keep in mind that you can only publish one Project at a time and you must export the entire movie. If you need to publish only a portion of a project, you'll need to send your project to Apple's Compressor. Also, since there is no way in this version of FCP to include chapter markers in the final movie directly exported from Final Cut Pro, you'll need to send the Project to Compressor to add the chapter markers and export from there.
My Overall Impressions
I love the organizational intelligence of FCP X and frankly it's long overdue. If you think about what a computer was born to do, it excels at chugging through and making sense of huge amounts of raw data. This is something a machine should be doing, otherwise it's something I have to do myself or pay someone else to do. I also like the smart analysis, background rendering, the skimmer and the Precision Editor. These features make the editing experience feel fluid, organic and less mechanical then track based editing applications. Also, I don't mind the single monitor. The Viewer is simple and clean and the interface does not feel cluttered. Anyone should feel at home editing on it from an iMac to a MacBook Air (which is the point of the single window interface). Also, adding effects, titles and transitions and editing them is infinitely easier and more intuitive. The interface is not daunting like Final Cut Pro 7 and anyone coming from iMovie will immediately "get it". And speaking of iMovie, (I didn't mention before) you can open iMovie projects and even your entire iMovie library into FCP X. This feature alone makes upgrading to FCP from iMovie a no-brainer. While FCP X will no doubt be referred to as a souped up version of iMovie by some, this is not my impression at all. I have been cutting a documentary on it among other things, and I just finished a tutorial that is close to 5 hours long which speaks to it's depth. I was very surprised at how much iron the Apple engineers put into it.
While FCP X is very promising, it still lacks key features for professionals. (I'm cutting it some heavy slack because I'm taking into account this is essentially a version 1 product built on an entirely new foundation). But the fact remains that there is no professional audio editing capabilities. With many of the features of Soundtrack Pro now rolled into FCP X, I still long for a full featured waveform editor to perform bread-and-butter audio editing chores. This coupled with the fact that there is no built-in way to collaborate with sound editors using ProTools or other DAWs is problematic.
Also there is currently no support for 3rd party effects plug ins. This is something that most likely will be addressed in the future. That said, Motion 5 is now much more that a motion graphics application. It's now a motion graphics publishing application and you can easily "publish" your own titles, effects, generators and transitions for any Final Cut Pro X editor. This is such an important development, that Mark Spencer and I produced an entire Motion 5 tutorial called Rigging & Publishing in Motion 5 to teach people how to "roll their own" FCP X visual content.
The other thing that needs improvement is color correction. While the simplicity of the Color Board will be great for the YouTube set, professional colorists will find the color grading tools wanting. With no way to export EDL's or XML files, there is no way to hand off your project to a Colorist - so again, you're stuck in your own sandbox until the next upgrade or someone really smart is able to write hooks into FCP X.
Another challenge I see with all the terminology changes is that old school editors may be put off by it. I hear them asking: "Did we really need a new editing metaphor called a "Storyline?" And while a legitimate case can be made as to why legacy FCP projects cannot be opened in FCP X, some editors will not be understanding. Also, it's yet to be seen how professional editors will react to the "magnetic timeline." Let me explain. The whole purpose of this new feature is to keep things in sync and prevent clip collisions. The magnetic timeline solves problems for the beginner who cannot fathom why a clip won't move from point a to point b. But knowing pro editors as I do, they may get frustrated wondering why an editing program is making these decisions for them. They will then turn to the Position tool (a tool I did not have time to cover in this article) to work around this "problem" and soon discover that this tool creates a different set of "problems". Most of the frustration will therefore result in not understanding the thinking behind a given tool or feature. But this is to be expected. I remember all the detractors when FCP 1 was released. Few broadcast professionals is 1999 took it seriously and many outright labeled it a toy.
I also believe many editors will be willing to give FCP X a shot for the price point alone. If not for that reason, they will buy it for the curiosity and novelty factor. If the features I mentioned above are eventually addressed, then yes, they will be invested in future versions. However, my Spidey-sense tells me they will keep using FCP 7 on a "wait and see" basis while watching how the market reacts to it over time. On the other extreme, they might, based on their initial experiences with this product, decide to abandon it altogether because it's just too foreign to them and it lacks the aforementioned "pro" features. Finally, only a company as big and successful as Apple would have resources and temerity to try to reinvent the wheel. From my perspective, FCP X is not so much revolutionary, but rather, evolutionary - because at the end of the day, your reasons for using Final Cut Pro have not changed - you're still using it to make movies. A re-invented wheel is still a wheel.
 Steve Martin in the creative force behind Ripple Training and has been using and teaching Final Cut Pro since 1999. Since Final Cut Pro's introduction, he has introduced thousands of people to Final Cut Pro through his classes, workshops and training products. He has consulted and/or trained for Apple, Adobe, Disney, Canon, Walmart and other companies. He is also a writer, producer and photographer and is a Master Trainer for Apple's Authorized Training (AATC) program.
Ripple Training just released 3 new tutorials on Apple's new creative software: a 5 hour tutorials called the Apple Pro Video Series: Final Cut Pro X, Motion 5 Fast Forward, and Motion 5: An Introduction to Rigging & Publishing Titles, Transitions, Effects & Generators for Final Cut Pro X.
Steve Martin in the creative force behind Ripple Training and has been using and teaching Final Cut Pro since 1999. Since Final Cut Pro's introduction, he has introduced thousands of people to Final Cut Pro through his classes, workshops and training products. He has consulted and/or trained for Apple, Adobe, Disney, Canon, Walmart and other companies. He is also a writer, producer and photographer and is a Master Trainer for Apple's Authorized Training (AATC) program.
Ripple Training just released 3 new tutorials on Apple's new creative software: a 5 hour tutorials called the Apple Pro Video Series: Final Cut Pro X, Motion 5 Fast Forward, and Motion 5: An Introduction to Rigging & Publishing Titles, Transitions, Effects & Generators for Final Cut Pro X.
Steve can be reached at: steve@rippletraining.com
|

|
|
| Motion 5 Fast Forward | Apple Pro Video Series FCP X | Rigging and Publishing |