October 3, 2011

 
Keyframing in FCP X
Updated for FCP 10.0.3

Download the ePub iPad/iPhone version of this article.

By Ken Stone

Inspector
Keyframing in the Inspector
Keyframing an Effect in the Inspector
The Video Animation Editor
Fade In and Out using the Video Animation Editor
Solo Video Animation
Keyframing in the Video Animation Editor
Using the Select & Range Selection Tool in the Video Animation Editor
Keyframing in the Viewer window
Keyframing Audio
Notes

 
We keyframe in FCP when we want some element (parameter) of a video clip to change over time. This can be as simple as keyframing the opacity of a clip so that it fades in from black at the start of the clip or fades out to black at the end of the clip. We can keyframe video 'Effect' filters so that the effect is applied over time, give a clip motion (moving across the screen), change its size, shape, crop, distort and even spin the clip as it plays out on the screen. Effects, Mattes, Masks, Compositing, and even Audio volume can all be keyframed. Color Correction is very limited, only Shape Mask can be keyframed, however there is a link to a free keyframable Color Correcting filter at the end of this article. A clip can have any number of different attributes keyframed and have them all running at the same time, all changing independently of each other.

When we set a first keyframe on a frame in a clip, we are 'marking' that video frame as the starting place for something to begin changing. When we set a second Keyframe, further down the timeline, we are marking that video frame as the place were we want the change to be complete. FCP will interpolate or generate all the frames needed between the 2 Keyframes so that the change will happen smoothly, over time. We can add any number of keyframes to an effect varying it as the clip plays out. Keyframing work can be done in either the Inspector, in the Viewer or on the timeline in the 'Video Animation Editor'.

Different applications have different workflows for working with keyframes and keyframing in FCP X has been changed with the release of 10.0.3. Keyframing now works in the same manner as it does with legacy FCP. For your first keyframe, place you playhead on the frame where you want the change to begin. Set a keyframe by clicking on the keyframe icon and then change the parameter setting, or you can change the parameter and then set a keyframe. To set a second keyframe, move your playhead to the position you want in the clip and change the parameter, FCP X will now set a keyframe for you automatically. The Inspector, Video Animation Editor, and Viewer windows are all linked together. Work in one and the other two update in real time, they are ganged together. You might find that the best workflow is to work in two of these windows simultaneously while doing your keyframing work.

[Top]

 
The Inspector

Select a clip in the timeline and look to the Inspector window, video tab. The Inspector has a number of built in parameters that can be keyframed; Color (color correction), Transform, Crop, Distort and Compositing. In legacy versions of FCP, some of these keyframeable parameters are found in the Motion tab in Viewer window.

In order to keyframe we first need to reveal or open up the parameter settings in the Inspector window. Move your cursor into the area to the right of the parameter name that you want to keyframe and the word 'Show' will appear, in this case we will work with Transform.

Click on the word 'Show' and the Transform section will open up offering those parameters that you can keyframe.

In the Transform section we have Position, Rotation, Scale and Anchor, but where are the keyframing controls? If you move your cursor to the right of any of the parameters, a plus sign inside a gray diamond icon will appear. This icon with the plus sign is the 'add keyframe' button. As shown below, my cursor is on line with the 'Position' parameter. If I were to move it down a bit, in line with 'Rotation', then an 'add keyframe' button will appear for the Rotation parameter. Clicking on the plus sign sets a keyframe.


You will also see a small disclosure button just to the right of the plus icon, red arrows above. This menu offers controls for working with keyframes. Each parameter has its own add keyframe button and disclosure button so that each parameter can be keyframed independently.

When you are done keyframing you can close down the parameters section by placing your cursor where you found the 'Show' button, but now it will say 'Hide'.

 
[Top]

 
Keyframing in the Inspector

I have a clip of the Ferris Wheel at the Santa Monica pier. I want to start off with the clip being very small and then, by the end of the clip, to be full size. I am going to select the Ferris Wheel clip in the timeline and move my playhead to the first frame. You can do this by placing the playhead anywhere on the clip, then hit the Up arrow on the keyboard to move the playhead to the first frame.

You can tell that you are on the first frame of a clip by looking in the Viewer window where, in the lower left hand corner, you'll see the first frame marker (it looks like the letter 'L'), shown below red box (a little hard to see when the image is dark).

In the Inspector I am first going to click on the 'add keyframe' button for the Scale parameter to set a keyframe.

After adding a keyframe, the keyframe icon will turn into a yellow diamond with a smaller red diamond inside, denoting that a keyframe has been set, (red box below). For the first keyframe, you can either change the parameter setting and then add the keyframe, or you can click on the keyframe icon first and then change the parameter.

With a keyframe set I am now going to change the Scale (size) setting of the clip down to 25%.

In the Viewer the clip size has been reduced to 25%. First frame marker shows lower left in the Viewer window.

I now move the playhead to the last frame of the clip. Do this by hitting the down arrow on the keyboard. When you hit the down arrow, the playhead actually moves to the edit point just past the last frame, so, it is necessary to hit the left arrow once to move back onto the clip. Look for the last frame marker, red arrow below.

With the playhead on the last frame of the clip, place your cursor over the parameter settings, as soon as you do you'll see that the 'add keyframe' button lights up with a red plus inside a yellow triangle. This tells you that any change to the parameter setting will automatically set a keyframe for you.

There are several different ways that we can change the Scale parameter. We can click on the Scale slider and drag, red box below. As you drag the Scale slider the Scale percentage will turn blue and the numeric value will change, green box below. As you move the Scale slider, the size of the clip will change in the Viewer window.

Another way to change the scale of the clip would be to place your cursor on top of the percentage size, the percentage number will turn blue and you can click and drag the cursor left or right to change the Scale setting. Note that when you place your cursor onto the percentage number, up and down facing triangles appear above and below the percentage amount, this indicates that you can click on the percentage number and drag left or right to change the amount of the percentage.

If you need to change the percentage size in very small increments, click once on the blue percentage number, it will turn white, shown below. Now, from the keyboard tap the up or down arrows to increase or decrease the size one percent at a time. You can also click on the number and enter a new value from the keyboard.

On the left and right hand side of the keyframe icon are 'greater than' and 'less than' brackets. If you click on a bracket, FCP will jump the playhead to the next or previous keyframe.

Any time your playhead is parked on a frame that has a keyframe, if you place your cursor on the keyframe icon, the icon will change to a red X (delete keyframe). Click on the red X to delete the keyframe.

As I mentioned earlier, just to the right of the keyframe icon is a small disclosure button.

If you click on the disclosure button, a small window will drop down offering a different way to manage your keyframes.

 
[Top]

 
Keyframing an Effect in the Inspector

In addition to the built in effects found in the Inspector, like, Color, Transform, Crop, etc., FCP provides us with many dozens of additional effects found in the Effect Browser. Additionally, there are numerous third party effects plugins that are also available. While any of these effects can be applied to video, like turning colored video into black and white video using a B & W effects filter, all of these effects can also be keyframed. For example, a video clip can start off as B & W and then ramp up to being colored by the end of the clip. The transformation from B & W to color happens over time.

For this demonstration I'm going to use some video of a trolly car that will start playing having an 'Aged Film' look, but by the end of the clip, it will have transformed into modern day video. First, select the clip on the timeline.

Place your cursor over the desired effect in the Effects Browser and skim. You'll see the effect applied to the actual video in the thumbnail as you skim, red box below.

As you skim through the thumbnail in the Effects browser, the video and effect will also display, full size, in the Viewer window, updating in real time. This ability to see your video with the effect, in the viewer window, is a very powerful way to audition different effects.

When you have found the desired effect, double click on it in the Effects Browser to apply it to the video clip in the timeline. Remember that the clip in the timeline must be selected for this to happen. The effect, 'Aged Film' will be added to the top of the stack of effects in the Inspector window.

You can also drag the desired effect out of the Effects Browser and drop it onto the video clip in the timeline.

In the Inspector, place your cursor just to the right of the 'Amount' parameter. You will see the 'add keyframe' plus sign (+) for setting a keyframe, but you notice that the word 'Show' is not there. This is because the 'Aged Film' effect only has one parameter and there is nothing else to 'Show'.

The process for keyframing the 'Aged Film' effect is the same as the keyframing work that we did earlier in this article. Place your playhead at the start of the clip in the timeline.

As we want this clip to start with the 'Aged Film' look, in the Inspector, click on the Add Keyframe button and set the Amount slider to 100%.

Now, in the timeline, move the playhead to the last frame of the clip.

In the Inspector move the Amount slider all the way down to 0%. Notice that the keyframe icon changes from a red plus sign to a red diamond. A keyframe has been set.

As the clip plays out, the video will go from the 'Age Film' look to modern day video at the end of the clip.

Should you decide that you want to remove the effect from the clip, in the Inspector, click on the effect name to select it, which will turn blue-gray in color, and hit the delete key. Gone. Just to the left of the effect name is a small blue square button (red arrow below). Clicking on this blue button will toggle the effect on and off for comparison. To the right of the effect name is a 'hooked arrow' (green arrow below) which is a re-set button. Clicking on the hooked arrow will re-set all of the parameters to their default settings.

You can add any number of effects to the same clip, as shown below. Some of the effects have just one parameter, other effects can have any number of parameters.

 
[Top]

 
The Video Animation Editor

While keyframing in the Inspector is pretty straight forward, it is lacking some abilities. For example, when the parameters of several different effects have been keyframed, it can be impossible to properly adjust or 'tweak' the keyframes because there is no way to see how the different keyframes for the different effects relate to each other. What we need is a graphical representation of our keyframes and FCP has just such a thing, called the 'Video Animation Editor'.

To open the Video Animation Editor, select a clip on the timeline.

If your timeline looks like mine, with many clips, the clip that we want to work with is very small and we'll need to enlarge it to work inside the Video Animation Editor. Position your playhead on the clip and from the keyboard, 'Command +' several times to enlarge the clip to a workable size. The reason for placing the playhead on the clip is that as we enlarge the timeline, the clip will stay in view and not move off screen as the timeline enlarges.

There are two ways to access the Video Animation Editor. The first way is from the Clip menu > Show Video Animation.

The second way to open the window is to click on the small arrow icons in the upper left corner of the clip.

This will open a menu window in which you can select 'Show Video Animation'.

The quickest way to open the Video Animation Editor is 'control v' from the keyboard. (Remember to have the clip selected.) As you can see below, the Video Animation Editor displays the same effects as found in the Inspector, with the exception of 'Spatial Conform' and 'Rate Conform' which are not keyframeable and don't show in the Video Animation Editor.


If an effect is added to a clip from the Effects browser, the added effect will show in both windows.


[Top]

 
Fade In and Out using the Video Animation Editor

Fading a clip in and out is something that is often done in FCP and this can be done more easily in the Video Animation than in the Inspector. In the Compositing: Opacity section is a small disclosure button.

Clicking on the disclosure button will open up the Compositing: Opacity section. If you move your cursor anywhere into the Opacity section, two opacity icons will appear at the start and end of the clip.

When you place your cursor on an opacity icon, you will see a left and right facing triangle around the opacity icon. Click and drag in towards the center to set your fade in and fade out. As you drag you'll see a frame counter.

Aside from creating fade in and fade outs in the Opacity section, if you place your cursor on the thin black horizontal line at the top of the graph you'll get an up and down facing arrow. Click and drag down to lower the overall opacity of the clip. Note that pulling down the thin black opacity line, to say 65%, will cause the clip to play at 65% from start to finish.

 
[Top]

 
Solo Video Animation

If you are working in the Video Animation Editor and have a number of different effects applied, the height of the Video Animation Editor can be an issue, you can run out of vertical space in the timeline. We are going to need to collapse the Video Animation Editor by putting it into 'Solo' mode.

To collapse the list of effects, select the clip on the timeline and then from the Clip menu > Solo Animation, or from the keyboard, 'shift control v'. When you have 'Solo Animation' selected in the Clip menu, the Video Animation Editors for all clips will open in Solo Animation mode until you turn Solo Animation off.

As shown below, the stack of video effects has been collapsed and only 'Compositing: Opacity' shows as an option. Click on the disclosure button, red arrow below.

The disclosure button will open a drop-down menu listing all of the effects in the stack. I am going to choose the Old World effect.

As you can see below, the Old World effect is now the Solo effect in the Video Animation Editor. I have already added three keyframes to display how they would be shown.

We need to expand the Old World effect in the Video Animation Editor in order to do our keyframing work. Click on the disclosure button, red arrow below. You can also double click on the blue bar of the effect to enlarge the window.

Shown below, the effect window has been expanded enabling us to work with the keyframes.

Should you need to work on a different effect, click on the disclosure button just to the right of the effect name and choose your effect.

To collapse the Old World effects window, click on the disclosure button on the right.

You can change the render order of effects that have been applied to a clip from the Effects Browser, but you can not reorder the stock effects found in the Inspector; Color, Transform, Crop, Distort and Compositing. The rendering order of the stock effects in the Inspector is not important because these effects have no influence on each other. To reorder effects from the Effects Browser, expand the Video Animation Editor, then click on an effect and drag up or down. You can reorder the effects in the Inspector in the same manner, but only effects applied from the Effects Browser.


[Top]

 
Keyframing in the Video Animation Editor

The Video Animation Editor is a graphical representation of our keyframing work. While this can be helpful in adjusting the keyframes of an effect, I need to point out that the Video Animation Editor works differently depending on what effect you are working with and also depending on if your Video Animation Editor is in expanded or solo animation mode.

If you have applied several effects to a clip and you are viewing the Video Animation Editor in the expanded view (not solo animation) and if the Video Animation Editor is so tall that it slips under the timeline ruler, shown below, you will not be able to move the playhead.

If this happens you can lower the Video Animation Editor by adjusting the timeline height slider found on the far right of the timeline window.

We can also put the Video Animation Editor into 'Solo Animation' mode, in which the Video Animation Editor displays only one effect at a time, greatly reducing the need for vertical space in the timeline.

When we select Solo Animation the effects stack is collapsed, showing only one effect, which always defaults to 'Compositing: Opacity'. Just to the right of the effect name is a disclosure button that when clicked, will drop-down to display all of the effects applied to the clip. You can choose the effect that you want to work on, in this case, Aged Film.

It is easier to work in the Solo Animation, and you can always switch between different effects by using the disclosure button just to the right of the effect name, red arrow above.

I mentioned that different effects filters work differently in the Video Animation Editor. Below are two examples. On the left 'Aged Film Amount', on the right 'Trim All'. Notice that Aged Film Amount effect has a disclosure button on the far right (red arrow below), 'Trim All' has no disclosure button.

When there is a disclosure button on the far right, as is the case with Aged Film, we can do all of our keyframing work right here in the Video Animation Editor. We can set both the location of keyframes on the timeline, earlier or later in time, and also change the parameters of the effect, all right from inside the Editor. Click on the disclosure button, the Aged Film section opens up. As we have not done any keyframing, the window is empty.

I'm going to set three keyframes for this clip. With the playhead near the start of the clip, 'option k' from the keyboard will set a keyframe. I've then moved to the middle of the clip and set another keyframe, then one last one near the end of the clip.

The Aged Film effect defaults to 100%, so, If I were to play the clip back, it would have the Aged Film effect applied, but there would be no visible change to the effect because I have not yet changed any of the effects parameters. As you can see above, all three keyframes at set at 100% effect.

What I want to do is to have the clip start off normally, ramp up to Aged Film midway through the clip and then back down to normal by the end of the clip. You need to place your cursor accurately onto the first keyframe, when you do, the percentage of the effect is shown, in this case, it's at 100%.

With the cursor on the first keyframe, click and drag down to change the effect setting. Dragging down to 0% turns the effect completely off.

As I want the effect to be full on mid-way through the clip I'll leave the second keyframe where it is and pull the third keyframe all the way down to turn the effect off.

You can click on a keyframe and drag up or down to change the percentage of the effect to be applied. You can also click and drag left or right (earlier or later) to change the position of the keyframe on the timeline. If you drag vertically to change a setting, you must release your mouse button and then click again to move vertically. You can jump the playhead from keyframe to keyframe, be sure that the effect is selected in the Video Animation Editor, then from the keyboard, option ' for the next keyframe and option ; for the previous keyframe.

You can add additional keyframes by placing your cursor on the white line that connects the existing keyframes. When you first place the cursor on the white line it will turn into an up down facing arrows. Hit the option key (the up down facing arrow cursor will turn in to standard arrow cursor), and then click the mouse button. The playhead will move to that position in the timeline and a keyframe will be set.

You can also set additional keyframes by placing the playhead where you want the keyframe and then 'option k' from the keyboard. If you place your cursor on the white line between two keyframes, it will turn into an up down arrow, click and drag, the two keyframes will move together. Hold down the shift key and click anywhere on the white connecting line, you can drag all keyframes up or down in unison.

There is an 'Ease In - Ease Out' function, right click anywhere on a line between two keyframes to activate the Keyframe Interpolation pop-up. There are no Bezier handles because the Animation Editor cannot show an animation path. Bezier handles are only available for Transform parameters. Bezier curves and handles are useful when your animation follows a physical path. They help make the animation path look more organic and realistic by smoothing out the path or by creating a more natural looking velocity. To work with Bezier handles, you have to go to the Viewer to see and manipulate the path using Bezier handles. To reveal the animation path and the animation keyframes in the Viewer while you work in the Animation Editor, just click the Transform icon either in the Viewer or the Inspector.

We have been working with Aged Film, which has a disclosure button on the far right of the effect name, but some effects have no such disclosure button and therefore, the Video Animation Editor can not be expanded. As shown in the above section, when there is a disclosure button and the Video Animation Editor is expanded, we can drag keyframes left and right on the timeline, earlier or later in time. We can also drag keyframes up and down changing the amount of effect applied to the clip. Without the ability to expand the Video Animation window, we can only change the position of keyframes in time but can't change the amount of the effect that is applied. You would need to do this in the Inspector.

As shown below, Trim All (Crop All) has been selected as the effect. Notice that there is no disclosure button, red box below. The default effects found in the Inspector; Color, Transform, Crop, and Distort do not have the disclosure button in the Video Animation Editor. Compositing (Opacity) is the one exception. When there is no disclosure button on the right of the Editor, you can click and drag on a keyframe, left or right, earlier or later in time, but you cannot change the parameter settings inside the Video Animation Editor. You'll need to place the playhead on the keyframe in the Video Animation Editor but change the parameters in the Inspector window. Most of the effects applied from the Effects Browser do have the disclosure button.

I have added three keyframes to Trim All. Note that the keyframes are double diamonds, red box below. When a keyframe has more than one diamond it means that the effect has more than one parameter that can be set. Because I have chosen Trim All, there are multiple settings that can be keyframed; Left, Right, Top and Bottom. With no disclosure button to expand the Video Animation Editor, what we have to work with is the timeline (horizontal dotted white line). If you click on a keyframe you can drag it left or right on the timeline to change the timing of the keyframe, but there is no way to change the parameters of the keyframe. If you need to change the parameter of a keyframe you'll have to make the change in the Inspector.

Earlier I mention that one of the draw backs to working in the Video Animation Editor, in Solo Animation mode, is that you cannot delete keyframes directly, but there is a work around. In the Video Animation Editor, place the playhead on the keyframe that you want to delete.

The Inspector will now show the keyframe that you have placed the playhead on in the Video Animation Editor.

Now, place your cursor on the keyframe icon, it will turn into a red X, click on the X to delete the keyframe.

 
[Top]

 
Using the Select & Range Selection Tool in the Video Animation Editor

When working in the Video Animation Editor we can use the Select or Range Selection tool to automatically add keyframes to an effect.

Select a clip on the timeline and then add an effect.

With the clip selected, from the Clip menu, select 'Show Video Animation', or from the keyboard, control v.

We can work in the Video Animation Editor in either the Expanded, shown below left, or Solo Animation mode. You can choose Solo Animation from the clip menu, below right. I'll be working in Solo Animation mode.

The Solo Animation mode opens showing one effect, which defaults to 'Compositing: Opacity'. Click on the disclosure button just to the right of the effect name, (red arrow below) and select the 'Aged Film' effect.

To expand the 'Aged Film' effect window, click on the disclosure button on the far right, red arrow below left. With the window expanded, there is a thin black horizontal line at the top of the graph, this line represents the amount of the effect that is applied to the clip. In this case its at 100%.

Choose either 'Select' or 'Range Selection' from the Tools menu, red arrow below. Or you can use A for Select, or R for Range Selection from the keyboard.

With either the Selection or Range Selection tool, click and drag to select an area of the clip. I'm using the Selection tool. After you have selected an area, place your cursor at the top where the thin black horizontal line is, you will see the effect percentage amount.

Click and drag down, as you drag the percentage amount of the effect will be displayed, below left. After you have dragged down you can see that keyframes have been set for you automatically.

You can click and drag any of the keyframes, up or down, left or right, to adjust the keyframing of your effect, below left. You can also add additional keyframes, place your cursor on the keyframe line and option click, below right.

 
[Top]

 
Keyframing in the Viewer window

The Viewer window offers the ability to keyframe three different effects; Transform, Crop and Distort. Keyframing in the Viewer window may be the more intuitive way to work, because we can alter these effects right in the Viewer window by clicking and dragging on the effects handles. We can also click on the video in the Viewer window and drag to reposition the clip, creating motion paths. The Viewer window is shown below, at it's default setting. The buttons for the three effects, Transform, Crop and Distort are found, the lower left of the Viewer window.

These three effects are also found in the Inspector. Make a change in the Viewer and it will be reflected in the Inspector. Make a change in the Inspector and it will be updated, in real time, in the Viewer. If you open the Video Animation Editor in the timeline, you'll see that these effects and changes are reflected there too.

When an effect is selected, in either the Viewer or Inspector, it will turn blue in color at both locations. This makes it easy to see which effect you are working with. I have Transform selected, shown below.

We'll start by selecting the Transform effect, which, when selected reveals options, upper left of the Viewer window, red box below. There are three icons, a greater than and less than bracket on either side of the 'add keyframe' button. The two brackets are for moving back and forth between keyframes. I need to point out that the keyboard shortcuts; option ' for the next keyframe and option ; for the previous keyframe, do not work in the Viewer window. Off to the right is a 'Done' button. In order to save the work that you have done, you need to click on Done which also returns the Viewer to its normal mode.

Over in the Inspector, with the 'Show' icon selected, the different parameters of the Transform effect are displayed; Position, Rotation, Scale and Anchor.

There is something special about the Add Keyframe button in the Viewer window (below left), when you click on this add keyframe button, keyframes will be set for all four parameters simultaneously, as you can see in the Inspector window, red box below right. There is a good reason for this. When you do your Transform keyframing in the Viewer FCPX assumes you might change the parameters right inside the Viewer by dragging the image around and scaling it on sight. As dragging in the Viewer often results in multiple parameters changing together (position, size...) the application sets keyframes for all four parameters. If you don't want all of the parameters keyframed, which may be the case, do your work in the Viewer window, but use the add keyframe button over in the Inspector.

Should you set keyframes for all four parameters but need to delete a keyframe, place your cursor on the keyframe in the Inspector, the keyframe icon will display a red X, click to remove.

We will keyframe some of the parameters for Transform working in both the Viewer and Inspector windows. We will start with the clip off screen, to the right, and reduced in size. As the clip plays out, it will move on screen, rotate and increase to full size, midway through the clip, then the size of the clip will be reduced as it moves off screen to the left. This example has been done before but it does demonstrate the workflow.

Position your playhead on the first frame of the clip in the timeline, be sure that the clip is selected. Click on the Transform icon, lower left of the Viewer window.

First we want to reduce the clip window size in the Viewer window so we can move it off screen. From the Size menu, top right of the Viewer window, select 25%. There will now be some open gray space around the clip, so that we can position the clip off screen.

As we know that we want the clip to start off small and grow over time, let's reduce the size of the clip to 30%. You can do this by clicking and dragging in, on one of the blue corner dots. You can also change the Scale parameter in the Inspector.

We'll drag the video clip down and to the right so that it will start off, off screen.

You can also set the position of the clip in the Inspector window. Click on the X and Y values and scrub to change the value. You can click on the position values and enter new amounts from the keyboard. As you change the position in the Inspector, the clip will move in the Viewer window.

We have changed the size and positioned the clip where we want it to start playing from. We are working with three different parameters, so I'll add keyframes by clicking on the Add Keyframe button, top left of the Viewer window. The only parameter that we don't want to keyframe is 'Anchor', so I'll delete the Anchor keyframe in the Inspector. Placing the cursor on the Anchor keyframe turns the Anchor keyframe into a red X, click to delete, below right.

Now we'll move the playhead midway through the clip.

With the playhead positioned midway through the clip I am going to click on the white circle in the center of the clip and drag towards the center of the window. When the clip is exactly centered, yellow dynamic positions lines will appear. As the clip will be moving through the screen as the clip plays out, there is a red 'motion path' showing its trajectory.

We now need to change the size of the clip, in the Inspector I have set scale to 100%.

The last parameter we want to set is Rotation. Lets give it one full rotation, 360 °

When we play the clip from the start, the video will move on screen, increasing its size and rotating 360°, until halfway through the clip, it is now centered, full size on the screen. As the clip plays out from the start to the mid-way point, the clip moves along the red motion path in a straight line. We can change the trajectory of the clip by right clicking on the motion path and choosing 'Add Point'.

Click on the Point and drag to reshape the motion path. The clip will now curve up into the window following the new motion path. When we add a point to a motion path to change its shape, we get Bezier handles to further shape the motion path, red arrows below.

To finish up my Transform effect, I have moved my playhead to the last frame of the clip. I then set keyframes in the Inspector for Position and Scale. Once the keyframes have been set, I first changed the Scale of the clip back to 30% and then I dragged the clip downwards and to the left out of the picture.

Right click on the keyframe where the motion path changes direction and choose Smooth.

Choosing Smooth evens out the motion of the clip. As you can see below right, you can manipulate the Bezier handles to alter the shape of the motion path.

When you have finished your work, click on the 'Done' button upper right of the Viewer window to set your Transform effect.

The one parameter that I did not keyframe is 'Anchor'. When we rotate a clip, it rotates around its center point, like a wheel rotating around its hub. We can change the Anchor point from the center of the clip to a different position in the clip. Now, when we rotate the clip, it will rotate around its new anchor point and will rotate with a wobble.

 
[Top]

 
Keyframing Audio

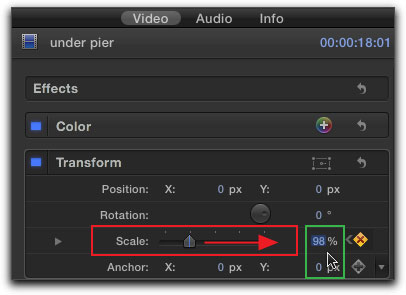
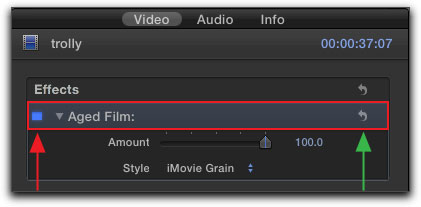
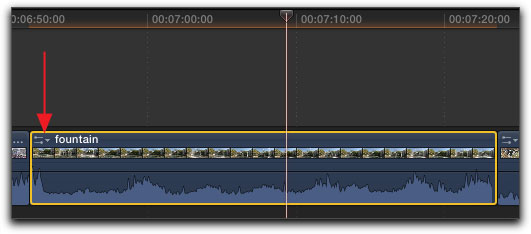
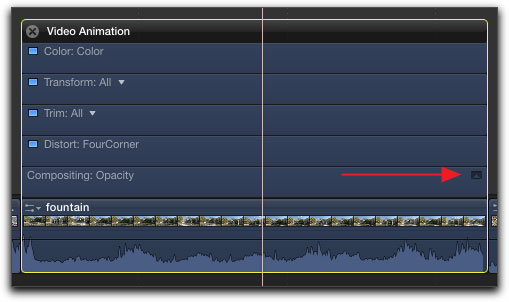
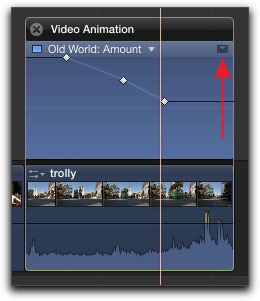
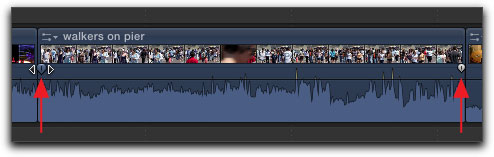
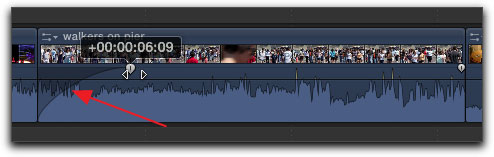
One thing that we often do when editing is to fade our audio in and/or out and FCP provides us with a simple tool to do this. Find the clip you want to work on in the timeline. There is no need to place the playhead on the clip or to select the clip. Place your cursor anywhere in the audio section of the clip and you will see two small fade audio handles appear, red arrows below. When you place your cursor on one of the audio fade handles, on either side of the fade audio handle, you'll see left-right facing arrows.

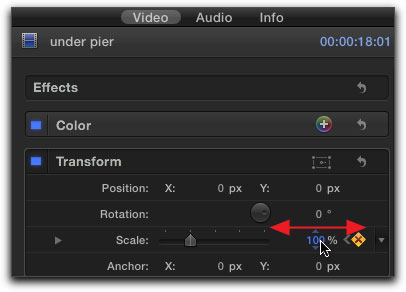
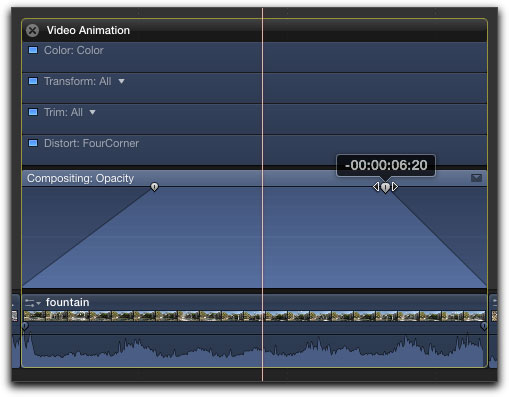
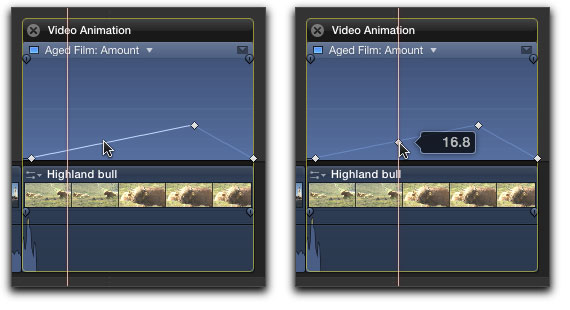
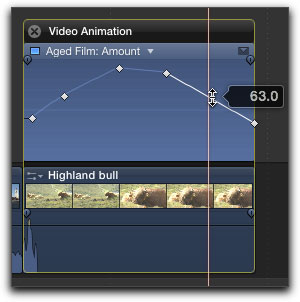
Click and drag the fade audio handle at the start of the clip to the right, as you drag in you'll see the fade in being created at the start of the clip, denoted by a shaded area over the waveform, below red arrow. As you drag a frame counter will appear showing how many frames you have dragged the fade handle.

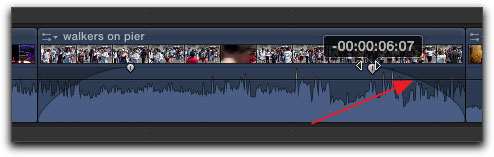
Do the same thing at the end of the clip to create a fade out.

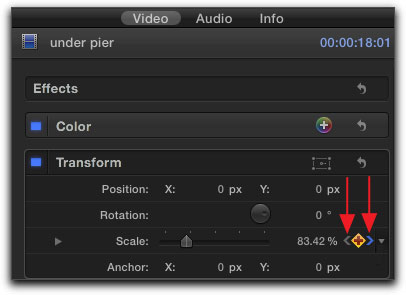
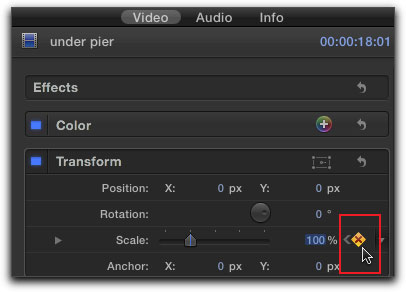
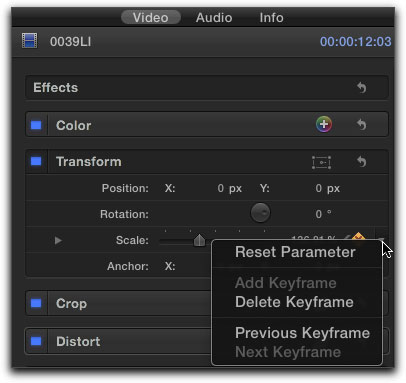
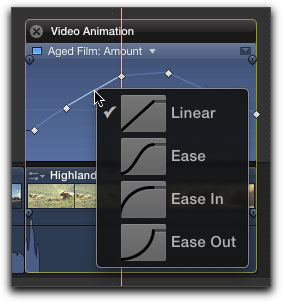
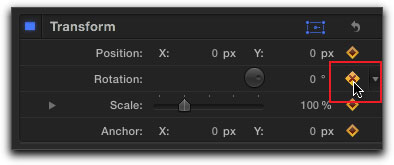
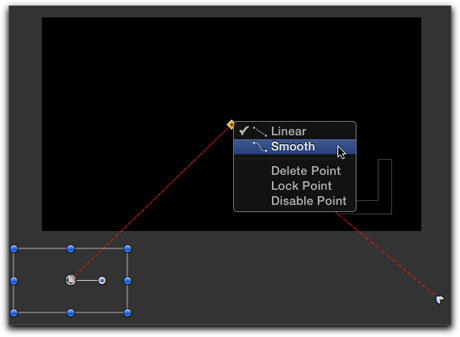
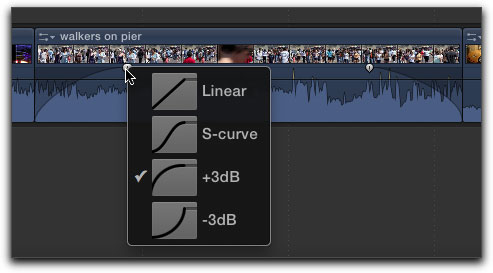
Additionally we have the option to change the shape of the fade to alter its impact. Place your cursor on the audio fade icon you want to change and right click, this will produce a menu with four options for the shape of the fade; Linear, S-curve, +dB, and -3dB. +3dB is the default, which fades more slowly at the start of the fade and more quickly at the end. The +3dB fade is the most natural sounding of the four fade types.

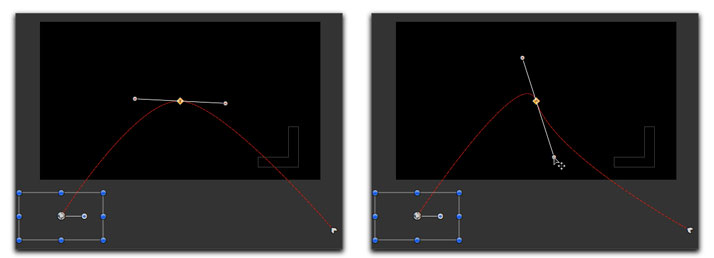
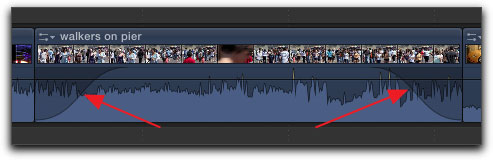
A S-curve shape fade is shown below.

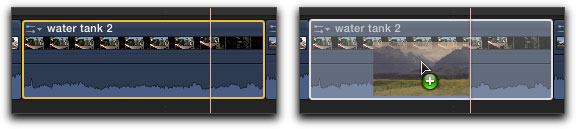
When working with audio, there are occasions when the audio spikes, becomes too loud and we need a way to lower the audio at that point, but leave the rest of the audio in the clip at its present volume. There can also be the need to lower the volume, called 'ducking', in certain places in the clip, of say a music track. We can keyframe our audio to do these things, right in the timeline.

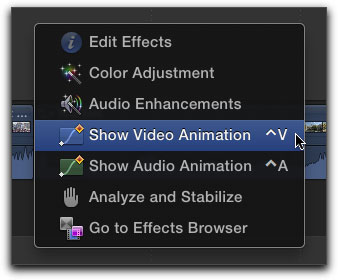
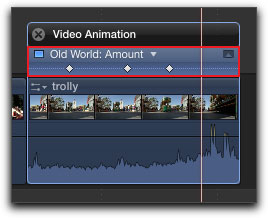
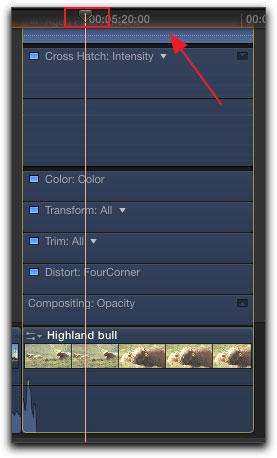
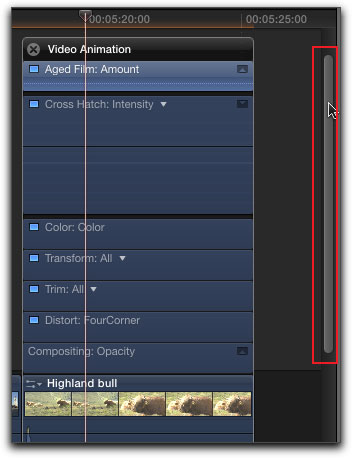
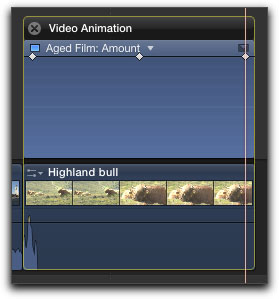
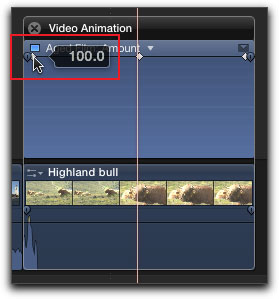
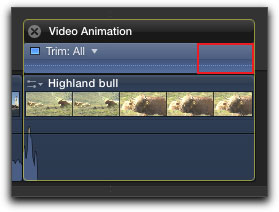
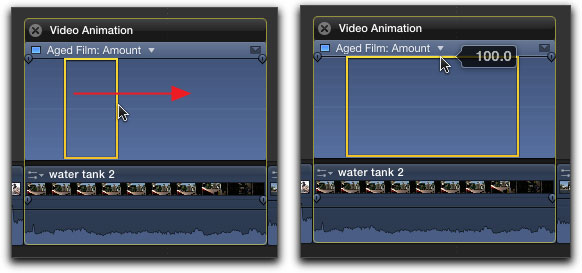
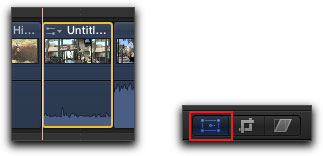
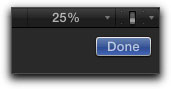
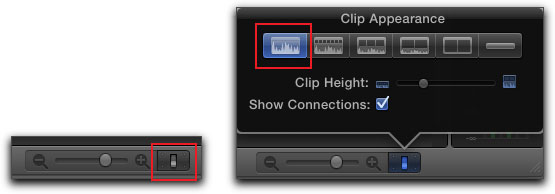
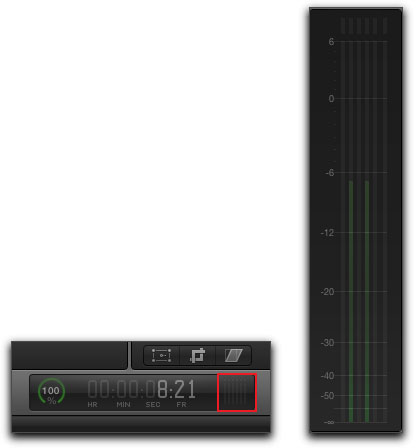
When keyframing audio in the timeline, it helps to enlarge the waveforms so that we can see exactly where to place our keyframes. Bottom right of the timeline is a light switch icon, called 'Clip Appearance' and from this menu we can change the way that the waveforms are displayed. As shown below, I have picked the waveform only option, below right, red box.

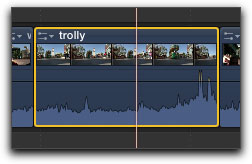
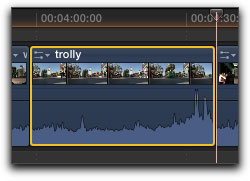
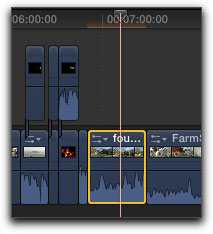
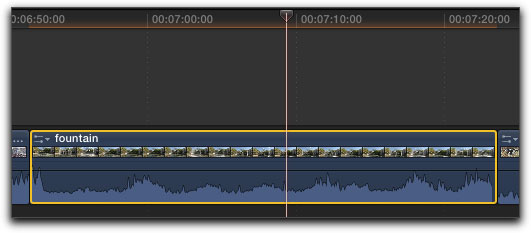
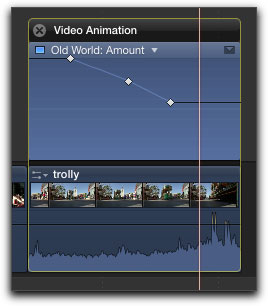
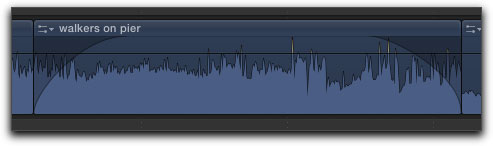
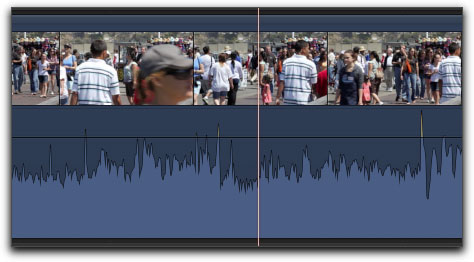
The timeline is shown below with only waveforms being displayed.

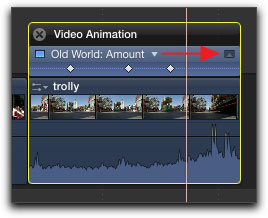
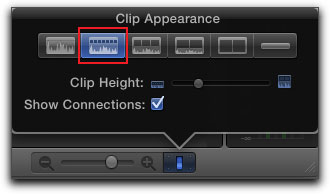
Most often I need to see the clip thumbnails to help locate that part of the waveform that I want to work on, so, in the Clip Appearance window I select the second from the left option.

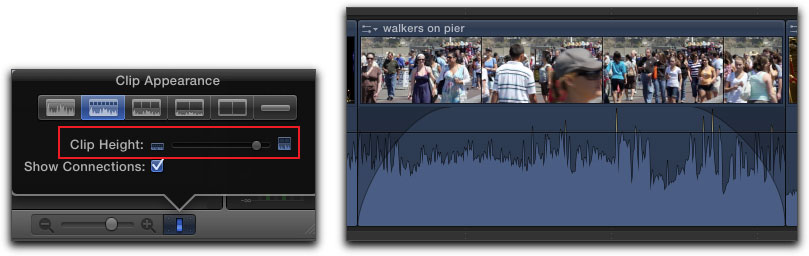
There is one more control in the Clip Appearance menu, 'Clip Height', which I have moved to the far right, making the waveforms larger, easier to work with.

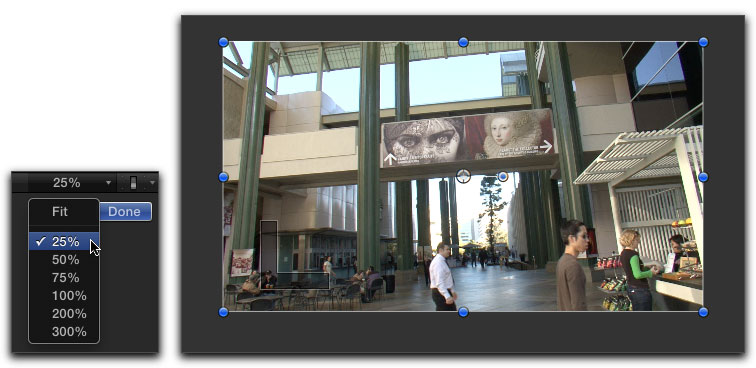
We have enlarged the height of the waveforms from the Clip Appearance menu, if you place your playhead on the clip and command + from the keyboard, the waveforms will spread out horizontally, enabling you to be more accurate in the placement of your keyframes. What would be very helpful here, after setting up our waveform display, would be if we could save our window layout for when we need to work on waveforms in the future.

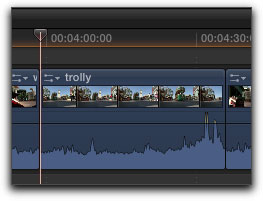
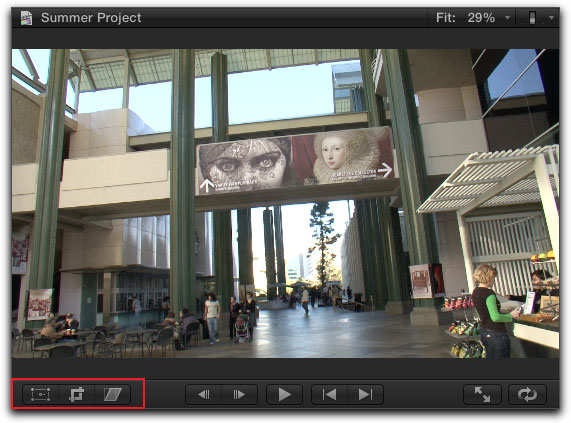
It is always helpful to have your audio 'VU' meters turned on. On the right hand side of the Dashboard, red box below, is the audio meter icon, click on it to open the audio meters which appear on the far right of the timeline.

The audio section of every clip has a black horizontal audio volume bar that runs through the clip and the audio level of the bar defaults to 0 dB. The audio waveform for this clip shows several audio spikes, colored yellow and red, showing that the audio level is above 0 dB. When the audio goes above the 0 dB level, it is not considered to be 'Broadcast Safe'. With digital audio, when the audio level gets too high (loud), audio clipping can occur, not a pretty sound.

We can lower the volume for the entire clip by placing the cursor on the volume bar and dragging downward. As you drag, the number of decibles that you have reduced the audio is displayed on screen.

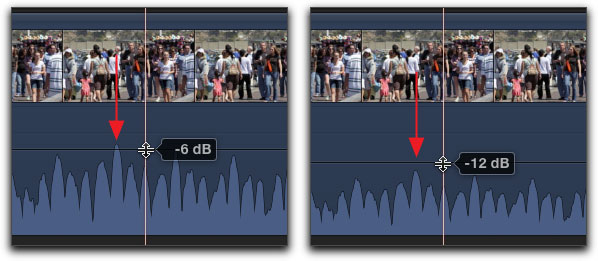
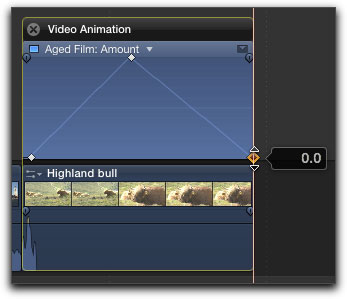
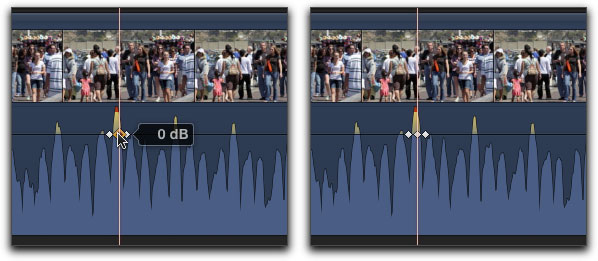
This works if we need to lower the volume for the entire clip, but in this case the volume of the audio is correct except for a few audio spikes. We need to lower the volume of the spikes while leaving the rest of the clips audio alone. We will keyframe around the audio spike. Place your cursor just to the left of the spike, hold down the option key and click to set the first keyframe. A keyframe icon will appear. Now place your cursor just to the right of the spike and option click to set a second keyframe.

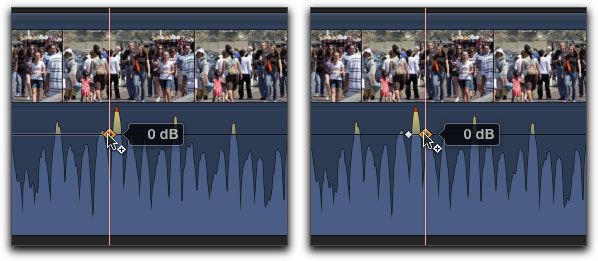
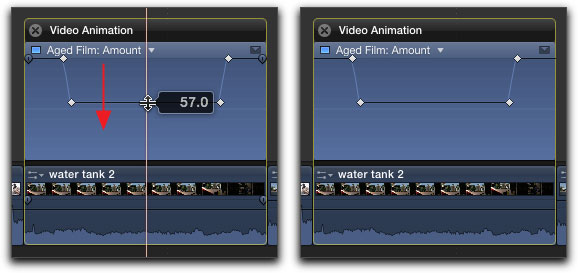
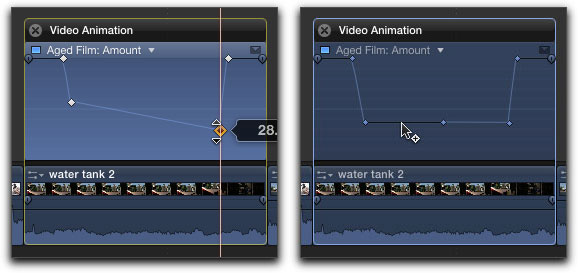
Lastly, place your cursor on the audio spike and set a third keyframe, below left. Three keyframes have now been set, below right.

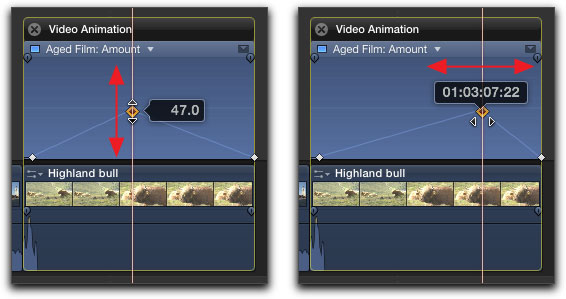
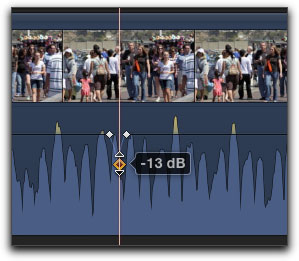
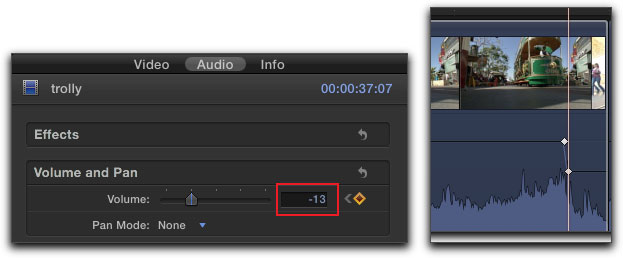
With our keyframes set, click on the center keyframe, the one on the spike and drag down until it is safely below the horizontal black volume bar which runs at 0 dB. I have decreased the volume by -13 dBs. To remove a keyframe, click on it and hit the delete key. You can also click on a keyframe and drag left or right to reposition it.

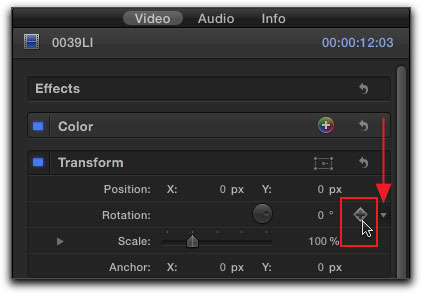
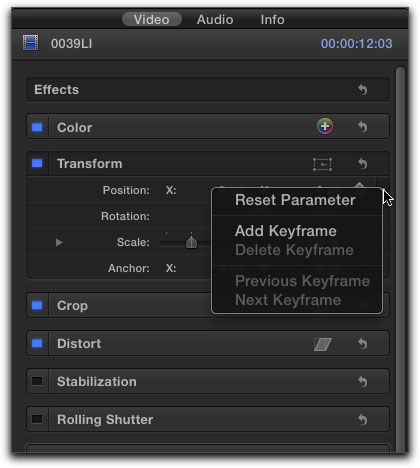
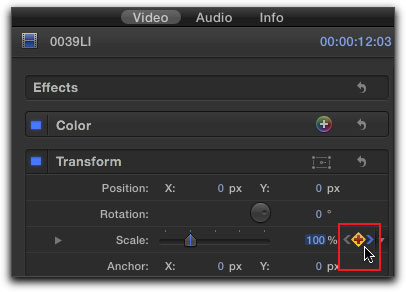
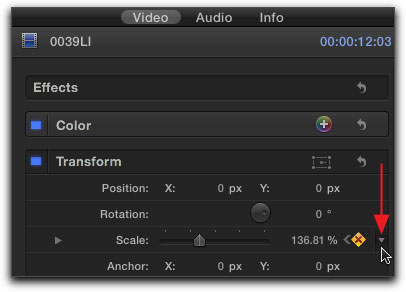
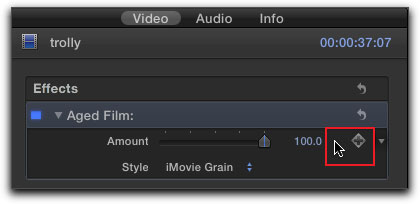
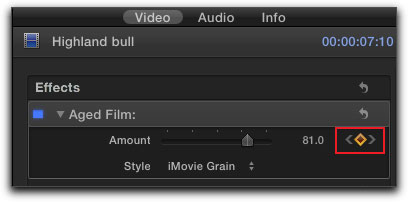
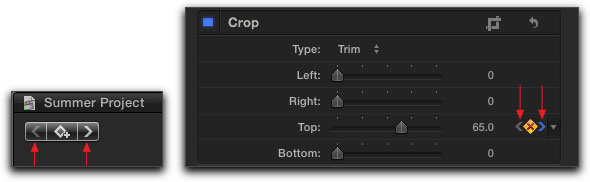
We can also keyframe using the timeline and the Inspector. Position your playhead in the timeline just to the left of the audio spike, in the Inspector click on the add keyframe button.

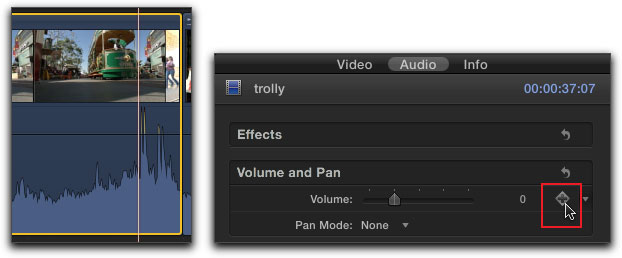
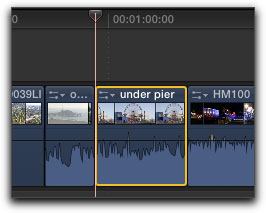
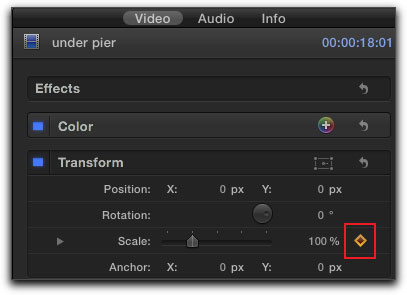
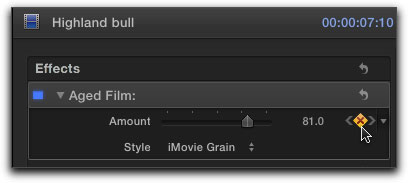
When you add a keyframe in the Inspector, a keyframe will show in the timeline.

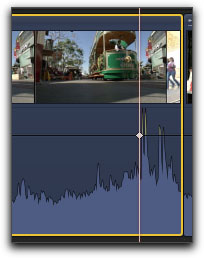
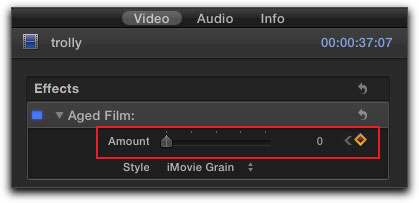
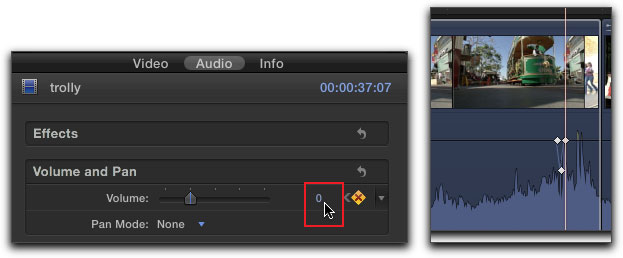
In the timeline move your playhead so that it sits on top of the spike, in the Inspector add a keyframe. Use the Volume slider or click on the numeric setting amount and enter -13 from the keyboard, below left. A second keyframe will appear in the timeline showing that it has been placed at -13 dB, below right.

Move the playhead just to the right of the spike and, in the Inspector, add a third keyframe. After you have added keyframe, adjust the Volume slider back to 0 dB. The third keyframe has been added to the timeline and the volume has been returned to 0 dB.

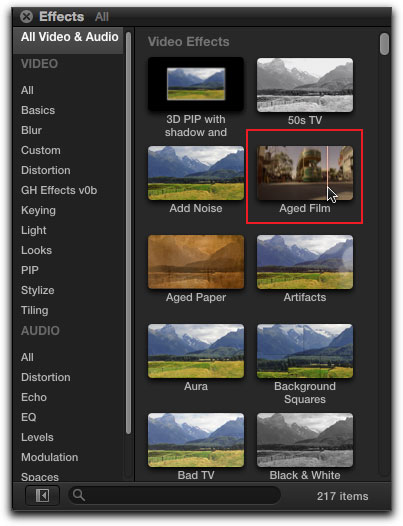
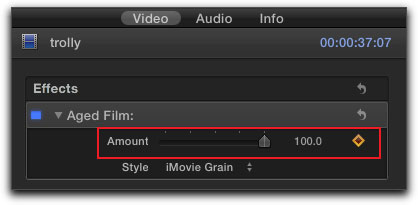
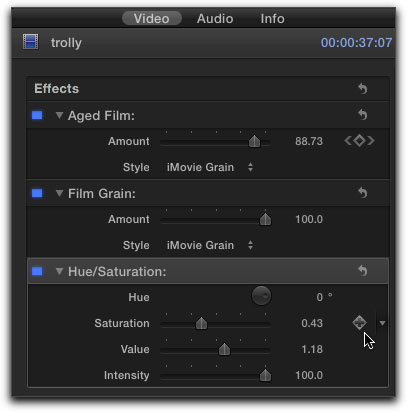
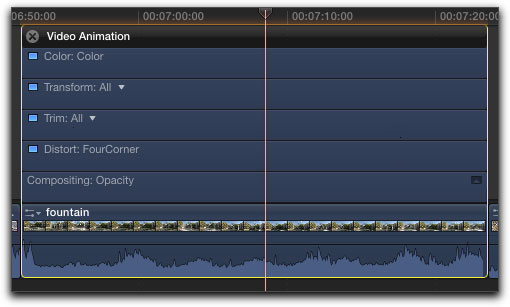
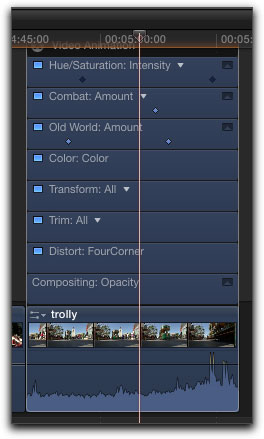
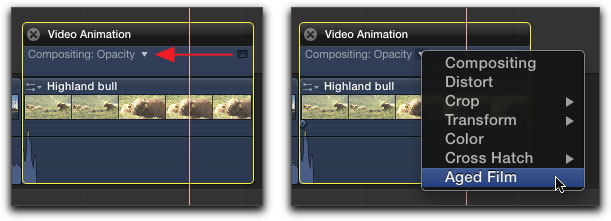
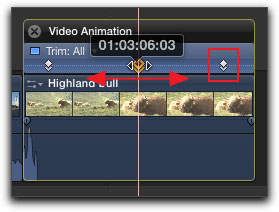
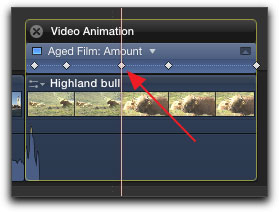
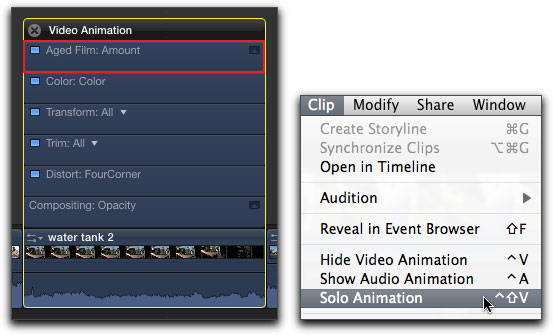
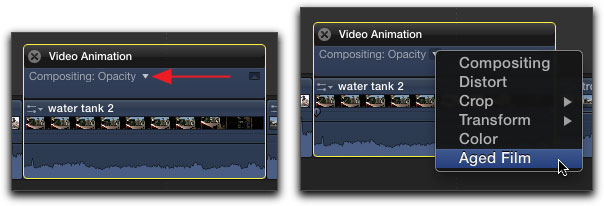
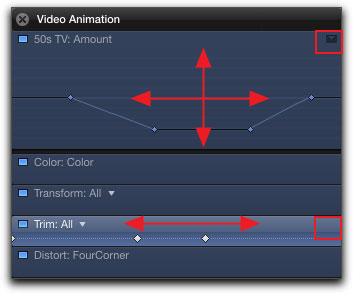
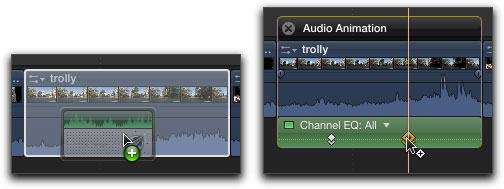
If you are working with audio filters, you can keyframe in the Audio Animation Editor. Select an audio filter, in this case 'Channel EQ', and drop it onto the clip in the timeline. Select the clip and from the keyboard, 'Control A' to open the Audio Animation Editor. Place your cursor at the position that you want the audio filter to start and 'Option k' from the keyboard to set your keyframes. You can also add keyframes in the Inspector.

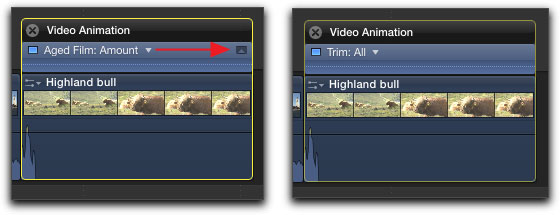
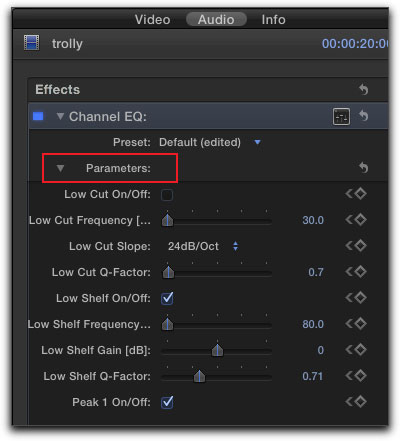
While you can move the keyframes in the Audio Animation Editor, by clicking on them and dragging left or right, earlier or later in time, you need to work in the Inspector, Audio tab, to set the parameters for the audio filter.

 
[Top]

 
Notes

I have a few addition points that I would like to make about keyframing in FCP X.

First off, at the start of this article I said that the only parameter that is keyframeable in Color Correcting is 'Shape Mask', which is correct. This is a major short coming in FCP X. Having said that, there is a free Color Correcting filter from Ripple Training, called 'RT Color Balance', that is completely keyframeable and even uses a color wheel. You can download the filter here. After you install the filter, it will show up in the Custom section in the Effects Browser.

The process for keyframing the Crop and Distort effects in the Viewer window works in the exact same manner as working with Transform, detailed earlier in this article.

You can Copy and Paste effects attributes from one clip to another clip(s), but you can not Copy and Paste Keyframing work.

When animating a clip in the Viewer window, for example, having the clip come on screen over time, it can be helpfull to know where the Title and Action Safe boundries are. From the top right of the Viewer window is the 'Viewer Display Options' drop-down menu, click on it and choose, 'Show Title/Action Safe Zones'.

When working in the Video Animation Editor, some effects have disclosure buttons, top right of the Editor window, others do not. As shown below, the '50s TV' effect does have a disclosure button, that when clicked, expands the Editor window. You can set keyframes, click on them and drag left or right, earlier to later in time, and, you can also click on a keyframe and drag up and down to change the parameter setting. The 'Trim All' effect has no Disclosure button, empty red box below. When there is no disclosure button, you cannot expand the Animation Editor window. You can click and drag on a keyframe, left or right, earlier or later in time, but you can not change the parameter settings inside the Video Animation Editor. You'll need to place the playhead on the keyframe in the Video Animation Editor and then change the parameters in the Inspector window.

In FCP X we have three different areas to do our keyframing work; the Inspector, the Viewer window, and from the timeline, using the Video and Audio Animation Editor. What I have found while writing this article is that the Video and Audio Animation Editor is difficult and complex to work with. The main issue I have with this Editor is that everything is very small in size. It is necessary to enlarge the timeline in order to enlarge the Animation Editor window. Icons like 'Fade handles', are small and can be hard to grab ahold of. Each time you want to change from keyframing one effect on a clip to another effect on the same clip you have to jump through hoops; clicking on disclosure triangles, opening further windows to get to additional parameter settings.

On the other hand, keyframing in the Viewer and Inspector window is consistant and works very well. It is easy to to set keyframes and see the results, updated in real time in the Viewer window. When working with Transform, Crop and Distort in the Viewer window, being able to click and drag right in the window makes for exact visual placement and working with motion paths is well implemented.

While we do have keyboard shortcuts for previous and next keyframe, option ' for the next keyframe and option ; for the previous keyframe, I found that using the previous and next keyframe buttons found top left of the Viewer and in the Inspector windows to be more reliable.

To do accurate audio keyframing work, you might want to set your Clip Appearance to Audio Only and your clip height to maximum.

 
Enjoy,

--ken

 
[Top]

copyright © www.kenstone.net 2011

© 2000 -2011 Ken Stone. All rights reserved. Apple, the Apple logo, Final Cut Pro, Macintosh and Power Mac
are either registered trademarks or trademarks of Apple. Other company and product names may be trademarks of their respective owners.

All screen captures, images, and textual references are the property and trademark of their creators/owners/publishers.