October 24, 2011
Organizing Your Media
Download the ePub iPad/iPhone version of this article.
By Steve Douglas and Ken Stone
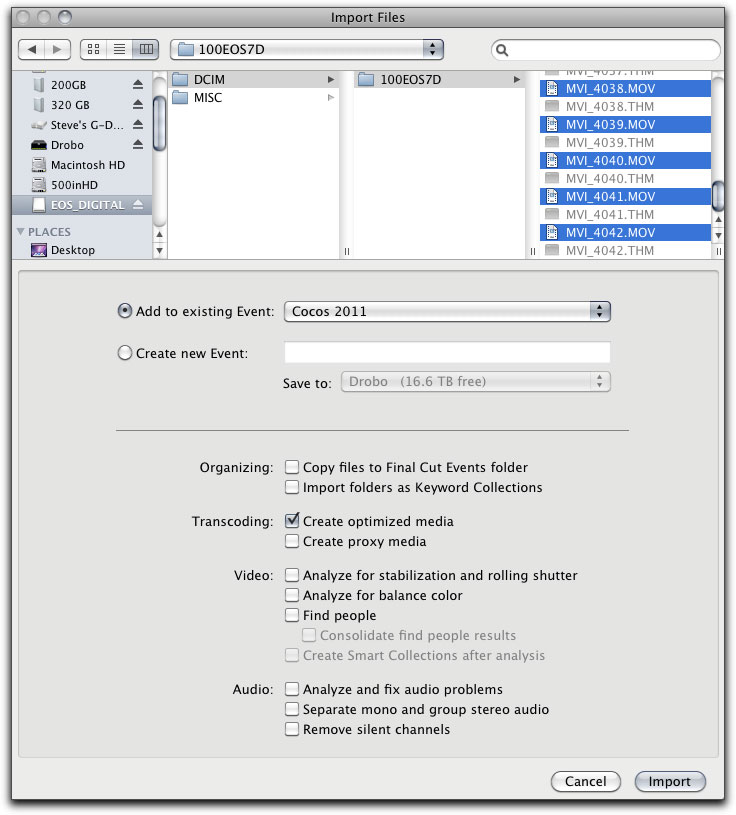
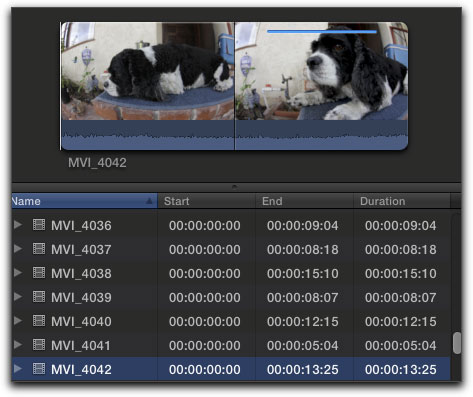
In legacy versions of Final Cut Pro we learned to organize our footage via the use of labeled bins that we could refer to in order to locate specific clips. For example, bins could be labeled, interior, exterior, music, narration, foley and so on. In my case, bins were separated by species of animals and marine life. Having separately labeled bins made for a quicker and more efficient workflow. In legacy versions of FCP, I always named my clips and then imported. While time consuming, it had a positive impact on my organization. With the introduction of SSD memory cards for video recording, and the decline of tape in the workflow, in FCP X we now ingest our video using 'Import Files' or 'Import from Camera'. Import window is shown below. Using either of these two methods does not provide us with the opportunity to name our clips before ingesting. Clips that are ingested have names like "MVI_3773" which could be a clip of an elephant or a clip of a clown fish; the file name provides no indication of what the clip actually is. After the clips have been imported, it is necessary to name each clip within the Final Cut X Clip Browser, one at a time.
In FCP X, we organize our media by using 'Keywords' and 'Keyword Collections'. This enables the editor to be just as efficiently organized as he/she was in legacy versions of Final Cut Pro. Keywords are a way to tag your clips with metadata. Metadata is actually the foundation of FCP X. By adding keywords, we add additional metadata to the clips. For example, I might name a clip, 'Hammerhead Attack' while the keyword applied is simply 'Hammerheads'. This is the same as having named a legacy bin as Hammerheads while within the bin were several clips of hammerheads all with different names such as 'hammerhead approach', 'hammerhead cu', 'hammer biting my ankle', and so on.
Naming Clips
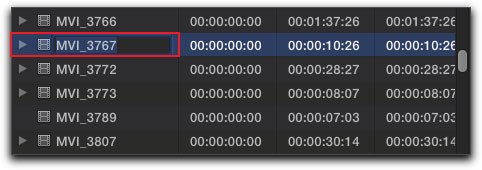
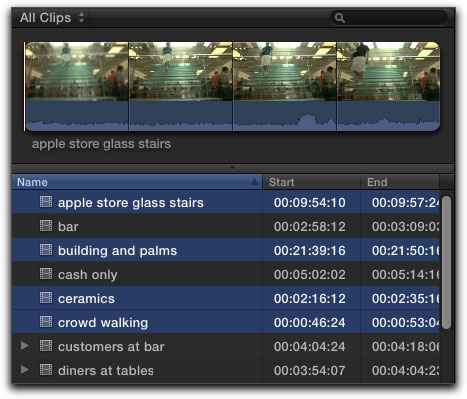
Before we move more deeply into organizing our footage using keywords, let us start with the simple naming process. In the browser you can see what each clip contains by scrubbing through each one. That can be time consuming. Trying to remember which clip is which by the camera given name would be an exercise in futility, so naming them appropriately is your first major step towards proper clip organization.
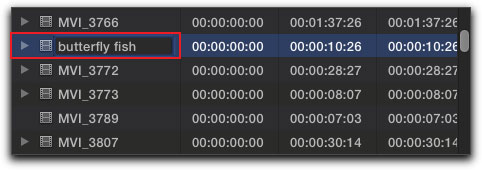
We can highlight the clip in the browser and rename it with a name more apropos to our subject.
Renamed, the clip will stay linked to its original clip name and return to the browser in alphabetical order. A renamed clip, brought into the timeline will retain the name you gave it. However, should you bring the clip to the timeline before it was named, and then rename it in the Clip browser, the timeline clip will retain its original name. Therefore, it would be prudent to make sure all clips have been named and organized before building the timeline.
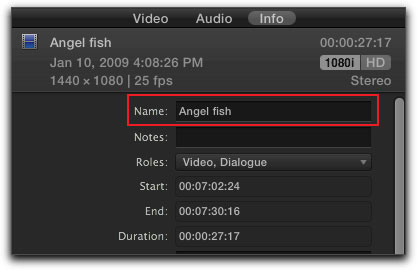
Additionally, you can rename a clip in the timeline by selecting the clip in the timeline and in the Inspector window Info tab, there is a name window where you can change the name of the clip. However, if you change the name of the clip in the timeline, the name of the clip in the Clip browser will not be changed. The good news is that the clip in the timeline and in the Clip browser will still be linked.
Final Cut Pro X will preserve the clip name always retaining the connection to the clip no matter how often or frequently you name or rename it. Thus, no more of the disconcerting 'clip off line' messages we sometimes got with legacy versions or the frustration of reconnecting clips where the search function sometimes did or did not work.
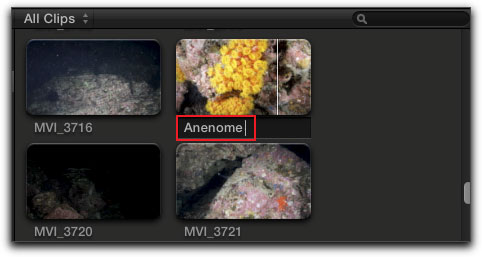
If you do work in Icon View, you can rename a clip just as easily and in the same way as for list view by highlighting the clip name and typing in your chosen name. Changing the name in Icon view is no different than if we changed it in list view.
Keywords
Part of the power of FCP X comes from its use of metadata to help organize media. Metadata is information that is attached or embedded in media, such as time and date, video format, frame rate, codec etc. This metadata is recorded by the camera while shooting. In FCP X we can add additional information to the metadata of a clip, which will then help refine the organization of our media. The metadata that we will add is called 'Keywords'. Keywords enable us to further sort our clips; and Keyword Collections are created to hold our keywords.
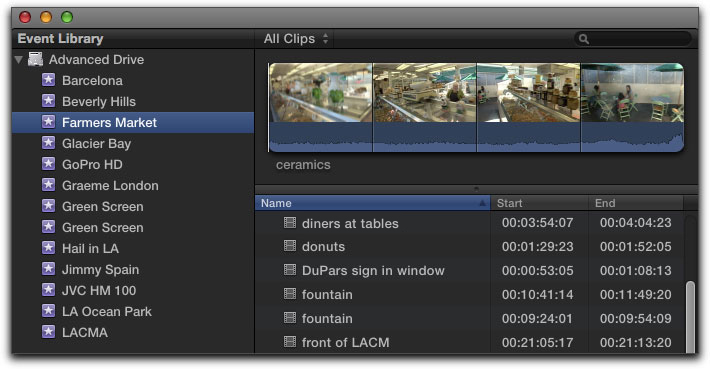
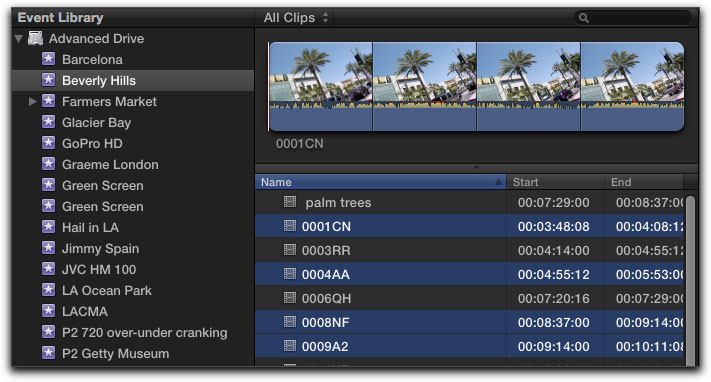
For example, I shot at the Farmers market in L.A. After import, I have an Event named Farmers Market in the Event Library. Selecting the Farmers Market Event loads the clips into the Clip Browser.
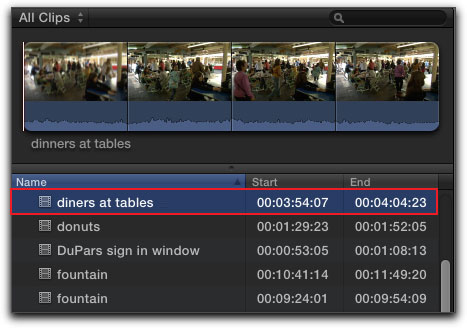
While my clips from this shoot cover a variety of activities, there are a number of clips that show people eating. As I'll need to work with these clips, I'll give each of these clips the keyword 'Dining'. When done, all of the Dining clips will be sorted into a Dining keyword collection for easy access. A keyword collection is like a folder that holds all same named keywords, i.e. Dining.
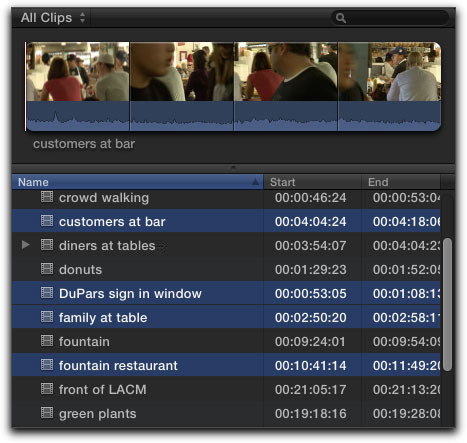
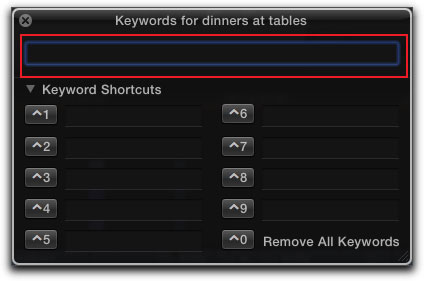
To assign a keyword, select a clip in the Clip Browser, in this case, 'diners at tables'.
From the Tool Bar, click on the keyword icon, or 'Command-K' from the keyboard.

This will open up the Keyword Editor.

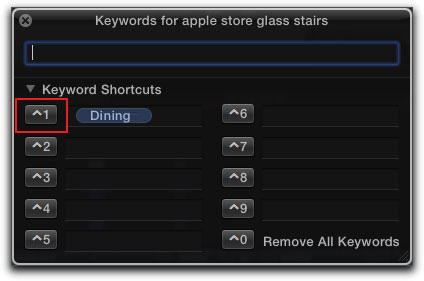
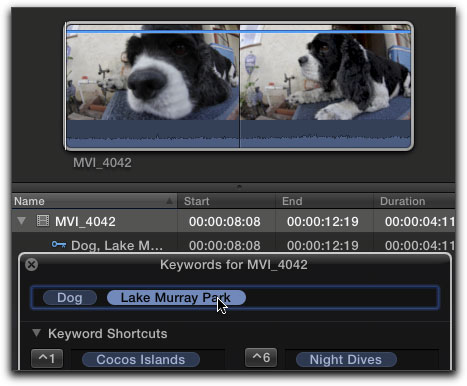
I have entered 'Dining' into the name field.
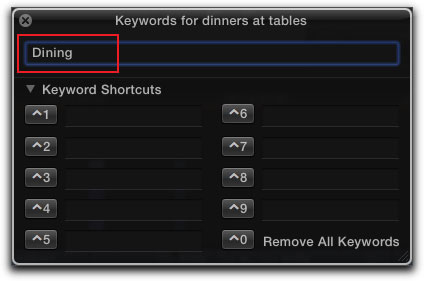
After entering your keyword name, hit the Enter key on your keyboard and the keyword will be created. As this is the first keyword it will be assigned to slot 1. Just to the left of the Dining keyword is the keyboard shortcut, 'Control-1' for assigning this keyword to a clip.
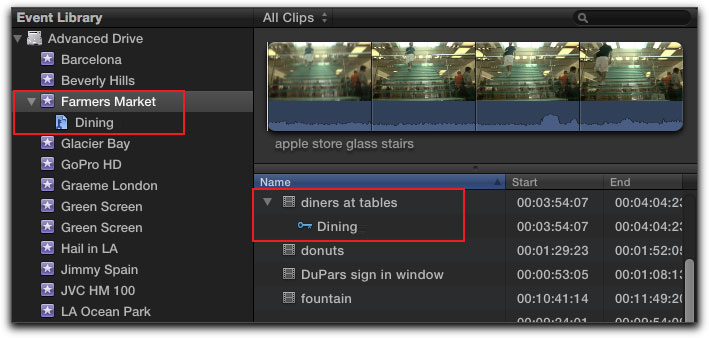
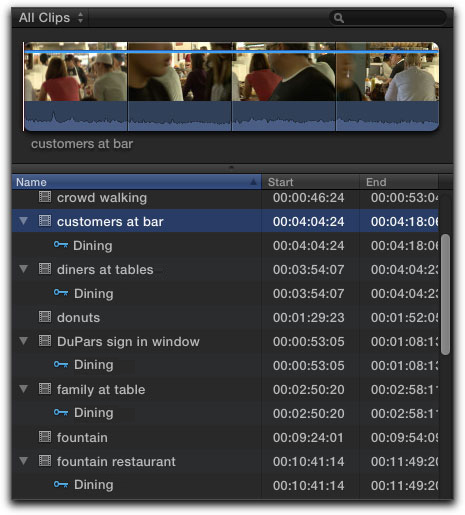
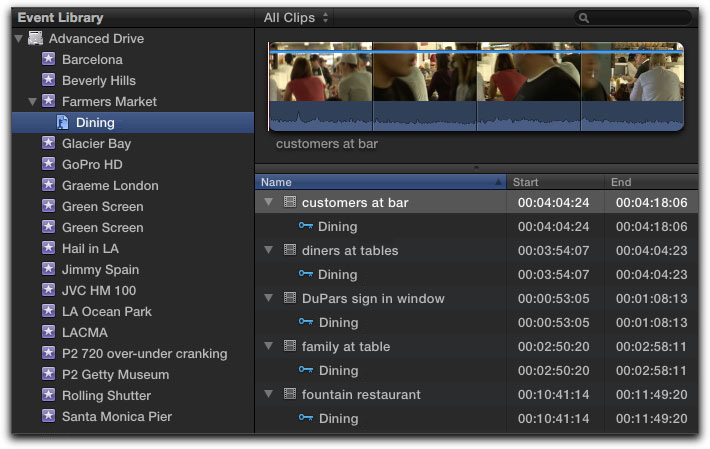
In the Clip Browser, you'll see that the clip ,'diners at tables', now has a disclosure triangle; open it up and you'll see the keyword 'Dining' has been attached to the clip. If you'll look at the Event Library, you'll see that the Farmers Market Event also has a disclosure triangle, open it up and you'll see that a Keyword Collection has been added. A keyword collection is symbolized by a blue paper icon with a key and a folded corner. Note that when you create a new keyword and apply it to a clip, FCP X will automatically create a Keyword Collection in the event for you.
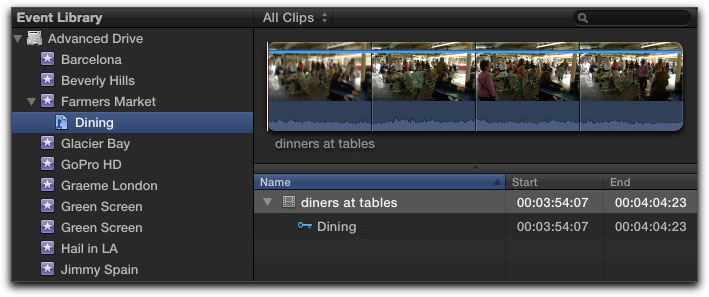
Click on the Keyword Collection, it will open up in the Clip Browser. As I have assigned a keyword to just one clip so far, the Clip Browser displays only one clip.
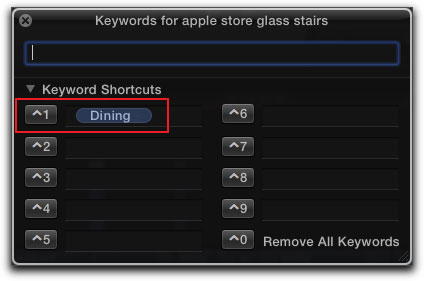
I now wish to apply the keyword 'Dining' to other clips in the event. I can select a clip and then open the Keyword Editor, by either clicking on the Key icon or by using the keyboard shortcut, Command-K, and then, inside the keyword editor, click on the keyword shortcut button, as shown below red box.
But it is not necessary to open the Keyword Editor every time you want to apply a keyword that you have already established. In the Clip Browser I have selected an additional four clips that I want to tag with the 'Dining' keyword.
With the clips selected, I use the keyboard shortcut, 'Control-1' to apply the keyword to the selected clips. As you can see below, the selected clips each now have a keyword.
So, where is all of this leading us, and how does this help with organizing our video? In the Event Browser, click on the 'Dining' Keyword Collection and now all of the clips tagged with the 'Dining' keyword will now be displayed in the Clip Browser.
I have created a second keyword, 'Tourists', which will use the keyboard shortcut 'Control-2'.

Back in the Clip Browser I have selected those clips that I want to tag with the keyword 'Tourists'.
'Control-2' from the keyboard applies the 'Tourists' keywords to the selected clips. As this is the first time that I have used this new keyword, FCP X has automatically created a keyword collection, 'Tourists', in the Event Library. Clicking on the keyword collection in the Event Library opens those keyword clips in the Clip Browser.

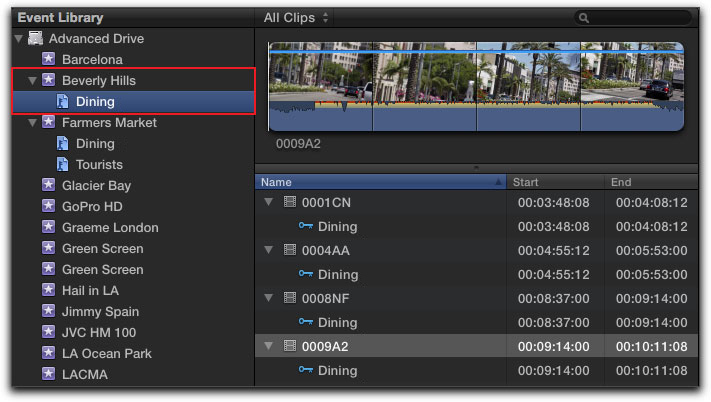
So far I have been working in the Farmers Market Event. If I have other Events that contain clips of people dining, I can add the 'Dining' keyword to clips in those Events as well. Having said that, I need to point out that each Event will have it's own Keyword Collection for that keyword. As shown below, I have selected the Beverly Hills Event in the Event Library and then, in the Clip Browser, I have selected those clips of people dining.
'Control-1' from the keyboard will assign the Dining keyword to those clips. The Beverly Hills Event now has a 'Dining' keyword collection and the keyworded clips now show in the Clip Browser.
So, as you can see, we can assign a keyword to any clip in an event and even to clips in other events. You can also add different keywords to the same clip. If I was working on a video project called 'Dining in LA', I could go into each event, open up the keyword collections, and build my project using only those clips that have been keyworded, thus saving all the time that would have been required if I had to sort through all the clips in the different events. This is a very efficient way to work.
There is one limitation to working with keywords, the keyword editor only has 9 slots. If you use up all of the slots, you can still create new keywords and collections by typing the name into the name box (below in red) of the Keyword Editor and applying it to a clip. However, there will be no keyboard shortcut to apply the keyword to additional clips. You would have to retype the name each time.
Keyword Collections
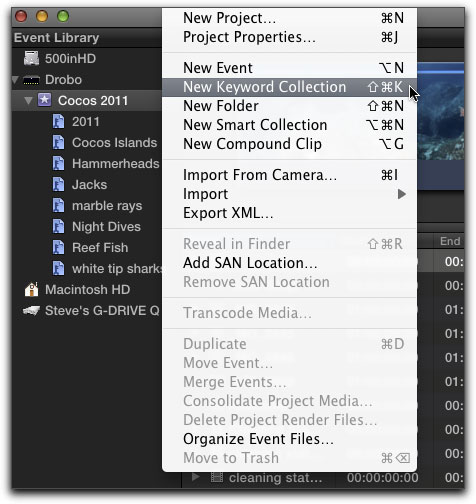
When you start a new project, should you already know how you want to organize your clips, you can create 'keyword collections' before you apply any keywords. First, select an Event, and then go to the 'File' menu and scroll down to 'New Keyword Collection', or by using the keyboard shortcut 'Shift-Command-K'.
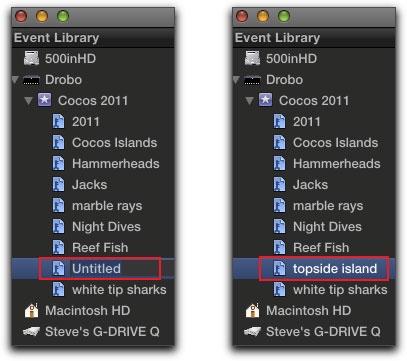
An untitled keyword collection will then be created within your event library, below left, which you can then name, below right.
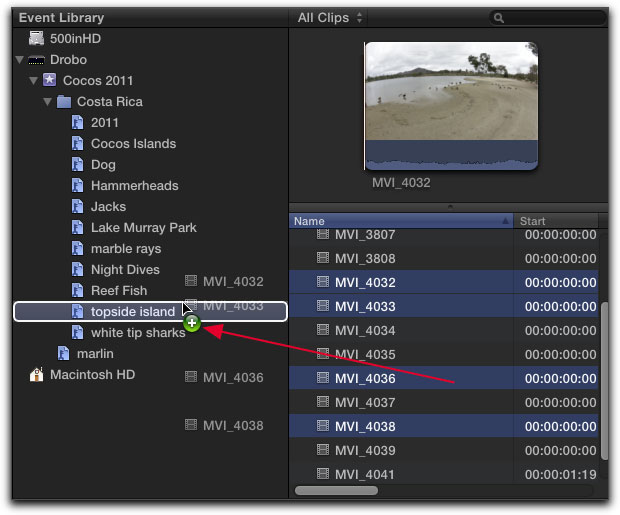
Drag your unnamed clip(s) into the 'topside island' keyword collection and the clips will automatically have the keyword collection name applied to them. Just as easily you can drag several highlighted clips to the keyword collection at the same time by clicking on the shift key to highlight more than one clip at a time.
This method of bringing one or more clips into a keyword collection works the same whether viewing your browser in list or icon mode.
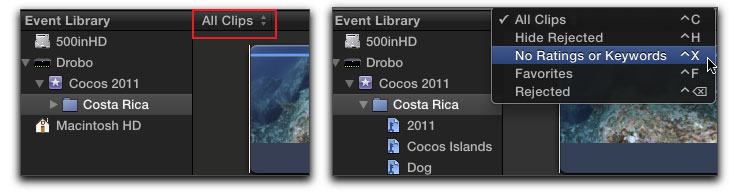
I have found that it is easier and more efficacious to have a good idea of what keyword collections I will need before I begin the process of naming my individual clips. I can create as many Keyword Collections as I need or want to prior to naming the clips themselves. By setting the ' View Options' window to 'No Ratings or Keywords' using either the drop down menu or keyboard shortcut, 'Control-X', as I name and assign keywords to their appropriate collections, they will be hidden from view in the Clip browser, with only those that are not yet assigned to keyword collections remaining visible. This narrows down the visible number of clips you will see in the event browser so that it becomes unnecessary to have to scroll through more clips than necessary in order to find the ones that haven't been tagged yet.
As always, when working in any version of Final Cut Pro, there are several ways to accomplish the same thing. We can name each clip individually or simply assign various keywords to them. Click on the 'Key' icon in the toolbar or use the keyboard shortcut, 'Command-K'. Select a clip in the Browser, type in a 'keyword' that you want to be associated with that clip. This keyword will then tag the clip and be assigned a keyboard shortcut.
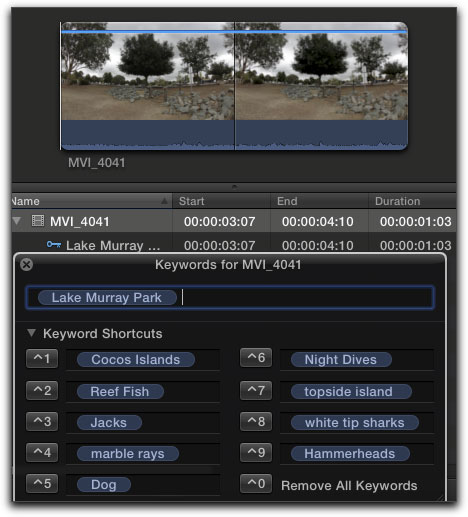
For example, I have a clip, currently named MVI_3748 that I want to tag with the name 'Marble Rays'. As you can see below, the keyboard shortcut for 'Marble Rays' is now 'Control-4'.
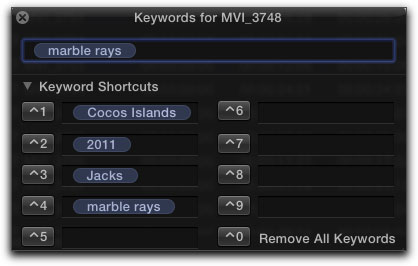
Though it is a bit difficult to see, the keyword editor can be resized by dragging on its lower righthand corner so that you can see all the keywords and the shortcuts which have been assigned to a specific clip.
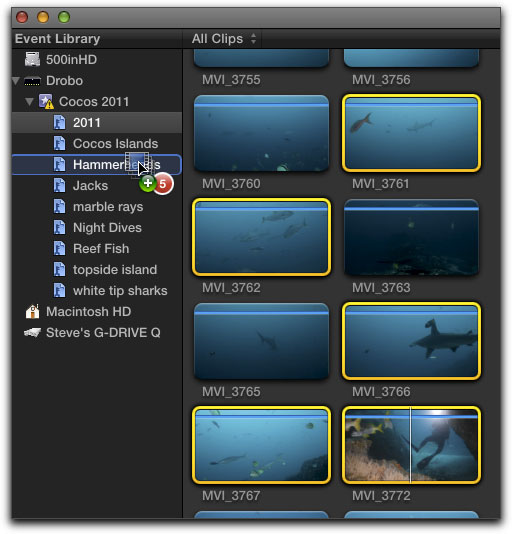
When a keyword is attached to a clip, a blue line lays over the clip in the browser as a visual reminder that a clip has one or more keywords associated with it. In addition, when adding a new keyword to any clip, a new 'Keyword Collection' is then created in the Event browser. This collection is fairly synonymous with the bins that we have long used in legacy versions of Final Cut Pro. Deleting a keyword is as simple as highlighting the word in the Keyword Editor and clicking on the Delete key from your keyboard.
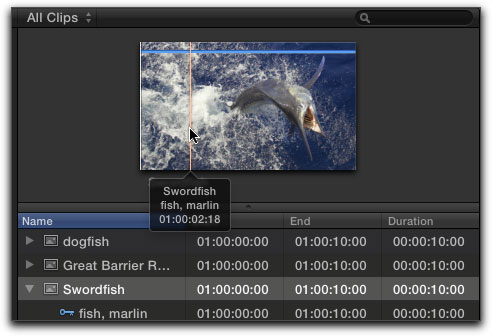
While the browser does not save In and Out points, now called 'Range', we can use keywords to save these ranges.
Next, using the keyword editor, assign a keyword to the clip. You will see that, this time, the blue line in the clip indicating that there is an assigned keyword only covers the area of the clip to which a range was set.
By clicking on the scroll down arrow adjacent to the clip, you will see both the key symbol and keyword assigned to it. If you select the clip, in the Clip browser, and place it on the timeline, you will get the entire duration for the clip. However, if you select the keyword representing the range, only the range will be applied to the timeline.
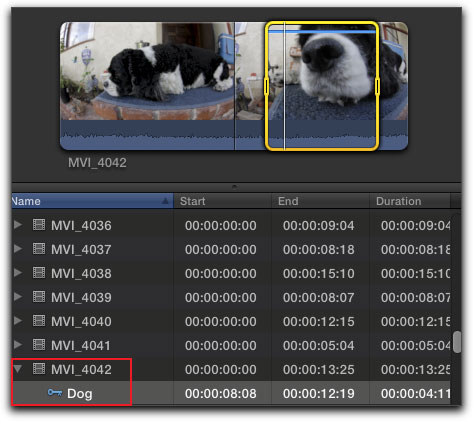
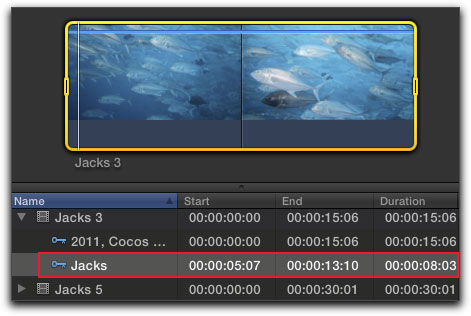
Should you want to retain multiple ranges from a single clip, you can, by going back to the clip, set a new range, apply your keyword and hit enter. Now both ranges will show the blue line only where they have been set. Note the different Start-End times for each range.

If you select a clip that has a range applied, only the range of the clip will be shown in the filmstrip window, not the entirety of the source clip.
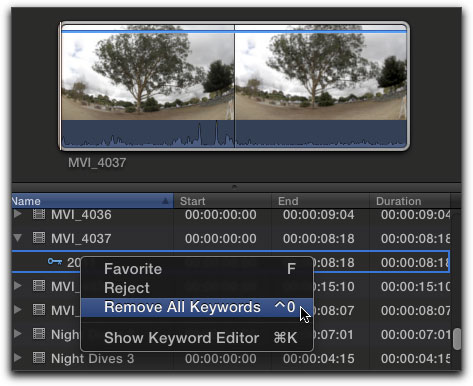
It would be nice to be able to now delete the clip and retain only the ranges (In and Out points) of the clip you used. Unfortunately, should you decide to delete the clip, while the ranges listed in the browser will remain, they will not connect with the source media and will only show the clip as an empty black window in the Clip browser. Since a keyword can represent a clip that has an applied range, this range can be deleted from the clip by deleting the keyword in the Clip browser, 'Control' or right click on the keyword and select 'Remove All Keywords'. This action can not be undone by using 'Command-Z'.
Should you have more than one keyword applied to a clip, you can use the keyword editor to remove one of keywords by highlighting the keyword in the keyword editor and hitting the delete key. The clip will retain all other applied subset keywords except for the one you now just removed. Keep in mind that if you should remove the keyword from the Event, rather than the clip, then that keyword will no longer be applied to any of the clips in the Event Library.
When you have used up the 9 allotted keyword slots, you can still add a keyword to a clip. Open the keyword editor, Command-K, and type in your new keyword, which will be applied to the clip even though it does not show up in the keyword editor.
Another way to view the metadata of a clip is to select the clip and use the keyboard shortcut 'Control-Y', then use the scrubber, 'Command-S', in the filmstrip at the top of the Clip browser, the clip name and associated keywords will be displayed.
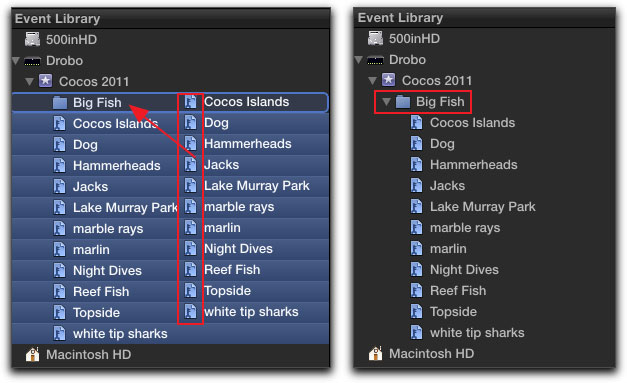
One way to help organize your Event Library would be to create a folder in which you can store your keyword collections. First select the Event in the browser and go to File > New Folder or use the keyboard shortcut, Command-Shift-N. I've named the folder 'Big Fish', selected the keyword collections and dragged them into the folder, below left. A disclosure triangle now appears beside the folder for easy access to your keyword collections, below right.
Reject Clips
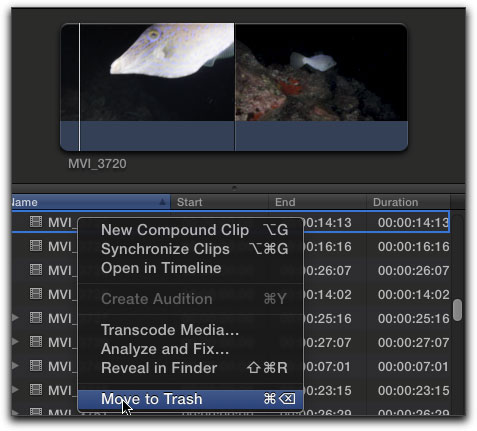
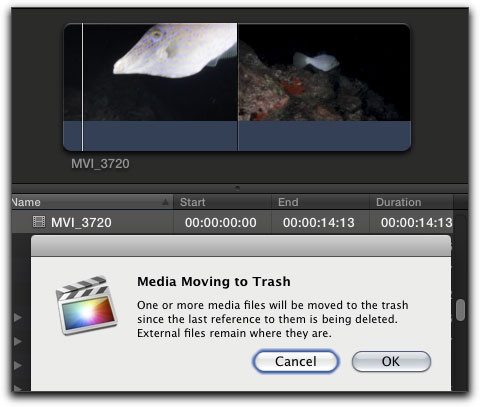
But wait, there's more! We have all imported clips that, on second thought, we were unsure about whether to use or not, as well as some that we knew we will never use and probably shouldn't have bothered to import in the first place, sacrificing valuable hard drive space . There are two ways to deal with this conundrum. If you know that this is not a clip you will ever want or need and would rather delete the whole thing from your drives, Do Not highlight the clip and delete from the keyboard. While the clip will be removed from your browser, it will remain on your hard drive. Instead, right or control click on the clip. A drop-down menu will appear giving you the option of removing the clip to the trash. Should you click on this, a second warning window will then appear advising you that the media may be lost. This is okay since you regret importing and putting the media on your drive in the first place.
But hold on! Suppose you're just on the fence about a clip and are not sure whether you want to use it or not. At this point there is no sense in completely trashing the clip, but you do want to remove it from view, making your browser a bit easier to navigate. In this case, you can select the clip, click on the X found at the bottom of the Clip Browser in the tool bar, or simply select and use the 'delete' key.

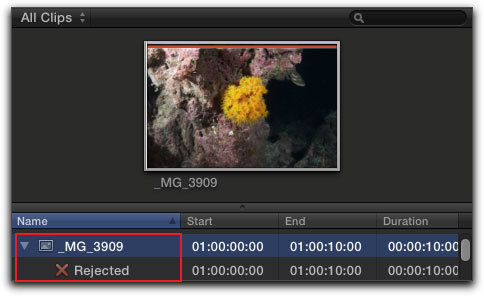
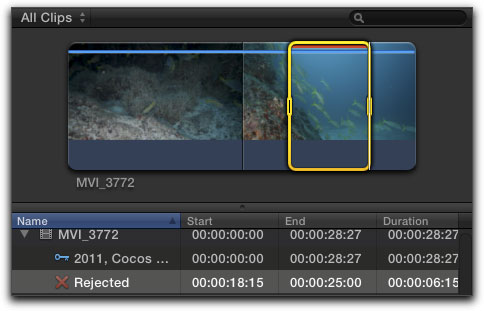
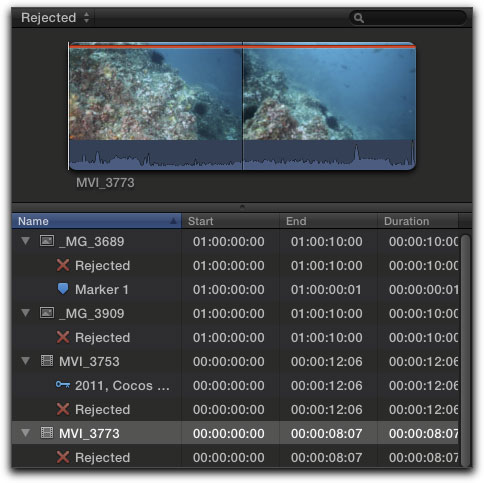
Open the disclosure triangle and you will see that under the name of the clip is a red X marking the clip as 'Rejected'. You will also see a red bar across the top of the clip, showing that the clip has been rejected.
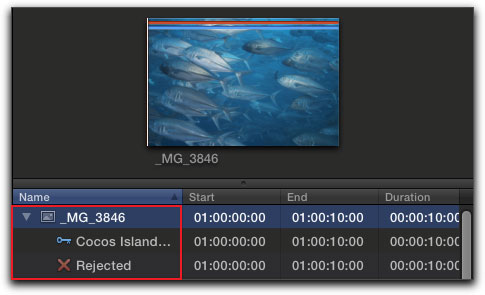
If you reject a clip that already has been given a keyword, the blue line, indicating that a keyword has been assigned to the clip, will remain. As shown below, both the 'Cocos Island' and 'Rejected' keywords are displayed. With the disclosure triangle open, the keyword will still be listed as well as the 'Rejected' keyword.
Additionally, you can set a range in a clip and mark just that part of the clip as 'rejected'. The red line across the top of the clip will mark which part of the clip has been rejected.
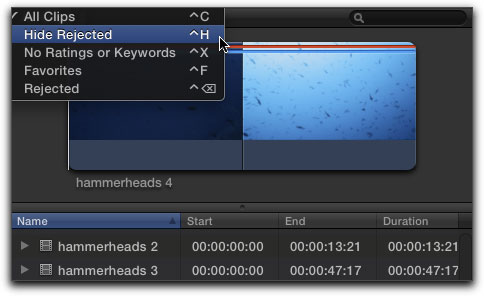
The great thing about 'Rejecting' a clip without completely deleting it from your hard drive is that you can now hide any and all clips that have been rejected by going to the top of the browser and use the drop down menu or the keyboard shortcut, control-H, to hide all rejected clips.
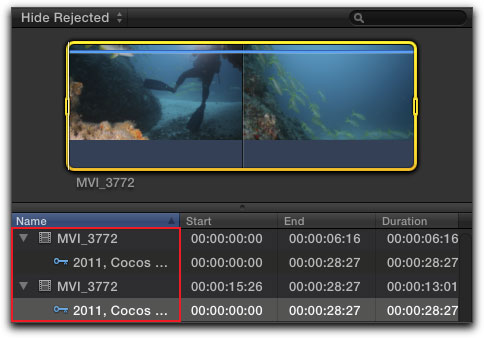
Should you have a long clip and there is part of the clip, in towards the middle, that is no good, you can set a range around the bad part and 'Reject'. When you select 'Hide Rejected' from the menu, the clip gets split into two clips in the Clip Browser. The first clip is up to the beginning of the rejected section, and the second clip starts after the rejection point. This is a fairly powerful feature, however, if you change the name of one of the two clips, the other takes the same name.
All rejected clips will now be hidden from view within your keyword and smart collections providing you with fewer clips to have to scroll through repeatedly.
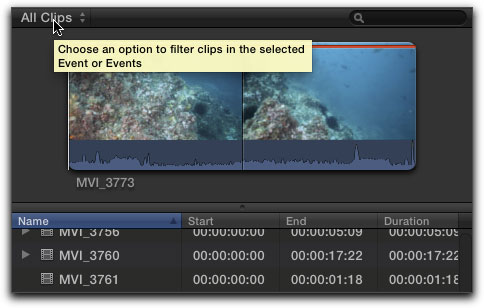
You can, at any time, go back to the Option View Window and set it to view only the rejected clips, or click on 'Control-Shift' for further consideration. To see all your clips, rejected or otherwise, use 'Control-C'.
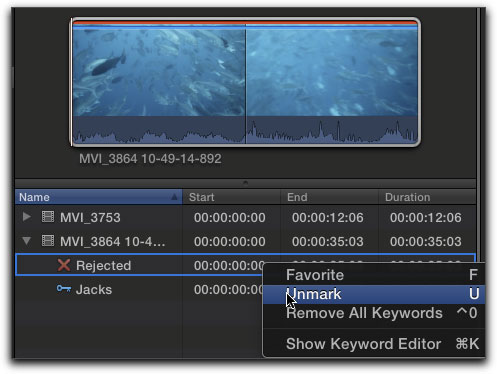
Should you want to remove the 'Rejected' tag from a clip, right or control click and choose 'Unmark' from the Option View menu.
Favorites
Another method of tagging a clip is to mark it as a 'Favorite' by first selecting the clip and using either the keyboard shortcut 'F', or by clicking on the green star in the toolbar.

You can select the entire clip as a Favorite, or create a range, and mark that as a Favorite. A clip tagged as a 'Favorite' may or may not have additional keywords applied. At the same time, the tagging of a clip as a Favorite is not the same as applying a keyword to it, nor is the Favorite tag considered a keyword in itself. Favorites can be used once clips have been assigned to their respective keywords, as it denotes which of your clips, within your keyword collections, are the ones you feel may be the best of the bunch before you begin editing within your timeline. A clip marked as a Favorite will display a green bar in the filmstrip of the clip browser.

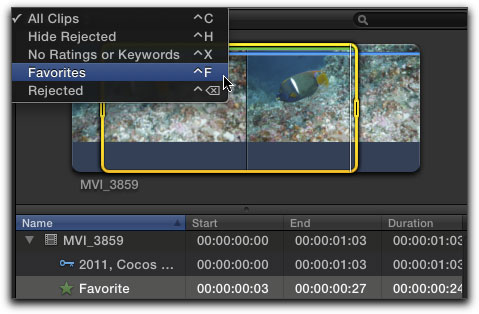
You can also use the View Option window, 'Control-F', to search for just the clips that have been marked as a Favorites.
By using keywords, keyword collections and folders, you can be just as organized, if not more so, as when using legacy versions of FCP.
Marlin photographs provided by Donald Riley.
Steve Douglas is a certified Apple Pro for Final Cut Pro 7 and underwater videographer. A winner of the 1999 Pacific Coast Underwater Film Competition, 2003 IVIE competition, 2004 Los Angeles Underwater Photographic competition, and the prestigious 2005 International Beneath the Sea Film Competition, where he also won the Stan Waterman Award for Excellence in Underwater Videography and 'Diver of the Year', Steve was a safety diver on the feature film "The Deep Blue Sea", contributed footage to the Seaworld Park's Atlantis production, and productions for National Geographic and the History channels. Steve was a feature writer for Asian Diver Magazine and is one of the founding organizers of the San Diego UnderSea Film Exhibition. He is available for both private and group seminars for Final Cut Pro and leads underwater filming expeditions and African safaris with upcoming excursions to Bali, Raja Ampat, Indonesia, and the Maldives Islands. Feel free to contact him if you are interested in joining Steve on any of these exciting trips. www.worldfilmsandtravel.com
[Top]
copyright © www.kenstone.net 2011
are either registered trademarks or trademarks of Apple. Other company and product names may be trademarks of their respective owners.
All screen captures, images, and textual references are the property and trademark of their creators/owners/publishers.