March 5, 2012
Updated May 25, 2013
Download the ePub iPad/iPhone version of this article.
By Ken Stone
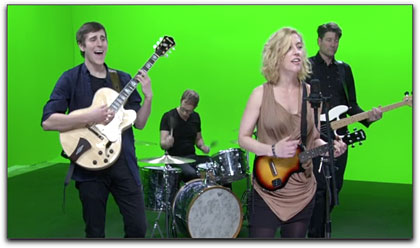
When FCP X first shipped, one glaring omission was the Multicam feature, a feature that many editors depend on. With the release of FCP 10.0.3, Apple has added the Multicam feature, and I must say that it was worth the wait. For the uninitiated, 'Multicam' allows the editor to work with video shot from any number of cameras of the same event. Music videos are a good example of when Multicam might be used. For example, you can have one camera shooting the lead singer, one on the guitarist, one on the bass player and one on the drummer. Each camera's video is called a 'camera angle'. The editor can take the video from these four cameras and turn them into a multicam clip, then play the four camera angles in a new special window called the 'Angle Viewer'. As the video plays out, all four camera angles play on screen in the Angle Viewer, and clicking on any one angle in the Angle Viewer will switch to that camera. You can start with the lead singer, click on a different angle, the bass player and to cut to that video, click on another angle to cut to the guitarist, then back to the lead singer, and so on. Very much like a 'live switcher' cutting between different cameras for a live broadcast.
What makes Multicam work is the fact that all of the camera angles can be placed into sync with each other. In other words, each of the camera angles will be playing the exact same moment in time. Camera angles can be synced by audio, timecode, content created, start of each clip, or marker. In this article we will use audio to sync the different camera angles. At the start of the shoot, with all cameras rolling, a hand clap or other distinct audio sound, like an electronic clap stick's 4 'beeps', is recorded to each camera. When we sync by audio, multicam will look for that distinct audio sound (waveform) on each of the camera angles and align each camera angle so that they all play in sync.
Staying with our music video scenario, suppose that we have a pre recorded music track that is played while the video is being shot. Normally when we cut from one camera angle to another, both the audio and video are switched. However, when we set up our multicam, we can tell it to only use the audio from the pre recorded audio track, regardless of our cuts from one camera angle to another. When we cut from one camera angle to another, say lead singer to base player, only the video will be switched. When all the camera angles are synced together along with the audio track, if several of the band members are singing, when we cut between them, their lips will be in sync with the audio track. Now, if we were shooting a live musical event with multiple cameras and one of the cameras was recording the 'house audio feed', we can set up our multicam to lock down the 'house' audio so that only the 'house audio' is used throughout and cuts will switch only the video from one camera angle to another.
Learning Multicam
I learned much about Multicam from the Ripple Training's Multicam Editing in Final Cut Pro X Tutorial by Mark Spencer. The FCP X Multicam feature is extremely powerful, offering a number of different ways to sync and work with multicam clips. The Ripple Training tutorial goes into Multicam in great depth and it is based on a real music video shoot featuring the band 'Tiny Little Blackouts' using 5 different cameras. An iPad app called "Movie Slate" was used in lieu of a traditional physical slate. One benefit of this iPad slate was that audio from the bands' click track could be fed to the speakers for the Band to lip sync to. The audio track also contained a series of audio "beeps" recorded at the start of the song that Final Cut Pro can use for synchronization. An audio file that starts with audio cues is often called a 'click track', in my example for this article, the click track is called 'Heaven B Click T'. All of the five camera angles have recorded both 'clap stick' audio and 'click track' audio, so we have two very distinguishable audio waveforms in each clip. One of the more common ways to sync clips for a multicam clip is by using audio, so common, in fact, that the Multicam feature defaults to audio sync right out of the box. For this article, I'll be working with the media that is supplied along with the Multicam tutorial from Ripple Training. What I want to do is to walk you through a very basic multicam scenario using audio for clip syncing.
Creating a Multicam Clip
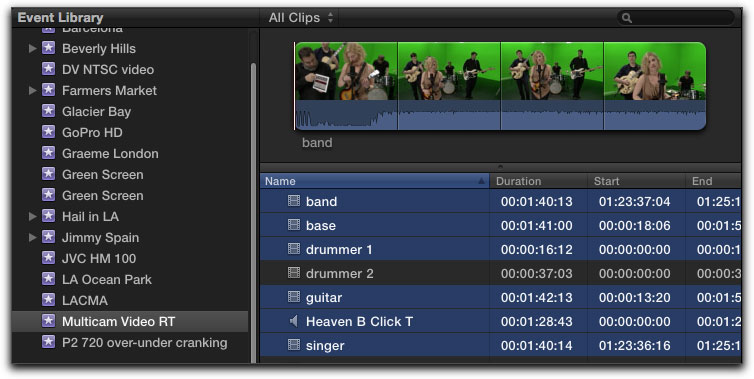
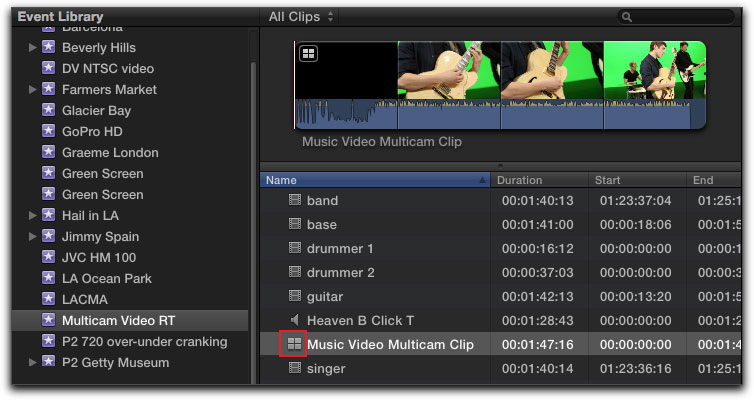
As shown below, I have imported all of the different camera angles and the audio clip into the 'Mulitcam Video RT' Event.

Next we need to create a multicam clip. In the Clip Browser, which Apple calls the Event Browser, I have selected six clips, band, base, drummer 1, guitar, singer and the audio track.
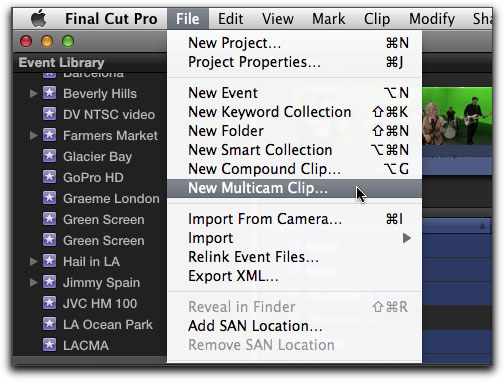
With all the clips that I want to use in my multicam clip selected, from the File Menu > New Multicam Clip.
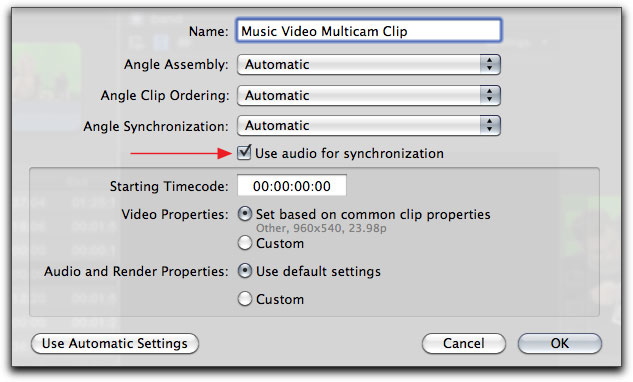
You will be presented with the Multiclip dialog box. I have given my Mulitcam clip a name but have left all other settings at their default. Be sure that the 'Use audio for synchronization' box is checked.
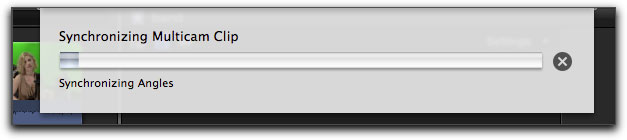
When you click 'Okay', FCP will run a synchronizing process. In this case, it is looking for matching waveforms in each clip and will then sync all of the clips based on its analysis. There will be a progress bar, this process can take a few minutes.
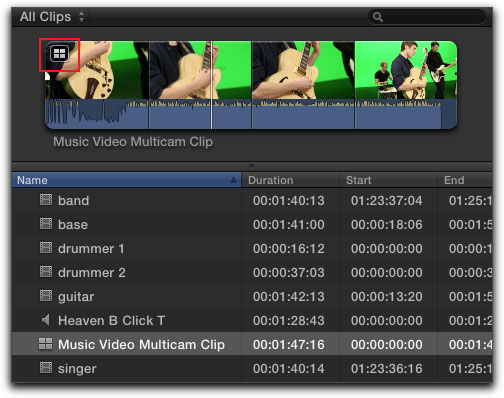
When the syncing process has completed, there will be a new Multicam clip in the Clip Browser. The Mulitcam clip is denoted by an icon with 4 small gray squares (red box below). The Multicam clip is a new clip and is independent from the original clips that were used to make the multicam clip. Making changes to or even deleting the multicam clip will have no effect on the source clips.
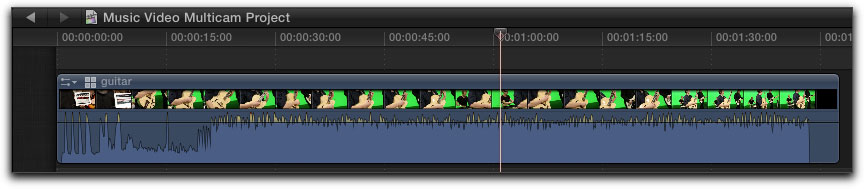
Multicam Project
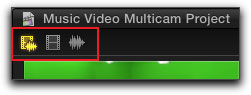
Now that we have our multicam clip we need to open a new project. In the Project library, click on the '+' sign at the bottom left of the Project library window, red box below.

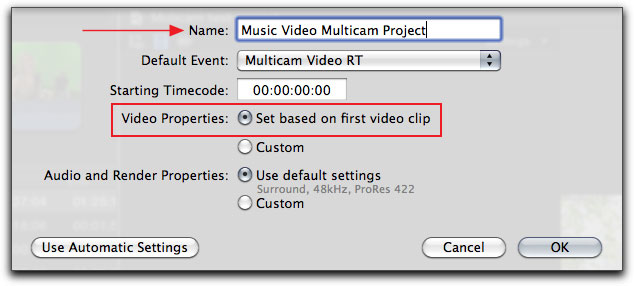
Give your new project a name. A Multicam Clip can contain video, audio, graphics as well as clips of different frame sizes, frame rates and codecs. The video that I'm working with is all of the same format and codec as it was transcoded to Apple ProRes Proxy for the Ripple tutorial. So in the new Project window I have selected 'Video Properties - 'Set based on first video clip'.
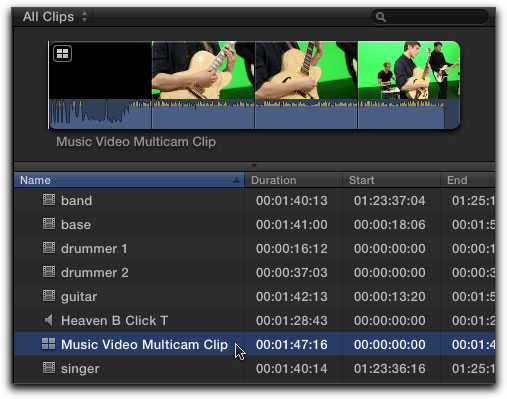
Select the Multicam clip in the Clip Browser.
From the keyboard, hit the E key (Append to Storyline) or drag the multicam clip down into your new project. Note that because I set 'Video Properties - 'Set based on first video clip' in the new project window, and because all of my clips are the same format, there is no render bar in the timeline.
Sync by Audio
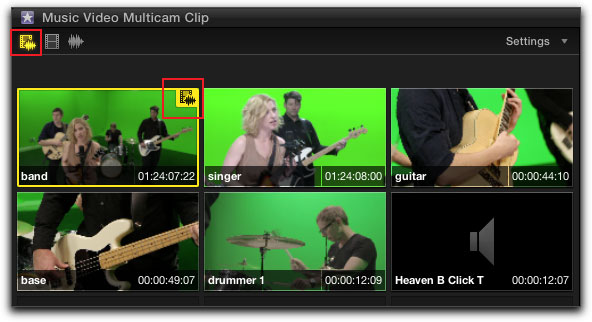
Before we start to cut our multicam clip, lets check out what FCP did to sync our clips using audio waveforms. With our multicam clip selected in the Clip Browser, at the top of the window, the multicam clip is displayed. Double click on the multicam icon, (red box below).
This will open up a new window in the timeline called the 'Angle Editor'. The Angle Editor is used primarily to check the synchronization of your camera angles and make adjustments if necessary. In the timeline shown below, you can see that in the Angle Editor, all of the discrete clips are displayed separately. This process is similar to working with a Compound clip. At the far right of each clip, red box below, are handles that you can click on and drag a clip up or down to change the Angle order. If you change the order of a clip in the Angle Editor, the new order will be reflected in the Angle Viewer, which we will look at later. To close or collapse the multicam clip in the timeline, click on the left facing triangle, called the 'Go back in History' button, top left of the timeline window, yellow box below.

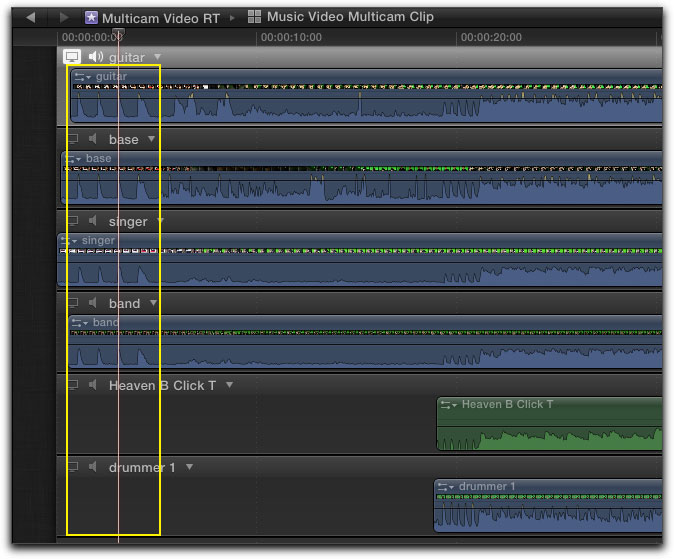
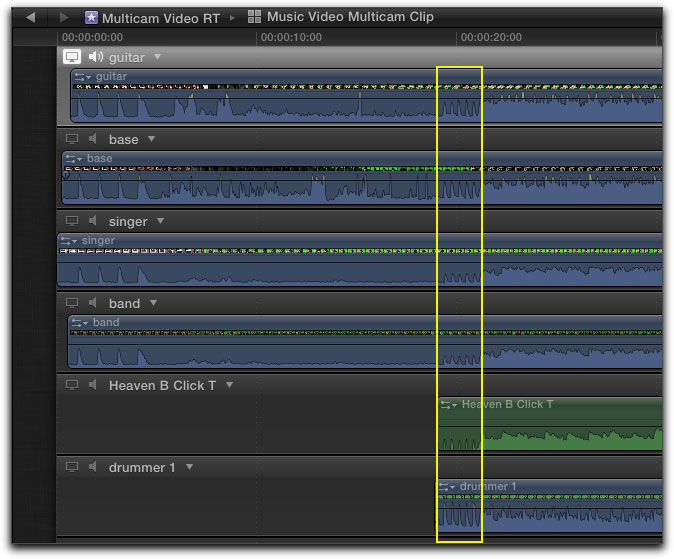
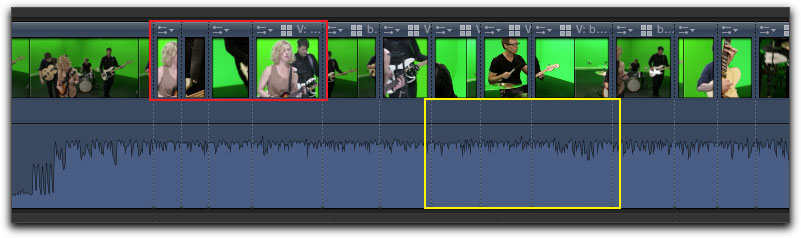
I mentioned that the video clips were recorded with both clap stick audio (4 beeps) and audio from the click track from the house audio. Below, yellow box, you can see the 4 beep audio waveforms from the clap stick. I have placed the playhead on the third beep of the top track and you can see that all of the beep waveforms are synced together. The last two angles (tracks) show no clap stick beeps. The 'Heaven B Click Track' is the pre recorded audio that the band plays to, so it has no clap stick. Audio only angles are green in color. The bottom angle, 'drummer 1', was started later in time and missed recording the clap stick beeps.
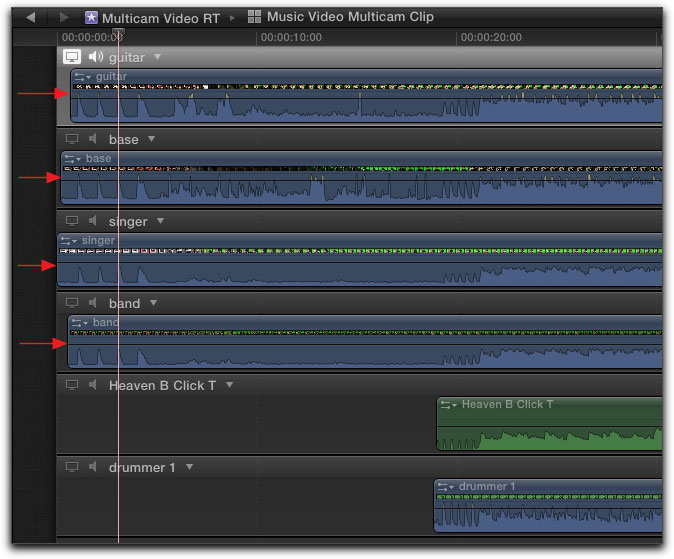
Looking below, you can see that the first four angles are synced via the clap stick beeps, even though each of the four different cameras started recording at slightly different times, red arrows below.
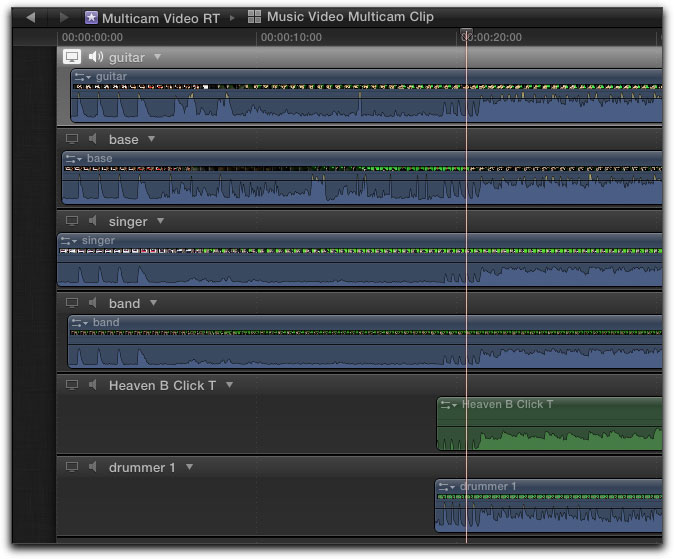
I did mention that the new Multicam feature in FCP is very powerful and here is an example of what it can do. While it was able to sync the first four camera angles using the clap stick audio beeps, the last two angles have no clap stick beeps, so FCP moved on, found that all of the angles have the click track audio waveforms and used those audio waveforms to sync all of the angles, yellow box below.
As shown below, I have placed the playhead on the third click of the click track, all of the angles are now synced.
You can use 'command +' to zoom in on the timeline to further check for exact sync. If a camera angle is slightly out of sync, you can select the angle in the Angle Editor and then, from the keyboard, use the ', or .' keys to nudge the track left or right. Should you have any camera angles that have unwanted long lead ins, you can trim the start of the camera angle. Select the camera angle in the Angle Editor and place your playhead where you want to trim and from the keyboard, 'Option - right bracket ( [ ). Click on the left facing triangle, upper left in the timeline to close the Angle Editor and return to the timeline.
Angle Viewer
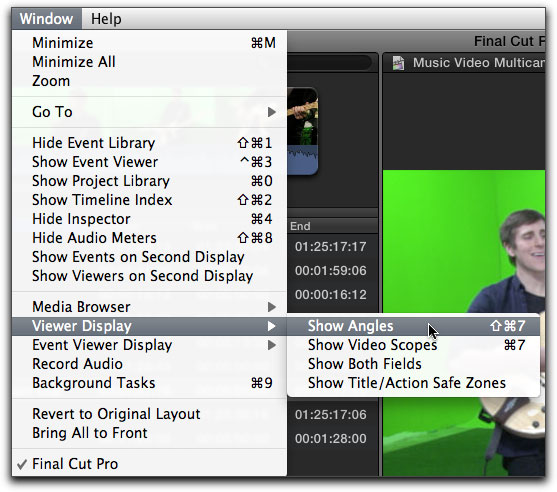
The Multicam feature in FCP X utilizes two special windows. The Angle Editor which opens in the timeline (shown above) and the Angle Viewer which opens in a window to the left of the Viewer window. First, make your timeline active. From the Window menu, select 'Viewer Display' and slide over to 'Show Angles'. To close the Angle Viewer window, from the Window menu > 'Viewer Display' >' Hide Angles'.
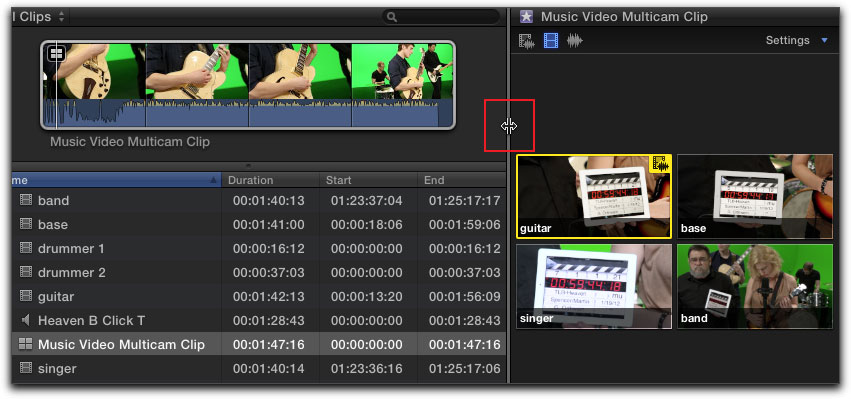
When the Angle Viewer window, red box below, opens up it can be rather small and difficult to see each camera angle well.
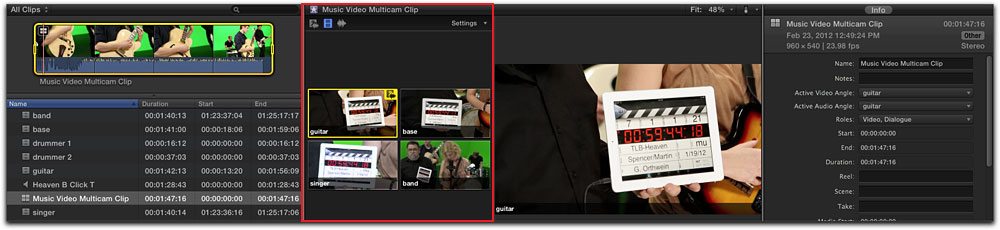
We can change things to facilitate working with the Angle Viewer. First, close the Inspector window. Next, you can adjust the width of the Angle Viewer by placing your cursor on the border line between the Clip Browser and Angle Viewer where it will turn into a 'left-right' facing arrow (below red box), drag to make the Angles Viewer larger and decrease the size of the Clip Browser window.
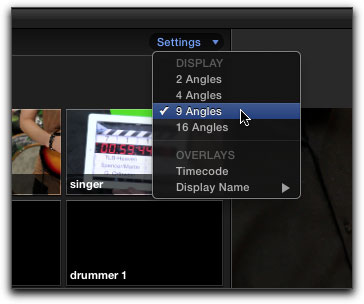
As shown above, while we have 6 different angles, only four are showing up in the Angle Editor. Click on the 'Settings' drop down menu and select 9 angles, now all of our angles will show in the Angle Editor.
I have adjusted the width of the windows so that the Angle Editor and the Viewer windows are of good size. When we have our windows layout the way that we want, it would be helpful if we could save our Multicam window layout for future use, but alas, we can't. I also went back into the Angle Editor (in the timeline) and rearranged the order of the camera angles so that they lay out in a more logical order in the Angle Viewer window.
With Multicam we have two different modes that we can work in.
When playing back from the Clip Browser, if we place our cursor onto an angle, it turns into a hand icon. You might call this the 'practice' mode. As the multicam clip plays, clicking on different angles with the hand icon will switch between the angles but it will not make any cuts. Use this mode to test out some of your angle switching. The active angle in the Angle Viewer window will have a colored border around it. Note that when in this mode, each time you switch angles, there will be a pause in the playback. (This will not be an issue when we are actually cutting our multicam clip.)
The other mode of working with Multicam is when the timeline is active. When you place the cursor onto a clip in the Angle Viewer, it will turn into a razor blade. This is the mode that is used to actually cut the multicam clip and when in this mode, the cuts are instantaneous.
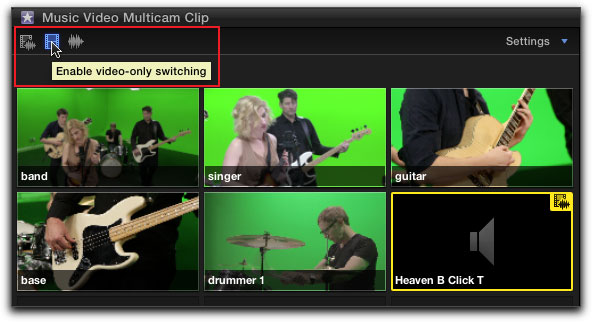
There are three icons, top left of the Angle Viewer window (red box below), that allow us to choose three different options for cutting audio and cutting video.
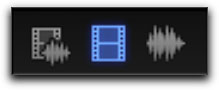
The icon on the far left, a film strip and a waveform, 'Enable video and audio switching', is used when you want to cut both audio and video from one camera angle to another. The middle icon, a film strip only, 'Enable video switching only' is used when you want the audio from one track to play continuously, all cuts will be video only. The last icon, a waveform, 'Enable audio switching only', is used when you want to cut audio from one angle to another but not cut video.
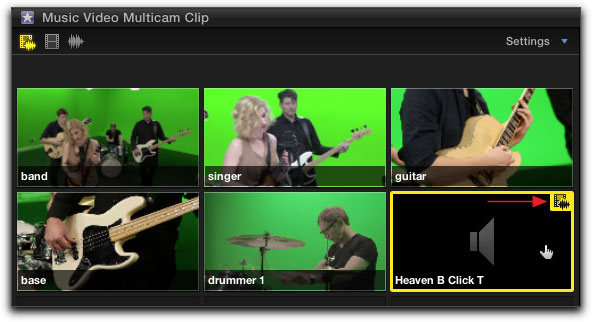
In our example music video we have an audio track, 'Heaven B Click T', that we want to play continuously. When the Angle Viewer is first opened, it defaults to 'Enable video and audio switching', the film and audio waveform icon (red boxes below), we will need to set it to 'Enable video switching only', the film strip icon in the middle.
I like to do the following process from the Clip Browser, because when I click around, I'm switching and not cutting. In the Angle Viewer, place the hand icon on the 'Heaven B Click T' audio track.

Click on the audio track, it will show the yellow 'Enable video and audio switching' icon, which is the default.
With the audio track selected, click on the blue filmstrip, 'Enable video switching only', icon.
Note that even though we have selected the filmstrip, 'Enable video switching only', icon, the audio track still shows the yellow 'Enable video and audio switching' icon. This is okay as the Event Viewer needs to 'refresh'.

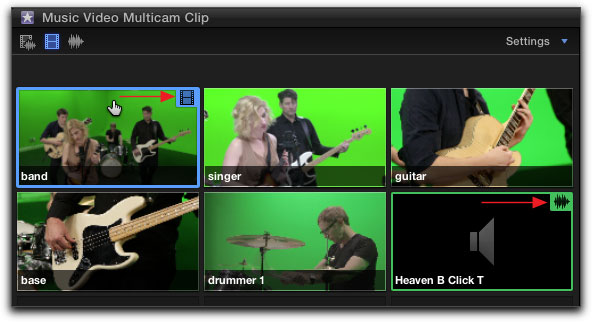
Click on any camera angle, you will now see that the camera angle that you selected shows the blue film strip icon indicating that it will play video only. It also has a blue border, a border around an angle indicates an active angle. Note that the audio click track now has the waveform icon with a green border, the border shows that the audio track is an active angle as well. So we have two active angles, the blue angle is video only and the green angle is audio only.
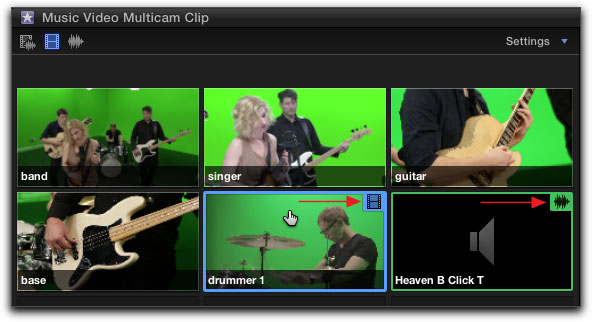
Click on any other camera angle to select. It will now show the blue film icon, the audio track remains selected regardless of which camera angle is selected.
Cutting the Multicam clip
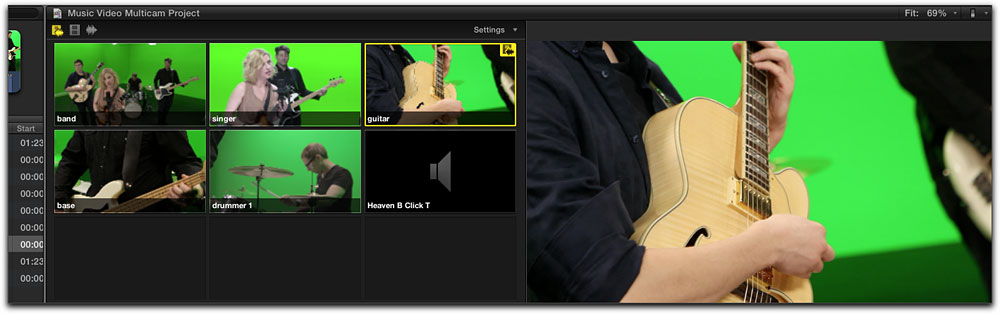
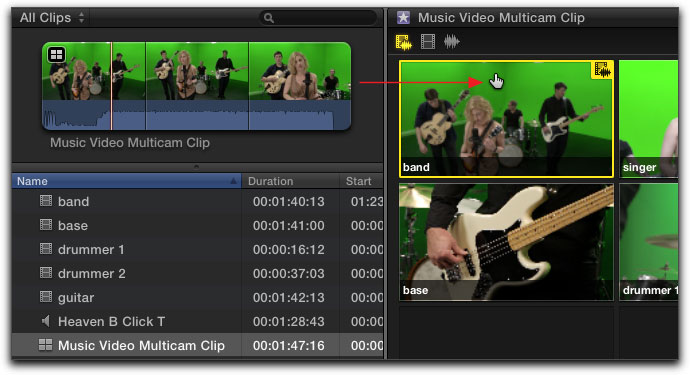
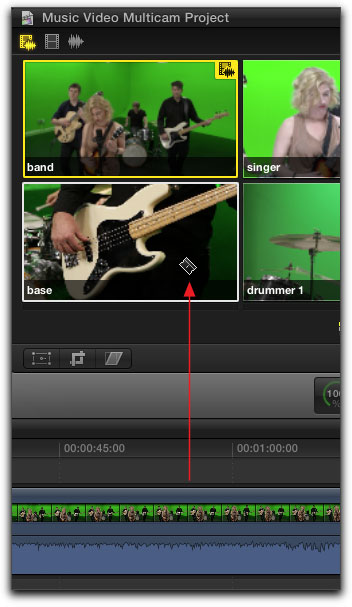
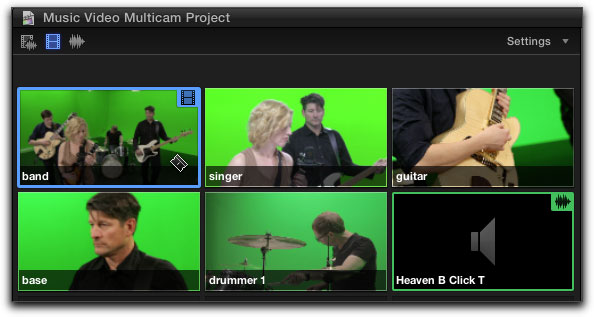
We are now ready to begin cutting our multicam clip. In the timeline, move the playhead to the beginning of the multicam clip, and with the timeline active, move the cursor into the Angle Viewer where it will turn into a razor blade. Select the camera angle that you want to use to start the music video. In this case I have selected the 'band' camera angle for my opening.
Hit the space bar to start playback and then click on the different camera angles with the razor blade in the Angle Viewer to make your cuts. Cut lines will appear on the multicam clip in the timeline as you switch from one angle to another. When you stop playback, thumbnails of the video will appear in the timeline. Looking at the timeline below, there are vertical dashes running between each cut. If the dashes are black in color, red box below, it means that there has been a cut from one angle to another. If the dashes are white in color, yellow box below, it means that no cuts have been made. This is how we set up the multicam clip, cuts between camera angles, but audio is 'locked' to play back from the audio track only.
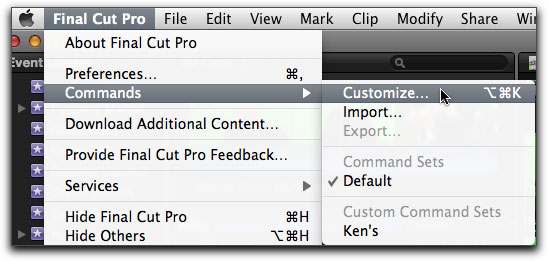
Aside from clicking with the razor blade in the Angle Viewer as the clip plays, we can also use either the numeric key pad if you have an extended keyboard, or use the numbers that run across the top of the keyboard to cut from one angle to another. If you attempt to use keyboard numbers to cut and this does not work, if you get a 'bonk' sound each time you hit a number, you'll need to check a FCP setting. From the FCP menu > Command > Customize.
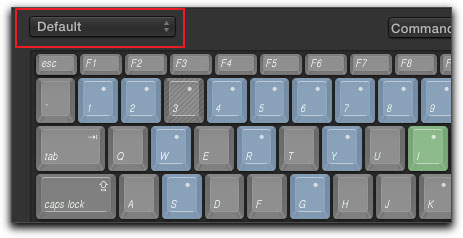
In the Command Editor window, upper left, be sure that this is set to default, red box below. Any other setting will disable the number keys for use with Multicam.
For some, playing back the Multicam clip in real time and making cuts may not offer the type of precision that you are looking for, things may move a little too quickly. You don't have to play the timeline to cut your multicam clip. You can manually move the playhead in the timeline to where you want to make a cut, click on the camera angle in the Angle Viewer with the razor blade, then move the playhead to the next position and make your next cut in the Angle Viewer, and so on.
After you have cut your multicam clip, you can tweak your cuts. Place your cursor on a cut between two camera angles and it will turn into the 'Roll' tool, red box below, this will enable you roll your cut point earlier or later in time.

Final Thoughts
If you have cut your multicam clip and want to start over there are two options. If possible, 'command z' from the keyboard to undo all of the cuts. If this is not possible, you'll have to delete the multicam clip from the timeline, reselect the multicam clip in the Clip Browser and 'E' from the keyboard to load it back into the timeline. There probably should be some type of command to 'remove through edits' from the multicam clip.
If you open the multicam in the Angle Editor, where all of the camera angles are shown as discrete tracks, you can apply filters or work with the clips just as you can with 'normal' clips on the timeline. You can add a clip into one of the camera angles in the Angle Editor, just select the clip in the Clip Browser and drag it onto the track you want.
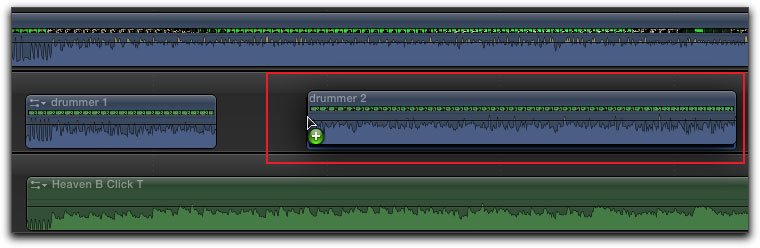
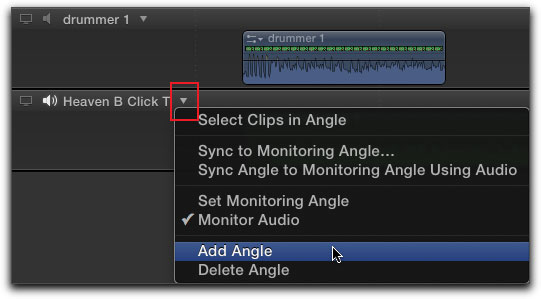
You can add angles to your multicam clip at any time. In the Angle Editor, click on the drop down triangle, red box below, and select 'Add Angle'. You can delete an angle from this menu as well. This will create a new empty track.
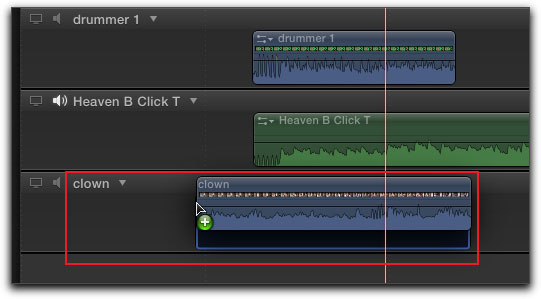
I have named the new track 'clown' and have dragged the clown clip into the track. As this clip has been added after the multicam sync process has been run, you'll have to sync the new clip (camera angle) manually.
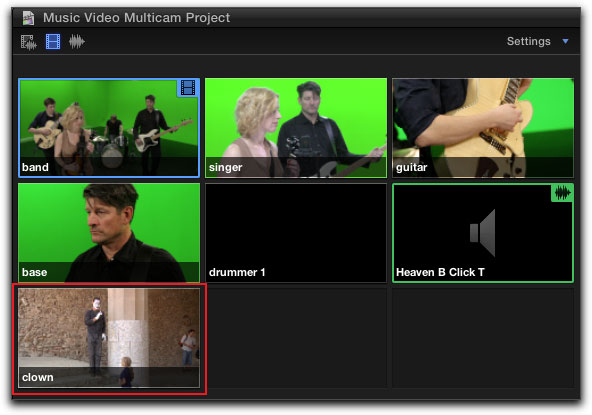
After adding a new camera angle in the Angle Editor, the angle now shows up in the Angle Viewer window.
One thing that seems to confuse people when setting up the camera angle cutting process, is which of the three icons you want to select to control the cutting of audio and or video. Multicam defaults to the first icon on the left, 'Enable video and audio switching'. When in this mode, when you cut, both the audio and video cut to the new camera angle. But often we want the audio to play from one camera angle or audio track only, we want to 'lock' down the audio to play from just that one source.
In the Angle Viewer, select the camera angle or audio track that you want to lock down the audio, and then, click on the blue film strip icon, 'Enable video switching only'. That's it. Now your audio will play from that one source and clicking on any other camera angles will cut the video only.
There can be times, when one of the cameras used in a multicam shoot, records the main audio. When setting up the multicam, in the Angle Viewer, select this camera angle and then click on the film strip icon, 'Enable video switching only' to lock in the audio. If doing a multicam shoot and the audio is recorded to an audio recorder, like the 'Zoom H4n, you will select the audio file in the Angle Viewer and then the film strip icon, to set its audio.
What I have tried to do in this article is to demonstrate a basic 'audio sync' multicam workflow, but muilticam in FCP 10.0.3 is much more sophisticated than what I have shown here. Aside from using audio to sync camera angles, you can also sync by timecode, content created, start of each clip, or marker. If you plan on doing a lot of work in multicam, and, remembering that this is a brand new feature, then I would suggest that you take a look at the Ripple Training's Multicam Editing in Final Cut Pro X by Mark Spencer. It starts with a real world music video shoot and then, while building the projects, works its way through all the multicam possibilities and workflows, to the finished project.
Enjoy,
--ken
copyright © www.kenstone.net 2012
are either registered trademarks or trademarks of Apple. Other company and product names may be trademarks of their respective owners.
All screen captures, images, and textual references are the property and trademark of their creators/owners/publishers.