June 22, 2011
Ripple Training - $39.00, 5 hour duration.
Available via download, Mac and iPad.
Tutorial Download 1.3 gigs, Tutorial Media 1.5 gigs
Review by Ken Stone
Normally before starting in on a review of a tutorial, the first question I ask myself is "who is this for?" The answer often varies, Beginner, Intermediate, or Advanced. But for long time FCP users, we are at a crossroads. Final Cut Pro X genesis' draws from both iMovie and legacy FCP, but make no mistake, FCP X is a brand new application. So, regardless of how many years experience one has with older versions of FCP or even a familiarity with iMovie, we have all become "Beginners". Everyone who plans on migrating to the new FCP X is going to need this tutorial. For those people who are not yet sure if they want to spend the $300 bucks on FCP X, or are just curious about it, watching this five hour FCP tutorial will answer any and all questions you might have, you'll know exactly what you want to do.
Steve Martin is our host for this 5 hour tutorial and like all Ripple Training tutorials, the quality and production values of this tutorial are 'top drawer'. All of the Projects and media used in the tutorial are supplied, so you can work through the lessons. The best way to first learn and then work in FCP X is to actually build projects, from start to finish, which is the method that Steve uses to teach us this new application. The tutorial is divided into 37 lessons, listed below, and as you can see, they do run the gamut.
|
|
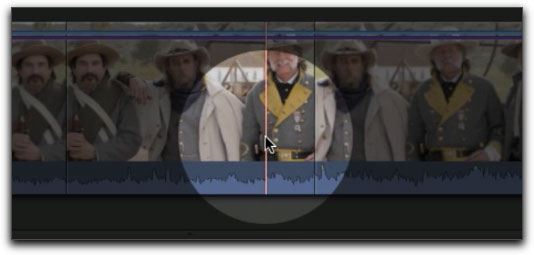
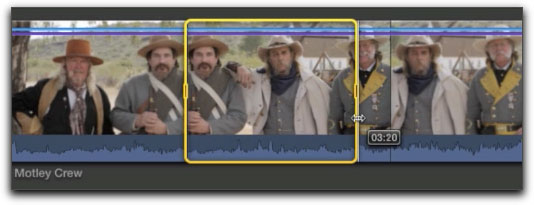
FCP X is a new paradigm and everything has changed, the interface is completely new. Steve takes us through the new interface, examining the relationships between the different windows and exploring all of the menu options. The tutorial works through the process of building a movie trailer of a Civil War documentary and as you work, you will learn the new interface. While there are new windows, menus, buttons and a tool bar, I promise you that by the time you finish with this tutorial, you'll know where everything is located and how to navigate through the interface.

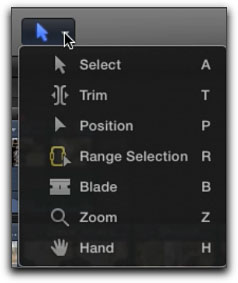
Many of the functions that we need to access are now found in the new 'Tool Bar'.

For example, clicking on the blue 'Arrow' icon provides access to a number of editing tools, many of which will look familiar and even use the same keyboard shortcuts that legacy FCP users are accustomed to.
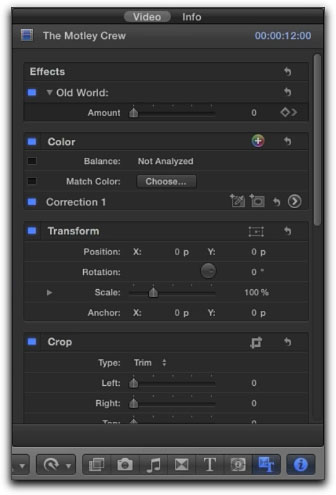
Another new interface element in FCP X is the 'Inspector' which some of us already have some experience with. The Inspector in FCP X is contextual, by that I mean that it is aware of what you are doing and will provide information and control over the task that you are working on. Additionally, the Inspector replaces the tabs found in the Viewer window (Audio, Filters and Motion tabs) of legacy versions of FCP. The Inspector becomes the workplace for adjusting Filters, Transitions Generators and just about everything else.
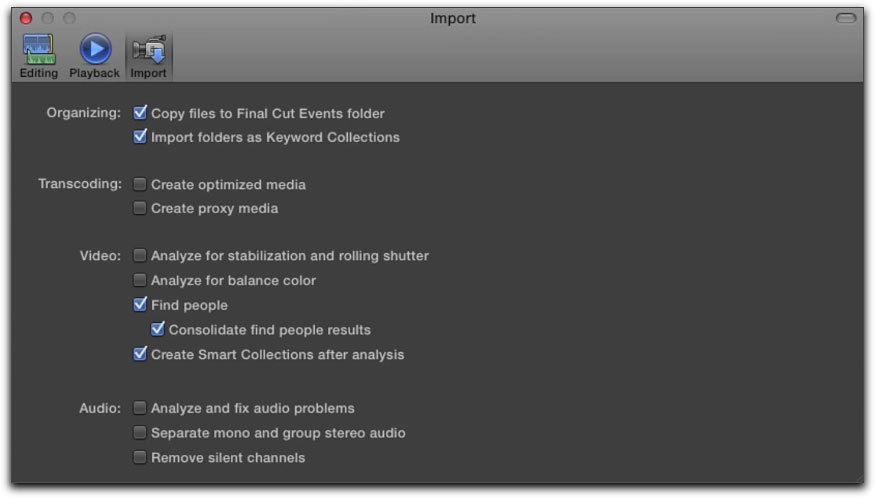
The lessons on Importing covers the Organizing, Optimizing and Analyzing of your media. Everything in FCP X is so very different from legacy FCP and this becomes very obvious the first time you open the FCP Preferences. Gone are the User Preferences and System Settings, (Scratch Disk settings are nowhere to be found). Knowing and understanding how and where FCP X places your Projects and media is essential to getting off to a good start. Additionally, you can import video in its native format or have the video transcoded to ProRes 422 on import. Of equal importance is the ability to archive your media to a new FCP X feature called a 'Camera Archive' for back-up purposes. Also included in this lesson is how to import iMovie Projects and iMovie Event Libraries.
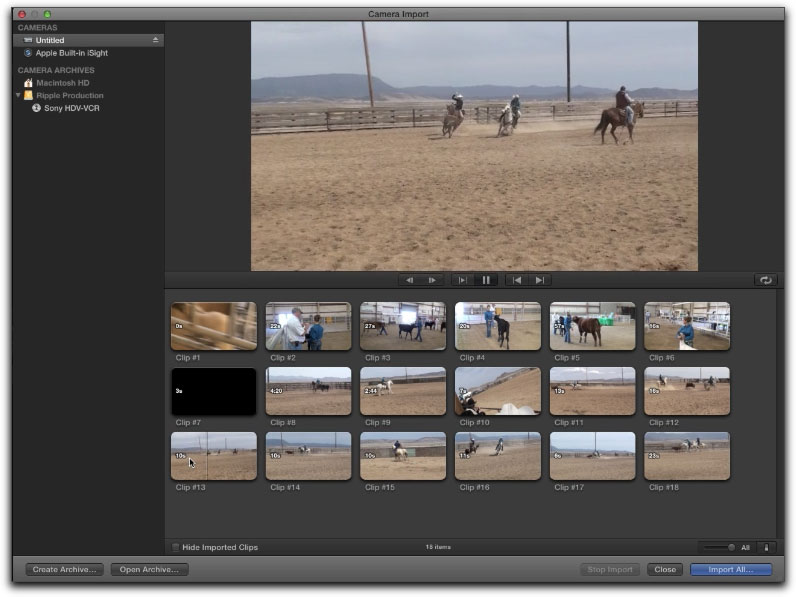
The lesson on Importing covers importing from a hard drive on your Mac (using the Finder), from memory cards (files based media) and also from tape cameras over Firewire (DV and HDV using a procedure akin to the legacy 'Capture Now'). The import process also controls where your media will live and how it is organized into Events and Smart Collections, media analysis and how 'Key Words' are applied to the incoming media. The video tape import widow is shown below.
One of the most important changes to the way we will work in FCP X is the 'Event Library' which replaces the Browser window in legacy versions of FCP. Not only is the 'Event Library' new, but the way that FCP X works with, organizes and rates your media is very different from what we have become accustom to. Events organizes and stores all media by creation date. It is essential that we understand this new workflow and Steve takes us through the Event Library explaining and demonstrating the process of import, organization and tagging as you move through the lesson. All elements of the Event Library are thoroughly covered and we learn how to set up the Event Library to suit our own workflow including working with the metadata associated with each clip.
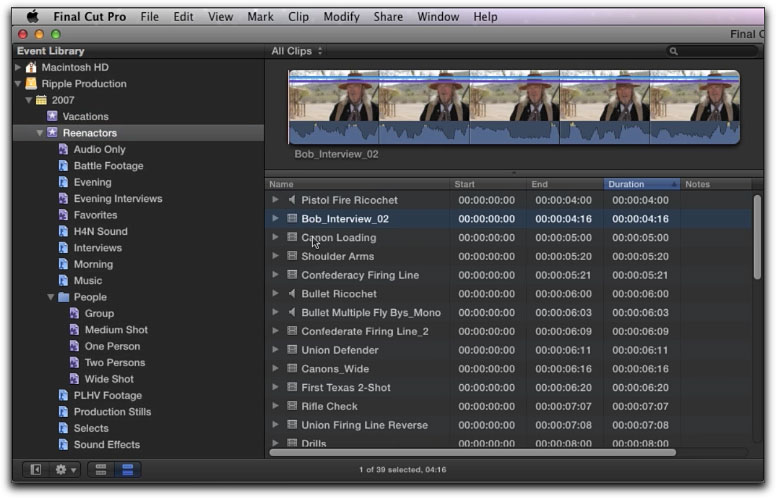
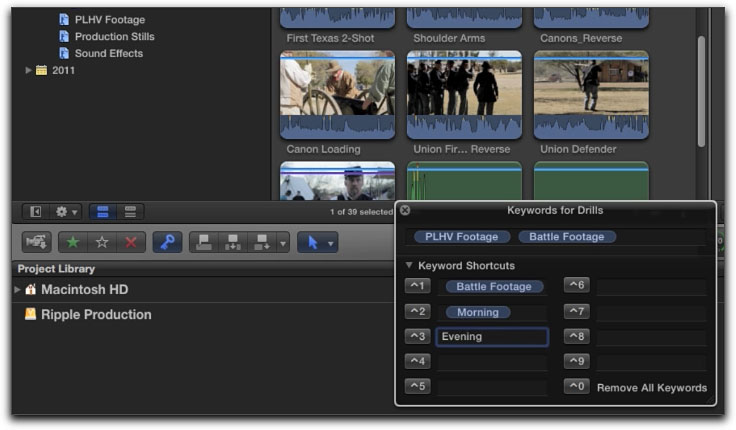
We are introduced to and learn how to use 'Key Words' which is the organizational tool that enables us to manage the vast amounts of media that we will be dealing with. We also learn how to Rate our clips and use the new 'Search' tools in FCP X to find and sort through our clips. Once you have a good understanding and are comfortable with the Event Library, the rest of working in FCP X will fall into place.
The first three sections of this tutorial, Exploring the Interface, Importing Media and Working in the Event Library are key elements in learning FCP X. It is imperative that you learn and understand these new ways of working with and organizing your media, this is the part of learning FCP X that has the steepest learning curve. Steve does an excellent job conveying this information to us. Watching him set up, organize and build Projects and working along with him, using the supplied media, will ground you in the new workflow that we all must learn.
Now, that we have worked through the importing and organizing of our media it's on to the fun stuff, actually working in the FCP timeline, time to learn how to edit in this new application.
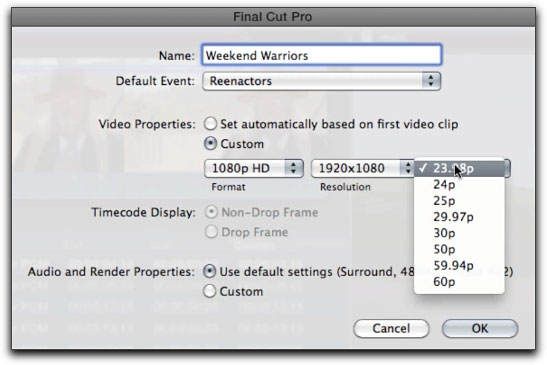
'Building a Rough Cut' starts with creating projects and working in the Project Library. The new Project window is very different from what we are used to, and yet it is strangely familiar. If you'll look at the window below, you'll see elements in the dialog box that remind us of both Easy Setups and Sequence settings. When creating a new project, not unlike in legacy FCP, there is 'Set automatically based on first video clip' but unlike legacy FCP, once set for a project, it can not be changed.
Projects in FCP X are different than projects in Legacy versions of FCP. In FCP X, projects have no sequences and all projects are always open so we need to learn how to manage them.
The tutorial moves on to working in the Viewer window and making selections from our clips. It is here that we are first introduced to the new 'Skimmer' tool and it's relationship to the Playhead. Using both the skimmer and playhead in conjunction with each other proves to be a new and powerful way of working. This relationship is explored throughout this tutorial and by the end of the tutorial we have a good working understanding of the 'Skimmer' and how to use it.
Setting the 'Selection Range' in a clip in the Viewer is the new way of setting In and Out points and there are a number of different ways to select the range of a clip. Good to know that we can still use 'i and o' from the keyboard to set In and Out points and the J-K-L keys still work.
Moving clips from the Viewer window to the timeline can still be done by 'drag and drop', but the Overlay window in the Canvas window in legacy FCP is gone, replaced by a cluster of three small icons in the new Tool bar that will perform the different types of edits; 'Connect the selected clip to the primary storyline', 'Insert the selected clip into the primary storyline', and 'Append the selected clip to the primary storyline'. As you can see, we are introduced to new terminology in video editing and even the term 'primary storyline' is new, but not to worry, all of this is clearly explained to us as we move through the tutorial.

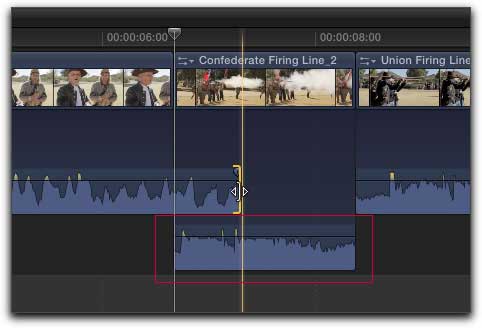
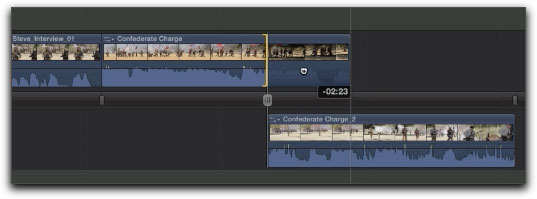
A primary storyline is shown below and it replaces the 'tracks' metaphor found in legacy versions of FCP. We are introduced to a brand new concept and new feature in FCP X called the 'Magnetic Timeline'. What the magnetic timeline does is prevent a 'clip collision', where a clip or clips in the timeline are prevented from being moved or trimmed by other clips. With the Magnetic timeline, no such collusions occur because the other clips automatically 'flow' out of the way to make room for the adjustment.
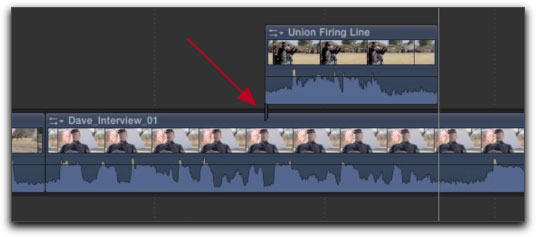
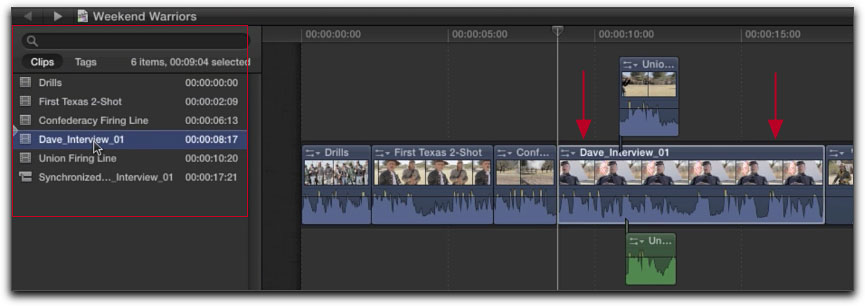
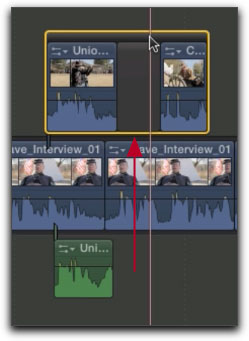
Another new term in FCP X is the 'Connected Clip'. A connected clip is like 'B' roll video which in legacy versions of FCP, would be placed in the video track (V2) above the main video track (V1). As there are no tracks in FCP X, a new metaphor is needed to attach the 'B' roll video to the primary storyline and it's called the 'Connected Clip'. As shown below, a clip (B roll) has been added or connected to the primary storyline clip. The red arrow below points to a small vertical line that denotes that this clip is a connected clip.
As the lessons progress and we build our project, refining our edit, we are introduced to powerful new tools and features of FCP X. A new feature called the Timeline Index provides us with a list of all the clips that make up our timeline and also provides a way to quickly locate any clip in our timeline. As shown below, clicking on a clip in the Clip Index automatically selects the clip in the timeline.
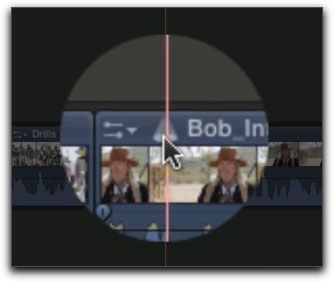
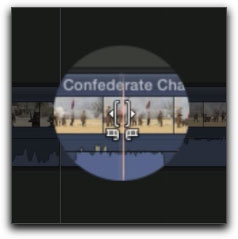
Adjusting the edit point between two clips on the timeline produces a two-up view in the Viewer window if you have "show detailed trimming feedback" enabled in your Editing Preferences.

3-point edits are easy to perform. Mark the range selection of your replacement clip in the Media Browser and drop it onto the clip in the timeline. A menu will appear giving you a choice of using either the starting or ending point of the clip on the timeline to execute your 3-point edit. You can work it the other way by setting only an In or Out point in the clip in the Viewer and then setting both an In and Out point in the timeline.
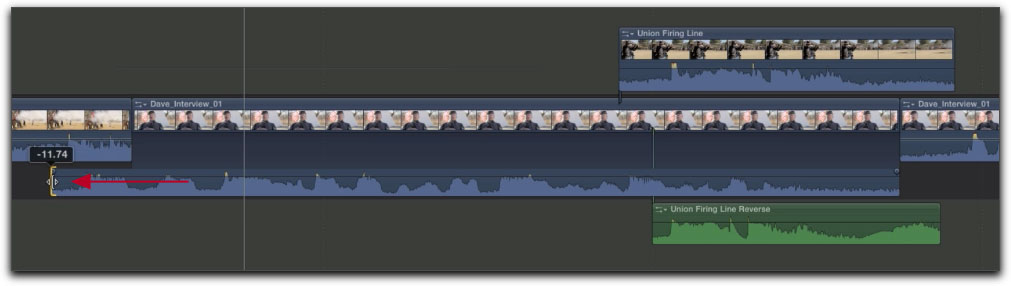
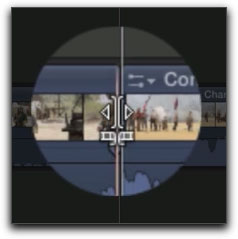
Even doing 'split edits' is easy in FCP X. Double click on the audio of a clip in the timeline and the audio will detach from the video and drop down in the timeline. Once the audio has been separated from the video it is easy to click on the end of either the audio or video and drag to perform the split edit.
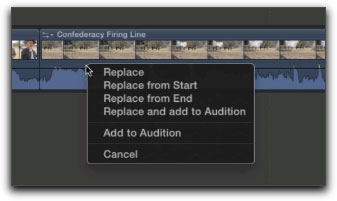
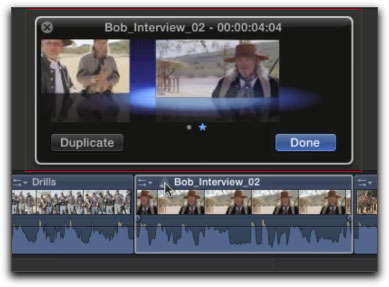
Another new feature in FCP X is the ability to audition alternative clips at a given point in your timeline. To audition a different clip, drag an alterate clip onto a selected clip in the timeline, a pop up window will appear, select 'Replace and add to Audition'. After doing this a new icon is placed at the top of the clip called the 'Spotlight Badge'.
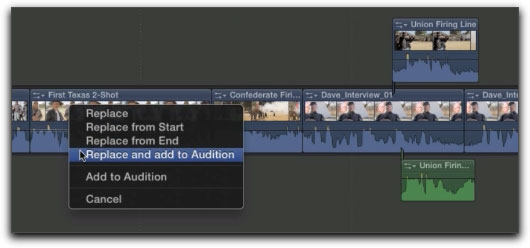
Click on the Spotlight Badge icon and the Audition clip container opens. Clicking on different clips in the audition clip container will play that clip in the timeline. You can add any number of different clips to your audition.
The tutorial then moves on to Trimming Tools. While accessed differently with different icons the traditional trim tools are still available and work as you would expect; Ripple, Roll, Slip and Slide.
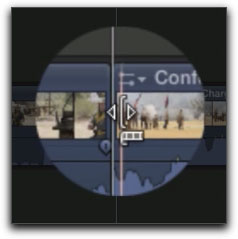
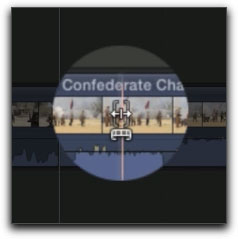
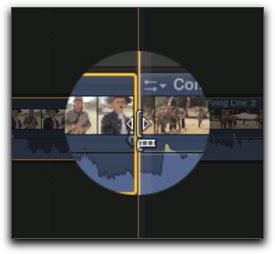
New in FCP X is the 'Precision Editor' and it is accessed by double clicking on an edit point. In the timeline the view changes and now shows both the out going clip and the incoming, split apart.
A lot has changed with the new FCP X timeline; gone are the traditional tracks, replaced with the new 'Storyline' metaphor. New to us is the 'Gap Clip' which has replaced the traditional slug, as well as methods for detaching the audio from the video and creating and working with Secondary Storylines (sometimes called Connected Storylines). As shown below, two Connected clips have been combined into a Secondary Storyline.
There are many powerful new features in FCP X. The project that you will build with this tutorial involves working with some 'dual audio'. The video comes from a DSLR and the audio from a secondary audio recorder. You will actually go through the process of syncing the secondary audio with the video, a process which is now very simple and straight forward. The new 'Match color' feature is used to ensure that all of the clips in your Storyline have the same color balance and contrast; is amazingly easy to use, and again, with this tutorial, you'll learn how to use this feature by matching the color of different clips in the project. This amazing feat is accomplished with just two clicks of the mouse.
Legacy FCP users may be surprised to discover that 'Nesting' is now gone and that it has been replaced with a new item called the 'Compound Clip'. I have never been a fan of Nesting so, for me, the Compound Clip is a welcomed new addition in FCP X, as it is much easier to work with than Nesting and has additional abilities. Working with Compound clips is well illustrated and demonstrated in this tutorial.
The tutorial then proceeds with lessons covering; Working with Sound and Enhancing, Retiming, Transitions and Effects, Transform Crop and Distort, Titles and Themes, Color Correcting and Sharing (exporting). I have to be careful here as I don't want this review to be longer than the tutorial itself. (g)
I have been a big fan of Steve Martins' tutorials over the years and have learned much of what I know about FCP and its attending suite of Apps from Ripple Training. This FCP X tutorial is probably one of Steves best. The tutorial is clearly written, the processes are explained and demonstrated in detail and we learn most of the new keyboard shortcuts (many of the keyboard shortcuts are exactly the same). Steve uses analogies to help us understand the many new workflows and by working along with Steve, building a complete project using the supplied media, we become both familiar and comfortable with this new app. In the iTunes player controls is a drop-down menu, so that we are able to select and go to specific parts of the tutorial for a quick review of a topic. A plus for those of us coming from legacy versions of FCP is that Steve often references those items in FCP X that have their origins in legacy versions of FCP and those new features that replace older processes like the Compound clip replacing the Nested clip. These references enhance the learning experience. Steves excitement and enthusiasm is contagious.
To be honest I thoroughly enjoyed being immersed in this tutorial. I discovered that FCP X is a very powerful editor and that much of what I know, what I have learned after using FCP for 10 years, is still applicable. To be sure, things are different and features are now found in different locations and menus, but with this tutorial you'll quickly learn your way around this new app. For anyone who is coming from legacy FCP, iMovie or even if you are brand new to video editing, this tutorial is the best way to learn FCP X and the price of $39.00 is most reasonable.
Enjoy,
--ken
copyright © www.kenstone.net 2011
are either registered trademarks or trademarks of Apple. Other company and product names may be trademarks of their respective owners.
All screen captures, images, and textual references are the property and trademark of their creators/owners/publishers.