
How To Feburary 7, 2001
How To Feburary 7, 2001
Feel the Burn:
Creating Maintenance and System Disk Image CDs
by Charles Roberts
This article discusses the process of creating a bootable system maintenance CD and the creation and back up of a disk image of your perfect FCP start up drive. With such CDs, you can periodically correct minor problems on your system, or if need be, completely re-install it with no muss or fuss...
You're going to wonder how you got along without this when you realize how valuable it is and how easy it makes your life. For very little money, you can make your editing system bullet-proof against sudden data loss, viral attack and the sort of disk troubles that only come once in a blue moon, but which can make your life hell for that short period.
First thing is attitude. The Macintosh is not a magic box. It does not run itself (except maybe into the ground). It is like a child prodigy; if you take care of it and provide it the things it needs (even when it doesn't ask for them), you will be regarded with envy by the folks who are plagued by unstable machines. But if you ignore your Mac and just hit 'OK' when it is showing signs of trouble, you are going to end up with a problem child. Do not be negligent.
This does not mean spend the rest of your life rebuilding the desktop. You are not sending your prodigy to military school. But you need to regularly perform little maintenance tasks that keep the system free of Ôtrouble before it becomes trouble'. System maintenance is covered more thoroughly in another little article, but here we will investigate the rationale and creation of the Boot CD. No other tool is as singularly valuable as this, and no other backup method is more reliable, cheap or easy.
Why a Boot CD? Well, there are a couple of reasons, one being a maintenance issue and one being simply a backup/cleanup/configuration issue. Let's talk first about the maintenance.
Your Mac is a combination of disk drives, motherboard/processors, in/out cards and other stuff. We know that our system is further divided into hardware and software. Failure of hardware is fairly rare, but corruption of software is a pretty common phenomenon. From data copying problems to viral infection, there are numerous ways for your OS to get screwed up. Luckily, there are ways of correcting these screw-ups before they become serious problems. This is where regular maintenance comes in.
You should be performing regular maintenance on your system. It may not need to be cleaned every week, but if doing it quickly once a week makes you do it regularly, then that's not too frequent. The idea is to catch trouble before it happens. Like I said, specifics of the maintenance thing are covered elsewhere. But here's where the Boot CD comes in.
Some problems may be encountered that are only correctable if you are booted from a different disk than where the problem is. In other words, if you only have one System Folder (which is what you boot from) and there is a problem with it, you might not be able to fix the problem. It's kind of like trying to scratch your hand with the same itchy hand. A drive can't correct itself in a lot of cases. So you need to boot up from another partition or drive and correct the trouble from there.
Now, there's a lot to be said for having your internal drive partitioned into several partitions, and then having a different System Folder on each partition. In fact, I have that same set-up on my editor. But I use that multi-partition arrangement for different extension sets, not for maintenance. Maintenance is best conducted from a locked volume that can't be corrupted. Like a Boot CD, for instance.
One reason is paranoia about viral infection. Viruses generally can infect ANY mounted volumes when they enter a system. That means that any other partitions you have would get infected if you got a virus. Macintosh viruses are rare, but they do exist. Since a CD is a locked volume, or can't be written to, it makes a very safe Boot partition if you need to do maintenance.
Some will say, "Why not use Extension Manager instead of different partitions for extension sets?" That's tricky, but it has been my long experience that Extension Manager gets confusing and complicated way too easily. If you are constantly installing and updating your extension sets, invariably you're going to screw up by not updating it one day. Also, I find that if you HAVE to organize your system manually between an 'Extensions' folder and an 'Extensions (disabled)' folder, you will always know what is loaded up. Know your machine; never work in the dark.
Either using Extension Manager or the hallowed system of disabling extensions, you will need a way of Booting up another partition if you have to fix something. The Boot CD is the way. Simply pop it in right after the "Bong" and hold down the "C" key. It will mount the CD and then you can perform your maintenance.
Another reason for this is the convenience of backup/cleanup/configuration that it will afford you. Chances are, especially if you are new to FCP, Macs or editing, you ran into some rocky terrain when configuring your FCP system. Once you finally get the system in order and running smoothly, wouldn't it be great if you could just take a snapshot of it? Then if you ever ran into trouble, you could just restore the thing to the way you had it perfect (not the way the VAR had it, which might not be tooled the way you want). That way you could eliminate the possibility of software trouble altogether by simply re-installing instead of spending hours rooting out the one problematic file.
Well, it's easier than you think. And there are further bonuses. Some maniacs (like Ralph Fairweather, for instance, if his name carries any weight for you) advocate wiping your entire system totally clean at the end of each project so that every project is a totally clean slate. I advocate this where it is possible. Now, those of you who took two months to get their system in order may be shaking in your boots right now, but there's no reason to. It's so easy it hurts.
Once your system is JUST how you want it, you run maintenance and virus software really quickly to make sure that its totally clean. Then you burn a CD that has a disk image of this perfect System Folder. If you have room on this same CD, you can include a disk image of all the applications configured the way you want them, as well. Since most CDs only handle 650 mbs, this can get kind of tight, so you may just have a second and third CD for your application files. Once you've wiped the drive and copied over the perfect System Folder, you can reboot to that partition and then copy all your application stuff from the other CDs.
It's painless, foolproof and it is only as slow as your system's CDROM drive. If you are tired of the big mess on your system, you may want to consider this procedure at the next juncture between projects.
1. Boot from an installer CD, wipe drive and reinstall everything you have and want. Since this is your editing system, you'd be best advised to leave off the Microsoft Word, etc.
2. If this is your only machine, then maybe you should partition your drive and set-up a Boot partition for internet/word processing and another Boot partition for editing. Keep'em separate and you'll have less trouble with unruly extension sets. Just remember when you do this that if you install an application to a partition, that partition's System Folder must be active. In other words, if you have an internet/word processing partition and an editing partition, if you want to install MS Word, you need to boot up the I/WP partition so that it can put the extensions in the proper System Folder.
3. Through one of the various methods described next, burn a Boot CD that has all this material on it. If you are making Maintenance CD, you need merely include a Bootable System Folder and the various maintenance applications, like Norton Disk Doctor, Tech Tool Pro, etc. If you are creating the back up of your system, you can simply create a Disk Image of what you want to copy, then burn that.
There is no 4. It's that easy.
There are a lot of burners on the market and it's beyond the scope of this article to describe the differences between them. The is a host of great information, both about CD burning in general and about burner models in particular at http://fadden.com/cdrfaq/. Check that out for specifics.
Leaving aside DVDRAM burners and such, let's talk about your options. There are three main types of connectivity for modern CD burners. There is SCSI, USB and Firewire. While there are no obvious benefits to any of the three, there are more appropriate choices for your system and your technical expertise.
SCSI is a mostly legacy format that some of you may not be familiar with, since it is not built into the Macintosh anymore and must be included via a PCI expansion card. There are various speeds for SCSI and various cable standards. If you don't own an older Macintosh that has SCSI built into the system (and if you don't know the ins and outs of configuring SCSI chains) you may want to leave this option alone. SCSI burners used to be cheaper, but that was before the USB and Firewire market really kicked in (and before Adaptec Toast began supporting USB and Firewire). Now the market is pretty level, and a nice fast Firewire drive can be had for around the same price as SCSI or USB. It should also be noted that some (not all, but some) SCSI expansion cards are not bootable, meaning drives on the SCSI chain, whether CD burner or hard drive, can not be used as a start up drive. This is usually a nasty surprise for the buyer, since card manufacturers rarely advertise this shortcoming in bold letters.
USB, or Universal Serial Bus, is a newer standard of connectivity for the Macintosh. It replaces the old Serial Port connections, enabling printers, scanners, floppy's, Zips and burners. USB is a slower protocol and may require a hub, since the native USB ports on your system also have to service the mouse/keyboard and possibly speakers.
The Cadillac of connectivity these days is Firewire. Firewire is a high-speed connection mostly dedicated to uses that involve large data sizes like video, scanning, etc. Firewire burners that I have had experience with are blazingly fast and a pleasure to use. Since the price has dropped on them recently, and since Toast now actually supports many Firewire burners, this is really a fantastic way to go.
No matter which one you choose, you will also need software to burn with. Many CD Burners come bundled with Adaptec Toast. I will be giving the Toast CD Burning method below. Toast is a tried and true, easy-to-use burning application that I have been working with for years. It's really straightforward and has an enormous user-base that is reassuring. If there's a problem with a version of Toast, you'll know it before you install it. There were a lot of problems with Toast's upgrade from 3.x to 4.x, although it seems that most of these have been worked out. Make sure that if you go this route, you get the most recent updates to Toast and check www.versiontracker.com, www.macfixit.com. and www.macintouch.com for recent patches/issues.
There is a more important issue about the bundled version of Toast that comes with burners. There used to be one version of Toast. It could make any kind of CD in any way you could think of. For some reason, Adaptec felt that they were giving away too much of a good thing, so with the 4.0 upgrade they released a Standard and Deluxe version of the software. The Standard version only allows three types of CD to be burned. These are the Audio CD, Copy Volume and ISO 9600. This is kind of pathetic, considering the flexibility of what Toast OEM used to provide.
My suggestion? Go ahead and drop the dime and get Toast Deluxe when you buy the burner. The options available with the full version are well worth the 89 bucks Adaptec is charging for it. Why they want to charge for it is beyond me, but there it is. The instructions I'll give below sort of depend on the full version anyway, so think about it.
Also, Toast can use as much RAM as you can give it. It writes faster by loading up the data into RAM and then writing to the CD from there. Allocate lots of RAM to Toast and set it's RAM buffer high and you will experience creating fewer coasters.
If you will be creating a Maintenance Boot CD, you need to burn a partition onto the CD that your Mac can boot up from. BEWARE: many of the newer Macs (essentially post-Yikes board) require a special ROM file to be in the System Folder of any Boot partition to work. Thus Norton, Tech Tool Pro and other commercially prepared Boot maintenance CDs cannot boot up many Macs. Before you burn a copy of a Boot partition, make sure that it will actually boot up your Mac. An easy way to do this is to simply copy your OS installer CD as the Boot partition. This takes up a lot of the CDs space, but the maintenance stuff you will include is really small, so it's not a bad fit.
You can create your own special Boot System Folder and use this instead if you want, using the techniques described below for the disk image, as long as you include that all-important ROM file in the Boot Folder. Also remember that when you burn a Boot CD, it will only be bootable 1) if it is the first thing burned on the CD and 2) if you tell Toast to make the CD bootable. Otherwise you are making uninteresting data CDs.
Pop the OS installer CD into the regular CD on your Mac. Pop a blank CD into the burner.
|
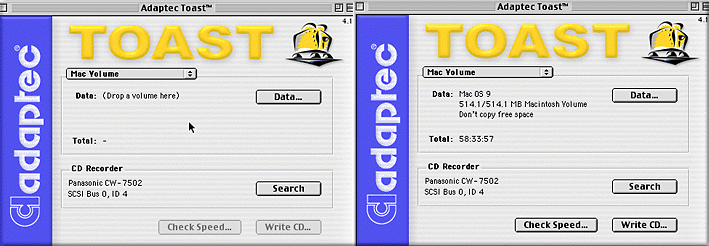
Start up Toast.
In the Window that pops up, select "Mac Volume"
Drag the OS installer CD icon into the window and drop it. The window will reveal the specs on the CD you are copying.
|
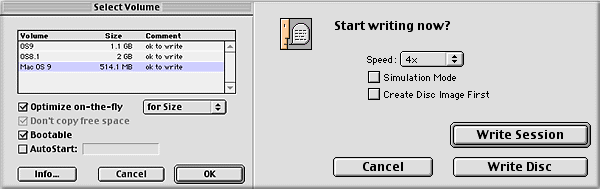
There should be a DATA button in the window. Click this to configure how Toast sets up the CD. You should select the OS installer as the volume to copy, set 'Optimize on the Fly' for size and enable the 'Bootable' box. Click OK.
You should have returned to the first window. Hit 'Write CD.'
After a moment, you will go to a final box where you must select either, 'Write Session' or 'Write Disk'. Choosing Session will allow you to write another partition using the space left over after you write the first (if the OS installer is only 550 mbs, you'll still have around 100 left for the maintenance applications). Choosing 'Disk' will seal off the rest of the CD so that nothing else can be written to it. What a waste of storage. Always choose 'Session' unless you have a very good reason.
Let it burn the CD and then when finished, hit Verify. Always verify a disk after burning. CDs are not perfect and a certain number of writing errors is inevitable. Check the CD after burning it. Then, immediately check to make sure that your machine will boot from it by rebooting and holding down the 'C' key.
Now that you have a bootable CD, let's take the remainder of the space and create a Maintenance partition that just has lots of good diagnostic and repair tools. Mine has everything from Norton and the pay-to-use bunch to the free stuff from Apple and a lot of valuable shareware and freeware applications. Most are very small, so you can get nearly every conceivable tool on there with space left over for Virus Definition Updates whenever you need them.
Now there are a few different ways of doing this second partition, none of which are especially easier or faster. I choose this method because it is a little safer in terms of generating bad CDs. This is less of an issue these days because data speeds are generally higher than when I began doing these things, but it doesn't hurt to be cautious.
|
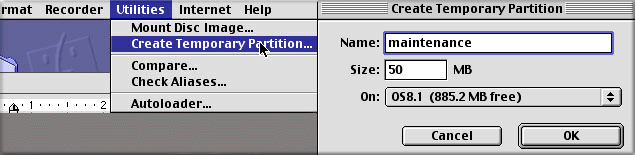
We need to create a Temporary Partition on our drive. This is done from within Toast. Go to the Utilities Drop-Down Menu and select 'Create Temporary Partition'.
In the next box, name the partition 'Maintenance CD', make it 50 mbs (a good size), and select a drive with enough space to handle it. When you hit OK, Toast will create a false partition on the drive. It will look and act like a partition, but it is really just a location on another drive. It should appear on the desktop and will have a Toast icon (you can change this icon to whatever you want and personalize the CD if you know howÉ)
Next, go to the drive where you have all your maintenance applications (Norton, Tech Tool, Disk First Aid, Drive Setup, Apple System Profiler, Disk Copy, whatever Antiviral solution you use, Stuffit Expander, etc.) and copy them into this 'Maintenance CD' false partition.
Once the copying is complete, go back to Toast, set it for 'Mac Volume' again and then drag the fake volume off the desktop and into the window. This time hit the DATA button and deselect bootable (actually it should tell you that you can't make it bootable because no System Folder exists there. Smart app, huh?)
Now follow the same burn instruction (6-8) above and you will have a totally functional, incorruptible maintenance CD.
Creating a Disk Image of your perfect System Folder and/or application set ups CD is pretty easy. You are essentially performing the same function as burning the Maintenance CD. But since this CD doesn't need to be bootable, we can actually compress the selection of files we include using the Disk Copy tool that comes free with your Apple OS. Remember those update installers from Apple that mount as a disk on your desktop after you finish downloading them? Those are Disk Images and that's what we will make and archive on CD.
One of the best things about Disk Images is that they can be compressed. The compression depends on the file types, but you can get up to 30% compression rates on applications folders and System Folders. The average fully-packed System Folder weighs in at about 350 megabytes. Your compressed System Folder Disk Image will come in at about 225 megabytes. This means that one CD can hold the compressed contents of the average non-linear editor's hard drive.
Create just such a back up Disk Image of your FCP set-up once a month, or whenever you make a big change and you'll always have the insurance of a quick re-install of a guaranteed workable copy of your OS and FCP/applications. What could be better?
 First, run Diagnostic and Repair tools like Norton Disk Doctor and Antiviral solutions to make sure that the Disk Image you are creating has no defects. The one time you assume your nose is clean you will blow it.
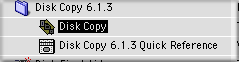
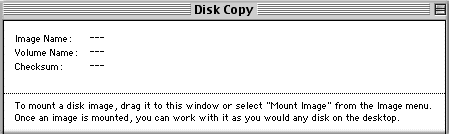
Find Disk Copy on your hard drive. It will probably be located in your Utilities folder. Set the Memory allocation as high as possible. This means selecting the Disk Copy icon, hitting command-I, and choosing 'Memory'. Choose the appropriate memory value by subtracting about 65 megs from the amount of actual physical RAM in your machine. Insert this value into both fields of the Memory allocation window. Close it.
 I suggest that you create a separate Disk Image for your System Folder and your Applications/FCP folder. It will make your life easier if you only need to access one or the other at some point. And it will make no difference in the CD burning process. Start up Disk Copy.
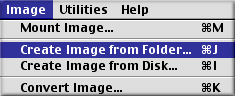 Open your drive up, grab your System Folder, click-and-drag it over into the Disk Copy window. You can also select the System Folder by going to Image>Create Image from Folder and then maneuvering to the System folder.
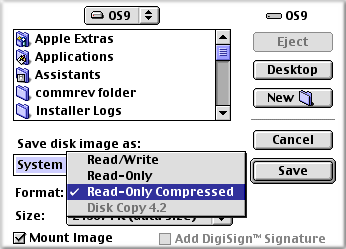
Disk Copy will figure out the necessary size of the Disk Image. You will get a dialog box asking you to name the Image and select a location for it. You must also tell it to make the Disk Image 'Read-only/Compressed'.
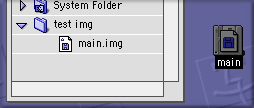
 After you name it and hit OK, it will create a false partition on the target drive similar to the Toast partition we manually created earlier with Toast. Be patient, this process, especially the compression part, is pretty slow, especially if you aren't loaded with RAM and a G4. When its done, there will be an 'System Folder.img' file on the drive you selected, plus a mounted Disk Image of what you created. The Disk Image doesn't really exist, and if you put it in the Trash, you'll see it disappear. To mount it again, simply double-click the 'System Folder.img' file and it will automatically mount.
You can use this same drag-and-drop technique on any other Files or Folders that you want to compress and archive on CD. My setup CD contains an Image of the System Folder, the Applications Folder and the projects folder. This collection allows me to restore exactly the same FCP setup anywhere (ROM file might need to change depending on machine) and then recapture from any previous copy via timecode. This is the total archive, and with Disk Copy compression, you can fit it all on one CD.
 Now you can just go back to the Toast instructions above and burn a CD with the XXXX.img files, using drag-and-drop and 'Files and Folders' instead of 'Mac Volume'. Do not burn the mounted Disk Image; it is not a compressed .img file. If you burn the .img files, you can mount the subsequent Disk Image on any machine that has Disk Copy installed.
Although this article is really just glancing at the CD burning process, you've got enough here to make you feel much more secure. Just having a bootable Maintenance CD and a Disk Image of your more important software will make you feel better, even if you never have reason to access it. And having archived projects on CD will save you tons of time re-constructing work that you've done before. Pretty soon you'll wonder how you ever got along without a burner.
Charles Roberts AKA Chawla teaches Digital Video and Audio Production at Fitchburg State College in Fitchburg, MA. He uses his long tedious rendering times to generate content and tackle hard hitting issues on the discussion boards of 2-pop.
copyright © Charles Roberts 2001
All screen captures, images, and textual references are the property and trademark of their creators/owners/publishers.