May 9, 2005

May 9, 2005
Film to Digital Video in Cinema Tools: An Alternative Workflow
Final Cut Pro HD (4.5)
By Aureliano Sanchez-Arango
Introduction: The Problem
This article describes an off-the-beaten-path workflow that arose from wrestling with a common problem: bringing film, shot at 24 progressive frames per second, to digital video, which normally runs at 29.97 interlaced frames per second--without losing the progressive frames. If your finishing format is DVD or broadcast tape, why would you need progressive frames? One reason is that punching out mattes for visual effects compositing tends to be a lot easier, and the mattes infinitely cleaner, when you have full progressive frames rather than interlaced fields from separate frames. Another is that you might not be finishing to NTSC--you might print to film from video, a process that's rapidly becoming more commonplace.
The standard Apple solution to this problem is to use Cinema Tools to remove the 3:2 pulldown introduced in the telecine process, thereby (we are told) restoring the 24 progressive frames per second we started with. But that's not how it tends to work out. Too often the pulldown removal process leaves unwanted interlacing artifacts, seen as horizontal lines in the areas of the frame where we should be seeing the blur of a moving object.
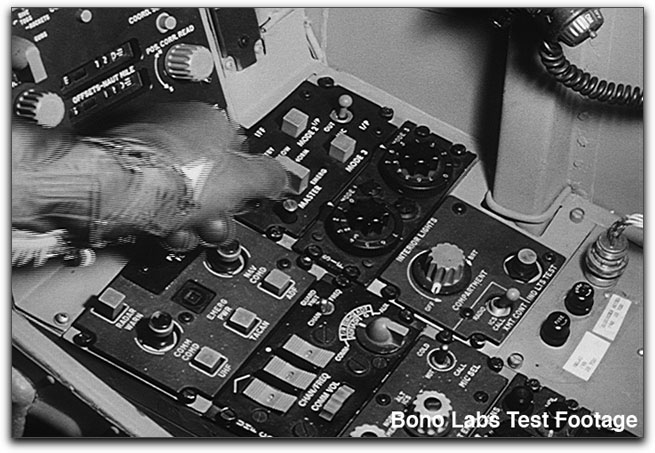
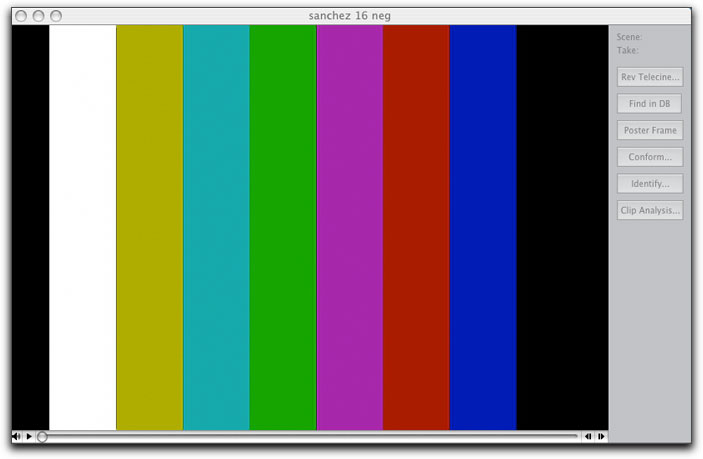
You can see the effect clearly in the following two images. The first image is the result of removing the 3:2 pulldown in Cinema Tools from a 24 fps clip captured with a standard telecine process. After trying various settings in Cinema Tools, such as changing the field order and so forth, this image is the best I could do with Cinema Tools' reverse telecine:
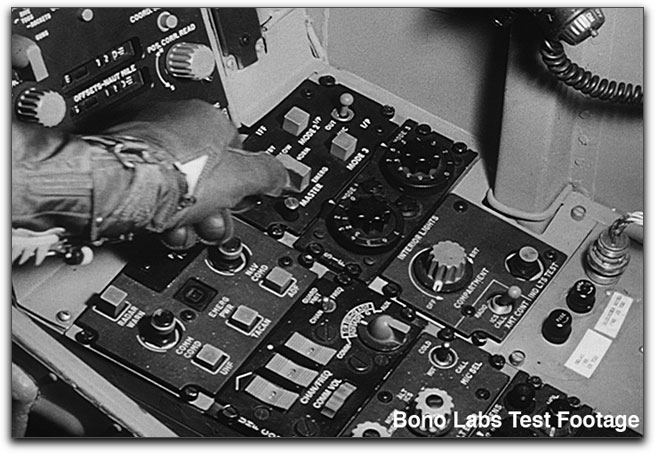
This second image is the same frame. It is taken from the version of the footage that was transferred at 30 fps with no pulldown, and then conformed to 23.98 fps in Cinema Tools. If my job were to isolate the pilot's arm with a mask, I'd much rather be working with this frame:
I've been unable thus far to get a grip on just why Cinema Tools doesn't always cleanly remove the pulldown (my guess is it may be getting the field order wrong when it's compensating for the jitter frame), but the fact remains that it does. I have heard this from numerous sources as well; no one I've ever spoken to has gotten a clean 3:2 pulldown removal from Cinema Tools using reverse telecine.
The Solution
While researching various labs and processes, I came across a lab that does direct-to-drive transfers in HD and NTSC. The lab is Bonolabs of Arlington, Virginia (http://www.bonolabs.com/tapeless.htm). You ship them your negative, and they ship you a hard drive with your footage on it in 24 fps progressive HD, or 29.97 fps NTSC with a 3:2 pulldown added, or 30 fps with no pulldown. This last option initially puzzled me, so when I requested their "test drive," I asked them to include a 30 fps progressive clip.
The footage I received was 35mm film transferred to 24 fps, 1080p 10-bit uncompressed 4:2:2. There was a different film clip transferred as 8-bit uncompressed 4:2:2 NTSC with the 3:2 pulldown, so it ran at 29.97, and the same clip transferred again with the same codec but transferred at 30 frames per second with no pulldown. My suite isn't yet HD capable, so the HD clip brought my dual-G5 FCP machine to its knees as expected.
The NTSC clips, however, got my attention. The clip transferred at 30 fps (but really running at 29.97 fps, of course) showed faster motion in the frame than the one transferred with the 3:2 pulldown, and it ran 15 seconds shorter to boot, at 01:05 versus 01:20. After conferring with the lab, I realized that this was deliberately done. 16mm or 35mm film is often transferred at 30 fps for broadcast, but this has the unfortunate side effect of speeding up the action by about 25%, and changing the pitch of the sound.
But Cinema Tools has a cure, at least for the image side. There's a "conform" button on the Cinema Tools main window that allows you to change the frame rate of a clip without reprocessing the clip itself. So by conforming the clip's speed from 29.97 fps to 23.98 fps (or 24 fps for that matter), Cinema Tools restores the clip's proper speed and, therefore, its running time. It's the digital equivalent of turning the switch on a projector from 30 fps down to 24 fps. Once this is done, the sound, transferred separately at its proper speed, can be re-synched to the picture in the edit. For someone like me, who trained on a 16mm editing bench with a gang synchronizer where synching is done with a film splicer and a permanent marker, this is a cinch. But as always, your mileage may vary.
This process also allows for better slow-motion effects if your originating medium is digital video. For example, Panasonic's AG-DVX 100A doesn't shoot in progressive modes faster than 30 fps. So we're stuck shooting 24p or 24p Advanced and using time remapping in FCP or After Effects, and living with interpolation problems. But if you shoot your slow-motion footage in 30p mode and conform to 24 fps (or 23.98 fps), your footage is now 25% slower to start with--so you have a leg up on your time remapping.
The Process
The procedure is short and simple. Your clip should already be in Quicktime format, in whatever codec the lab has used to create the clip. In my case with Bonolabs, the footage arrived as Blackmagic 10-bit uncompressed 4:2:2 files at 30 fps progressive. I can't say enough about how great the footage looked, even though it was shot under very poor conditions with 7294 stock (remember, this footage is 20 years old). As with the 35mm test shots, at 30 fps the motion looked just a hair fast. The sound was transferred from its 16mm mag to digital files at 24 fps for synching later. As a practical matter, I have tested this workflow from raw clip through to DVD output, and it works well. Of course, as always, YMMV.
WARNING: This is a destructive process, meaning that Cinema Tools performs the conform operation without presenting a "save as" option. If you wish to retain an unconformed copy of your clip, make a copy with a different name. You can do this in the Finder by right-clicking the clip and selecting "Duplicate," or from within Quicktime Pro using either "Save As" or "Export" (remembering not to recompress the clip and to make the clip self-contained).
Having taken the proper precautions, now we're ready:
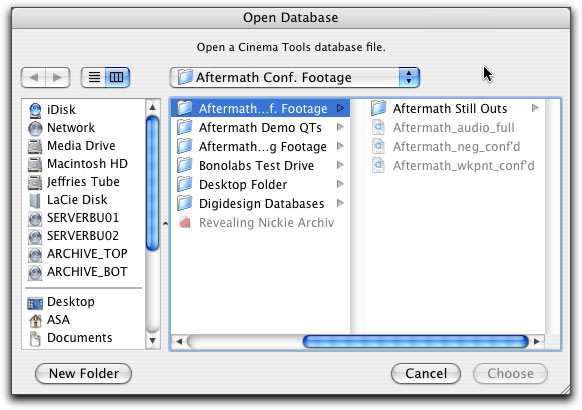
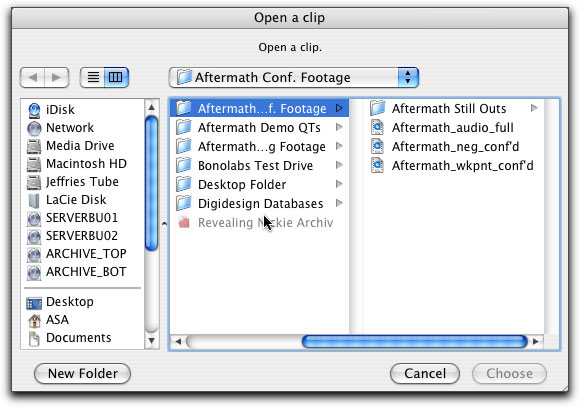
1. Open Cinema Tools. Cinema Tools will present an Open File dialog asking you for a Cinema Tools Database file. Click Cancel to close it.
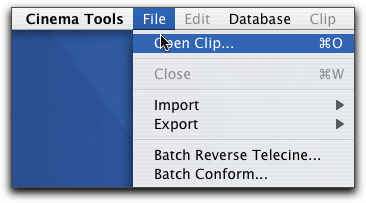
2. Load your clip. The command is File--> Open Clip. The "Open a clip" dialog will come up. Select your clip and click Choose.
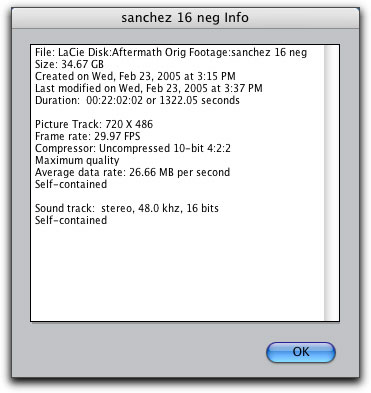
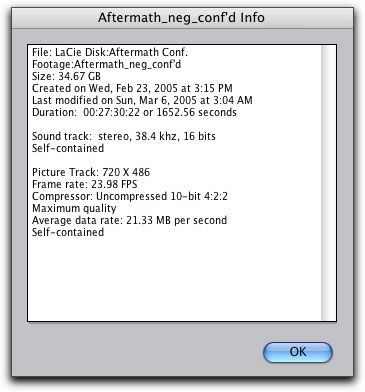
3. The Cinema Tools main window will open with your clip loaded. On the right side of the window are several buttons: "Rev Telecine" (for removing pulldown or "reverse telecine"), "find in DB" (grayed out in this case), "Poster Frame," "Conform," "Identify," and "Clip Analysis." Clip analysis brings up your clip's information for reference. Here, we see the frame rate is NTSC 29.97 fps.
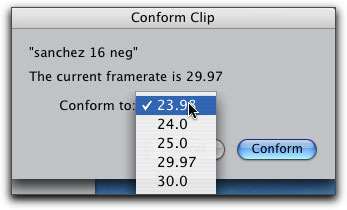
4. Click on the "Conform" button. A dialog box will come up. Here, it informs us the clip's current frame rate is 29.97 fps (as we learned from looking at the clip analysis). We select 23.98. We could select 24 fps exactly, but in my case, I preview NTSC video via Firewire. This requires that the frame rate be 23.98, since Final Cut Pro won't output real-time 24 fps monitoring via Firewire. In any event, 23.98 is suitable even for film-out. Bottom line, I use 23.98 fps and everything works fine. Choose your frame rate and click "Conform" to execute.
5. You'll hear a very short read-write on your hard drive. Cinema Tools is not reprocessing the entire clip, but rather re-writing the frame rate info. So the process takes less than a second to complete, and you may not even realize it's done. But take another look at the Clip Analysis dialog to see your clip is now 23.98 fps.
6. Close Cinema Tools. You're done. Your clip will now import into Final Cut Pro at 23.98 fps. If you have a sound track, load that into FCP and sych by hand. In my case, the sound track synched on the first try. The total film is about 6 minutes long, and I encountered no drift at all between the sound and picture. In a very long clip, you might see some drift-but chances are you'll be dealing with many short clips, not one enormous one.
A final note on how the lab may deliver your footage. In this case, Bonolabs decided it was more economical to spool all of my negative, nearly 1000 feet, onto a single reel and transfer it all into a single video clip on the hard drive. This means cutting the individual takes apart by hand in FCP. You can use the razor tool, or just set in- and out-points in the Viewer before you drop a take into your timeline.
You may be able to negotiate with your lab to give you a transfer "flash to flash," meaning the telecine process will give you individual clips between flash frames on your negative. A flash frame results whenever the filim camera starts and stops. As the camera motor speeds up on startup and slows down to stop, the lower speed of the motor results in longer exposures on one or two frames known as "flash frames." When you're spooling through a reel of film, looking for flash frames is a quick way to spot where a take begins and ends.
Of course, there are other methods available. Some labs may offer 24 fps progressive transfer of your film at NTSC resolutions, in which case this process is unnecessary (unless of course you want to conform your 24 fps clips to 23.98). If you're working in High Def, 24 fps progressive transfers are more common. But in this case, I found the 30 fps NTSC direct-to-drive transfer the most economical solution. For such instances, the availability of the Conform command in Cinema Tools gives us a viable workflow at lower cost.
All things being equal, I'm a big fan of lower cost.
Aureliano Sanchez-Arango left the practice of entertainment law to form his own production company, Me & The Wife Productions, LLC, and is a founding member of InDVFX Enterprises, LLC, bringing high-end visual effects to the independent filmmaker. Direct inquiries to info@meandthewife.com.
[Top]
copyright © Aureliano Sanchez-Arango 2005
© 2000 -2005 Apple Computer, Inc. All rights reserved. Apple, the Apple logo, Final Cut Pro, Macintosh and Power Mac
are either registered trademarks or trademarks of Apple. Other company and product names may be trademarks of their respective owners.
All screen captures, images, and textual references are the property and trademark of their creators/owners/publishers.
![]()
![]()
![]()