
DVD Authoring December 8, 2003
First Play - a "Bare Bones" DVD
Although DVD Studio Pro can be used to create incredibly complex DVDs with linked menus, multiple audio streams, subtitles, and scripting, it can also be used to create very simple DVDs. Often you need to create a DVD even simpler than iDVD can produce. For instance, you may want to build a DVD with no menus at all that will automatically begin playing a video track when inserted in a DVD player.Maybe you want to simply export your timeline from Final Cut Pro and create a bare bones DVD. No menus, no subtitles, no scripting, no frills. But you want to take advantage of the excellent compression available in SP2 or even Compressor.
Perhaps you also need this video track to loop Å SP2 can be used as an excellent video loop creation tool for tradeshows, kiosks, or video art installations.
This article will take you through the simplest way to create a bare bones DVD directly in DVD Studio Pro 2, also known as "SP2."
Exporting Video
To begin with, you must have an edited video to export. The first step will be to select the desired video in Final Cut Pro and export as a QuickTime movie.To select the desired video, choose a clip or sequence in the Browser. If your sequence is already open on the Timeline, simply click on an empty area of the timeline to make sure the sequence is selected. To export just a section of the sequence, set In and Out points.
The method for exporting will differ slightly depending upon your version of Final Cut Pro. If you are using Final Cut Pro 4, choose File > Export > QuickTime Movie. If you are using Final Cut Pro 3 or earlier, or Final Cut Express, choose File > Export > Final Cut Pro Movie. Note that both of these options are the FIRST choice in the Export dialog box. Although they have different names, they are the exact same option.

FCP 4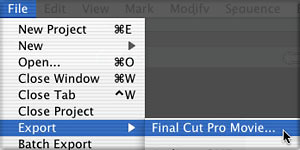
FCP 3 or earlier
In the dialog box, set Include to Audio and Video, and Markers to DVD Studio Pro Markers. Uncheck "Make Movie Self-Contained" to create a QuickTime Reference Movie, or check it to create a Self-Contained QuickTime. A Reference movie will take very little time to export and little space on your hard drive, but is linked to the video media on your drive. If you plan to delete or change any media (including render files) before burning your DVD, then you should check the Self-Contained box.
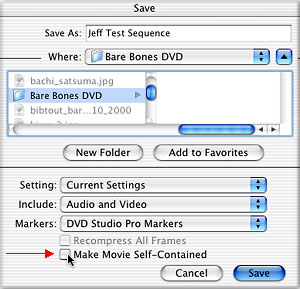
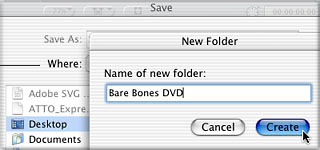
QT Export dialog boxBefore hitting OK, you want to create a Project Folder for your exported movie. You will also save your DVD project in this folder. This way, when SP2 automatically encodes your video to MPEG-2 and automatically creates other files for your DVD, it will create them in this folder. The Project Folder becomes like a Scratch Disk for the files in your DVD project. To create the Project Folder, navigate to your Desktop or media drive and choose New Folder. Name the new folder "Bare Bones DVD" or something more eloquent if you like.
Project FolderName your file and click OK. When the file is finished exporting, it's time to launch SP 2.
DVD Studio Pro 2
Even though you are building a very simple disc, you will need to use tools from the Extended / Advanced Configurations. Launch Sp2 and choose Window > Configurations > Advanced.
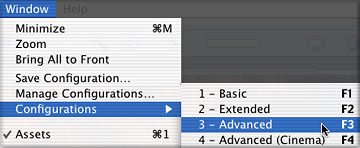
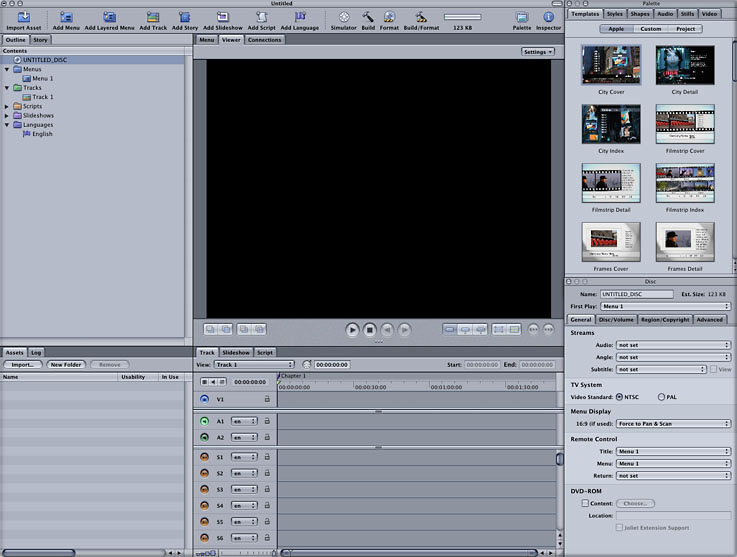
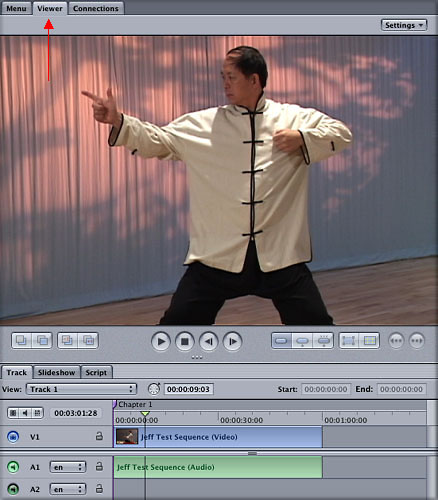
Choosing Advanced ConfigurationTake a moment to look at the SP2 Advanced interface. At upper left is the Outline Tab, which shows the Menus, Tracks, and other elements in your DVD. To the right is Menu/Viewer/Connections; for a Bare Bones DVD you will only use the Viewer window, so you can click the Viewer tab now. At lower left is the Assets tab, which is where all of your source materials will be kept, much like the Browser in Final Cut Pro. At lower right is the Track editor, much like the Timeline in Final Cut Pro. In addition, there are two floating windows: Palette and Inspector. You will use the Inspector for several tasks in creating this DVD. You do not need to become an expert in all the Advanced tools to create a simple DVD, only to know how to get around the interface.
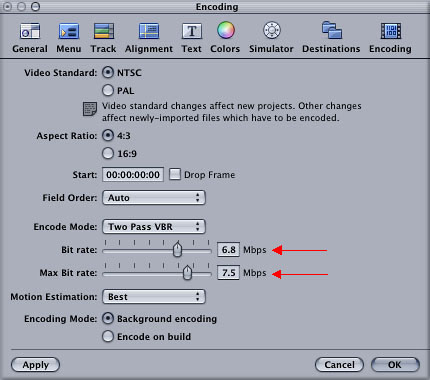
Advanced interfaceThe first step is to set the encoding for your video. Choose DVD Studio Pro > Preferences and select Encoding at the top right. Set the Video Standard to NTSC or PAL and Aspect Ratio to 4:3 or 16:9, depending upon your footage. For the best quality, set Encode Mode to Two Pass VBR. The Bit Rate setting will depend upon how long your video is: for less than 60 minutes, set Bit rate to 6.8 Mbps, for 60-90 min, use 5 Mbps, for 90-12 min, use 3.5 Mbps. Set Max Bit rate to 7.5 Mbps, and Motion Estimation to Best. Set Encoding Mode to Encode to Background encoding to encode your video to MPEG-2 while you work, or Encode on build to encode just before burning a DVD.
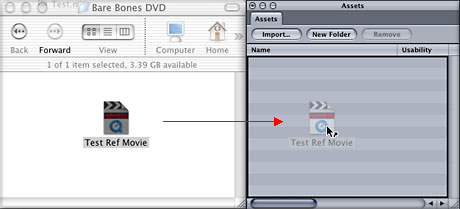
Encoding PreferencesHit OK to apply these settings. Now you can safely import your QuickTime movie. There are several ways to do this, but the simplest is to just drag it from your Project Folder into the Assets window at lower left.
Dragging QuickTime into Assets windowAfter importing, SP2 will automatically split your QuickTime movie into separate video and audio assets. Notice in the Outline Tab, under Tracks, that SP2 automatically creates a Track for you called "Track 1." Tracks in SP2 are much like Sequences in Final Cut Pro: they are composed of multiple video and audio clips that play in sequence. Track 1 is currently visible in the Track Editor's timeline. To add your imported video and audio to Track 1, simply drag the Video component from the Assets window into the V1 channel of the Track Editor.
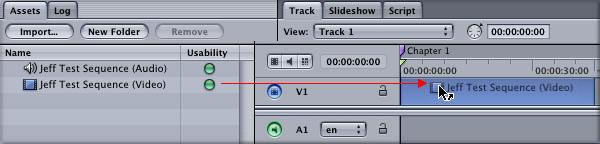
Adding video to a TrackSP2 will automatically add the Audio asset correctly to the A1 channel. You can preview the Track by hitting the play button in the Viewer. Notice how the playhead moves in the Timeline just like in Final Cut Pro.
Previewing your TrackOkay, now here's the crucial part. This is a bare-bones DVD, so you don't want any menus. However, SP2 not only creates a blank menu called Menu 1, but it sets this Menu as the First Play of the DVD. The First Play is the first thing that will happen once your DVD is inserted in the player. So you want to do two things: get rid of Menu 1 and set the First Play to your Track.
For these tasks, you will use the Outline Tab. The Outline tab shows you the structure of your DVD project and all of its elements. This is an essential tool in working on your DVD, because it lets you view and modify all the elements such as Tracks and Menus. To get rid of the Menu, select Menu 1 in the Outline Tab and hit the Delete key on your keyboard. That's it, the menu is gone!
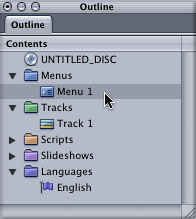
Deleting a menuNext, select the UNTITLED_DISC icon at the top of the Outline Tab. You will use the Inspector, a floating window which typically lives at the extreme lower right of the screen. The window's title bar should read "Disc:" the Inspector will constantly update to display the properties for any item selected in the Outline tab or anywhere else for that matter. At the top of the Inspector is the Name of the disc. Click here to edit the name of your DVD. Below the Name field is the First Play pop-up menu, which should currently read "not set." (However, if you did not delete Menu 1 in the Outline Tab, then First Play will read "Menu 1.")
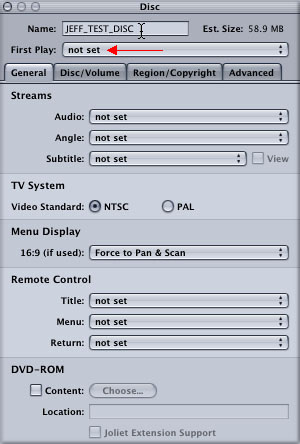
Disc InspectorTo set the First Play of your DVD, click the First Play pop-up menu and select "Tracks and Stories > Track 1 > [Track]." Now your Track will be the first thing that plays when you insert the DVD into a DVD player.
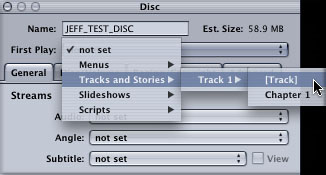
Setting the First Play of your DVDFinally, the only thing left to do is to set the End Jump of Track 1. A Track must lead somewhere when it is finished playing, or the DVD player will freeze. In this bare bones DVD, you will set the Track to loop. First, select Track 1 in the Outline Tab. The Inspector will update to show the properties of Track 1.

Track InspectorTo set the track to loop, you will set the End Jump property of the Track. Click the End Jump pop-up menu and set it to "Tracks & Stories > Track 1 > [Track]." This sets the End Jump to lead back to itself.
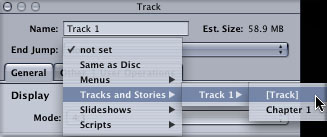
Setting the End Jump of Track 1 to itselfCongratulations! You have created a bare bones DVD by exporting a Final Cut Pro sequence as a QuickTime movie, importing into SP2, building a Track, and setting First Play and End Jump properties in the Inspector. This simple DVD will not display a menu, but will immediately play your Track in an endless loop. Good luck!
Jeff "Jeffu" Warmouth teaches video and interactive multimedia at Fitchburg State College in Massachusetts. He is the author of the upcoming book "DVD Authoring with DVD Studio Pro," to be published by Focal Press in early 2004. Jeffu is a moderator of the DVD Forum at the LAFCPUG site and at Kenstone.net, and is an independent video/DVD producer and media artist. His work can be seen at www.jeffu.tv.
copyright © www.kenstone.net 2003