
Graduated filter effects July 19, 2004
Grad Filter Effects
Graduated filter effects July 19, 2004
Grad Filter Effects
By Andrew Balis
In this article, we'll explore how to create a certain "look" for your images in Final Cut that has traditionally been something created on set using camera filters. In Final Cut, we have the power to alter a single color in the frame without affecting other colors in the frame. It's found in both the Color Corrector 3 Way and Color Corrector effects filters using the Limit Effect section of the filter.
But before the digital days that we live in now, when a cinematographer wanted to darken or enrich a photographed sky, he or she would place a grad filter in front of the lens. Grad stands for graduated, and these type of filters come in all flavors and variations. Basically, the filter is colored or is an ND(neutral density) on one side, and graduates to clear on the other side of the filter.
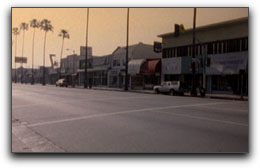
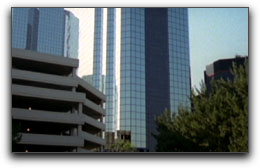
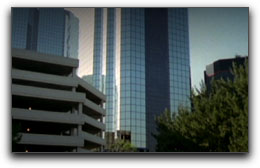
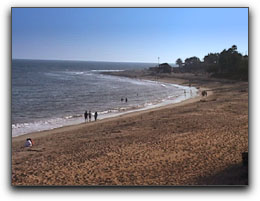
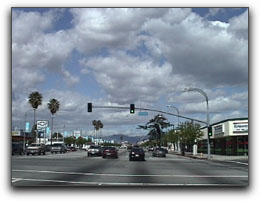
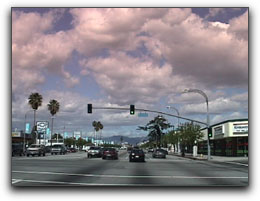
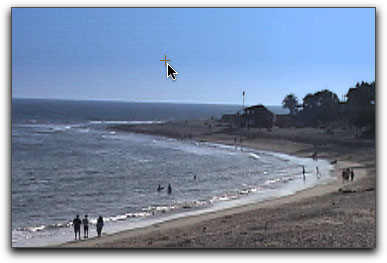
This way, part of the scene can be treated separately from another. This can be used to create a deeper blue sky, detail in an over-blown sky, or create a sunset when the original sky was shot mid-day. Below are samples of various uses for grad filter effects.
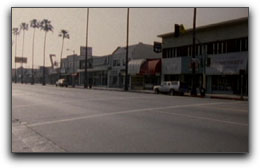
Before |
After |
Before |
After |

Before |
After |
Before |
After |
These effects are often used on static shots, as in most of the previous examples, but cinematographers have used them successfully on all types of moving shots as well. These looks are distinctive and different from selective color correction, and can be used subtly, or with bold, dramatic expression, and used to treat any side or corner of the frame as desired.
Nowadays, instead of, or in addition to shooting with these filters, you can replicate these effects in post, in particular, in Final Cut (all of the previous examples were created in Final Cut). There are definitely arguments for both options. Doing the effect in post is sometimes preferable, especially if the director is not locked into the idea during production. So, by committing to the look during production with a camera filter, you are also stuck with it. Additionally, if shooting film, you'll have to wait to get the dailies back from the lab to see the final result. Also, doing it in Final Cut allows for greater flexibility. On set, you have an assortment of filters, all colors and densities, but they are most commonly found in only two basic flavors: hard and soft. This denotes whether the graduated section of the filter is more narrow and creates a sharper line from one side to the other, or is softer and creates a more subtle shift from one side to the other. Below is an illustration of these differences.
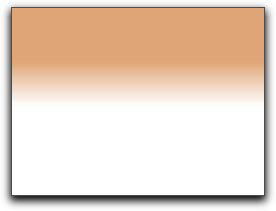
"Hard" grad |

"Soft" grad |
In Final Cut, you have greater flexibility to fine-tune the look of the gradient to match the unique aspects of the particular scene. The graduated section can be manipulated in an almost infinite array of possibilities, creating any desired softness in the gradient.
Creating a Color Gradient
We'll start by duplicating the clip to be affected because the end result will be a composite of the original and copied clip. One will have one color cast, the other clip will be naturally balanced. A gradient generator and a travel matte will be used to determine which section of each image is revealed. If that all sounds like too much work, don't worry, its pretty quick to set up.
Before we start, here's a quick summary of the steps:
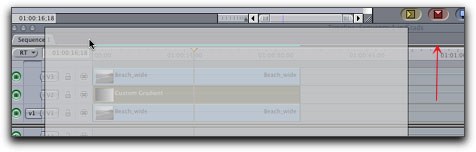
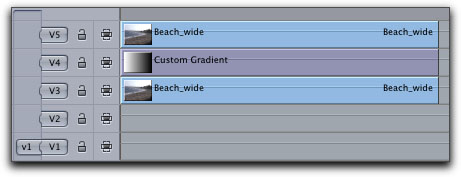
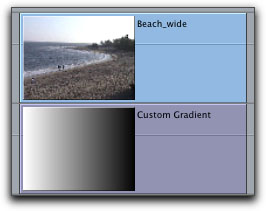
Start with the original clip on track V1 in the Timeline. Create two new Timeline tracks above V1. An easy way to do this directly from the Timeline is to Control-click in the blank space above the current video track and choose New Track from the drop down menu.

Highlight the clip on V1 by clicking on it. Hold down the Shift and Option keys, then drag the clip to V3. The clip is copied to V3, directly above the original.
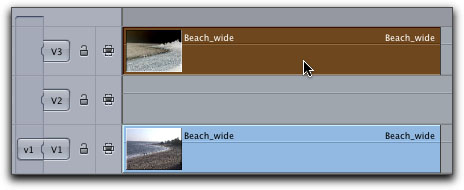
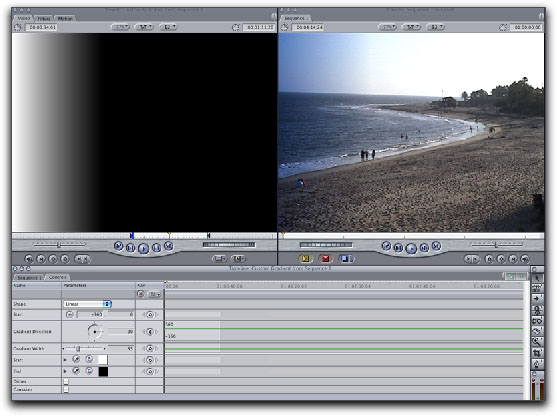
Select the clip on V3, then go to Effects menu > Video Filters > Color Correction > Color Corrector 3 Way. Then, double click the clip to open it into the Viewer, and click on the Color Corrector tab.
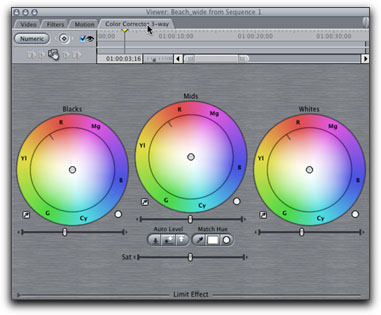
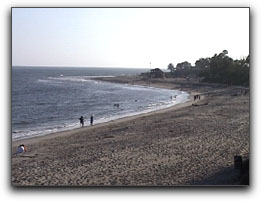
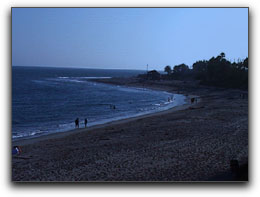
In this example, we'll be creating a blue sky from a scene shot overexposed and whited out.
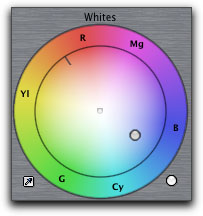
Since we are most interested in altering the highlights of the image, our work would be done mostly with the Whites controls. Since the sky is blown out, it will be easier to add color into the scene if we soften, or in other words, darken the sky a bit. This can be done by sliding left the Whites and/or Mids luma sliders.

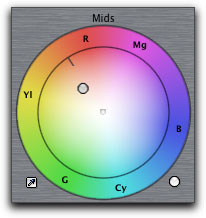
Then use the Whites color wheel to add a bluish color into the scene.
This will affect the entire scene, but later we'll only be using the sky from this clip, so don't worry about the impact that this color has on the shot as a whole.
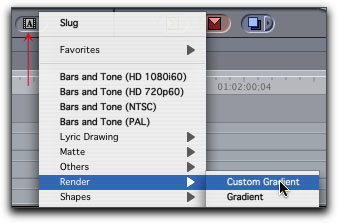
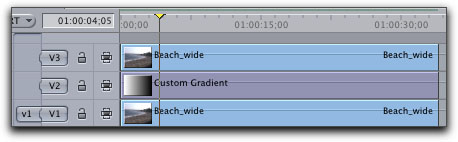
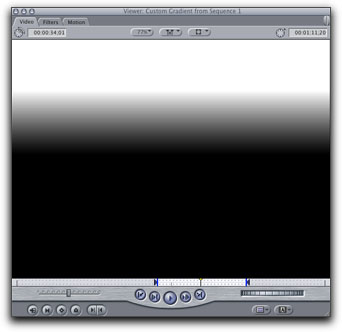
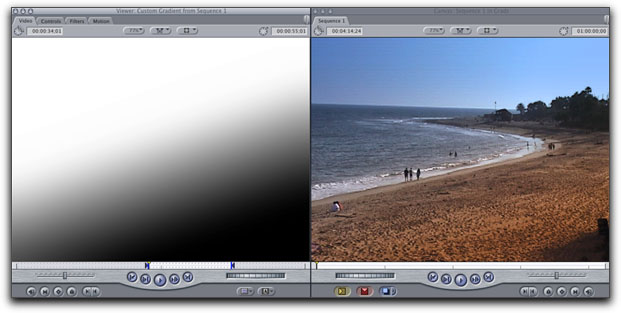
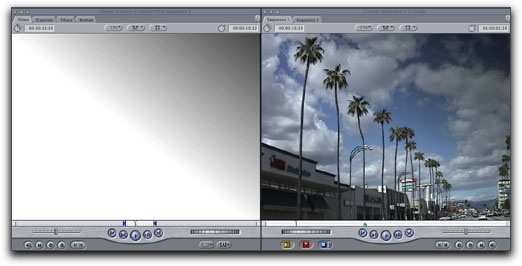
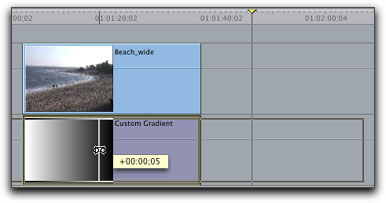
The next step is to add a gradient clip to the timeline. Click on the Video Generators pop-up button in the bottom-right hand corner of the Viewer. From the menu, choose Render > Custom Gradient. This loads a gradient clip into the Viewer.
Next, add this gradient to the Timeline on V2, between the other clips. There is a handy way to do this as well. Make sure that your Source controls in the Timeline are set to V1.
Place the Timeline playhead anywhere over the existing clips. Then drag the clip in the Viewer to the Canvas and drop on Superimpose. This is quick as it adds the clip to V2, and makes it the same length as the other clips all in one quick edit.
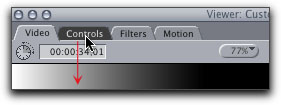
Next, double-click on the gradient in the Timeline to re-load the Timeline clip back into the Viewer. Click on the Controls tab and set Gradient Width to about 35.

This is just a rough setting to narrow the gradation that can be adjusted later. Click back to the Video tab in the Viewer so you can see the new gradient width.
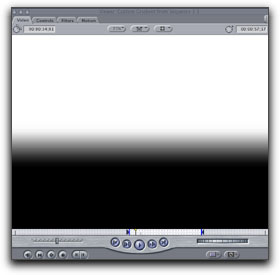
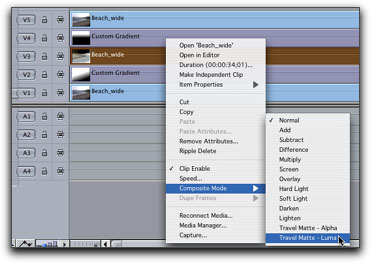
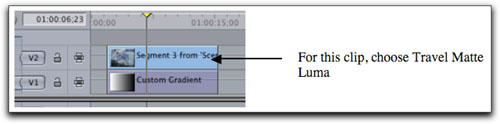
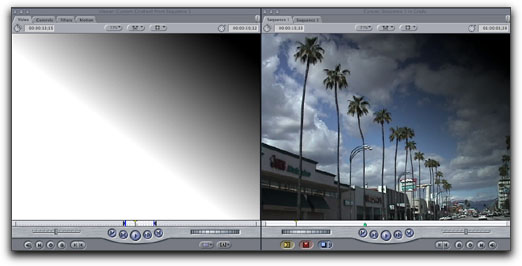
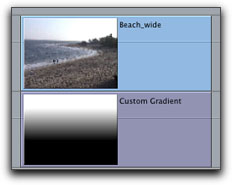
Then, in the Timeline, highlight the video clip on V3, then go to the Modify menu > Composite mode > Travel Matte Luma. This composite mode is used to blend the clip on V3 with the clip on V1. It does this by using the luminance of the gradient to "carve" out the clip on V3. Wherever the gradient is white, that same portion of the frame on V3 is preserved. Wherever the gradient is black, that portion of the frame on V3 is made transparent.
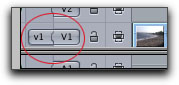
To see how this is really behaving, turn off visibility for V1 by clicking on the green visibility button on V1.

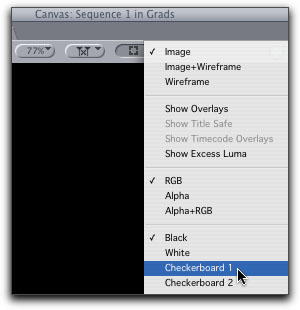
Next, in the Canvas, click on the View button and choose Checkerboard 1 from the pop up menu.
Now we can compare the gradient in the Viewer to the image in the Canvas and see how they relate to one another. Wherever the gradient is black, that part of the frame is made transparent. This allows us to see a portion of the clip on V3, and also a portion of the clip on V1. If there is no clip under the gradient, then the transparency will show up as black. We'll come back to how to use that variation later.
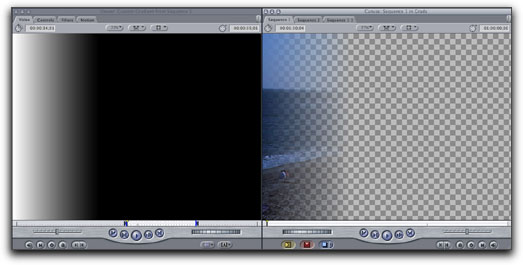
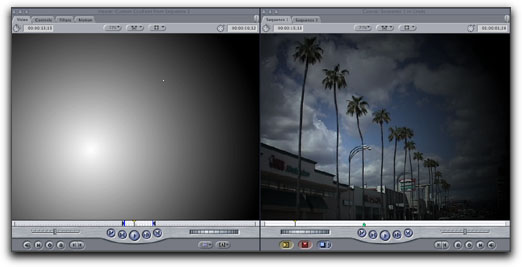
Switch the background back to Black from the View button and turn visibility back on for V1. Now you should see a composite of the clip on V3 and the clip on V1.
Next, we'll fine-tune the gradient so that we only see the sky from V3, and the rest of the image will be from the clip on V1. Since the Timeline itself isn't relevant to our next steps, we can use it as an expanded working area for our gradient. To do this, go to the Viewer, click on the Controls tab, and drag it away from the Viewer and down toward the Timeline.
When the Timeline shows a highlight around its edges, as shown below, then let go. The Controls tab becomes the new front tab of the Timeline. Cool, huh?
In the Viewer, click on the Video tab. Now we have all our controls at hand and visible.
On the Controls tab for the gradient, set the angle for the gradient by setting Gradation Direction to about 180 degrees. This rotates the gradient so it will be white on top and black on the bottom.
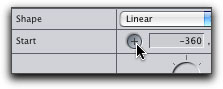
The next step is to set the line of the gradient with the Start crosshair button found on the Controls tab. Click on it to make it active. The button will darken somewhat.
Move your cursor to the Canvas. It will become a crosshair shape. Click in the Canvas right above the horizon line.
This centers the gradient's line at this point. Fine-tune the angle of the gradient, the Start crosshair and the gradient width so that the line seems to blend with the horizon line or just above the horizon, depending on which you prefer best. Tip: Instead of clicking with the Start crosshair in the Canvas, click and drag and don't let go of the mouse until the line is where you desire. This avoids having to click back and forth on the crosshair to try and find the best placement of the grad line.
Additionally, when the gradient width is fairly narrow, you may notice harsh changes from one shade to another, making the final effect appear a bit un-natural.
You can soften this line by adding a Gaussian Blur filter to the gradient clip. Although there is a checkmark for Gaussian built into the Controls tab of the gradient, its not as flexible as a filter. Click on the Filters tab in the Viewer. Then go to the Effects menu > Video Filters > Blur > Gaussian Blur. The filter will appear in the Viewer. Drag the filter's slider to the right as much as necessary to achieve the desired softness.
When you are done fine-tuning, you can close the Controls tab in the Timeline by Control-clicking (or right-clicking with a two button mouse) on the tab and choosing Close Tab. It will automatically rejoin to the Gradient in the Viewer.
Adding A Second Grad
In this beach scene, we could also enhance the color of the sand by adding a golden color into the bottom right corner of the frame. So we'll need to add two more clips into the Timeline, another gradient, and another copy of the original clip, this time color balanced to a golden hue.
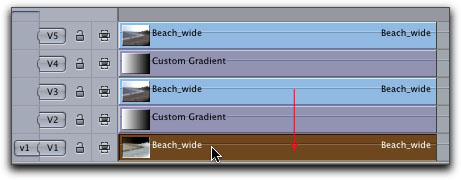
First, move the current three clips up two tracks.
Then place another custom gradient on V2. Then copy the clip on V3 to V1 by holding down Shift and Option, and dragging from V3 to V1.
Next, Control-click on the clip on V3 and choose Composite Mode > Travel Matte Luma from the drop down menu.
Now apply the Color Corrector 3 Way to the clip on V1. Make it sepia-like by dragging the Mids color wheel between yellow and red as shown below.
This time angle the grad as shown next so that the warm color only comes in along the same angle of the coastline.
As you can see, you can also place grads along any angle you desire.
Creating ND Grads
To simply darken one side or corner of the frame, then you only need two clips, the original clip and the gradient. Composite the clips as shown below.
Instead of using the gradient with white and black, change the black color on the Controls tab to a lighter gray. This will cause the part of the frame to get darker, depending on the shade of gray.
If you want a more extreme look, you can bring the darker shade of the gradient back to black.
Or you can change the gradient from Linear to Radial on the Controls tab for even more variations.
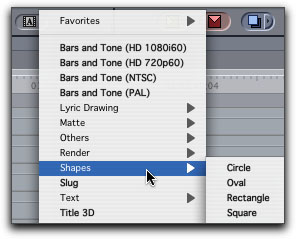
Not necessarily realistic, but cool nonetheless and used in a lot of high end spots. Other things to try include a Highlight gradient or any of the video generators found under the Shapes generators.
As a final note, you will find that the thumbnail icon for the gradient in the timeline isn't always the same as the current settings for the gradient. That's because the gradient was altered after the thumbnail was generated.
Since it can be a helpful reference to see the current gradient in the thumbnail, here's a little trick to get it to update.
Since the gradient is basically a still image that's the same from the first to the last frame, we can "slip" the gradient to force Final Cut to draw a thumbnail for the current gradient settings. Grab the Slip tool, and click and drag in either direction a little. It doesn't have to be specific.
When you let go, the thumbnail will be current.
Have fun!
By Andrew Balis
Let go of the mouse when Timeline shows this dark gray bar that wraps around it.
Andrew Balis is a cinematographer, editor, post production consultant and Apple certified instructor teaching classes in Final Cut Pro to industry professionals at Moviola Education and UCLA. He is co-author of the Apple Pro Series book Advanced Editing Techniques in Final Cut Pro 4. Andrew co-authored the original Apple certified curriculum for beginner, advanced, and effects classes developed at Moviola Education, and wrote the Final Cut Pro curriculum for the Apple Education/CNN Video Journalism classes offered in the K-12 market.
© 2000 -2004 Apple
Computer, Inc. All rights reserved. Apple, the Apple logo, Final
Cut Pro, Macintosh and Power Mac
are either registered trademarks or trademarks of Apple. Other
company and product names may be trademarks of their respective
owners.
All screen captures, images, and textual references are the property and trademark of their creators/owners/publishers.