January 29, 2007
On a budget -- kind of
MacVideo Magazine
For DV FilmMakers and Video Professionals
www.macvideo.co.uk
By Brian Dalton
In 2002, I jumped into low budget feature filmmaking with a small movie I shot "run-and-gun" style on a Canon XL1s. We used almost nothing but natural light and, because of the actors' time constraints, shot the entire 83-minute feature in just 12 days. The truth is, it looked fairly awful -- nowhere near what people expect from a feature film.
Two years later, InDigEnt gave us "November," a psychological thriller starring Cortney Cox ("Friends"). It was shot on DV tape with Panasonic's DVX100 and won DP, Nancy Schreiber, the Cinematography award at the Sundance Film Festival.
The DVX was great leap forward in terms of getting that "film look" from a relatively inexpensive video camera. It still suffered from 480 lines of vertical resolution, but it was capable of shooting at 24 frames per second (the same as film) and featured something Panasonic called "Cinegamma," which made the look of the video much more film-like.
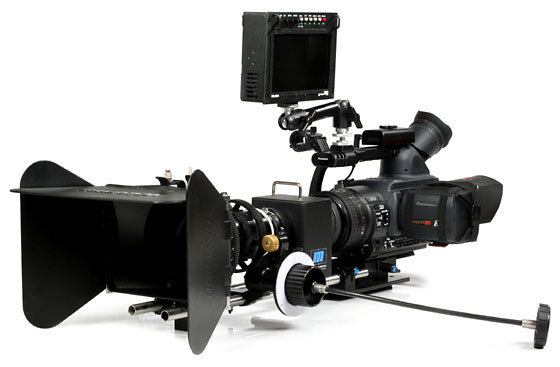
In the spring of 2005, I was ready to remake my "masterpiece" with a bigger budget, bigger production values (lights, dollies, jibs, etc...) a better script, and a DVX100. Then, Panasonic announced their new camera at NAB, the HVX200 -- a High Definition successor to the DVX.
The HVX200 is a generous blend of Panasonic's $70,000 "Varicam" and their $3,995 DVX100b. The camera uses 1/3-inch CCDs, has a fixed lens, and has the same basic form factor and layout as the DVX (though bulkier). But like the Varicam, the HVX shoots in High Definition -- both 720p and 1080i (the Varicam only shoots 720p) -- in Panasonic's industry-standard High Definition DVCProHD codec, giving you a better color space (4:2:2 vs. DV's 4:1:1 or HDV's 4:2:0) and less compression. It also gives you (and this was the kicker for me) variable frame rates, allowing you to shoot true fast-/slow-motion, from 12fps (frames-per-second) to 60fps. (Note: The camera has already been hacked to shoot variable frame rates from 2fps to 60fps in 2fps increments. As this solution is a hack, it is not supported or recommended by Panasonic.)
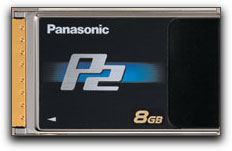 The main piece of technology that makes all of this possible is Panasonic's P2 card - a solid state PCMCIA card that slips into the back of the camera and is capable of recording the higher bit rate DVCProHD (up to 100mbps vs. DV/HDV 25mbps). This allowed Panasonic to forego the Varicam's expensive DVCProHD tape deck, making the camera more affordable. The HVX200 can also record DV to MiniDV tape, but to record High Definition video, you must record to the P2 cards.
As of this writing, P2 cards are available in 4GB and 8GB configurations. In 720pn mode, where the camera only records the actual 24 frames per second, an 8GB card will give you 20 minutes of record time. In 1080i (whether 24p, 30p or 60i), you get a minute per gigabyte. Fortunately, the camera's two P2 slots are "hot-swapable," meaning that you can take out one of the cards while the camera records to the other.
For me, the independent no-/low-budget filmmaker, this camera was a dream come true. So, I waited. In March, my HVX finally arrived and I began shooting. I was stunned by both the enhanced resolution and color space and realized that my dream of a low-budget High Definition Digital Camera was almost complete. But there was one more hurdle to leap if I was going to get that coveted "film look" --- shallow depth of field.
1/3 inch CCDs won't get you anywhere close to the shallow depth of field we're all used to seeing at the cinema. Sure, you can always shoot with the iris wide open at the long end of the zoom lens. But that's not really practical, and severely limits your options --- particularly in smaller locations.
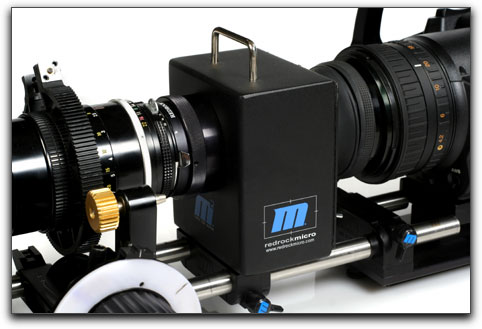 The HVX still had that one, tell-tale sign of digital video - that "everything-is-in-focus" look. The solution, for me, was the M2 35mm adapter from Redrock Micro.
The M2 is a device that is placed in front of the camera and attaches to the camera's lens via an acromat (a close-up lens). This adapter allows you to attach 35mm lenses to the front of it, giving you the kind of depth of field you'd get with any 35mm camera.
The "trick" of the M2 is a piece of rotating ground glass inside the adapter. The image from the 35mm lens is projected onto this piece of ground glass, which becomes the image that is recorded by the camera. This allows the camera to see what any other 35mm camera would see - shallow depth of field included.
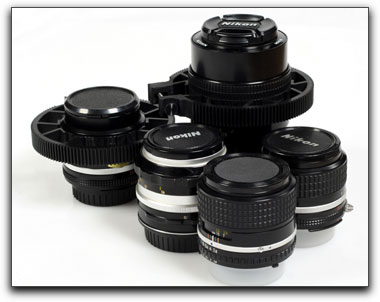
The M2 is extremely versatile in term of lens choices. You can purchase it with different mounts and swap them as needed. Mounts are available for the following lenses mounts: Canon EOS, Canon FD/FL, Nikon F, Pentax K, Minolta MD, Olympus, PL (Zeiss, Cooke, Arri), and Oct-19 (each mount must be purchased separately).
I chose the Nikon mount because "pre-owned" Nikon 35mm lenses can be purchased inexpensively and, because the Nikons allow you to adjust the aperture directly on the lens. My Canon EOS lenses, which I use for still photography, would not allow this as their apertures are set electronically by the camera.
There are drawbacks to using this adapter and I don't want to give the impression that the M2 is the perfect solution for everyone. First, you lose light - about 1 to 1.5 stops. Second, you lose a bit of resolution. Fortunately, it's not much. In my tests, I've been able to mostly compensate for this by turning up the "detail" settings in the camera a notch or two. Third, the image is upside down. This means that you need an additional monitor - one that can be mounted to the camera upside down (NOTE: So many people in the "indie" film world are using these adapters, that JVC actually built "LCD flip" into it's recently announced HD100U HDV camera).
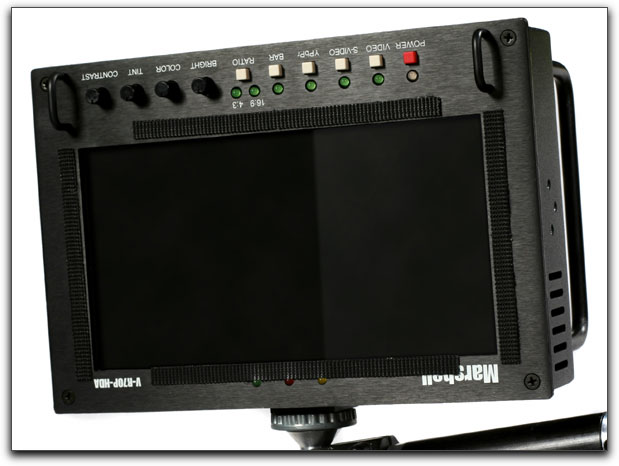
As focus is much more critical in High Definition, and difficult to do on the camera's small LCD, I had planned on buying the Marshall VR70PHDA 7-inch HD monitor in any case. Thankfully, Marshall's monitor can be mounted on any of it's four sides, and gives you a crisp enough image to focus accurately, with or without the M2.
Of course, having a shallow depth of field creates its own problems. When you only have a small area in focus, and your actor needs to move to another area, you have to adjust the focus as the actor moves. This requires a "Follow Focus" unit.
The Follow Focus I chose is from Cavision. It mounts on the same 15mm rods as the M2 and has a gear that connects to a gear ring attached to the lens' focus ring. On the side, there is a white dial, which allows you to make markings for the various focus points so you can repeatably hit those marks over and over again.
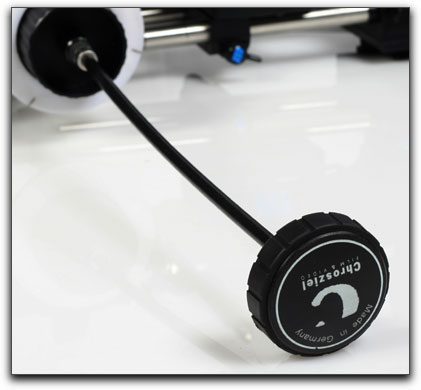
Attached to my Follow Focus is a "whip." This allows you to control the Follow Focus unit from farther away. Chrosziel makes whips in various sizes - mine is only 18 inches, but I've seen them up to four feet long.
The final touch is the matte box. It does two things. First, it helps keep stray light off your lens, preventing flares and giving you an overall better image. Second, it allows you to slide filters in and out as needed. My matte box is a 4" x 4" two-stage matte box, meaning it can take one or two filters at a time � and one of those filters can rotate 360 degrees. As the inexpensive lenses are more prone to flaring, the matte box is an essential piece of equipment when using the M2. A polarizing filter is also helpful in controlling flaring and ghosting, but since it too loses light, you're limited as to when you can use it (mostly outdoors).
Of course, once you've bought all this equipment, you're no longer looking at a "budget" camera. The rig, fully outfitted, will run you between $12,000 and $15,000. But, for indie productions longing for that 35mm "film look" in a small, High Definition video camera, the HVX200/M2 combination really is a dream come true.
In November, I shot my first feature with the HVX/M2 combo. It was a great experience and everyone has been blown away by the images we captured. They're just so "filmic."
There are a few important things I learned from the experience. First, my AC and I rated the ISO of the camera at 160 with the M2 attached. This means that you will always need a lot of light. Because of this, I regret buying any lens that was not at least an f2. Were I to do it over again (had I a bigger budget) I would probably not buy any lens that wasn't an f1.4 or f1.8. Of course, this makes focus and pulling focus that much more crucial. So, definitely plan on getting a good AC for any production on which you're going to be using this set-up.
Postal: Making the video.
The "Postal" video was shot over three days, mostly in my family room. We had no budget and only minimal help. Often, it was only me and one other person running the set. So, we were extremely limited in what we could do.
Virtually every image in the "Postal" video was shot with the Redrock Micro M2 35mm adapter attached to the HVX. The two exceptions are the shots of Evan standing up against a mural (outside), and a tight outdoor shot of her singing "you talk too fast for me" (both are towards the end of the video). We did an afternoon of outdoor shooting without the M2 which turned out to be somewhat disappointing when compared with the indoor/M2 shots. In fact, the experience has made me never want to shoot without the M2 again.
When the M2 was attached, I stuck to three lenses, the 24mm f2.8, the 50mm f1.4, and the 85mm f2. Since you lose light with the M2 (about 1-1.5 stops), the faster the lens, the better. And because we were always in tight quarters, the 100mm and 135mm lenses I have were never needed.
Aside from the M2, the most crucial piece of gear was the Cavision follow focus. Since the whole point of the M2 is to shorten your depth of field (the area in focus), almost any camera movement (or movement by the talent) requires you to pull focus during the shot.
As for the look of the shots, virtually everything was done in-camera. The only color correction I did was the conversion of the color images into black and white using the built-in 3-way color corrector in Final Cut Pro. Aside from that, the camera offers so much flexibility, that there was very little "post" work needed to get the shots to look the way I wanted. I simply tweaked the scene files as needed.
The other equipment used to make the video were the "Indie Dolly", the EZFX Junior Jib, a Bogen 516 tripod head, a Shooter Scooter a variety of lighting from Lowel (Caselite, Scandle, and "Pro-Lights"), an Alzo 2000 with 36-inch softbox, and a Flo-1400 Flolight.
Brian Dalton has been shooting digital video since 2001. His first feature film, "Killing The Dream" (which he wrote, directed, edited, and scored) won the Grand Jury Award at the 2003 Temecula International Film Festival and played all over the U.S. and in Europe. He shoots video locally and is the "on-sight" director of photography for a syndicated television show. His latest endeavor is a series of humorous shorts called "Mr. Deity." In the first two weeks, they were viewed over 300,000 times on YouTube, and broke into the top fifty of the iTunes comedy podcast charts. You can find out more about the series at mrdeity.com. If you would like to see higher quality versions of the Mr. Deity series (better quality than YouTube will permit), just drop a line to Brian and he'll send you the link.
 MacVideo Magazine
For DV FilmMakers and Video Professionals
Published Quarterly
Printed magazine DVD included - $59.95US £ 29.95UK
Electronic version (PDF) $19.95US £ 12.95UK
Both subscription versions include access to the MacVideo web site.
www.macvideo.co.uk
copyright © Brian Dalton - MacVideo Magazine 2006
© 2000 -2007 Apple
Computer, Inc. All rights reserved. Apple, the Apple logo, Final
Cut Pro, Macintosh and Power Mac
are either registered trademarks or trademarks of Apple. Other
company and product names may be trademarks of their respective
owners.
All screen captures, images, and textual references are the property and trademark of their creators/owners/publishers.