February 12, 2007
www.macvideo.co.uk
By Rick Young
According to legend and rumour it is possible to make High Definition DVDs onto regular 4.7GB DVD-Rs using a Mac with a DVD burner and DVD Studio Pro 4. Now if this were true then we could all get started knocking out HD DVDs straight away and stop waiting for Blu-ray to appear.
Reminds me of a time before DVD burners were widely available to the public. There was talk that one could take the disc out of DVD-Ram caddy, or record DVD content to CD, and then do something magical with the disc which, if you knew the secret formula, wouldĘ then play in a DVD set-top player. Not sure that talk was true.
But what is true is that it is well and truly possible to make High Definition DVDs onto 4.7 GB DVD-R (type 5) discs which can then be played back on most modern Macs. Let me repeat modern Macs - so far I have achieved this using a 2.5 GHz dual G5 and a Black MacBook.
Creating HD DVDs
The first thing to understand about the process of creating HD DVDs is that it is remarkably similar to creating Standard Definition DVDs. The main difference is that the content is encoded at a higher bit-rate which therefore means you get less time for content on the disc.
Expect to get just over 50 minutes of HD footage onto DVD-R (type 5). This applies for both 1920 x 1080 footage and 1280 x 720P. I've yet to try DVD+R or dual layer discs.
Encoding your material
Encoding via Compressor is the way to encode your material. While it is possible to encode inside of DVD Studio Pro the only option here is to encode to MPEG-2. When encoding your material using Compressor options are provided to encode to either H.264 or MPEG-2. In my tests the results one gets using H.264 are vastly superior to MPEG-2.
There are two ways you can encode your material in Compressor:
(1) Export direct to Compressor from Final Cut Pro
(2) Export your HD movie from Final Cut Pro, save it to disc, and then import this into Compressor.
The advantage of using method 2 is that while Compressor encodes you can carry on editing with Final Cut Pro. If you export direct from Final Cut into Compressor you will not be able to continue editing until the encoding process is complete.
(1) Highlight the Sequence you wish to Export in the Browser of Final Cut Pro or click within the Timeline of the Sequence you wish to export.
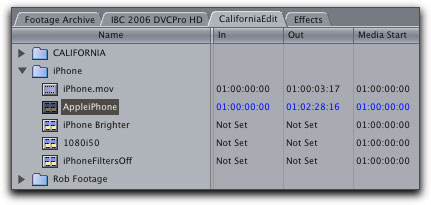
(2) Check that there are no "in" or "out" points in the Timeline unless you wish to define the area of the Sequence you are going to export
(3) Click the File menu, top left of the FCP interface. Scroll to Export - using Compressor
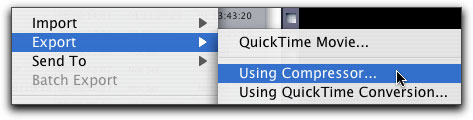
The Compressor interface will now open.
(4) Click the double-arrows to open up the presets built into Compressor.
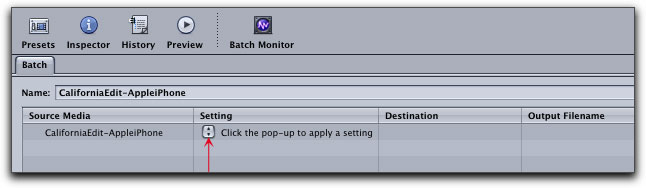
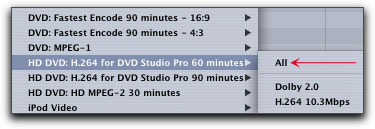
The setting you need to concern your-self with is the H.264 60 minutes setting (keep in mind you will get about 50 minutes of HD footage onto a 4.7GB DVD-R)
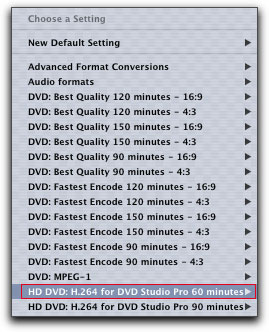
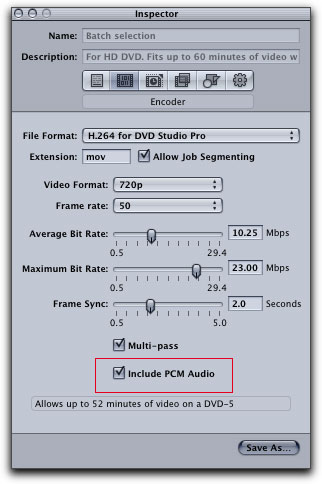
(5) Click the H.264 for DVD Studio Pro 60 minutes setting - then click All. This will encode the video files to H.264. An AIFF audio file will be generated along with the H.264 file. Additionally a second Dolby 2.0 audio file will also be created.
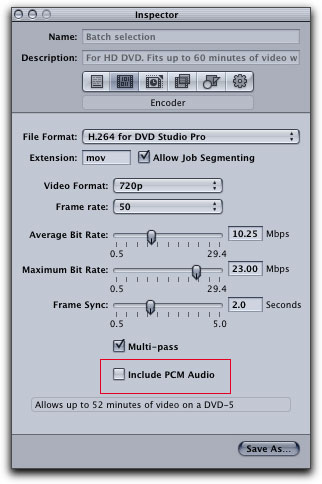
If you wish to work with a separate AC3 audio file (which will help you to conserve space and therefore allow you to get more content onto your DVD) then, in the Inspector, click the H.264 setting and uncheck where it says Include PCM audio. The audio will then not be included within the H.264 file and you can marry up the AC3 file with the H.264 video file later in DVD Studio Pro.
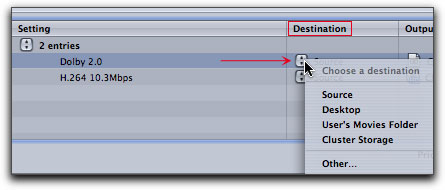
(6) Define where this file is to be saved: either source (which means in the same location as the original file, or you can specify the location manually)
(7) Press the Submit button at the bottom right of the Compressor interface which will send your files to the Batch Monitor where the encoding process will take place.

Note: the above method will tie up both the Batch Monitor of Compressor and Final Cut Pro, meaning you will have to wait for the encoding to finish before you can do any more editing. Encoding H.264 is a slow process.
If you want to avoid having Final Cut Pro tied up at the same time as the encoding process takes place then follow the instructions below:
Exporting a Self-Contained Movie from Final Cut Pro
(1) Highlight the Sequence you wish to Export in the Browser of FCP or click within the Timeline of the Sequence you wish to export.
(2) Check that there are no "in" or "out" points in the Timeline unless you wish to define the area of the Sequence you are going to export
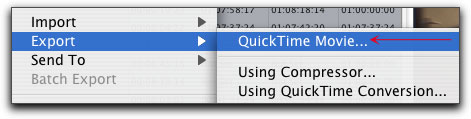
(3) Click the File menu. Scroll to Export - QuickTime Movie.
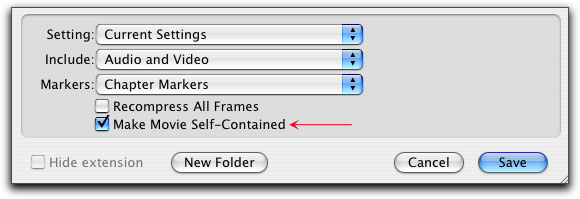
(4) Leave the Setting at Current Settings and make sure you Include Audio and Video
I would recommend checking the box which says Make Movie Self-Contained, though this is not absolutely necessary. Making a Self-Contained movie means the file produced is independent to other media stored on hard drive. If you choose not to create a Self-Contained movie this leaves more room for error. Sometimes people create a movie which is not Self-Contained (known as a Reference Movie). If the original files are then removed this will cause the Reference Movie not to work. By always creating a Self-Contained movie this risk is removed.
(5) Choose a Destination and Name and Save the File
(6) Import this movie into Compressor or drag from where it is stored on hard drive into the Compressor interface.
(7) Encode the files, as described earlier, to the H.264 60 minutes setting. Don't forget to specify where you want the files to be saved so you can find them once the encoding process is complete.
This is the important part. You need to tell DVD Studio Pro what format you are working with. When it comes to HD and DVD Studio Pro 4 you will be working in either 1920 x 1080 or 1280 x 720.
DVD Studio Pro will happily work with either format.
(1) Launch DVD Studio Pro
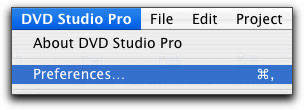
(2) Select the DVD Studio Pro Menu and choose Preferences.
(3) Click the Project preference at the left of the Preferences window
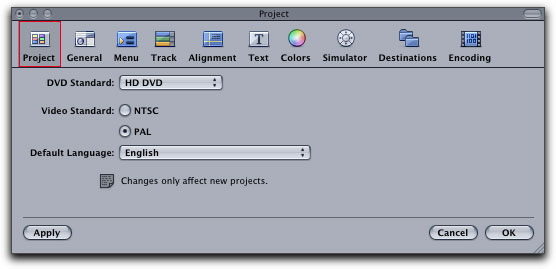
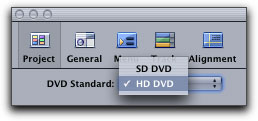
(4) Select the DVD Standard - HD DVD
(5) Choose NTSC or PAL, depending where you live in the world.
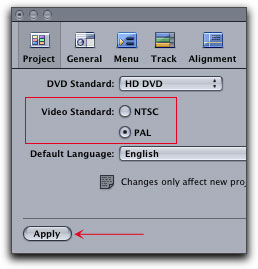
(6) Click apply.
Next, move onto the General preference.

(1) Go to the middle of the General Preference window where the heading reads HD DVD Menus, Tracks, and Slideshows
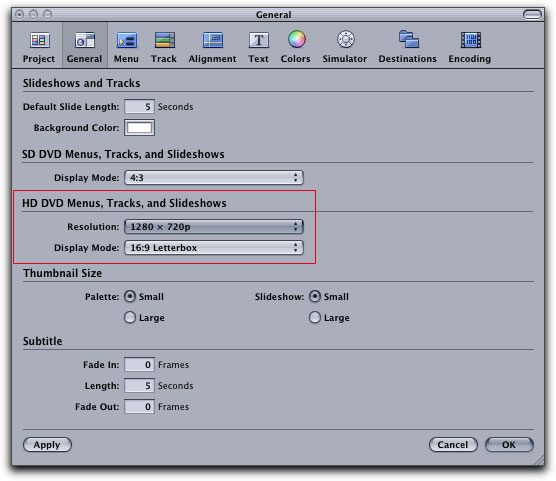
(2) Click Resolution and a drop down display will show you the options
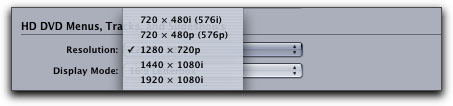
(3) Choose the format you are working with: 1280 x 720 or 1920 x 1080
(4) Leave everything else at default and click apply
Skip the next four Preferences: Track, Alignment, Text, Colors - these can all be left at their defaults.
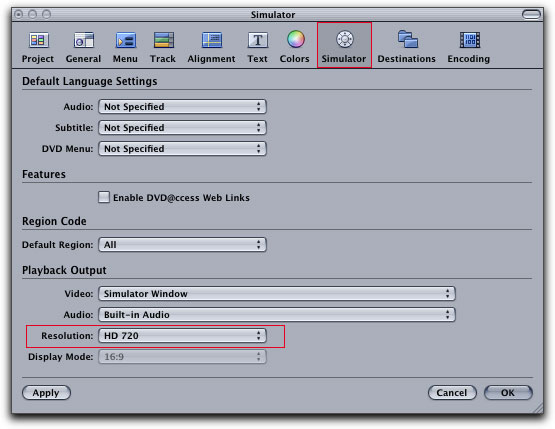
Click the Simulator tab on the preference Toolbar, then click on the Resolution drop-down menu and select the format you are working with.
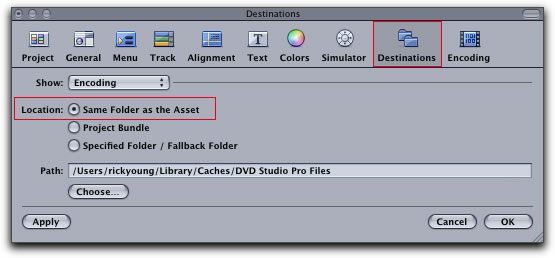
The Destinations preference can be left at the defaults, however, be aware that the default setting Same Folder as the Asset will send any files created in DVD Studio Pro to the same folder where your assets are stored. I would therefore recommend putting all of your assets into a single folder where they can be easily accessed. This means all files, including those created by DVD Studio Pro, will be contained in a single place. If you do not do this you may find files scattered all over the hard drive/s of your computer which are difficult to locate and track down.
Leave the Encoding preference at the defaults as you your assets have already been encoded in Compressor.
OK - you're now ready to move on and build your first HD disc.
Building Your Disc
I'm going to assume that if you are reading this article you already know something about using DVD Studio Pro. The good news is authoring HD DVDs is no different to authoring SD DVDs. The crucial task is to encode your assets correctly using Compressor and to set up the preferences as described. This tells DVD Studio Pro that it is an HD DVD you are creating.
So go right ahead, import your assets and author your DVD making use of any of the any of the facilities offered in DVD Studio Pro. You can make use of multiple tracks, angles, stories, subtitles and web-links.
Once you are finished, press the Burn button, insert a DVD into your Mac and let DVD Studio Pro do the rest.
Important
Now - if you get a message, when you press the Burn button, which reads:

This means that you must manually Build the DVD before before Burning.
The solution is simple:
(1) Press Build from the Toolbar at the top of the DVD Studio Pro interface.

(2) Manually select an area on your computer where you wish for the files to be stored.
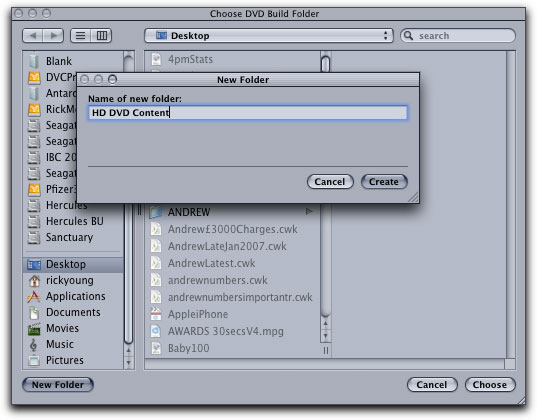
To do this choose the Desktop or a Hard Drive; Click New Folder; name the new folder; Press Create; Press Choose
You have now defined an area where the files created by DVD Studio Pro will be stored.
Press Burn and the files will encode and your HD disc will be created.
In Conclusion
So there you have it - a guide to producing HD DVDs by simply working with the current (or even previous) range of Macs and without investing in expensive HD recorders which are only just emerging onto the market right now. Furthermore, you can use affordable DVD-Rs.
I find encoding high definition DVDs to be a liberating experience. The quality is ridiculously good and it plays back beautifully on modern Macs. So for anyone operating in a Mac environment this is great way to show people your work.
Without doubt, in the not-so-distant future HD will rule the entertainment industry and Standard Def., just like the millions of feet of film that used to run through telecine machines in TV stations, will be phased out...
Not so many years ago editors fantasied about a time when Macs, like toasters, would spit out ready-to-watch DVDs.
Now the power in the hands of the creator has just been ramped up several notches.
Final Word
This article can be virtually summed up in few lines, which is: "if you want to make HD Dvds onto 4.7 GB DVD-Rs then set the preferences in DVD Studio Pro to the HD format required, encode your assets through Compressor, and then follow the same procedure as one has used to make SD DVDs." To arrive at this conclusion took quite a bit of experimentation and testing of various methods. While the process is quite straightforward finding my way through this unchartered terrain has been quite a journey. Good luck in your own quest to produce HD DVDs.
 MacVideo Magazine
For DV FilmMakers and Video Professionals
Published Quarterly
Printed magazine DVD included - $59.95US £ 29.95UK
Electronic version (PDF) $19.95US £ 12.95UK
Both subscription versions include access to the MacVideo web site.
www.macvideo.co.uk
[Top]
copyright © Rick Young 2007
© 2000 -2007 Apple
Computer, Inc. All rights reserved. Apple, the Apple logo, Final
Cut Pro, Macintosh and Power Mac
are either registered trademarks or trademarks of Apple. Other
company and product names may be trademarks of their respective
owners.
All screen captures, images, and textual references are the property and trademark of their creators/owners/publishers.