
| iDVD Authoring |
February 28, 2005
By Ken Stone

iDVD Authoring February 28, 2005
Authoring with iDVD 5
By Ken Stone
System Requirements
Introduction
I remember when the first version of iDVD shipped. Never a fan of VHS as a final output from Final Cut Pro I did some testing. Simple as it was, iDVD worked. As it turned out I started using iDVD to create DVDs for some of my customers who are artists. I would use a piece of art from the artists portfolio to replace the stock template backgrounds, added some music and produced a DVD that my customers could use. iDVD 2 added a few more features and more of my customers wanted DVDs of their projects. As time went by my customers demanded greater sophistication in their DVDs, so I switched to DVD Studio Pro 2 when it shipped.
iDVD still intrigues me and I have kept up with each new iteration. With each version more features have been added. Some of these new features have come down from iDVDs big brother, DVD Studio Pro. I admit to be being more than just a little surprised when I launched iDVD 5 for the first time. Aside from additional new features, the new stock Menu Themes with their animated drop zones are quite amazing, very professional indeed.
iDVD 5 will accept most QuickTime formatted material, except for: QuickTime VR movies. Sprite movies, Flash tracks, MPEG-1 and MEPG-2 files. You can use video from Final Cut Pro, Final Cut Express and iMovie. Photos from iPhoto and music from iTunes as well as AAC, MP3, and AIFF audio files. Images and photos from graphic applications like PhotoShop are supported. iDVD will accept bitmapped image files, JPEG, TIFF, PSD, GIF, BMP, PICT, and PDF, but not Vector graphics (Illustrator files), iDVD 5 supports high definition video (HDV) and 16:9 widescreen formats as well as MPEG-4 and iSight video imported as an iMovie HD movie.
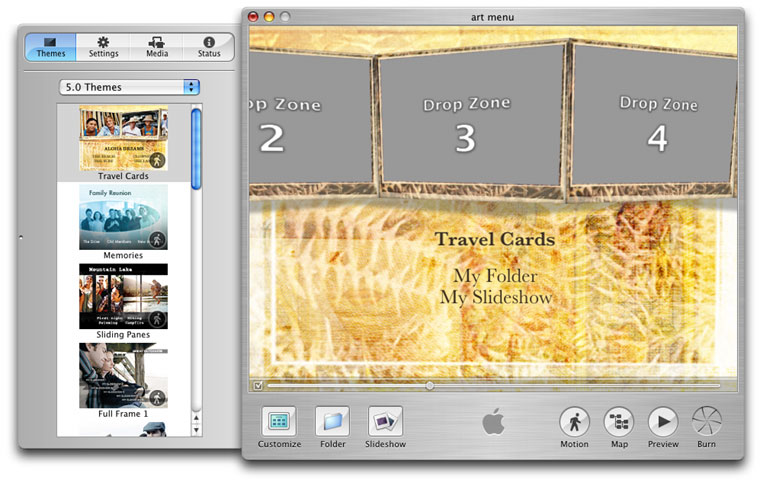
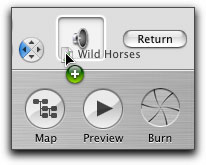
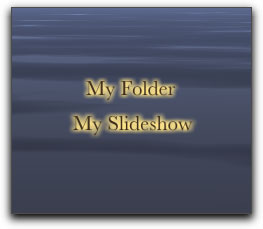
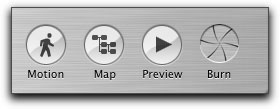
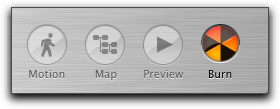
There are seven buttons along the bottom of the iDVD Editor window. The Customize button, opens the Customize drawer to the left of the main iDVD window (shown below). The Folder button (which I would rename the 'Submenu button'), places a 'My Folder' link on the menu and at the same time creates a new menu which is accessed by the 'My Folder' link. There are several reasons to create new menus. For one, iDVD limits you to a total of 12 links (buttons) on any one menu. If you need to have more than 12 links, then using 'Folder' for the 12th link will take the viewer to a new menu where you can have an additional 12 links. Yes, you can add a 'Folder' to this new menu for yet another menu. More often, you'll simply want to have different menus for different subjects of your DVD. The last button on the left is 'Slideshow'. Like 'Folder', Slideshow will create a new link (My Slideshow) in the menu that links to the new Slideshow. First, on the right side is the Motion button which turns green when activated and plays the motion menus with audio for a quick preview. Next is the Map button which provides a graphical view of the organization of your DVDs menus and links; more on this later. The Preview button puts your DVD into play mode complete with an on screen remote control. The Preview button allows you to simulate how your DVD will work when viewed on a TV. When in Preview mode you can run your links, navigate around and test out your DVD. This is essential for proofing your DVD before you burn to disc. When you have completed your DVD and tested it out then it's time to use the Burn button; more on this later.
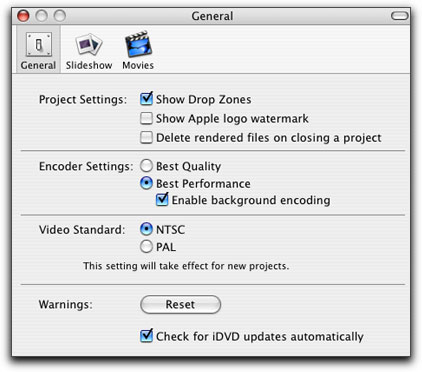
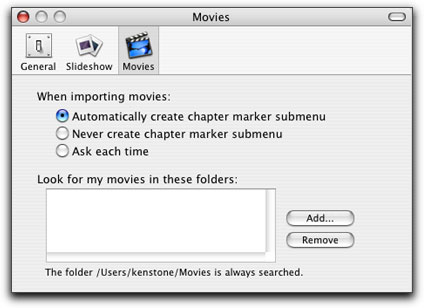
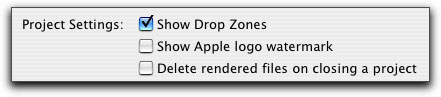
iDVD 5 has three Preference panes that you will want to go through and set up before you start your new project. From the menu bar, choose iDVD and select Preferences. In General settings, turn on 'Show Drop Zones', turn off the Apple logo watermark and turn off 'Delete render files on closing' as well.
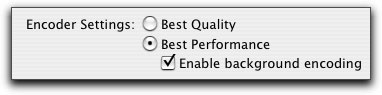
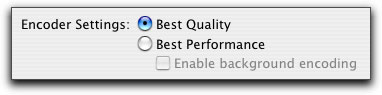
Encoding is the process of converting video to the m2v format (MPEG 2) which can then be read by DVD players. These encoder settings control the quality of the encode, the speed of the encoding process and when the encoding will take place. When Best Performance (max 60 minutes) is selected, encoding will happen quickly and you have the option of selecting 'Enable background encoding'. With this selected, iDVD will start encoding as soon as you place your video assets into the iDVD interface. You can continue to work on your project, add art work, background images and audio, create buttons, additional menus and build slideshows. While you are working, iDVD will be preparing your video. Provided your video is under 60 minutes, this is the fastest way to encode, but the quality takes a bit of a hit. If your video runs more than 60 minutes, or you want higher quality, then you want the next encoding option.
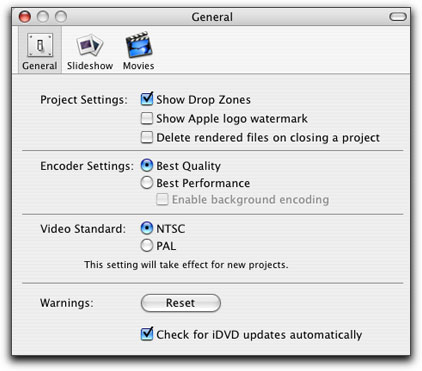
If you choose 'Best Quality' you will notice that the Enable background encoding is grayed out and you will not be able to encode as you work on your project. Encoding will have to wait until you have finished your project and click the Burn button. There is a reason for this. iDVD will automatically select the best quality possible for the total amount of video you have in your iDVD project. As quality will be determined by the length of your video, iDVD must wait until you have completed your project so it will know how much video it needs to encode and can make the appropriate choices. iDVD uses the same encoding engine found in Compressor which ships with FCP and DVD Studio Pro. Set your Video Standard to either NTSC or PAL.
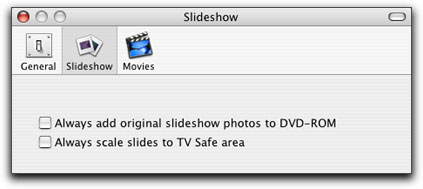
Slideshow settings. When you build a slideshow, the photos that you use in the show will be reduced in size and resolution and cropped to fit in the DVD window. iDVD will automatically scale your photos to fit on screen while maintaining the photos aspect ratio, this can cause a black border top and bottom or on the sides. To avoid black borders and fit your photos exactly in the DVD window, it will be necessary to resize your photos first in an image-editing application, to 640 x 480 at 72 dpi. If your photos have an aspect ratio different than 4:3, viewing on a TV set may crop some of the photo producing black borders. You can avoid cropping by selecting 'Always scale slides to TV Safe area', however, this may distort the image and may not be the best choice.
There is an additional option to include these same photos on your DVD, as data files, at their full size and resolution. These files can be opened on a computer and used for other purposes.
The Movies section basically covers how iDVD will handle Chapter markers that have been set in FCP, FCE and iMovie. Chapters will be covered later but you should set this to 'Automatically create chapter marker submenu'.
It is in the Customize Drawer and tabbed panes that we build, modify and customize our DVDs.
Themes
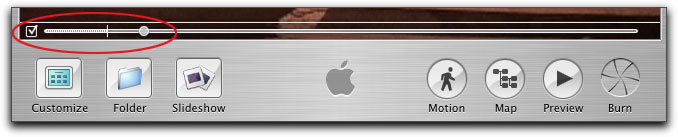
iDVD 5's new Themes, with their animated drop zones, add a new and exciting dimension to your menus, moving across the screen and performing a seamless loop for continuous playback. In addition to the drop zones being animated, the menu title and buttons are also animated, moving onto the menu during the first few seconds and then settling into place. There is a new level of sophistication with these themes. When the menu first start to play, drop zones, DVD titles and links (buttons) move onto the screen and slowly come into view. When the loop is completed and starts over again, you would not want the titles and links to disappear only to reappear once again on screen; you want them to stay in place. As shown below, there is now a scrub bar and a loop control that causes the animated menu to start its' second loop, not at the beginning, where everything is off screen, but at that point in time where all the items are on screen in their final position. You can also scrub through the duration of the motion menu to have access to drop zones that otherwise would be off screen.
Preference Settings
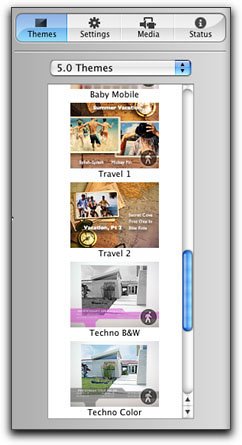
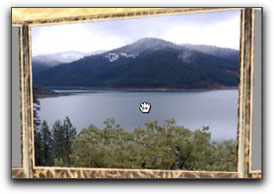
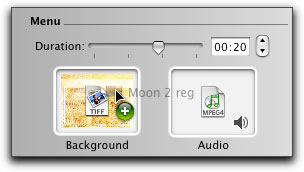
The first pane holds 15 iDVD 5 pre built Themes, menus with an interesting variety of backgrounds, motion, animated drop zones and links, button styles, fonts, and audio. In addition to adding photos, video clips, and even Slideshows to the Drop Zones, (which are predefined areas in the menu designed to hold art work), you can choose to replace the menu background art with a photo or video clip of your own, however, adding a photo or video clip to the background using the 'Background Well' in the Settings pane of the Customize drawer, will knock out the animated drop zones. Replacing the menu background art with a photo or video clip by dragging it directly onto the menu will not disturb the drop zones.
Each theme has its own style and look. Several of the themes come in pairs, two different versions of the same theme, great for a main menu page and an index (chapters) menu page. If iDVD 5 is the first version of iDVD that you have installed then only the Themes contained in iDVD 5 will be available. If you had earlier versions of iDVD on your Mac, then the Themes from those earlier versions will be available to you as well. Themes that contain motion elements are denoted by the same motion icon that is found on the Motion button. Some of the motion Themes contain audio as well. You can change the audio to any music you like or delete it entirely. To preview or use any theme, simply click on a Theme in the Themes pane, it will load into the iDVD window. You can continue to try different themes until you find one that suits you. Selecting a different theme will replace the existing theme.

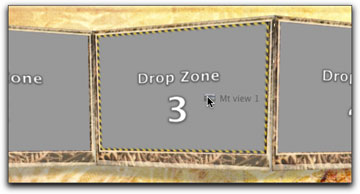
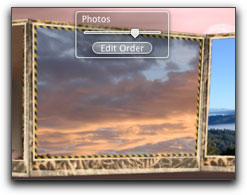
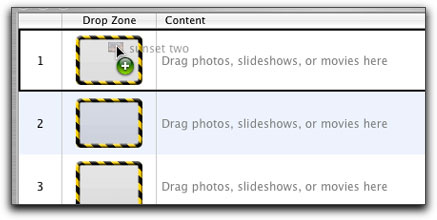
Most of the iDVD 5 Themes have animated 'Drop Zones', predefined areas in the menu designed to hold art work, that scroll across the screen in a never ending loop. You can place a still image, movie or even a slideshow that contains up to 99 images into a drop zone. You cannot, however, apply audio to a drop zone. Drop Zones are simply containers for art and cannot be used as links to movies, submenus or slideshows. When you drag an image, movie or slideshow into a drop zone, the borders of the drop zone will be marked by a broken yellow line. If you do not like your choice, simply drag a different item into the drop zone; this will replace the first item. When adding photos to a drop zone, placing your cursor and clicking on the photo will turn the cursor into a grabber hand icon. With the grabber hand you will be able to shift the art either up and down or left and right, to better position your art work. If you have added a Slideshow to an animated drop zone, clicking on the zone will display an overlay control. You can move the slider to select which photo you want to appear first. In addition, clicking on Edit Order will open up the Slideshow Editor which will allow you to change the order of the photos, delete or add additional photos to the show.
You do not have to use the stock iDVD Themes. You can create your own unique menu, using a still image, QT movie with audio, a freeze frame from a movie, art from an image editing application or digital camera, by dragging your art into the 'Background Well' found in the Settings pane in the Customize window. Placing an image into the Background Well will change the background art and will delete the animated drop zones in the process.
Images that become background art for a menu are scaled by iDVD to fit the DVD window standard of 640 x 480. When you use an image as menu background art, it will be cropped to fit the standard DVD window size, while maintaining the aspect ratio of the original image. If you want your image to fit the DVD window exactly and not be cropped by iDVD, you will need to size your image to 640 x 480 at 72 dpi first in an image editing application. You can use this art as the default art for your entire iDVD project, by choosing 'Apply Theme to Project/Apply theme to Folders' from the Advanced menu.
Settings
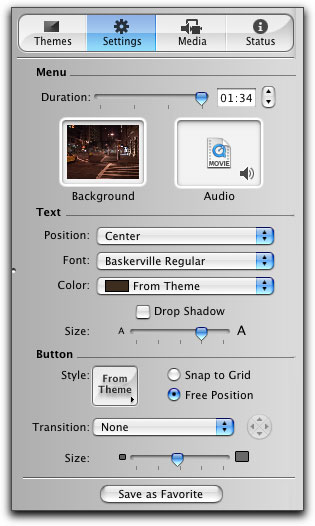 The Settings pane is where we customize and modify the look (and sound) of our menu. The Settings pane is divided into three sections; Menu, Text and Button.
Menu
Locate the movie, audio or still image you want and either click on the 'Apply' button at the bottom of the Media window or click on the item and drag it into the iDVD menu and drop.
Text
Button
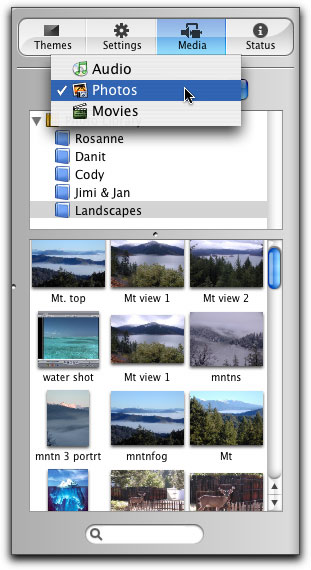
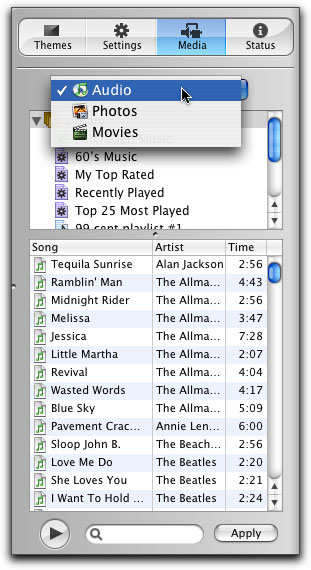
Media
As a member of the iLife family, iDVD integrates with the other iLife applications. From inside the Media pane you have access to your iTunes, iPhoto, and iMovie Libraries. If you use these three applications, then it could be that all the material that you need to build your DVD is in these Libraries.
If you use other applications to create movies, audio or still images, you can drag these assets from the Finder directly to the iDVD menu or use Import in the File menu.
Status
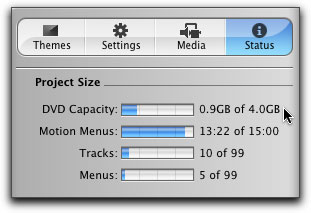
The Status pane in the Customize pane allows you to monitor how much space your DVD is using and how much additional space is left for your project. The total amount of space used is the combination of the amount of video, plus motion menus, still menus, transitions, audio, slideshows and DVD-Rom content. You will note that the capacity of a DVD-R disc is about 4.0 gigs.
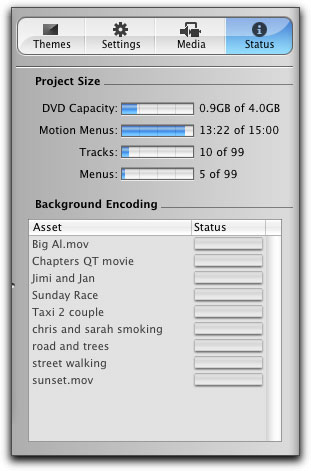
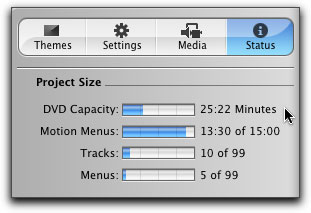
1. The DVD Capacity meter shows you how much space in gigabytes (GBs), is being used by your DVD project. If you click on the text to the right of the capacity meter the figure will change to display the run time in minutes for your project. This is critical information. If you want to encode your DVD at best quality, iDVD requires that the total time is less than 60 minutes. DVDs that run longer than 60 minutes will be encoded at lesser quality. The fact that iDVD produced DVDs have a maximum run time of 2 hours means that you have to know how long your DVD project is to prevent going over this limit. Additionally, if you want to save time by using the 'Enable background encoding' feature, you will have to keep your project to under 60 minutes.
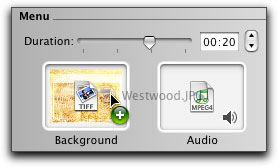
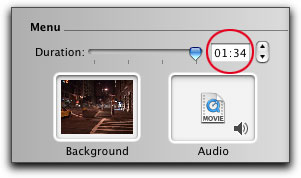
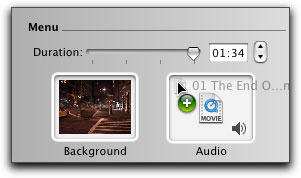
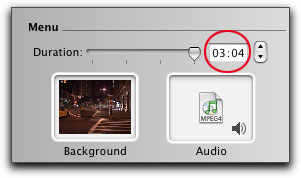
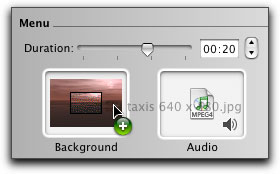
2. The Motion Menu meter shows the total run time of the motion menus in your propject. You can have up to a maximum of 15 minutes of motion menus which will use one GB of disk space. Space used by motion menus takes away from the space available for video and other content. You might want to keep your motion menus short. The duration of a Motion menu is determined by the length of the audio that you apply to that menu. As shown below left, the music that I have added to the motion menu is 1 minute and 34 seconds. Changing the music by dragging in a new song (below center) changes the duration of the motion menu to 3 minutes and 4 seconds. A motion menu will, by default, play the duration of the music thus avoiding cutting the music off before the music ends. You can shorten the length of the music by dragging the duration slider to the left.
3. The Tracks meter shows the total number of video tracks (movies) and slideshows in your project. In iDVD, slideshows are handled as tracks and iDVD can support up to a total of 99 tracks.
4. The Menu meter shows the total number of motion and still menus in your project. You can have up to 99 menus. When the duration of a menu is changed or a new menu is added to the project, the DVD Capacity and Menus meters will be updated to reflect these changes.
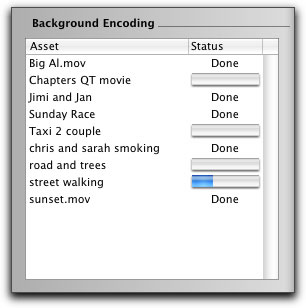
5. Background Encoding. If you decided to use 'Best Performance' (lesser quality) for your DVD that is under 60 minutes in length, and you have selected 'Enable background encoding', the encoding process will begin immediately allowing you to continue working on your DVD project while the encoding process goes on in the background. The progress of the encodes will be displayed in the Status pane with a blue progress bar. As each asset is encoded the progress bar will be replaced with the word 'Done'. If you click Burn before iDVD has finished encoding, iDVD will finish the encoding process before beginning to burn the disc.
If your iDVD project is on-going, you might find that you need to quit iDVD before the project has been completed. In order to insure that the encoded files thus far complete are not lost when you quit iDVD, be sure that the 'Delete rendered files on closing a project' in iDVD Preferences is unchecked.
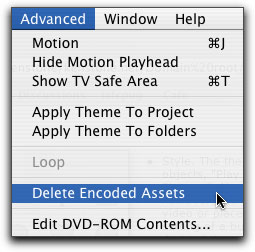
Using the 'Best Performance' setting for a DVD under 60 minutes will take the least amount of time to encode, however, there is a trade off, performance over quality. If you have encoded your DVD assets at Best Performance and then decided later that you prefer to have higher quality, first select 'Best Quality' in the iDVD Preferences. Then, to delete the earlier, less quality encoded files, select 'Delete Encoded Assets' from the Advanced Menu.
As there is no 'Enable Background Encoding' available for 'Best Quality', the encoding process will not begin until you click on the Burn button. This is because iDVD will need to know the total length of your finished project so that it can pick the appropriate encoding settings. If you are wondering where iDVD hides its encoded assets, they are stored inside the iDVD project. Control click on the iDVD project and select 'show package contents'. You will find your encoded assets inside the Resources folder.
Workflow
Drop Zone Editor
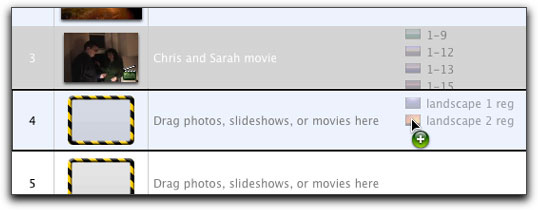
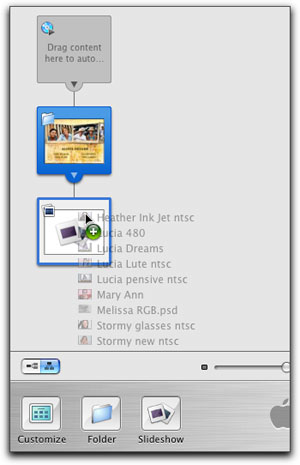
Along with the advanced animated drop zones, we now have a Drop Zone editor to manage this new feature. To access the Drop Zone editor double click on a Drop Zone or from the menu, choose Project > Edit Drop Zones. The Drop Zone editor window will open showing a numbered list for the Drop Zones in the chosen Theme. If you have already added photos, video or slideshows to your Drop Zones, their thumbnails will show in the editor. You can change the asset in a Drop Zone by copying a different image into that Zone, replacing the existing item. You can also delete content from a drop zone by dragging the image out of the editor window, it will disappear in a puff of smoke. You cannot, however, change the order of the assets in the Drop Zone editor like you can in a Slideshow.
But wait .... there's more. You can actually add a slideshow to a Drop Zone, or different slideshows to each Drop Zone in the theme. When there is a slideshows in a Drop Zone, each time the menu loops a different photo will appear. To create a Slideshow Drop Zone drag multiple images or even a folder containing photos into the Drop Zone in the Drop Zone Editor. This can also be accomplished by dragging photos into a Drop Zone in the menu window as well.
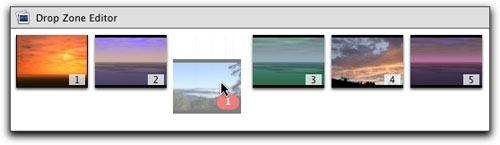
You can edit the images in a Drop Zone Slideshow by double clicking on the Slideshow in the Drop Zone editor which will open up the Slideshow editor, shown below. You can add, delete or reorder the photos in the same manner as a regular slideshow and as with a regular slideshow, you can have up to 99 slides per Drop Zone Slideshow, but do you really think that someone is going to watch your DVD menu loop 99 times? (grin)
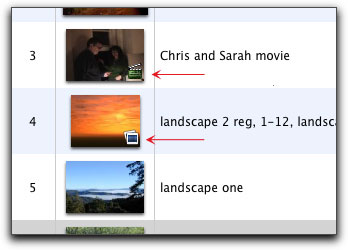
You can tell what each item is in the Drop Zone editor by the small 'clap stick' (QT movie) or slideshow icons. A single image in a Drop Zone will have no icon.
DVD Authoring
You can jump right in, building your project in any manner or order that you like, however, I have found that a little planning before hand will help keep things organized and make for a better DVD project for your viewer. I often sketch out on paper my menus and sub menus, marking out my links and noting any still images, for backgrounds or drop zones or audio that I might want to add to the project. You'll want to decide what elements you want on your main menu, what you want it to look like, and what links (buttons) are needed so that your viewer can navigate your DVD. If you are planning on encoding at 'Best Performance' with Background encoding enabled, you'll want to add your video assets early so that the encoding process can proceed while you are working on your DVD. Locate and prepare all your assets so that they are ready to go as you need them, ie. gathering together photos for a slideshow.
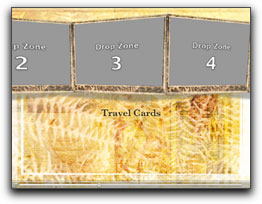
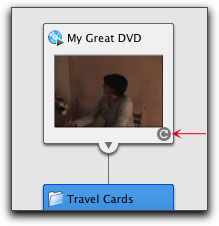
I have decided that I will use the 'Travel Cards' theme from the iDVD 5 templates. This menu has 6 animated drop zones. You can drop photos, QT movies or Slideshows right into the Drop Zones, accessing each Drop Zone by scrubbing through the motion menu, but I have found that it is easier to use the Drop Zone editor.
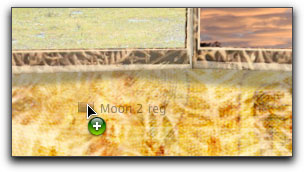
Back in the 'main menu view' my first menu's Drop Zones are finished. I'm not crazy about the background art or audio that comes with this theme, so I intend to replace both. There are two ways to change out the background art. Dragging new art into the 'Background Well' in the Setting pane in the Customize drawer will not only replace the background art but it will also eliminate the Automated Drop Zones, this may not be what you want. To replace the background art only, drag your new image into the Menu window and drop on the existing background, being careful not to hit a Drop Zone. To use a QT movie as your menu background, hold down the Option key as you drag the QT into the menu. This will set your QT movie as the background and will retain the Animated Drop Zones. To change out the music, drag your new music into the 'Audio Well', use the Audio section in the Media pane, select a song and click on the 'Apply' button or drag the song onto the menu from the Finder.
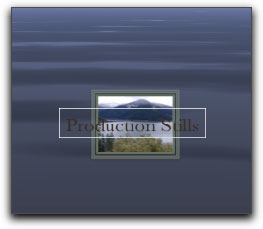
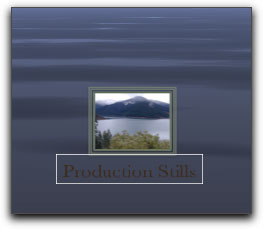
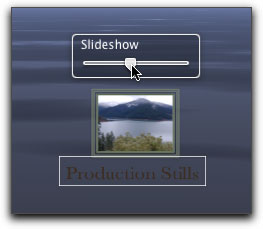
With the main menu finished, it's time to add buttons (links) and content. From the main menu I want to have a link to a slideshow called 'Production Stills' and a link to a submenu that will have movies.
Slideshows
To create a Slideshow, click on the Slideshow button at the bottom of the iDVD editor window. This will place a text link (button) into the menu called 'My Slideshow'. Let's change the name of this link by clinking on it to select it, then click again to highlight the text and make the change.


To work on a slideshow, double click on the slideshow link to open the Slideshow Editor. You can select images from iPhoto in the Media pane or you can drag images in from the Finder. Bottom left of the slideshow editor are several controls. Loop Slideshow, for continuous display. You might use this slideshow loop ability in conjunction with iDVD's 'Auto Play' function. Display navigation gives the viewer the chance to move forwards and back using the remote control and is a must when you have set 'Slideshow Duration' to 'manual'. Add photos on DVD-ROM will add the photos in the slideshow to the DVD as separate data files for use on computers and unlike the photos in slideshows where iDVD reduces the size and encodes the photos, the images added to the DVD-ROM as data will be at full resolution. You can also add photos to the DVD-ROM aside from the ones in the slideshow. From the Advanced menu, choose 'Edit DVD-ROM Contents'. In the 'DVD-ROM Contents' dialog box, you will find 'New Folder' and 'Add Files' buttons. Remember that adding photos will use up space that otherwise would be used for video. Unfortunately, it does not appear that the space used in the DVD-ROM section, is reflected in the Status pane.
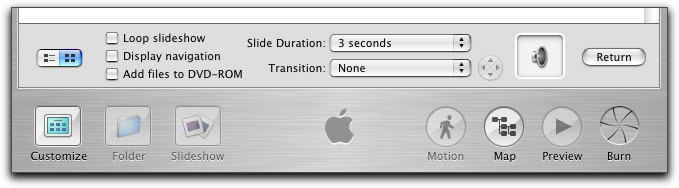
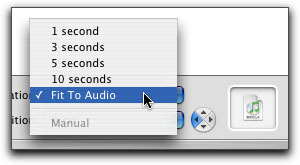
There is an Audio well into which you can drag your background music from the Finder, or using the Media pane, select your audio and click the 'Apply' button. With the 'Slide Duration' settings you can control the display duration of each photo to; 1, 3, 5, and 10 seconds. If you have added audio to your slideshow then 'Fit To Audio' will become available which will set the display time for the slideshow to match the length of the audio. There is also a 'Manual' option which would be used in conjunction with the 'Display navigation' during slideshow so that your viewer can navigate through the show.
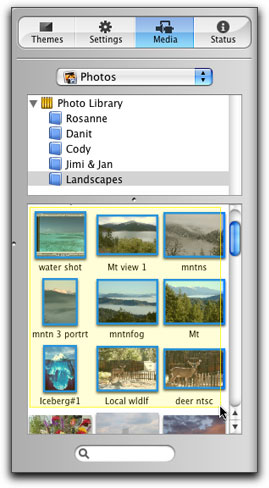
You can load photos into the Slideshow editor in several ways. If you use iPhoto, open the Media pane in the Customize drawer and select 'Photos'. You can drag photos in one at a time or you can marquee a number of photos and drag them all in in one shot. You can also drag photos in from the Finder one at a time or drag in a folder of photos. There is also a 'Search' option at the bottom of the Media pane.
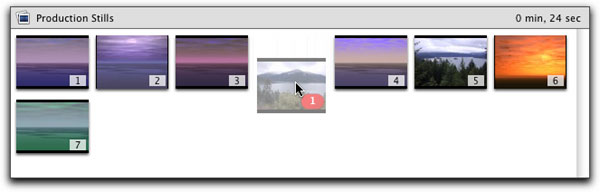
Once you have your images inside the menu editor you can re arrange their order by dragging them to a new position. The slideshow editor offers two 'views' of your photos, horizontal or vertical (lower left in the editor). You can remove an image by selecting it and hitting the delete key. The total duration of your Slideshow will be displayed in the upper right of the Slideshow editor window. In this case I have 8 slides set at 3 seconds each which equals 24 seconds.
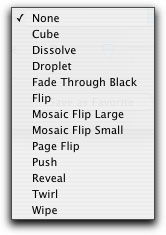
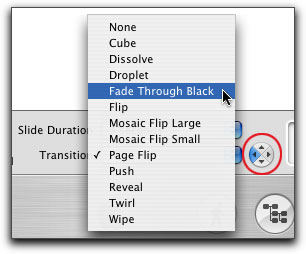
Transitions can be applied to the photos in your slideshow, just as you can apply transitions between menus, however, you cannot use different transitions for different slides, one transition per slideshow. You control the direction of the transition using the control circle to the right of the transition selection menu for those transitions that use direction motion like Page Flip or Wipe.
iDVD will support 99 photos per slideshow, and a total of 99 slideshows per DVD. Note - If you use high-resolution images, resolution greater than 72 DPI, you may experience audio glitches when a burnt DVD disk is played back.
To exit the Slideshow Editor click on the 'Return' button, bottom right of the window.
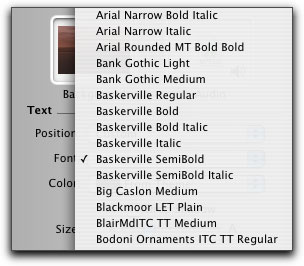
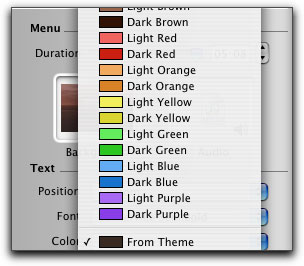
Setting Text
We can change the font, color, size, position and even add a Drop Shadow to any text links or the menu Title that appear in the menu. To edit text, click once on the text to select the item.

In the 'Text' section of the Settings pane are the drop-down menus for each of these attributes.
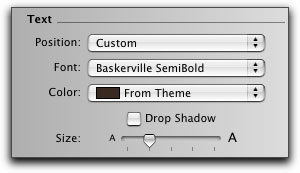
To reposition the text in the menu select 'Custom' from the Position menu. To delete the Title completely choose 'No Title'.
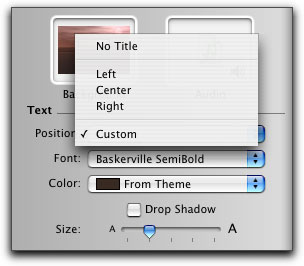
To change the text, click once on it to select the item, click again to edit the text.

Submenus
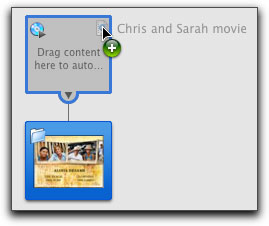
Next, on my main menu, I want to create a link to a new menu for my movies. Clicking on the Folder button (submenu) causes two things to happen; a text button which at first will say 'My Folder' is placed on the menu (which I have changed it to read 'Movies') and iDVD creates a new menu page.


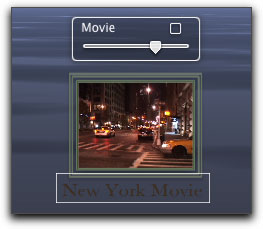
Double clicking on the Movies link will open the new 'Movies' menu. At first glance it might not appear that you are now looking at a new menu, as all of the art from the first menu, including the animated drop zones, will appear in the new menu. The only difference is that the text links (buttons) will not come forward into the new menu. The title from the main menu will also come forward and I have changed it to read 'NY Movies'.
I want to replace the background art, audio and lose the animated drop zones for this menu. I can change the art in one shot. Remember that I told you that dropping a new image into the 'Background Well' will replace the background and eliminate the automated drop zones. If I had wanted to preserve the animated drop zones I would have dragged my new background art into the menu. While it's true that the animated drop zones will disappear, the menu title and any text links (buttons) on the page will still be animated and may take a few seconds before they appear on screen. If you do not want your viewer to be looking at a link-less menu at the start you can turn off the animated effect by unchecking the looping function in the scrubber bar in the menu window.


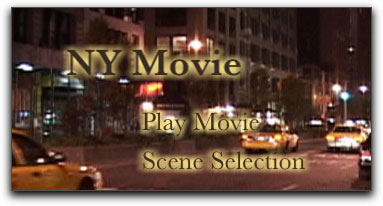
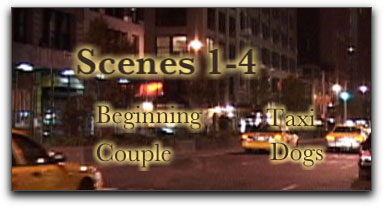
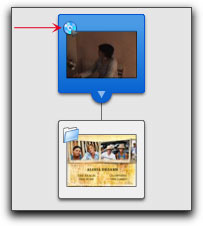
The first movie I want to add is 'NY Movie' a QT movie exported from FCP with chapter markers (more on chapter markers later). In my iDVD Prefs I have "Automatically create chapter marker submenu" turned on. Dragging the FCP movie with chapter markers into the menu will set the movie title and add two links, 'Play Movie' and 'Scene Selection' (below left). If the viewer clicks on 'Play Movie' the entire movie will play and when done, return to this menu. If the 'Scene Selection' link is used, the viewer will be taken to a new menu that is automatically create by iDVD (Below right). You can change the background art and audio of the Scene Selection menu as well as changing the title "Scenes 1-4" and the scene (chapter) names.
Buttons
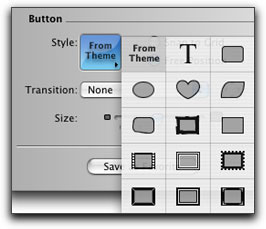
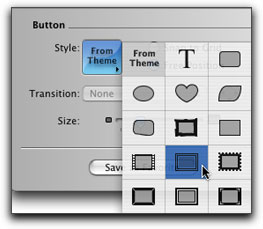
When you create a 'New Folder' (submenu), Slideshow, or drag a movie into the iDVD menu, a 'text button' that will link to that item will appear in the menu. After renaming the text links you can turn these text links into actual buttons. Select a button and from the 'Button' section of the 'Settings' pane, click on 'Style' and choose a button style from the drop-down menu. Button styles are global for each menu. Apply a style to one button and all buttons will take on that style. This will produce a button with a text link. Once you have assigned a button style, you can remove the text portion by selecting the text and hitting delete. If you have applied a button style and wish to remove the button, select a button and then select the 'T' (text) in the Styles drop-down. This will remove the button style and leave you with a text link. If you want the text link to match the art of the theme then from the 'Style' drop-down, select 'From Theme'. If the themes 'text' links are animated, the replacement buttons will display the same animated behavior that the 'text' links did.
Default link names |

Links renamed |
14 different button styles |
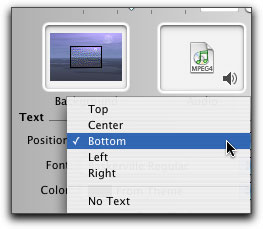
When a text link is first converted to a button the text link will fall across the face of the button. To reposition the text link, select the text and from the 'Text' section - 'Position', choose a different location for the text link. A button and its text link are tied together, move the button and the text will move with it.
Default text position |
Options for text placement |
Text and button are locked together. |
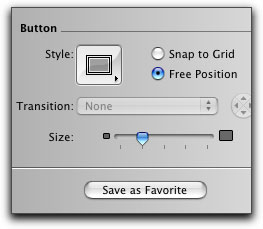
The size of the buttons can be changed by selecting a button and moving the 'Size' slider. As with other element controls, changing the size of one button will change the size of all the buttons on that menu. Changing the size of a button will not affect the size of the text that goes with the button. The size of the text can be changed independently, a nice feature. In order to move a button to a different position in the menu, the 'Free Position' option must be selected in the Button section of the Settings pane.
Free Position |

Button & text can be resized independantly |
One reason for converting text links to buttons is the fact that art work can be placed on the face of a button. A Slideshow button will display the first image of the slideshow on its face. Clicking on the button will produce a Slideshow slider which you can scrub to select which image from the slideshow will be displayed; this is called a 'Poster Frame'. You can also drop a video (QT movie) directly onto the face of a button and the movie will play out on the face of the button. Clicking on the button will produce a Movie slider. If you do not wish the movie to play on the button face you can uncheck the movie box, then using the scrub bar, you can select a Poster frame to be displayed as a still image.
Scrub to find slideshow Poster frame |
Scrub to find movie Poster frame |
Note: With some menus, like Sub menus (new folder) and Scene Selection menus, iDVD will automatically place Return arrows on each menu so that the viewer can return to the proceeding menu via remote control. When iDVD creates these arrows, it uses the text color from the Theme, as the color for the return arrow. If you have a dark menu, and the text color is dark, the return arrow can be hard to see. Changing the color of the menu title or text links does not change the color of the Return Arrow as the color of the Return Arrow is set by the Theme. It might be necessary to change Themes.


Chapter Markers
Chapter Markers can be created in FCP, FCE and iMovie for use in iDVD 5. With Chapter Markers it is possible for the viewer to move from scene to scene, via the remote control, and by using the Scene Selection menu that iDVD will automatically create for you when it detects chapters markers.
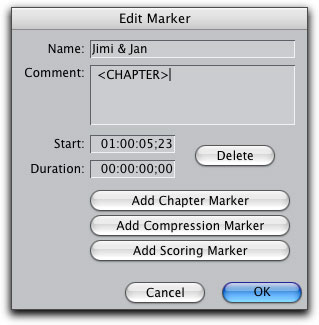
When creating your chapters in your video editing app, do not place a Chapter Marker at the start of your movie as iDVD will create the 'Beginning' chapter marker for you. With FCP and FCE, place your playhead at the position on the Timeline that you want to mark as the start of a scene. Now tap the 'm' key on the keyboard twice to set a marker and open the Edit Marker window. In the name section enter the name of the scene, remembering that this is the name that will appear in the iDVD scene selection menu in your finished DVD, so give it a proper name (you can change the name in iDVD if necessary). Next, click on the 'Add Chapter Marker' button. This will set the chapter marker and will enter "(CHAPTER)" into the comment box. Leave this exactly as it is as this comment is needed for the process of embedding the chapter markers. If you change this, Chapters will not work. Click okay and move your playhead to the next position and repeat the process. There is a limit of 99 Chapter Markers.
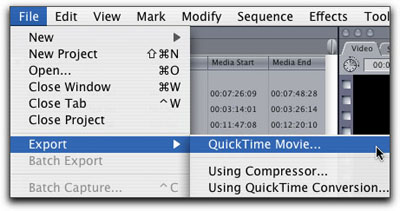
Once you have set all your markers, set an in and out point on your Timeline, File Menu > Export. From FCP 4.5 and FCE 2, select QuickTime Movie (not 'Using QuickTime Conversion').
There is an option in the Save box, "Make Self contained". If you uncheck this box the movie that is generated will consist of pointers to your media. The export process will happen quickly and the resulting file will be small in size. This is a good choice if you will be using iDVD on the same Mac as your editing application. If you chose to "Make Self contained" the resulting movie will contain all of the media, it will take longer to export and the file size can be quite large, (about 22 gigs for a 100 minute movie). If you will be moving to a different Mac to work on iDVD then you'll need to have your movie be self contained. In either case, leave 'Recompress All Frames' unchecked.
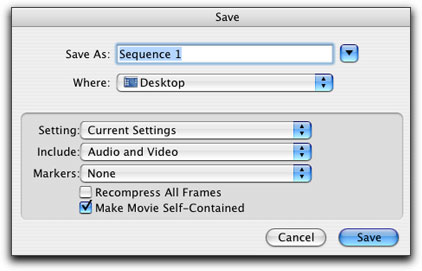
Final Cut Pro 4.5 |
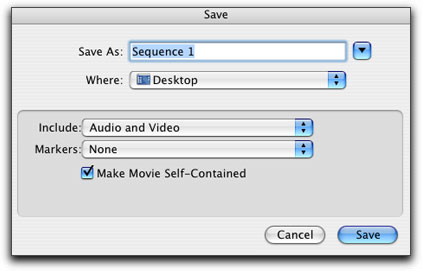
Final Cut Express 2 |
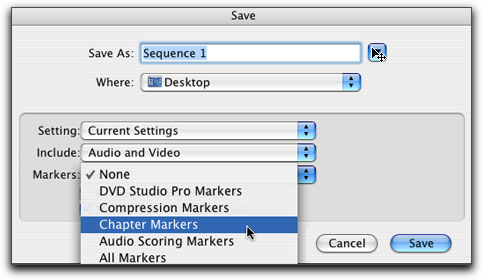
In The Save dialog box set the 'Markers' drop down menu to "Chapter Markers". Then click Save. You are now ready to drop your exported movie into iDVD, drag the QT movie icon directly into a iDVD menu where it will automatically set two text links for you, 'Play Movie' and 'Scene Selection'.
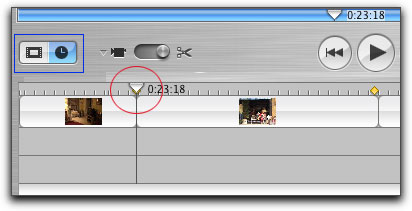
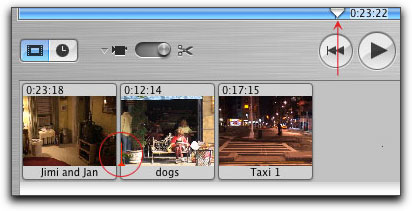
The process of adding Chapter Markers in iMovie is a little different. In iMovie 5, there are two views of the Timeline, Timeline Viewer and Clip Viewer, switch between the two by clicking on the icons (blue box below left). Move the playhead to the place in the Timeline that you want to set your first chapter marker, remembering that iDVD will set the a first chapter marker at the very start of your movie. In this case I have moved the playhead to the beginning of the second scene. In Clip view the playhead is also noted by a vertical red line (circled in red, below right).
Timeline Viewer |
Clip Viewer |
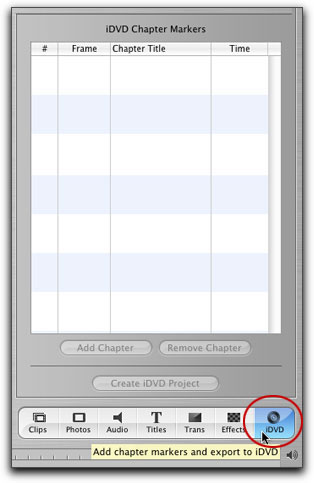
With the playhead in position, click on the 'iDVD' tab, which will open the 'iDVD Chapter Markers' window, then click on the 'Add Chapter' button.
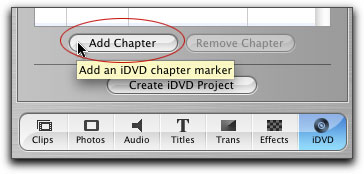
Each time you add an additional Marker it will be added to the list. You can click on the clip name to the right of the clip image and change the name to an appropriate scene name.
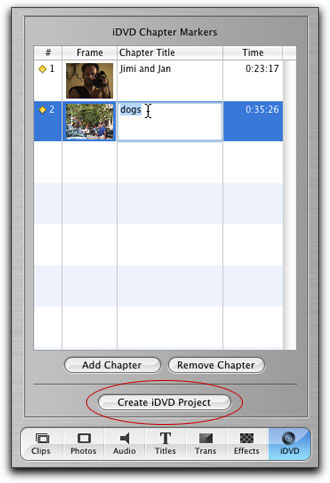
 When you have finished with your iMovie and added chapter markers, which should be the very last thing you do, click on the 'Create iDVD Project' button. This will launch iDVD and move your movie with chapter markers into iDVD. However, this will create a DVD with just the one movie. Most often you'll want your DVD to have more elements; additional movies and Slideshows. To use your iMovie as just one element of your DVD, open iDVD and then drag the iMovie Project icon into the iDVD menu.
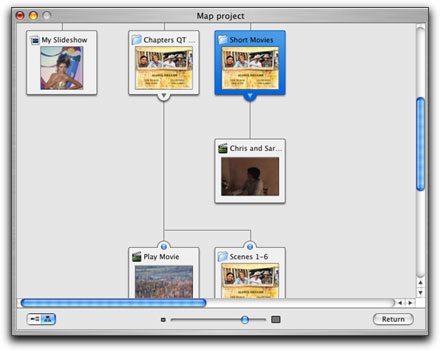
Map View
Map View, a feature introduced in iDVD 4, as a simple graphical view to show the organization and flow of a DVD project, has been updated to add a high degree of functionality in iDVD 5. Map view shows icons for all of the elements in the project and navigational paths (links) to each item. While Map view still serves to offer a graphical view of a DVD project, in iDVD 5 you can now build much of your DVD right inside Map View. You can add movies, movies with chapter markers producing the Play Movie & Scene Selection text links, add slideshows, create new menus, add transitions to menus, change background art and audio. You can also change text font, color and size, set 'Auto Play' (add Looping), even delete elements from your project.
Using Map View can be an efficient way to work in iDVD. When working in the 'main menu view', each time you change menus, iDVD takes some time to load the different elements and this can slow things down. In addition, rather than clicking down through the menus in the 'main menu view', to get where you are going (which takes a lot of patience), double click on any element in Map view and you will jump to that item immediately. For example, if you double click on a slideshow icon, the slideshow editor will open. This is a much more efficient way to navigate to different items as you need to work on them. In Map view there is no delay, 'instant gratification' (grin).
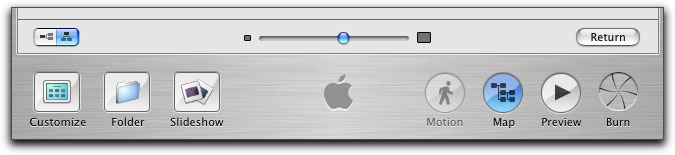
In Map view, there are controls at the bottom of the window. On the left, are the two visual orientations icons, horizontal and vertical. In the center is the Size slider and at the far right is the Return button which will return you to the 'main menu view' for whichever menu is selected in the Map view window.
Horzontal view |
Vertical view |
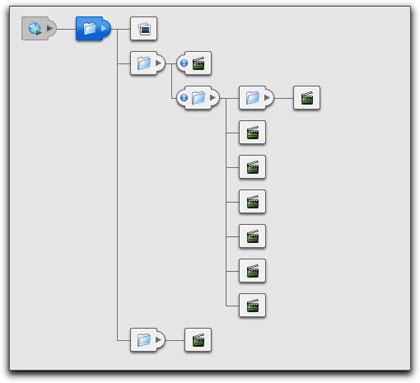
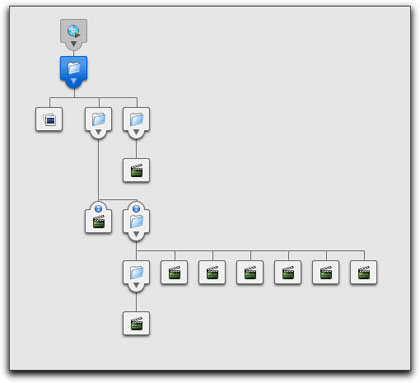
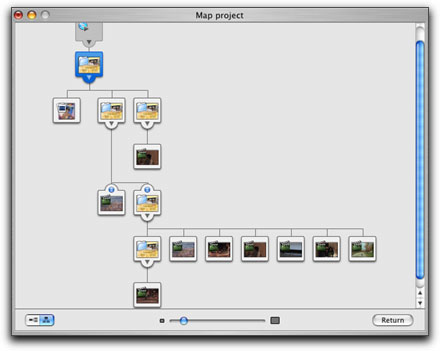
As you can see above, when the icon Size slider is set to small, all icons are generic and display little information about each item. As the size of the icons are increased (below left) the generic icons are replaced with art work that reflects the actual item. When the icon size is increased even further (below right), text information about each item is displayed. Larger is better for identifying each of the elements in your project, however, with the increase in size and when dealing with a larger DVD project, not all elements are visible on screen at the same time. There are scroll bars, but better yet, place your cursor in the Map view window and it will turn into a grabber hand icon with which you can click and drag to reposition the Map display and view all of the elements of your project.
As the size of the icons increase, menu art is displayed |
At even larger sizes, menu titles are displayed |
To aid with navigation inside the Map view window, you can collapse sections (threads) of the map by clicking the icon's disclosure triangle, shown below. This helps.
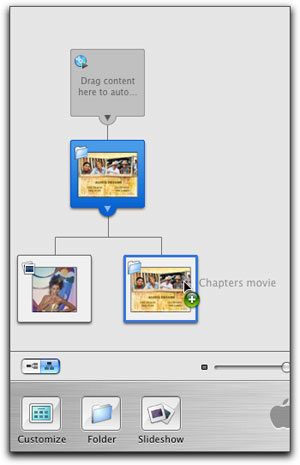
Working in Map view is similar to working in the 'main menu view'. Click on the Map button to open Map view. To add a movie click on the 'Folder' button which will add a new folder to Map view. Drag your movie onto the folder. To add a slideshow, click on the 'Slideshow' button then drag your images onto the slideshow icon. You can select items from the media pane in the 'Customize' window or drag items from the Finder.
|
|
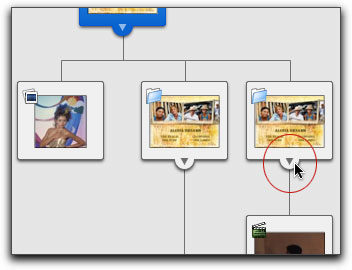
You can open the 'Customize' drawer while in Map view which will provide you with access to all the controls that you would use in 'main menu view'. I want to have my menu transition to my slideshow. As shown below, I have selected the menu in Map view and then picked 'Fade Through Black' as my transition. The transition is applied and noted by the transition icon at the top of the slideshow folder.

When an item is selected in Map view, you can change the background image and background audio by dragging these items into the Background and Audio 'Well'. You can also select an item and change the font, size, color, placement and add a drop shadow, although you won't be able to see these changes until you return to the 'main menu view'.
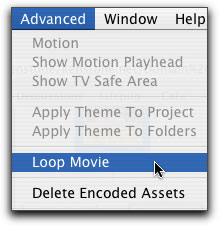
One of the more powerful features found in Map view is the ability to create an Autoplay DVD which will begin playing as soon as it is inserted into a DVD player, (this feature is called 'First Play' in DVD Studio Pro). Start a new iDVD project and open Map view. Drag the movie or slideshow that you want to autoplay and drop onto the 'Autoplay' icon. If you want your autoplay movie to loop, with the autoplay icon selected, from the Advanced menu, select Loop. The Loop icon will appear, shown below right. Nothing could be easier. If you want to remove the autoplay feature, drag the movie or slideshow icon out of the autoplay icon. It will turn into a puff of smoke. To return to the 'main menu view' from Map view, click the Map button.
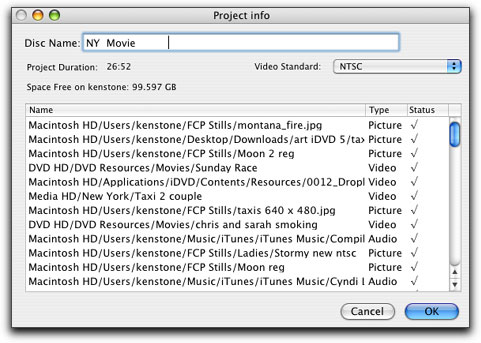
Project Info
You can see a list of all the assets in your iDVD project, and where they are on your hard drive, by choosing Project Info from the Project menu. You cannot alter or delete items from this list, it is view only.
Burn
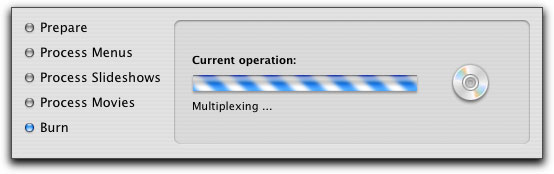
When you have finished your project and are ready to burn, the process could not be easier. Click on the burn button to start the process. The burn button will open and start spinning. At the same time, the DVD drive will open and you will be asked to insert a blank DVD.
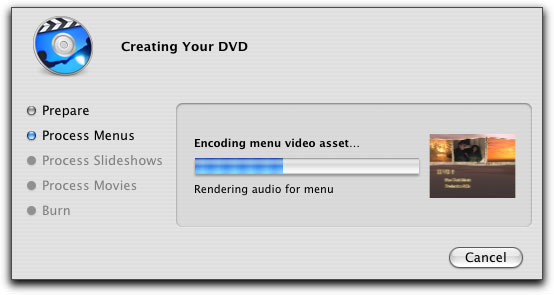
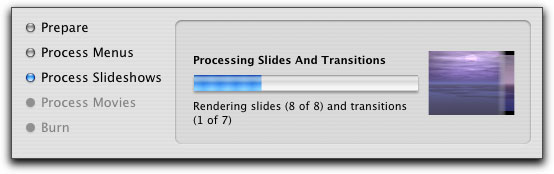
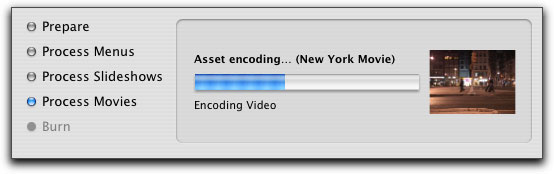
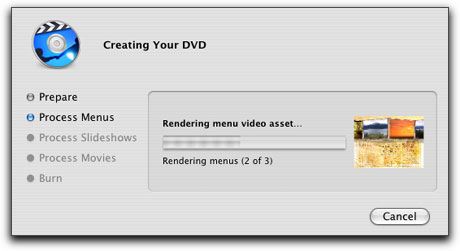
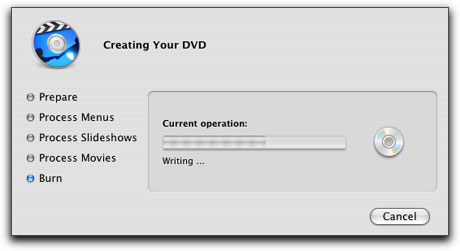
While the burn process in iDVD 5 is the same as in earlier versions, the process of reporting progress has been greatly enhanced. In older versions there was one progress bar which left us guessing as to how far along we were in the render-encode-burn process. In iDVD 5 there is a new Burn dialog box with the list of steps and a progress bar for each step, that iDVD is going through. In addition, there is a small preview window which displays the elements that iDVD is working on. Not only does this keep us informed on progress but if a problem should occur, we will know about it and at which stage the problem occurred.
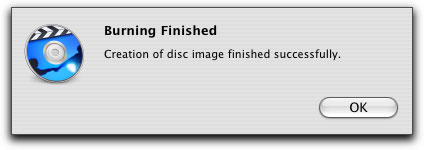
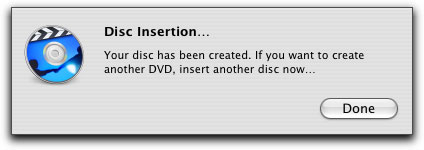
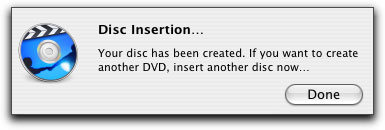
We are informed when the burn process is completed, the DVD drawer will open and we are asked if we would like to burn an additional DVD.
iDVD 5 can now burn to multiple DVD media: DVD-R and DVD+R, rewriteable DVD-RW and DVD+RW formats. SuperDrives in the newest Macs can write to DVD�R and DVD�RW, as well. BTW, while all these formats are now available to us you should be aware that Apple still recommends using DVD-R discs.
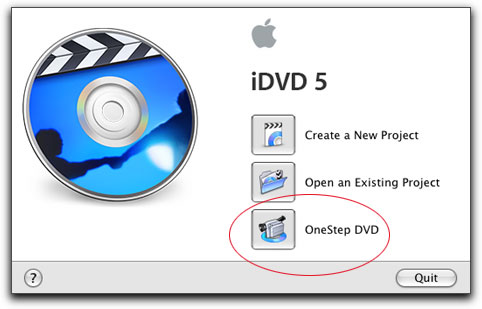
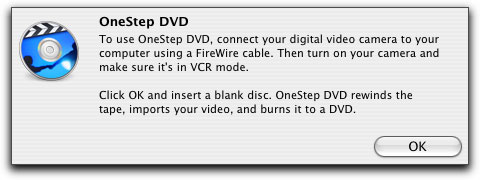
OneStep DVD
This new feature enables us to grab video from DV tape and burn to DVD in a 'OneStep' automated process. Plug your camera into your Mac via Firewire, turn the camera on and set to VTR mode. Select 'OneStep' in the iDVD project window and you will be walked through the process.
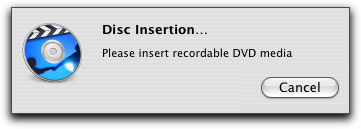
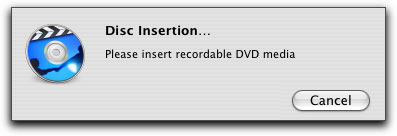
iDVD will rewind the tape in your camera, the DVD burner drive drawer will open up and you will be asked to insert a recordable DVD.
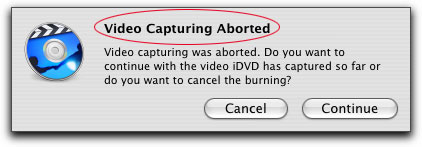
iDVD will start to capture the video to your hard drive. This process will capture the entire tape, but this may not always be what you want. You might have only 30 minutes of video with the rest of the tape blank. Fortunately, you can stop the capture process at any time. During the capture process, the video is displayed in the small preview window as it's being captured. When you get to that point where you want to end the capture, hit the 'escape' key to stop the process, not unlike ending a 'Capture Now' in FCP. After using the escape key, iDVD will present you with the 'Video Capturing Aborted' box. If you decide that you want to abort the process and trash everything that you have captured so far, click on Cancel. This will end the procedure and dump the captured video from your hard drive. If you want to move forward with the process using the material that you have captured so far, click on the Continue button and the process will move ahead.
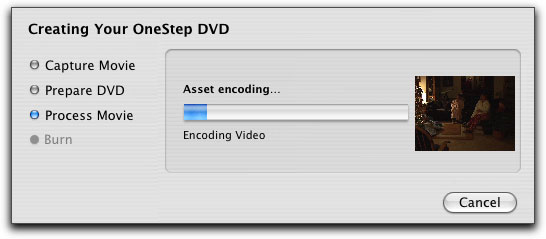
The 'Creating Your OneStep DVD' dialog box will return to the screen and you can follow the process as iDVD first encodes your video and then burns to DVD. The final product will be a looping, auto-start DVD. Upon completion, iDVD will ask if you wish to burn another disc. A great use of OneStep DVD is that it can quickly create 'Dailies' on DVD for movie projects.
Disc Image
Until iDVD 5, an Apple Superdrive was required to burn disks authored in iDVD. This did create a bit of a hardship for those people who wanted to use iDVD but did not have a Superdrive. Third party external DVD burners were not recognized by iDVD. In iDVD 4, the 'Archive' feature was introduced that let you author in iDVD and then, when finished, Archive your project and move it to a Mac that did have a Superdrive. An inelegant workaround.
iDVD 5 fixes this problem by introducing the 'Disc Image' feature which will create a finished, fully encoded and formatted version of your completed iDVD project. Rather than burning to disc, this process produces a 'disc image', a virtual DVD that you can use to burn to a third party burner, move to another Mac or open in the DVD Player to test before you burn to disc. One reason to have a disc image is that with a viable disc image you no longer need to keep your iDVD project and it's attending assets. This will free up hard drive space. You can use the disc image to burn multiple copies of your DVD using the Finder or a third party application like Toast.
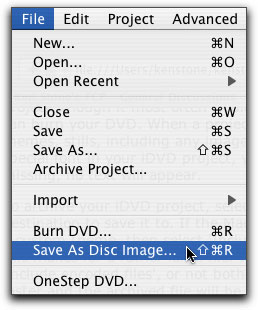
To create a disc image, select 'Save As Disc Image' from the file menu. You will be asked to name the disc and assign a destination to Save it to. When you click on Save you will note that the Burn button becomes active. Don't worry, its not really burning anything, just demonstrating that its working.
You will be presented with a progress box that informs you of the steps being taken and provides a preview of the video that it is working on. This is exactly the same information provided when you burn a disc.
Creating a disc image is an excellent way to proof your DVD before you commit to burning a disc. You can test your disc image by double clicking on the disc image icon and then launching the DVD Player.
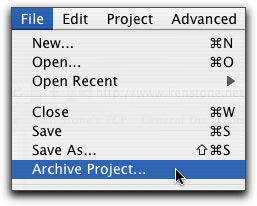
Archive Project
The Archive Project feature can be used to create a fully self contain version of your iDVD project. You can use this feature to store your project, though it most often would be used to move the project to a different Mac, a faster Mac or one that has a DVD burner. When a project is 'Archived', all elements of the project are written to a new file and all assets, movies, audio, themes, stills, including any images that you may have added to the DVD-ROM section. All links will be maintained. If you have used a special font in your iDVD project, you must insure that that the font is available on the Mac you are moving your project to. If the font is missing, no text will appear. Note. Up until iDVD 5, this feature was important if you needed to move your project to a Mac with a Superdrive to burn your DVDs. With the introduction of Disc Image in iDVD 5, the Archive Project feature has less value.
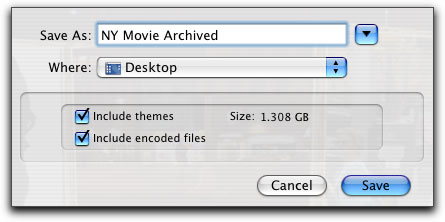
To archive your iDVD project, select 'Archive Project' from the File menu. In the Save dialog box, name your project and select a destination to save it to. If the Mac that you are moving the project to does not have the themes used in your project, or if you have built a custom theme, then select 'Include themes'. If you have already encoded your project then you can move the encoded files as well, but this makes for a rather large file. If the Mac you are moving it to is faster than the one you are working on, you may wish to uncheck 'include encoded files', or not bother encoding in the first place. If the encoded files are not included, the archive process will go much faster and the archived file will be much smaller. The archive process my take some time, however, you will be provided with a progress bar. If you make any changes to your project after archiving it, you need to archive it again.
HD support
iDVD 5 now offers High Definition support which means that it can import and edit HD video. However iDVD 5 is not able to encode to HD which means that there is no possibility of DVD High Definition output for playback. You may be aware that the video industry has yet to settle on a standard HD format and until they do, iDVD 5 will be limited to accepting HD video as source material but cannot output HD. For now, HD video will be handled as regular DV footage in the 16:9 widescreen format which will play correctly on wide screen TVs. As they say: "stay tuned".
Conclusion
iDVD 5 is a very impressive upgrade for two reasons. First, many new features and abilities have been added. With Disc Image we now have the ability to burn iDVD projects to third party burners (finally). OneStep DVD offers a quick and easy way to go directly from tape to DVD, no muss, no fuss. Also great for burning 'Dailies'. iDVD 5 can now accept 'high-definition' video as source material, (thought it can not output HD at this time). The Drop Zone Editor adds control and flexibility. The new motion Themes with animated Drop Zones and Loop points are both handsome and sophisticated, in addition, a scrub bar has been added to the 'main menu view' window. A number of existing features have been upgraded to add functionality, i.e. Map view. The Burn dialog box now provides useful information and iDVD 5 can now burn to a number of different formats.
The second reason is what seems to be a maturing of the iDVD code. Some of the features found in iDVD 4 were a little wonky, i.e. glitches in transitions between menus and in slideshows, as well as stuttering audio during transitions. The test DVDs that I burnt during the course of writing this article demonstrate that these problems have been fixed. Both transitions and audio play smoothly. The program runs faster, though you still need to be patient when switching menus, and it certainly seems to be stable. Although for my most complex DVD projects I would still be inclined to use DVD Studio Pro, there are times when I will use iDVD 5 as it handles some tasks extremely well, OneStep for burning dailies and Autoplay/Loop DVDs. With this latest version iDVD has finally grown up.
Enjoy,
--ken
copyright © Ken Stone 2005
All screen captures, images, and textual references are the property and trademark of their creators/owners/publishers.