
White Paper July 20, 2001
How to add a THIRD internal ATA hard drive to your G4
By Ben Bryant
White Paper July 20, 2001
How to add a THIRD internal ATA hard drive to your G4
By Ben Bryant
Eight months ago I added a 60 gig ATA drive to my G4 and the instructions in the G4 manual were clear, made sense and worked. I'm happy, I've got all the gigs I expect to need and am learning new tricks at an astounding pace.
Now along comes a gig-gobbling job: my first feature movie to cut; time for more gigs. With some excellent advice from two Mac/FCP experts I bought an IBM 75 GB DeskStar 7200RPM ATA-5 Internal Hard Drive and a Tempo Ultra ATA66 Macintosh PCI Host Adapter Card by Sonnet Technologies. I searched everywhere and read everything I could get my hands on or find on the web about installing additional HDs into a G4. All the instructions pertaining to ATA drives stopped right after you install one additional ATA. The rest of the information pertained to SCSI drives, or so it seemed. The problem was that, as is the case with so many manuals and instructions in the computer world, they left out a couple of very important facts - stuff that for some unfathomable reason they don't tell you - but I'm here to correct those omissions!
Before you open your beautiful machine give some thought and preparation to the work area. If you can put it on a table with enough space around it so you're not cramped while you work that's ideal. If not, spread a clean COTTON beach towel on the floor and do it there. I hope I don't insult your intelligence with this one but don't forget to shut down and unplug EVERYTHING from the back.
As you already know, when you open up your G4 and look at the diagrams in the manual you see a lot of empty space.
I begin this essay with a disclaimer: I am not a computer engineer, expert, geek or, as we say in New York, maven. I am a video editor. I learned the craft in analog tape when you had to shuttle back and forth, sometimes for what seemed like hours to do the work. This is not nostalgia, it's just background. I don't miss that stuff. I am a convert to Non Linear Editing. I love my Mac and I love FCP!
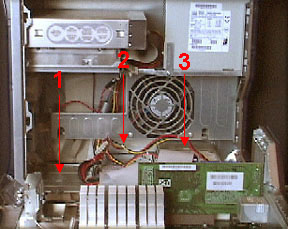
Looking at the open computer, on the right side (the rear of the machine, actually) of the upright, larger part of the innards, near the bottom you'll see what the manual designates as "Position 3". Seems to me it ought to be called "Position 1" because that's where your original Mac HD resides. Anyhow you put the first additional ATA drive in that position and the manual is pretty good at telling you how to do it so I'm not going to try and improve on that. Besides you've probably already done that or you wouldn't need this article because this is about the NEXT, the SECOND ADDITIONAL ATA drive you install.
Okay, back to the picture. Here's where the omissions come into play. To the left of "Position 3" there are 2 drive sized spaces designated in the manual as "Position 2" (the middle) and "Position 1" (the left -- the front of the machine). The manual further designates these spots as sites for SCSI drives. That's what started me on my quest to learn where to put my second additional ATA drive. And that's the "BIG LIE". You can also put ATA drives there but they don't tell you that! I have no idea why and now that we know the truth, it doesn't really matter. What is important is that we now know that it's not only okay to put ATA drives there, it's amazingly easy. Here's how you do it.
Before I begin the step by step instructions I must confess that I, myself, did not actually do this. Knowing what I know now I easily could have and the aim of this piece is to enable you to do it, fearlessly, yourself but I didn't have the guidance that I'm providing for you. Instead I had Dan Martin, an IT professional in the NYC/FCP user group, who generously came to my aid and popped this drive into my Mac like an 8-Ball in the corner pocket. Thank you, Dan!! An aside: If you can find a FinalCutPro user group you can get to, join it and make friends.
Before you install the drive you need to be sure it's properly "configured". Your 3rd ATA drive will be the 1st ATA drive attached to the PCI adapter card (which you need for drives installed after the first additional drive) so the drive's jumper switches must be set for the "master" position. The master position is generally set by default on new hard drives out of the box, but it is good to check the documentation that came with the drive to be certain. Incidentally if an additional drive is to be added using the same cable as your master drive, the jumpers on the new 4th drive would be set to "slave".
Configuring your new drive requires moving or removing jumpers (small rectangular pieces of plastic) from its end or side panel. The exact location of the jumper pins depends on the type (manufacturer) of drive you get. Specific configuration instructions come with most hard drives -- and may even be printed on the drive. In my case Sonnet sent a really well written instruction booklet along with their PCI card (and a little bag of screws) which made it very clear how to do it. There are different places on the drive where these pins and jumpers can be located so look at the instructions that come with the drive or the PCI card and you'll be able to figure it out. There are just too many permutations for me to be able to cover them all here. Besides I don't know them. Remember, I'm an editor like you, not an engineer. (If you're an engineer why are you wasting your time reading this?) You can use a sewing needle or a pair of small needle-nose pliers if you need to rearrange the jumpers. Once you've verified that the jumpers are properly set, you're ready to install the drive.
So your Mac is open, you've studied the diagrams. Your new, correctly configured ATA drive, PCI adapter card, its wide flat cable and a medium phillips screwdriver are lying in front of you; What to install first? According to Dan it really doesn't matter and, having watched him like a hawk as he did it, he's right. My inclination is to work from the deep to the shallow so I suggest you put the drive in first. Back to the picture.
(Read this all the way to the end before you start installing anything; You'll be glad you did!)
In the bottom middle (position 2, I mentioned it above) is the new drive Dan just installed so you can't see the plate. But to the left of it in position 1 you can see the exact same plate held down by a screw in the front.
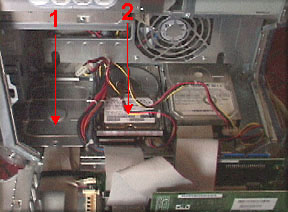
1) Pick either Position 1 or 2, makes no difference, whichever suits your fancy. Remove that screw, slide the plate out and remember where you put the screw. The plate has screw holes that line up precisely with the holes in the bottom of your new drive. Mine had 4. Other manufacturers may have more or less, I don't know but it will be obvious. If 4 screws won't hold the drive securely in place you've got problems I don't even want to think about!
2) Screw the drive to the plate and gently slide the plate back where it came from but don't screw it down yet.
 Somewhere near your other 2 drives you'll find a couple of loose bundles of 4 different colored wires with rectangular thingies containing 4 holes on their ends. Those are the "drive power connectors" and they can only go in one spot on the new drive.
3) Pick one and plug it in while the plate is still loose and tiltable. It'll be tight so line it up carefully and be brave.
4) Once the power cable is connected you can gently slide the plate with your new drive firmly attached into its position and tighten down the screw you took out a while ago Đ once you find it.
5) Next, plug in the end (not the set of connectors in the middle but the set on the end) of the wide, flat cable that came with the PCI card. (The card's instructions will tell you which end goes to the drive and which end to the card.) It has lots of pin holes on it, I mean lots -- 40, so do it carefully, be sure it's straight and continue acting as though you know what you're doing. (The reason you don't plug this one in while the drive is loose is that when you connect it to the drive it blocks the screw hole in the drive plate.)
Now you're ready to install the PCI adapter card. Fear not, it's way easier than it looks. By the way, I didn't know this so maybe you don't either. An ATA "bus" can only support 2 devices - hard drives, CD-ROM drives, whatever. That's why you have to get a PCI adapter card in order to install your second additional ATA hard drive.
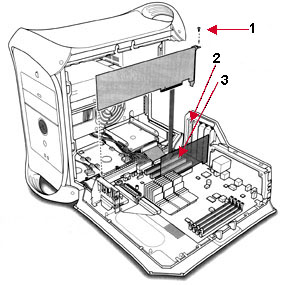
Moving right along ... Just as when you install the drive you need to remove something before you can install the card.
On the door side which is now lying perpendicular to the main body of your G4 you'll find, on the right, 4 "slots". In one of them, this time correctly designated #1, is the graphics card (runs your Mac Display, familiarly called the monitor) that came with your Mac. Leave it alone. The other 3 slots are where PCI cards (or other types of graphics cards) go. Pick a slot. Assuming you haven't already installed another card of some sort, 2, 3 and 4 are open and it makes no difference which one you choose. Dan and I chose #4, the slot closest to the innards of the machine, because it has more room around it and is easier to work with. By the time you need to install another card in one of these slots you'll be more adroit so take the easy way for now.
6) Each slot has a "port access cover" held in place by, you guessed it, a single screw. Remove the screw holding the cover to the slot you chose, slide the cover off and try to think of another use for it because it isn't going back into your Mac. But save the screw!
Before handling the PCI card it is not only customary but strongly suggested that you touch a piece of metal to discharge any static electricity that may have built up inside of you so as not to wreak havoc on the delicate circuitry of the PCI card (or anything that goes into the inside of a computer for that matter). That's why I told you to use a cotton towel - less static.
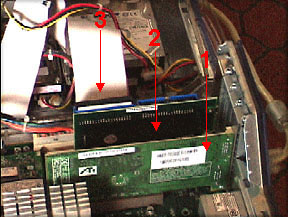
7) Take the card out of its packaging, being sure to hold it by its edges and line it up over the slot. Slip the bottom in and gently, without wiggling it, press it down until it seats. You will notice that the card is a little shorter than the slot itself. This is normal. Make sure you insert the card so that the back plane of the card is even with the back of the machine. All that's left is to connect the other end of the multi-pin-holed cable.
8) So do it, connect the PCI card cable. It connects to the top of the card in the leftmost position (if you are looking down on it) farthest from the slot bracket. Again, line it up straight and press it home. Now take the screw you saved in instruction 6 and screw the PCI card down.
9) Adjust the large loop of flat cable so it's not crimped and won't get jammed in a crack when you close the door.
10) Breathe deeply, smile and close the door.
Once you're powered up you need to initialize and name the new drive and you know how to do that. You did it before when you installed your first additional ATA drive. In case you forgot or someone did it for you and you didn't watch and pester them with questions - open Drive Setup (If you don't know where it is use Sherlock.) and initialize the new drive. If you're using a Sonnet Technologies PCI adapter card, as I am, you're in for a surprise. It will call your new ATA drive a SCSI. Why, you might well ask? Dan went to the Sonnet web site and found the following information.
Q. Why do hard drives connected to the Tempo Ultra ATA66 card show up as SCSI devices in Drive Setup and other formatting utilities?
A. Older Mac systems did not support ATA (IDE) technology. In order to make the Tempo Ultra ATA66 compatible across a wide range of Macintosh and Mac-compatible models, it was designed to work under the SCSI software manager.
Congratulations! You did it. Now crank up FCP, set the new drive as a scratch disk and put some video on it. You'll sleep better once you know it really works.
Ben Bryant has acted in prime time TV shows and commercials and on
Broadway, sung at the Metropolitan Opera and in Jazz clubs, produced
over 1,000 TV commercials and dozens of industrial films, worked as
First AD on features, produced and directed over fifty TV shows. Now he
shoots, directs and edits all sorts of video productions.
Ben Bryant Web Site
copyright © www.kenstone.net 2001
All screen captures, images, and textual references are the property and trademark of their creators/owners/publishers.