March 19, 2007
Logging Offline & Batch Capturing
By Seth Kenlon & Arayna Thomas
If you are using the CAPTURE NOW function in Final Cut Pro for your capturing needs, then you are missing out on some of Final Cut Pro's most powerful features. This article will explain proper workflow when beginning a project, including logging, batch capture lists, capturing, mini-DV back-up, as well as touch on the concept of matching-back to either High Def video or various formats of film.
Final Cut Pro contains a powerful database to help you organize your media. Take a look at the browser window.
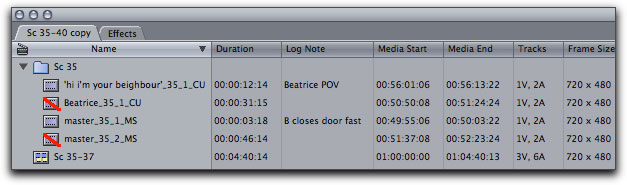
It contains a seemingly never-ending series of columns detailing every aspect of the footage in your project. Behind the scenes, in those mysterious Capture Scratch and Waveform Cache folders, Final Cut Pro is keeping tabs on every piece of media you are importing. After using Final Cut Pro, never again should you need to scratch your head and wonder what tape "that one shot" is on, nor fast-forward through that tape for an hour before finding the clip you're looking for.
Sound appealing? Then move your cursor away from the CAPTURE NOW button and let's begin...
Capture Settings
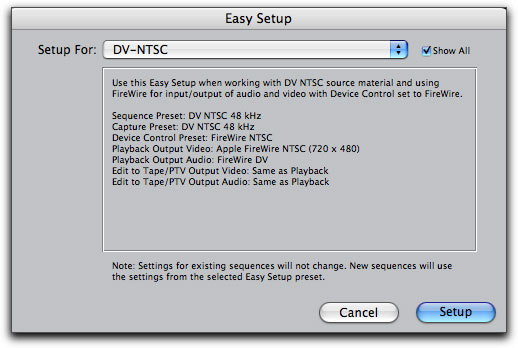
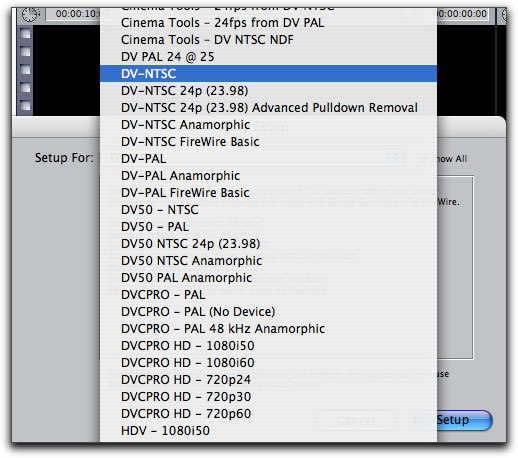
Well - almost. Take a moment to check your capture settings; usually you'll have them set already for the camera that you own. If you have not already set FCP for the camera you're using, there is an Easy Setup function that you can use. Launch Final Cut Pro and close any open projects. Go to the Final Cut Pro menu > Easy Setup. Check the "Show All" option for the greatest variety of formats available. Choose from the list what you are shooting in, and verify that this is the best format by reading the summary in the Easy Setup window. Once you've found what you need, click Setup.
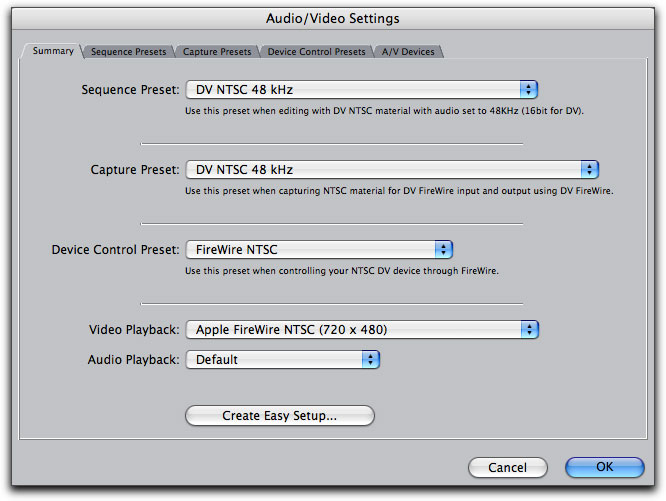
Go to Final Cut Pro > Audio/Video Settings. The most common settings are the miniDV pre-sets for both Sequence Preset and Capture Preset; this uses the DV NTSC Compressor with Audio set at 48khz. If you shot on miniDV and had your audio set for 16bit, then this is your preset of choice. If, however, you have recently upgraded to an HDV camera, you will need to change this pre-set to the HDV preset. If you are shooting HD you will require a 1080i setting. The main idea here is to set the format of what you have shot to the format of what you will capture and the format that you will edit in. It makes sense; they should all be the same in order to give you native editing capabilities without the need to render before you've even begun to make edits.
The exception to this rule is when you want to compress your incoming footage, something you may benefit from if you have shot HD but desire to save system resources by editing at a lower resolution. This is a choice you'll have to make on your own, depending on what kind of system you are editing on and the scope of your project. The process of editing footage that is different in resolution or format than the resolution or format that you shot on and will be ending up on is called "off-lining".
The Negative and The Work Print
The concept for the proper editing workflow began not with the digital revolution, but way back in the Hollywood Studio editing rooms, and it is still used today in the industry. When a film is shot, the film's negatives are treated like gold; as soon as they are developed at the lab, they are immediately copied into what is called a "work print" - and that work print is what the editors splice and tape together in order to edit the film. While they manhandle the work print, the film's negative is kept untouched and pristine in a cool, dry, safe vault.
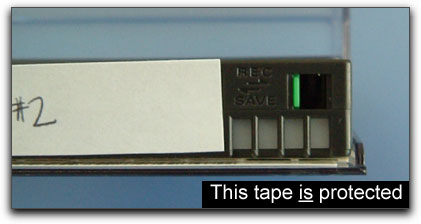
Why, then, should you not treat your own footage the same way? The tapes that you have shot for your project (or perhaps even more importantly, that your client has shot) are perfectly suited to hold the images you will be editing. As soon as they have been shot, overwrite-protect your tape and store it in a safe place where it will not be touched, mislabeled, over-written, destroyed, stepped upon, or dipped in coffee.
But before you store them away safely, you'll want to make a "work print", or "dub", of your tapes.
The Digital "Work Print"
1. Years ago, people would take their tapes to professional dub houses to have them transferred to some other format, like VHS, with the timecode burned into the frame. But now you can do this yourself as long as you have a VCR and your camera. The first step is easy but often overlooked; you must label your tapes if you haven't already. This should be simple and consistent. Do not use the date or a description of what you think is on the tape, but a simple reel number. Example: R1, R2, R3, R4, R5, R6, and so on.
You also don't need to worry too much about whether the reels are in any kind of order. (It's called non-linear editing for a reason.)
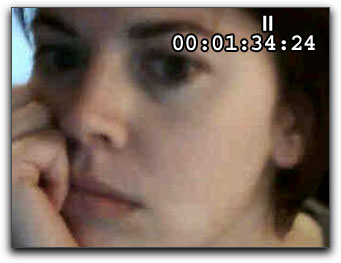
2. After you have numbered all of your reels, you should dub them to whatever format is most convenient to you. Make sure that you have the timecode option turned on in your deck or camera, so that while you're recording the reels you can actually see the timecode on the tv screen. It must appear on the tv screen or NTSC monitor, not just in the camera's LCD screen! This is so you will be able to reference the proper timecode when you are reviewing or logging these dubs later on. The term for this is "timecode burn-in". The picture below is a still taken from a VHS dub with timecode burn-in.
2a. Note that your copy of the reel does not need to be great quality. VHS tapes are a good choice (they cost less than a dollar each and can fit 6 hour-long reels per tape) but if you have gone completely digital in your home studio then you can also dub to a DVR or something similar. The bottom line is to get each reel copied along with its native timecode to a format that you can watch over and over again without worrying about wear and tear on your master tapes - your "negatives".
2b. The method of achieving a burn-in varies from camera to camera. Typically it is found in the menu function of the camera, somewhere in the "playback" category. For example, when your camera is in VTR mode, you may select Menu > VTR Setup > Playback > Data Code ON. Consult your camera or deck's user manual for the exact menu selection.
This displays the timecode and sometimes other data (such as audio bit rate) on the camera LCD as well as your NTSC monitor or TV screen.
2c. As an added bonus in many pro and "prosumer" cameras there is the ability to set the HOUR on the tape to be in accordance with its reel number. So for reel 1, your timecode will always begin with 01:00:00:00, and reel 2 with 02:00:00:00, and so on. If you are using a two camera set-up, then you may decide to begin the A-Cameras with hour 01 and the B-Cameras with hour 51. Or to use even numbers on the A-Camera and odd on the B-Camera. This must be done before you start shooting the tape, and is an advanced feature; consult your camera's user manual for instructions.
Don't forget to turn the 'timecode burn-in' feature off when you are done using your camera, After all, you don't want timecode burnt into your source tapes. It happens.
Log and Capture
3. The next stage is looking at your raw footage, and to catalogue it. This is the "log" portion of "log and capture". It involves, quite simply, sitting down and watching all of your tapes from 00:00:00:00 to the very end. Having this sort of workprint is a good way to be able to sit down in front of your TV with your laptop, watch the footage and log your clips. It can be relaxing after an arduous shoot. Take good notes while you watch; the log that you create from these sessions will dictate what clips you have to work with later on.
There is a very strict format (layout) that you will be using for your log. We have prebuilt templates for you that you can download (OpenOffice - Excel) to do your 'off-line' logging.

Notice the columns - these are absolutely essential and cannot be changed or excluded. You can, however, add to these columns - anything that the Final Cut Pro browser contains, you can enter into the log. All you need to do is create a column heading exactly identical to the column heading in FCP's browser window and FCP will be able to recognize it.
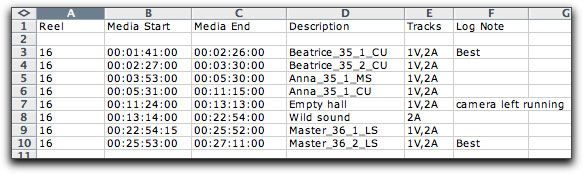
For the Reel number, use the reel numbers you've given your tapes.
Enter the timecode at which each clip begins and ends in the Media Start and Media End fields, respectively. Of course a clip's "beginning" and "ending" are sometimes nicely defined by a slate or clapboard, and then other times (such as during footage of the kids playing with grandma) it can be loosely defined by your own judgement. The bottom line is that clips should not go on for too long; even 5 minute clips can get overwhelming when you're scrubbing video in FCP for golden moments to include in your final edit. Keeping clips as focused as possible is usually best. Label the clips in the Description column. Numbering clips that are alike with "Scene Numbers" often is extremely helpful; later on, this will help you quickly associate clips with the same settings are similar content.
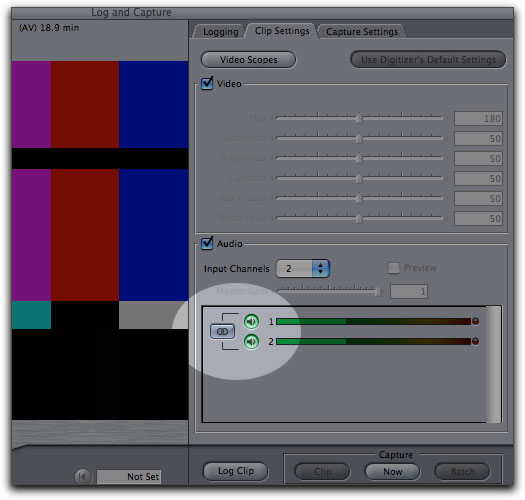
The Tracks column is usually "1V,2A", referring to one track of video and two tracks of audio. If there are shots that have no sound, it is economical to capture only the video track (type only "1V"). When capturing only the sound, you may enter "2A". How these audio tracks are captured (stereo pair, two mono) will be defined by your capture settings in File > Log and Capture > Clip Settings.
The final column is Log Notes, which is helpful to add notes to yourself or to your editor that may not belong in the Description field.
Timecode
3a. While you watch and log the footage, you may encounter timecode breaks. This is caused by breaks in the recorded data on the tape, and serious timecode breaks will cause the timecode to reset to 00:00:00:00. If this happens, you will need to assign a sub-reel number to the portion between the timecode break. So on reel 40, you may have 40_1, 40_2, 40_3, 40_4, and so on.
Both at the head of the tape and at the tail, and at the head of a timecode break and at its tail, you will need a buffer of a few seconds before you log the media start and media end. The Final Cut Pro manual states that you will need 3 seconds, but depending on your deck or camera, you may in reality need 6 seconds.
** A cheat to avoid this from happening if you are using a consumer camera without an End Search is to pre-record your miniDV tapes before taking them out to shoot. This lays down a timecode track that will remain in tact regardless of any in-camera cuts that you make. Another option is to always record ample time at the end of each shot and actually rewinding a few seconds before you start the next shot, thereby ensuring that will be no break in the timecode track.
Saving Your Batch Capture Lists
4. By the end of this process, you should have a number of spreadsheets listing all of your reels and all of the footage contained on those reels. From OpenOffice, select all data, copy, and paste it into a text document, saving it then as a text document. From Excel, save the document as a "Text (Tab Delimited)" document and place it on your scratch drive or whatever location your project will be saved.
Save the actual spreadsheet as well as the exported text document. The text document will be a permanent, written catalog of your footage. Should anything ever happen to the clips that you capture, you will always be able to easily and automatically re-capture it, using these documents. The spreadsheet can be a very handy, searchable file of keywords when you're looking for certain footage of an event or person. Just search the Name field and take a look at what reels you should refer to.
5. And now, only now, is it time to delve into Final Cut Pro. Open FCP and create a new project, and immediately go to File > Save As, and give it an appropriate name and save it on the drive your project will be store on. Working in an untitled project in FCP only encourages the creation of "Untitled Project" capture scratch folders and render folders and render files that frequently clutter your drive and take up space.
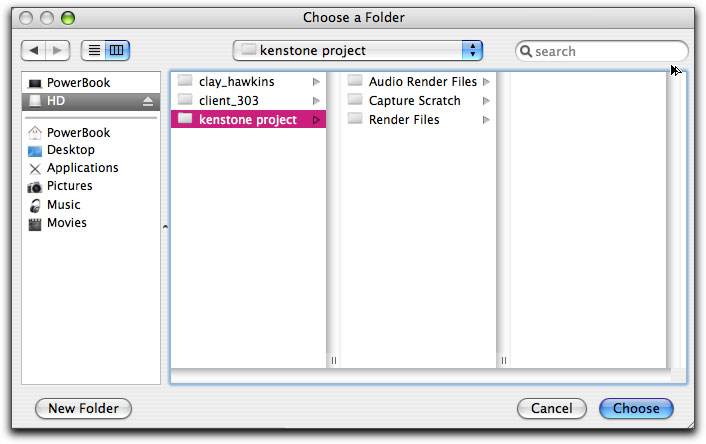
Setting Capture Scratch
You should also be sure to set your capture scratch drives. This process can save a project from being stored randomly across any number of hard drives, and instead will keep it localized, organized, and secure. This is important as it avoids potentially misdirecting Final Cut Pro to the wrong files or render files.
Note: Final Cut Pro will create the folders that you need for you, on whichever volume you select and in whichever directory you define as your capture scratch drive.
This means that you do not need to create the path PROJECT > CAPTURE SCRATCH. All you need to do is create a PROJECT folder and Final Cut Pro will create the various folders it needs.
If you ever need to re-direct FCP back to the CAPTURE SCRATCH folder (editors working on different projects simultaneously each with their own capture scratch drive, will do this frequently), the same is true; direct FCP only to the PROJECT folder and FCP will detect the CAPTURE SCRATCH folders it needs. This will keep you from wading through capture scratch folders within capture scratch folders.
The Batch Capture
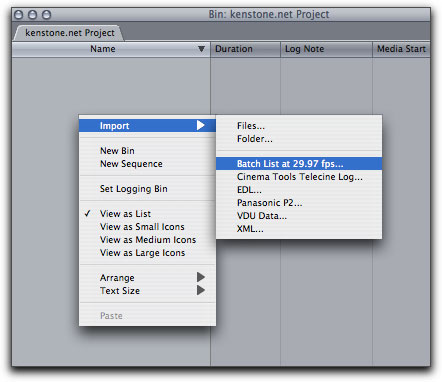
6. Now that the project is set up correctly, it is time to import the batch capture lists that you created during the LOGGING stage. Organize it as you wish; bins named for their reels are common, as are bins named for their scene number. Open one of the bins you create, and control-click (or right-click) on the gray space within it. This brings up a contextual menu containing the choice Import > Batch List at 29.97 fps. Select this choice.
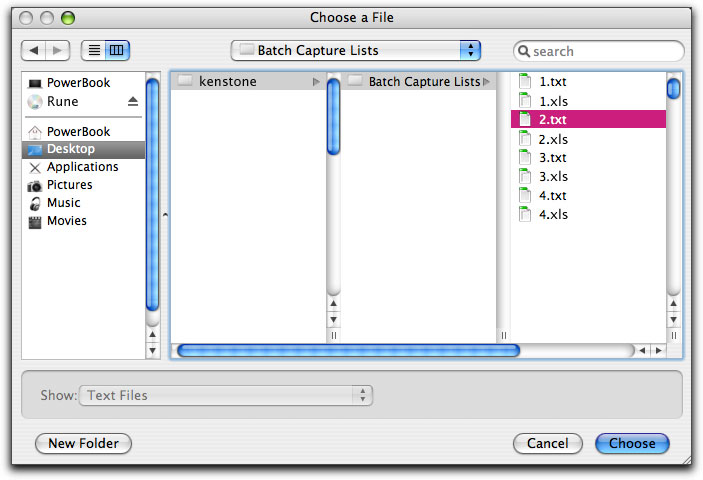
You will be taken to the 'Choose a File' window, requesting a list to be imported. Choose one of your text batch lists, one of the .txt formated files. Do not attempt to import the actual spreadsheet source file, which are marked as .xls files, as .xls files will not be recognized by FCP. Import the .txt file (shown below, right in red).
Watch as offline clips are created in your bin.
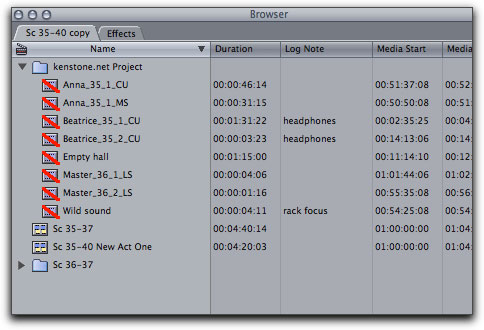
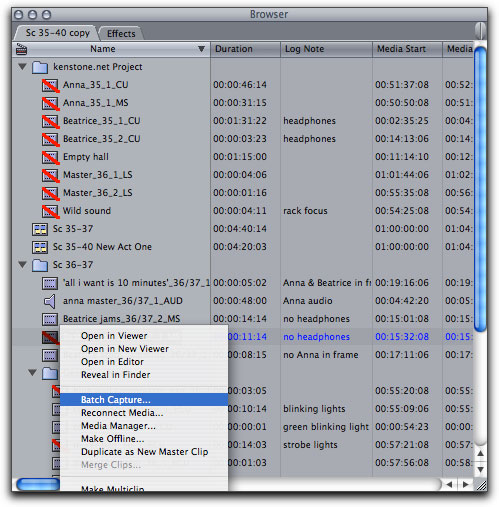
You may continue to populate your project with these offline clips. When you are ready to being capturing, select the clips you wish to bring online. Control-click on these clips and a contextual menu appears, with the option to "Batch Capture".
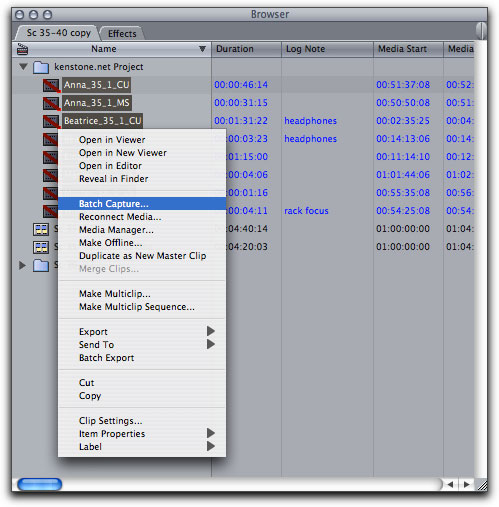
Select this, and you will be greeted by a window asking you to specify the capture settings. This is by default what you've already set at the beginning of this article. Click OK to proceed.
The next window that will open is a list of the reels you will need on hand, and how much footage from each the computer will be capturing. Once you proceed, the computer will request the specific reel number to be inserted into your deck or camera. And the rest is automated. The computer will capture all of your footage, connect it to the offline clips in your bin, and organize it in the capture scratch folder that you designated. You are free to go out, get a cup of coffee, and relax.
...well, almost. If your tapes were riddled with timecode breaks and errors, you may need to do some babysitting. Each time the tape reaches one of the timecode breaks, the computer will stop and ask for a new reel, such as 40_2. This of course is the same physical tape as reel 40, but occurs chronologically after the timecode break, so you will need to fast forward manually through the timecode break, and then tell the computer that the new "reel" has been inserted, and it will continue to capture.
iMovie, interestingly, has an easier time with timecode breaks and many people wonder how it is that a consumer program is able to handle these breaks in the timecode track whereas Final Cut Pro cannot. The answer is that when you are editing properly, you are editing for the long haul, meaning that you want to have a path to everything you have captured. iMovie is not like this; once the media is captured, the path is forgotten and it is tenuously retained on your hard drive and nothing had better happen to it!
7. After capturing the footage, be sure to return the reels to their safe storage location. This, therefore, has been only the second instance you have ever used or played back your shot reels. Compare this to a workflow in which the tapes themselves are reviewed time and time again, finding good clips, capturing those clips, and possibly re-capturing them in cases of either losing the media or encountering any kind of error while editing or capturing.
8. You are now free to begin editing! Feel free to experiment as much as you want to, and if anything should happen along the way, rest assured that you have a record of every piece of media you are using within the project and where you can find it again. If you need to recapture something, you can do so without fear of throwing anything out of sync or having to search through piles of tapes. Should you need to send your project to a professional lab or mastering house, you'll always be able to give them full access to your source material so that they will be able to provide you with the very best of results.
Problems and How They are Solved Easily
9. Although Final Cut Pro is a non-destructive editor, there are times when something goes wrong with the media that you have captured. Maybe it's Final Cut's fault or maybe it's your fault or maybe it's the hard drive's fault, but whatever the case if the footage has gone off line or is not playing back correctly. Re-capturing is easy; since the clip has been logged correctly, you know precisely what reel it is on and where on the reel it is.
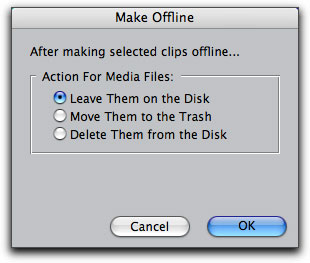
All you need do is control-click on the bad clip > Make Offline > Delete from Disk.

Then, control click again on the clip in FCP > batch capture. You will be prompted to insert the proper reel, and the computer will capture the media.
Offline & Online Editing
10. The same principle is applied when you are working with compressed video copies, off-line versions, of SD, HD, or film. Rarely is there really a do-or-die need to edit at full resolution. No matter what your system, there are always resources to save in that system by editing at a lower resolution. Far more SD footage can fit onto a 120 gb MacBook Pro when it's compressed as Photo JPEG 320x240 video, and HD footage is kinder on even the most robust Mac Pro system at SD resolution.
All of this low-res footage can be matched back to its source footage at the end of the project, when all the scraps that will not be used have been trimmed away (reducing the storage space you'll need) and all that remains to do is export for delivery. (In fact, this is also a concept upon which Cinema Tools was built. Obviously you cannot edit film on Final Cut Pro, as such; you edit "Digital Intermediates" of the film. Cinema Tools is used as, essentially, your batch capture list and an EDL, aligning not only reel numbers but also the edge numbers printed on the film itself so that the negative cutter will be able to match the film back to your editing decisions.)
So to convert a project from the low-res versions you've been cutting to its original full-res footage, you would select all of your clips in the project > make offline > Leave on Disk
And then batch capture them from the original tapes at full resolution. Your footage is now online.
Export the finished project, and deliver to your format of choice. For information on sending the final project to Compressor for best results for various formats, check out the Compressor articles here on kenstone.net
ISIS Productions, LLC is a full service film production company serving New York and LA, having produced projects with organizations such as Human Rights Watch, Catholic Big Sisters, and Columbia University. The company's first feature film, RUNE was the world's first feature film to world premier on Apple's iPod Video.
copyright ©Seth Kenlon & Arayna Thomas
are either registered trademarks or trademarks of Apple. Other company and product names may be trademarks of their respective owners.
All screen captures, images, and textual references are the property and trademark of their creators/owners/publishers.