
How To Feburary 4, 2001
How To Feburary 4, 2001
The Mac is not your mother...
by Charles Roberts
How to initially organize and then completely clean and disinfect your non-linear editor after the close of a project and before the beginning of the next one...
Wouldn't it be nice if computers could walk around behind us and pick up our dropped mittens, etc.? Unfortunately, technology is not there yet. And its a good thing, because your machine would probably throw away important bank records while keeping five backups of the emails from your brother chatting about his ingrown toenail. Cleaning up after ourselves is a responsibility we should assume. It's a lot more fun than picking up the debris when your system craps out at a clutch moment.
It's really not that difficult if you develop a regular watertight system. Its fast, it eliminates most errors, and it keeps you organized and sane. Admittedly, you have to think a little bit like your Mac to get into the groove, but that's one of the many psychological changes required by the DV revolution. Calling Apple Tech Support because of dropped frames in Final Cut Pro is like Che calling Moscow because his AK jammed. So let's learn to take this baby apart, get the barrel cleaned up, and move on to the next target.
This little article will describe the quickest way of cleaning up your system at the end of a project such that your machine is completely refreshed. Remember that this is not the only way to do this; there are others. Also remember that just because you don't do this doesn't mean that your system will stop working tomorrow. I'm not trying to scare you. But running a tight ship is the best way to avoid potential problems with your system. The #2 cause of Dropped Frames or Project complications in FCP is a messy OS and file/drive situation. Avoiding this will involve a couple of things. They are 1) organizing and streamlining your drives and 2) the correct procedure for wiping your drives and knowing when it is appropriate to do so.
Configuring your drives for FCP
There are so many differing opinions about how to arrange and configure your drives for FCP. The situation is complicated by the fact that what you use your system for can influence how you need to set it up. A further complication is that, being a Macintosh, your system will work quite happily in any of a number of customizations that are not limited to the business of a non-linear editor, or Final Cut Pro in particular. So you could potentially work for a long time without encountering trouble.
But some ways are more appropriate than others. One issue that must be decided is whether or not to partition a large drive into smaller pieces. Partitioning means allowing the System Software to treat one real physical hard drive as two or more logical partitions. The partitions act just like real drives, although you will not see the speed benefits of using two physical drives because they aren't real. There are no performance gains to be had from multiple partitions on a single physical drive.
So why would you choose to do so? The answer lies in convenience. Divvying it up will give you options for cleaning it that don't exist for the single partition. The only truly comprehensive method of making sure a drive has no corruption issues is to reformat it. This doesn't have to be an intensive low-level format. Quick Format, as described next, is quite enough to eliminate all but physical drive defects. And it's incredibly easy to do.
The only problem is that formatting a volume requires you to destroy all data on that volume. Now, that would be fine if you could guarantee that you would only ever be working on a single project at a time. I certainly can't do that; I've got projects coming out of my ears. So how can you perform this without wiping out data you need? The answer is multiple partitions.
Let's say you have a sixty-gig drive, for example. You could use a single
partition of sixty gigs, or you could divvy this up into three twenty-gig
partitions. If you use a single partition, as we said before, you can't quick format the drive till everything of importance is finished and cleared out to tape. But if you used partitions of twenty gigs each, you could assign another one (or more) to each project. Then as you finish projects, you can re-format that partition, leaving the other partitions/projects intact. If you need more than twenty gigs for a project, simply assign another partition to the project. Just be careful not to spread your projects across so many partitions that the separate partitions become meaningless.
Next, select the drive you want to partition. If you select a drive that can be partitioned, Drive Setup will say 'This drive can be initialized' and the Initialize button will be ready to go. Select the drive in question and hit Initialize. Remember that you cannot partition the current start up drive. You probably don't want to anyway, because that would wipe it clean, re-formatting your system drive and destroying all the data on it. If you are working with a system that only has a single physical hard drive, I only have this to say. 1) this article is not for you, and 2) buy a second hard drive while they are cheap and you aren't yet experiencing problems.
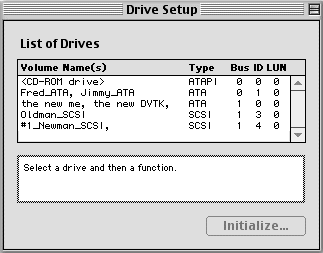 How to partition your drives? Easy. Apple provides a formatting utility with the OS called Drive Setup. All this application does is partition and format drives. Find Drive Setup in the Utilities folder on your system drive. When you start Drive Setup, a little window will pop up displaying all the physical drives present in your hardware. Since they are physical devices and have addresses, or physical locations in the system's hardware, any logical partitions are listed all on the same line of the physical drive's name. Since you haven't partitioned yet, you should only see a list of drive names and locations. If you have Zip/CD/DVDs, etc. these will appear as well, though you cannot use Drive Setup to affect them.
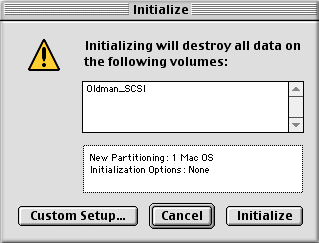
After hitting Initialize, you will go to a dialog box that contains the buttons Custom Setup, Cancel and Initialize. Click on the Custom Setup button. The window that pops up will give you the option of selecting the number of partitions you want to make (up to 8), how large you want to make each one and whether to make them Standard or Extended format. Choose the number and size of the partitions based on the size of your drive and in view of the fact that DV data rates make one gig last about 4 1/2 minutes. You want the partitions to be large enough to support an entire project but small enough that you can increase the possible number of projects on your system at a given time.
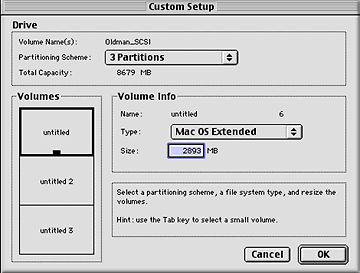
We should say a word here about the difference between Standard and Extended formatting. There is a great deal more to the Extended format for your secretary than for yourself. Extended format was a formatting system developed way back in OS 8.1 to allow more efficient use of a drive with regard to small file storage. Without going too far into the details, Extended allows more small files to be stored on the same size partition than Standard formatting would. If you've got fifty billion Word documents, they'll fit more compactly on an Extended format drive than a Standard, which is why you secretary might dig it.
With Digital Video and Audio, the associated file sizes are much larger, so this formatting issue is on the surface moot. For straight capture and cutting, either Extended or Standard is fine. There is, however, an issue for those exporting very large files. With the coming of OS 9.0.4 and QuickTime 4.1.2, there is no longer a file size limit of two gigs. Remember that this is barely ten minutes at DV data rates, so it's easy to make an export this large. The important catch here is that your destination volume for a >2 gig file must be Extended format. Trying to write such a file to a Standard format partition will return a file error.
Do not be confused by the fact that Final Cut Pro can apparently capture >2 gig files for clips that last longer than ten minutes. Final Cut Pro, unless told otherwise, uses a system of file segmentation that is unrelated to >2 gig file size. So format your drive as you think you'll need it. If you aren't sure, go ahead and make it Extended. You can always change this by quick reformatting again. After setting things up the way you want them, hit OK, then Initialize and watch the new partitions appear on the desktop.
The new partitions will be named 'untitled 1, untitled 2,...' but you can rename them however you see fit with a couple of caveats. 1) File Sharing must be turned off to rename a volume. If File Sharing is enabled, no matter how you click the name, it will not change. If File Sharing is turned off, simply click once on the name and it will turn into a selected text box. Type the name you want to use, hit enter and it will be re-named. Simple as that. 2) Do not use names that are very similar. Final Cut Pro has problems distinguishing between volumes that are too similarly named. My convention, which works quite well, is to use the number of the partition, then the bus it is on (#1SCSI, #2ATA). This gives FCP a naming distinction that works well. It also immediately tells you which drive and bus is causing problems when you have trouble. Come up with your own system, but stick with it and make sure that the names don't confuse FCP.
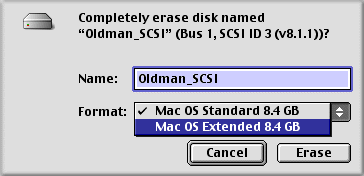
Now you've got your partitions all lined up. Let's say that you've finished up Project 1, which had #1SCSI, but you've still got Project 2 going, which has media on #3ATA. How do we clear off the media from the one drive and quick format it without losing the other project's media? It's easy. Since we created separate partitions, we can use 'Erase Disk' from the Special drop down menu on the desktop to wipe the drive. WARNING: CLOSE FINAL CUT PRO FIRST. NEVER WIPE A DRIVE THAT FCP IS AWARE OF WHILE FCP IS OPEN. YOU WILL DEMOLISH THE PROJECT AND THE PREFERENCES.
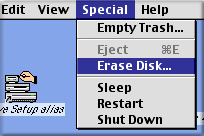 At the Desktop level, select the partition you want to clear by clicking once (do not click the name or it will do the renaming thing; click the icon once). Go to the Special drop down menu and select 'Erase Disk'. The dialog box that pops up will ask you to rename the volume (the old name will be the default) and will ask you which type of format (standard is the default, so you may have to change it). Finally, hit OK and it will instantly reformat your drive, leaving it clean and April Fresh. Be careful to actually mouse-click Erase in the dialog box. Since the action is irreversible, the default when you hit the Return key is actually for Cancel. The other partitions and projects will still be completely intact and you'll have a fresh partition with which to begin your next job.
 A note about archiving is warranted here. We have thrown away the media from the old project, but what about the project file itself? Should that be trashed? There's nothing wrong with trashing a finished project, but there's nothing wrong with saving it either. In fact, there's a benefit to saving it. It takes up very little space, especially if you are backing stuff up to CDROM as discussed in another article in this series.
Let's say the worst case scenario happens. You finish the project and hand over the tape to the client. The client disappears only to show up later with a story about airport X-rays and wondering whether you can re-edit the entire piece. You're hungry, so you take the job and make a big wad of cash. Now, if you saved the project file, and you were working from master tapes using timecode, you can re-create the entire project in as much time as it takes to batch recapture the offline clips you see when you start the project. If you don't have the project file, you can go through your notes and try and reconstruct this certain cool thing you did which the client will be expecting to mirror the original. Obviously the archived project is the easiest route. Its up to your personal morality as to whether you charge them for four days of work that you complete in a couple of hours. And if its your own stuff, well, trust me, its worth the 25 cent CDROM.
So, having finished this document, you now have the tools to organize your system to best suit your needs. You also have a strategy to use this organization to get the most efficient farming of your storage real estate. You can work on several projects at once and wipe the drives frequently enough to forestall any corruption on your media drive that might have been an issue if you rarely reformatted your drives. For more information of how to further secure your system, read the Feel the Burn: CDROM Backup article.
Charles Roberts AKA Chawla teaches Digital Video and Audio Production at Fitchburg State College in Fitchburg, MA. He uses his long tedious rendering times to generate content and tackle hard hitting issues on the discussion boards of 2-pop.
copyright © Charles Roberts 2001
All screen captures, images, and textual references are the property and trademark of their creators/owners/publishers.