White Paper - Setting up a Mixing Board

October 29, 2001
FCP, DV and the Audio Mixing Board
Audio Wiring Schematic

by Ian Sutherland and Ken Stone

 
Sounds Good "Why a Mixer?"

I'm sure there are many videographers around like myself who have made a conscious effort on a continual basis to increase the quality of their video imagery. But what about the audio side of the equation? When was the last time you had a serious look at the equally important subject of sound.

There are certain areas that are difficult to control. For instance, in capturing our video and audio via FireWire. What goes through the FireWire cable is what ends up in our project folder. But even this can be manipulated somewhat at a future point in the production. We'll get back to this line of thought a bit later.

But there are many other sound elements we work with in our timeline such as CD music, taped music, special sound effects and of course, Voice Overs. If captured in FCP as is, they can sometimes leave a bit to be desired.

Any opportunity to sweeten our audio or EQ down unwanted elements before they wind up on our timeline increases the clarity of the finished production. Rather than battling with bad sound on the timeline and throwing on filter after filter in an attempt to fix it later, the best angle of attack is to head it off at the pass.

Our first ally is the sound mixer (mixing board) and a good set of head phones. Once isolated, it's amazing what we previously thought to be clear sound can actually contain.

For the sake of this article, I have chosen the Mackie 1202 VLZ Pro for discussion purposes simply as this is my choice for sound manipulation. There are many other good quality mixers on the market. With four XLR mic inputs and a further four stereo line inputs, I find the Mackie serves my purpose extremely well.

All of my footage is shot with Sony VX3 Hi 8 cameras. My video is digitized with the Sony DVMC DA2 converter and the sound from my Sony EVO 9700 deck is fed into the Mackie through my first stereo line input. This gives me a first hit at the ball before the sound goes anywhere near the computer.

Being able to EQ the Hi's, Mid's and Low's and set the gain to the optimum level before capture means that FCP only gets the sound I want it to hear and at the correct level. Much more efficient than worrying about it later.

For background music, my CD player takes up position 2 on the mixing board. CD music is inherently a little on the hot side when fed directly into FCP. The gain can be adjusted to bring the music within the parameters of the VU meter on the Mackie and by tweaking the EQ knobs, a high degree of personalization can be accomplished in the chosen track.

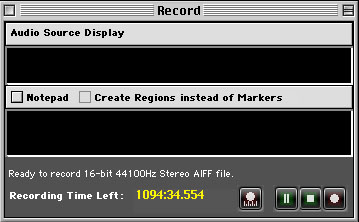
But we're not about to stop here. There's a little gold mine of free audio software called 'Peak DV' that comes with FCP, which will give me yet another kick at the cat. Rather than use FCP's audio 'only' capture, the track can be recorded in Peak and further manipulated.

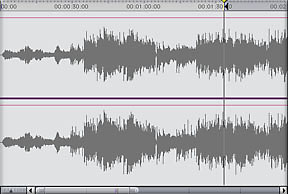
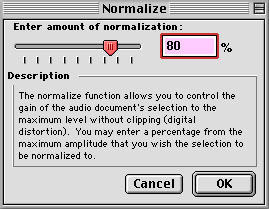
Once recorded, the levels can be checked further on Peak's VU meters and adjusted if necessary. The audio can then be normalized.

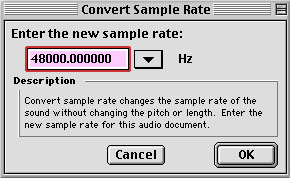
Lastly, the sample rate having been recorded at the CD's usual 44.1 kHz can be changed to 48 kHz before importing into FCP.

I mentioned that audio already on the timeline may need some sweetening. This also can be done in Peak.

Set 'in and out' points on your TL for the audio that you want to sweeten. At the same time set a marker, M on the keyboard, for the in and out. You can move the playhead from marker to marker by 'option or shift' M.

With your in and out set, File menu > Export > QT Movie > Audio only. AIFF, no compression, 16 bit stereo 48k. Under the options button. Save to your desktop and drop the QT Movie onto the Peak icon. Your audio will now be open in Peak. You will need to select the audio tracks and select 'Normalize' from one of the menus. When done export as a QT Move. AIFF 48k, etc.

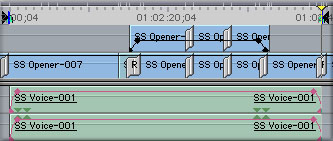
Back on the Timeline, unlink the old audio from the video. Click and SHIFT drag down A1 and A2 to tracks 3 and 4. This will leave a gap in A1 A2. Simply drag your new audio into the gap. Link the new audio. Turn off the visibility on the old audio and lock the track. When you are completely satisfied, trash the old audio.

Lastly and maybe most importantly, the voice over. My Shure 87A mic is in Mic Line 1 connected with 25 feet of XLR cable. The Mic is held in place on a 5 foot mic stand and clamped onto and over the end, a six inch diameter pop screen. Some people like to talk sitting down. I'm a 'stand up' person.

My mic EQ settings on my Mackie are set at 1.30. on the Hi, 1.30. on the Mid and 10.00. on the Low. With gain and trim at the unity level, I find this sounds best to my ear. It's a matter of personal taste.

The 25 feet of cable allows me to position my mic away from the sounds of the computer in a small room adjacent to my studio which has the best acoustics. My wife uses the room as a clothes closet and seeing as she owns enough clothes to supply a small city, there is ample baffling on the wall racks. Of course the construction of your own sound studio is a matter of personal choice. Not everyone likes working in a clothes closet.

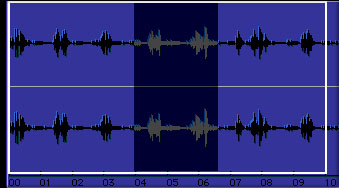
With script in hand and after hitting 'record' in Peak, I will leisurely go over each paragraph 2, 3 or 4 times until I am satisfied with the inflection in the head phones. Listening to each take on the one continuous waveform in Peak, I will make my final decision as to which one sounds best. Highlighting the unwanted takes and hitting the delete key will leave only the required take which will then be normalized and adjusted to 48 kHz sample rate. If any adjustment is needed to the dB, this will also be done before importing into FCP.

The included schematic diagram shows every step of the procedure from source to finished product. Being able to control the quality of our sound at multiple stages of the editing process means we only get what we want when outputting to tape.

 
Setting Up the Audio Mixing Board

 
Yes, it's true, when we capture DV video and audio via FireWire there is no chance to modify either the video or audio during the capture process. Capturing DV via FW from a camera/deck/device is simply writing an exact copy of what's on the source tape to a Media drive. The only way to sweeten or EQ DV audio that has been captured directly from a DV camera/deck/device is to export it from FCP to a sound application, sweeten, and import back into FCP. However, this type of audio is not the only audio that we use in FCP; Voice Overs and CD audio are often added to the mix.

The other important fact to consider is that Analog Video; Hi 8, Beta SP, S-VHS, etc. that are digitized using a camera/deck/device can have the analog audio routed through a mixing board for EQing before the audio runs into the camera/deck/device. This provides us with the opportunity to sweeten the analog audio before it gets captured. A chance to correct or at least improve poor audio. On output from FCP to analog tape there is once again the opportunity to adjust the audio as it passes through the mixing board.

In order to have this type of control over our audio we need to pass all audio, input and output, through the mixing board. The schematic below is based on the Mackie 1202 and 1402, but other brands of mixing board should work in the same manner.

 
CONTROL ROOM and HEADPHONES

The FCP manual and everyone else tells us that the correct way to monitor audio from FCP is to have speakers at the end of the FireWire chain and not to monitor FCP audio from the Mac speaker. The Mackie mixing board has an 'audio out' port called 'Control Room' (Blue arrows). The Control Room port is for monitoring audio and you will run from this port to an amplifier and speakers, or self powered speakers. The Control Room port has its own, independent volume control to adjust the listening volume. Changing the volume with this control has NO effect on the audio that is passing through the mixing board. There will also be a Head Phone port that also works off the Control Room volume control.

 
INPUTS

In order to have total control of our audio we will input ALL audio into the mixing board (Red arrows). Microphones, CD player, audio tape and mini disc players, and any analog decks that we will be using, Hi 8, Beta SP, VHS, etc. Yes, even our camera/deck/device's analog audio out will run into the mixing board. In the case of analog audio out from the camera/deck/device, audio runs into the mixing board, then 'Control Room' out to our speakers for proper audio monitoring.

MAIN OUT Port

The 'Main Out' port is the final output from the mixing board and will reflect all the audio adjustments made using the mixing board (Green arrows). As we will be running our mixed audio to several devices there is an 'Audio Splitter' (Radio Shack) attached to the Main Out port. From the splitter, audio is run to the analog audio in (RCA or mini) of our camera/deck/device, as well as to any other decks that we are using. You will use the buttons on the front of the splitter to direct the audio to your specific device. An example, we have a Hi 8 deck. The video is passed directly from the Hi 8 to the camera/'deck/device to be digitized and sent up FW. The analog audio out from the Hi 8 is passed first to the mixing board (red arrows), EQed, then passed out of the mixing board via 'Main Out' through the splitter and then into the camera/deck/device where it also is digitized and sent up FW with the Video. What we have done is inserted the mixing board between the Hi 8 and the camera/deck/device.

 
TAPE IN - TAPE OUT

The last bit of wiring that we need to do is to loop the Mac into the mixing board. The Mackie has a section called 'Tape In - Tape Out'. The Mackies Tape In and Out will run to the Audio In and Out ports on the back of the Mac. While B & W and older G4s do have both Audio In and Out ports, newer G4s are missing the Audio In port on the back. (Thanks Apple). If you have one of these newer G4s without an Audio In port you are going to have to buy a PCI Sound card. Now we know why Apple added an extra PCI slot.

It is important to know how the 'Tape In - Tape Out' section of the Mackie works. In all cases all audio will be passed from the mixing board into the Mac. However, when we want to monitor audio from the Mac itself, QT movies, Peak DV, start up chimes, etc. we will need to press the 'Tape' button found next to the 'Tape In - Tape Out' ports. To return to monitoring of all other audio (other than the Mac), press the 'Tape' button again.

 
Cabling - Wiring Up Your Sound System

 
The cables can make a significant difference to the quality of our finished product. Very few of us need to be informed as to the more superior results of sending a video image through an S video cable as compared to an RCA cable. The increase in vibrancy and color separation is readily apparent. Well, the same basic principal applies to our audio cabling.

The first step is in understanding the difference between 'pro' audio cables and the miniscule ones in the plastic package supplied with most electronic purchases. A cable with a small strand count will serve to 'choke' the incoming signal, effectively reducing the fidelity of the signal and it's overall amplitude.

There are two major types of cables used in pro audio. Balanced and unbalanced. Cables that contain only two wires plus a plastic sheath are called unbalanced. These are the type of cables found with typical audio equipment at your local audio store. High quality unbalanced cables will be much thicker and will probably have gold plated connectors on the ends.

Balanced cables contain a third wire that is a 'ground', hence the third pin in the XLR plug. The cable is terminated with XLR connectors aiding considerably in the rejection of noise.

Noise comes from many sources, AC sources being the major contributor. It's always a good idea to take a close look at the circuit your sound system is plugged into. Is your refrigerator plugged into a wall socket further up the line than your sound equipment?

Another consideration is cable length and placement. When positioning your editing set up, try to keep cable placement in mind. All these electronics have to be plugged into a power bar, right? Be careful to run the power wires as far away from the signal cables as possible.

Now back to this XLR subject. The XLR connector does a much more rugged job of locking our sound from the source to the destination. But many decks and CD players do not feature this type, so RCA has to be used at one end of the sound's journey. If an XLR connector can be utilized at one end but requires an RCA at the other, most good electronic stores can sell you a cable that is RCA on one end and XLR on the other. The cable will cost you a few dollars more but in my opinion, it is money well spent.

I'm sure everyone is familiar with the double ended cable connector used for transforming two 6 foot cables into one 12 foot length? Tying in two thirty dollar high quality shielded cables with a two dollar connector just doesn't make a lot of sense to me. For every connection there is a small drop in the signal strength. I keep my cable runs as short as possible and 'never' use connectors to increase the length of a cable.

So as you can see, there are many variables to consider when choosing cables. Taking the same care in their choice as you did when purchasing the audio equipment will almost certainly give you a higher quality audio result. The chain is only as strong as the 'weakest link'.

Enjoy.

 
Ken Stone
Ian Sutherland

copyright © Ken Stone and Ian Sutherland 2001

All screen captures and textual references are the property and trademark of their creators/owners/publishers.