
March 3, 2008
Magic Bullet Suite 2007

http://www.redgiantsoftware.com
$799.00 - $199.00 upgrade price
Review by Steve Douglas
Don't let that $799.00 scare you off before you read this. In the new Magic Bullet Suite you are actually getting four separate applications which can be used in Final Cut Pro, Motion 3, Adobe After Effects, or all three. Magic Bullet Looks, MB Frames, MB Colorista and Instant HD make up the entire suite. Each application can be bought separately, but if you don't have any of them, then I would certainly consider purchasing the suite in its' entirety. The first of the four is Red Giant's Instant HD which I reviewed here June, 2006 and sells for $99.00 as an individual application.
I have not gone back to Instant HD for the purpose of this review but it did its job very well up-converting Standard Definition footage to HD. I do wish that it were a bit easier to utilize as it takes some time to do the conversion, but once completed, the results were excellent.
The Magic Bullet Colorista version 1.0 sells for $199.00, as does the Magic Bullet Frames version 1.0. And then there is the star of the suite, Magic Bullet Looks that may be purchased for $399.00 separately. Most of us have seen interesting upgrades from time to time. Usually they include some different features or improve its efficiency. Rarely do you come across as complete a makeover of an application, as I am witness to with the Magic Bullet Looks.
Magic Bullet Looks helps you create a look that will define the mood of your sequence. It is the 3rd generation of Magic Bullet and replaces both Magic Bullet Editors and Looks Suite functionality from Magic Bullet Suite. In the previous version, while many looks were offered, they were difficult to adjust and impossible for the Final Cut Pro user to share a project with an After Effects editor.
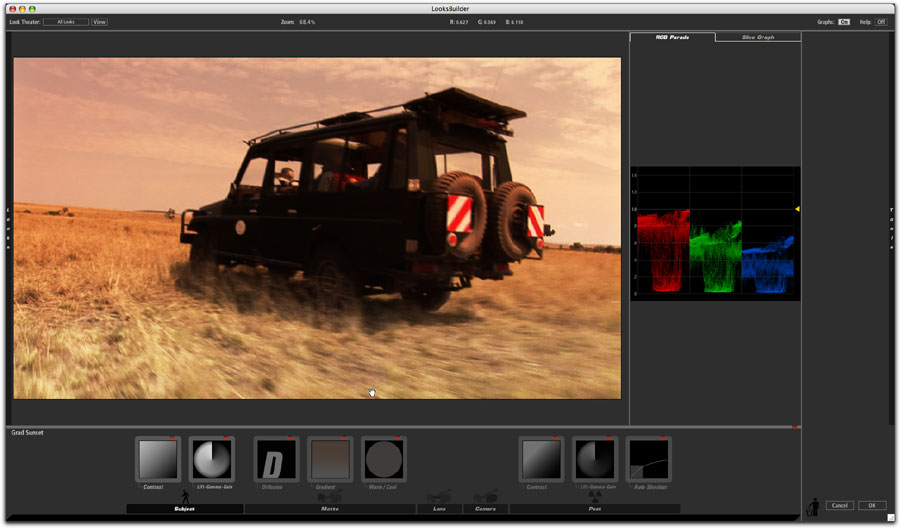
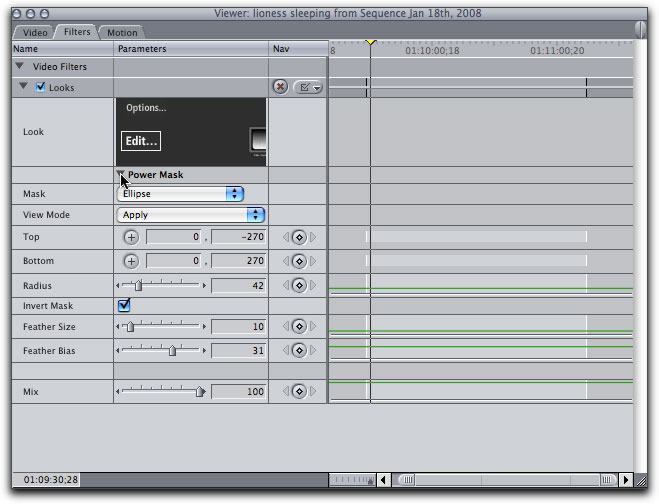
Once a Magic Bullet Looks filter is applied one clicks on the edit button found in the filters tab in Final Cut Pro or the effects Controls in After Effects. This brings up the Looks Builder window where different looks can be viewed, adjusted and applied. There are 6 parts to the Looks Builder interface which is intuitive and easy to navigate and use.
The Magic Bullet Looks interface is considerably different than its' predecessor.
I found it very easy to navigate. The supplied video tutorial explains it clearly and got me up to speed in just a few minutes.
The info bar at the top contains where you choose the genre of looks you wish to view, your zoom settings, your on/off graphs and RGB levels. The preview window shows the effects of the applied looks and any parameter adjustments you might make. The scopes on the right can be switched between either a slice graph or the RGB levels, and the tool chain, consisting of tools for the subject, matte, lens, camera or post. The pop up drawers of looks are hidden beneath a drawer type tab on the left and the pop up tools for the chain items are in a similar drawer on the right and, finally, the individual tool parameter controls are on the lower right which come up dependent upon which tool is selected.
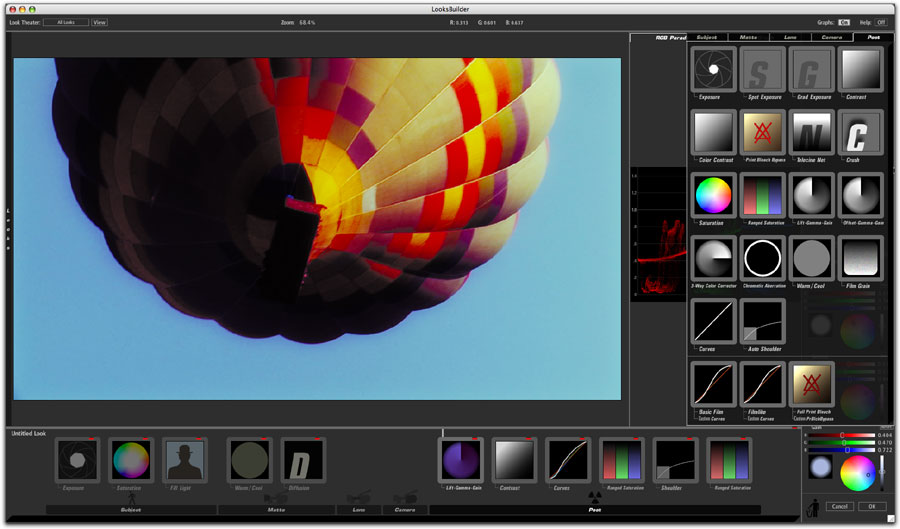
Once a tool is dragged onto the frame of the clip you can make any adjustments you wish,
working along with either the slice graph or the KGB levels scope, in the tool parameter controls in the lower right. Adjustments are immediately displayed.
A 'Getting Started' video is part of the package and it does a great job of explaining things, especially if you were used to the appearance of the previous version of Magic Bullet Editors and Looks.
The easiest way to begin is simply to chose from among a great many looks presets and then customize from there using the many supplied tools included in Magic Bullet Looks Suite. In many cases, customizing might not even be necessary. Simply applying any of the presets to your clip will bring up many of the tools that were used in creating that specific preset. These tools can then be adjusted to your individual tastes. In the info bar you have a 'look Theater' button where you can view the myriad choices of looks to keep as is or to finely tune. The 'View' button allows you to see an automatic show of one look after another. Setting it to preview either all the looks or just the looks in a specific category can alter this. The Magic Bullet 'Looks' are divided into several categories, 'Basic', 'Black and White Tints', 'Diffusion', 'Horror', 'Music Videos', 'Popular Film', 'Popular TV',' Special Effects', 'Stock Emulation' and 'Tints'. Each of these genres contains a significant number of different looks to chose from. There is also another category, 'Custom' where you can save your own customized 'look' for future use. Once you have picked the one that suits your project best and made whatever adjustments you needed, the editor clicks on the lower corner where it say 'OK' and the Looks Builder closes with your new 'Look' applied to the clip in the timeline.
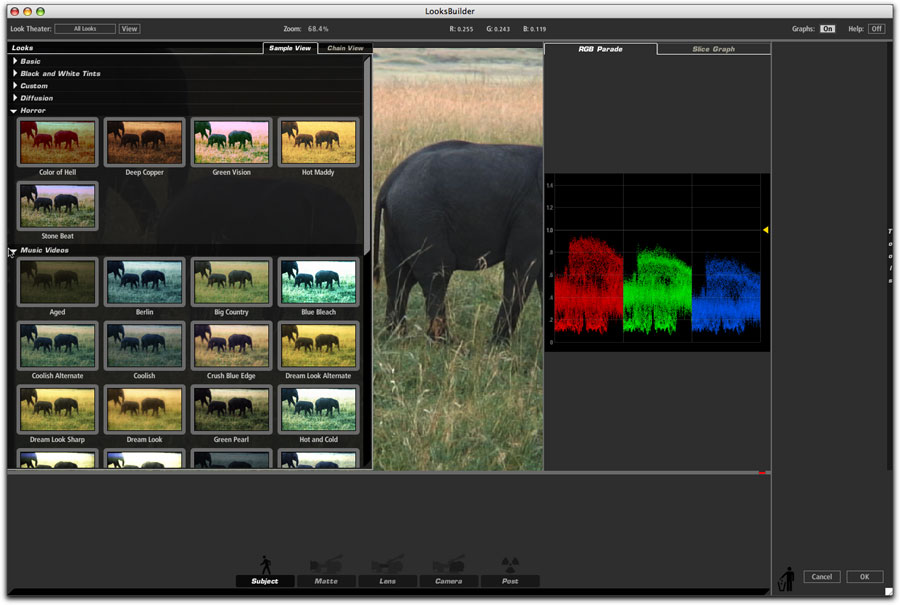
There are an abundance of 'Looks' presets already available to you. As you click on each 'look' the preview window quickly applies the new look.
Once your choice of look is applied, should you wish to adjust or change it, it is a simple matter of going back into the Filters tab in the FCP viewer or into your effects tab in Adobe After Effects and make whatever changes you wish.
As it initially appears in the filters tab in Final Cut Pro. Clicking on the 'Edit' button brings up the Magic Bullet Looks interface.
The 'Power Mask' allows you to apply a mask, with controls for size and shape to your image once a look has been activated.

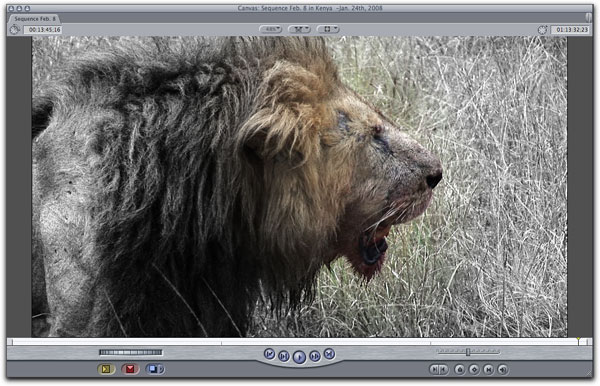
Before appearance of a Leopard.

After using the Bistrocity look from the Popular Film set.
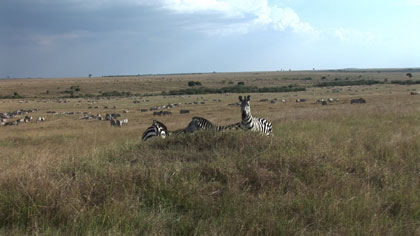
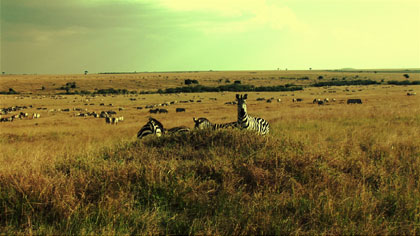
Zebra on the savannah before and after with the 'Mishandled Negative' look from the Stock Emulation set.
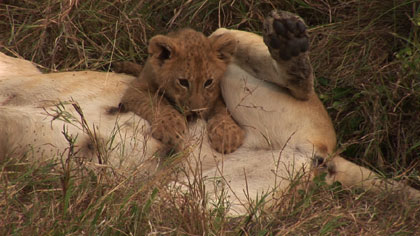
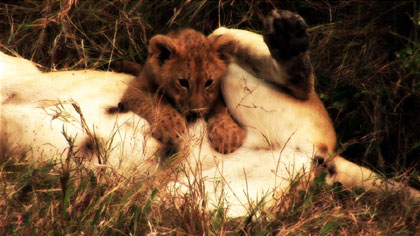
Nursing lion cub before and after the 'Sultrytron' look is applied from the Diffusion collection.
While testing Magic Bullet Looks in Final Cut 6 and Motion I had no crashes, spinning beach balls, or problems of any kind. On my 2x3.0 GHz Dual-Core Intel Xeon, running OS 10.4.11 with 5.5 gigs ram, it worked like a charm. I was able to watch the clip without dropped frames slowing the process. The same can be said for my efforts in After Effects. As I said earlier in this review, I liked the previous version of Magic Bullet Editors but didn't use it that much as adjustments were much more difficult to make and didn't seem as precise. That is no longer the case and I am thrilled with this total makeover of Magic Bullet Looks.
Magic Bullet Frames is a new part to the Suite ensemble. You begin with your ordinary interlaced video, apply the MB Frames and it produces a smoother look of de-interlaced 24p film. The Frames plug-ins includes an NTSC-to-24p and de-interlacing filters and offer both field-blended and a motion-adaptive de-interlacing approach that eliminates video artifacts. These include letterboxing and line offset controls to create mattes and adjust the image inside the letterbox area. I have found these controls to be a great help in the past, especially when I was mixing video formats and wanted to create a more consistent look. Final Cut Pro and Motion 3, in addition to Adobe After Effects now support Magic Bullet Frames.
Colorista was released about a year ago and is now a part of the Magic Bullet Suite as well. While I did not experiment with it very extensively it does have its advantages over the 3-way color corrector in Final Cut. Using it along with the scopes enables you to produce excellent results utilizing a Lift Gamma Gain. The exposure and the saturation controls are manipulated by your typical slide control enabling you to make that image pop. Regular color correction tools are part of the package with your basic color wheels and masking controls as well. Colorista is a native plug in for Final Cut as an FX plug, Motion, and After Effects.

Image before Colorista
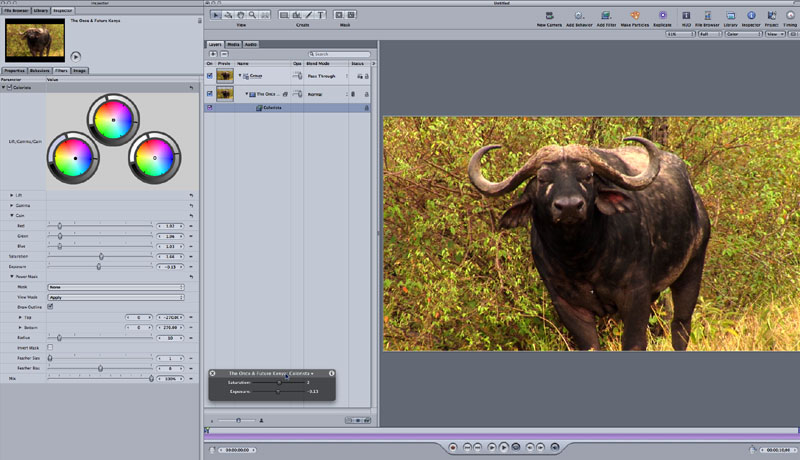
After Colorista was applied and adjustments were made. I wish I had discovered Colorista sooner.
It performed beautifully and was as smooth as silk to use. Look how the frame of the Cape Buffalo pops out as compared to the original.
Often I recommend that various software developers should, at the very least, have a couple of tutorials on their websites enabling the new editor or user to accomplish the same effects as the company brags about. This is unnecessary here as Red Giants Software has a great many 'Getting Started' tutorials on their website. The tutorial for the Magic Bullet Looks got me going very quickly and the Colorista tutorial was both informative and useful.
Bottom Line Time!! Kudos must be given to the developers at Red Giant for putting forth as much time and effort as must have been necessary to completely revamp Magic Bullet Looks as they have done. It is not often that you see so many improvements and additional features in a 'new version' as you will discover in MB Looks. It really is amazing to me what a fine piece of software MB Looks has developed into. I can't wait to start a new project that will make good use of it. Either bought individually, or as an entire Suite, the combination of Magic Bullet Looks, Colorista, Frames, and Instant HD make for a powerful package of editing tools. The need of any of these applications for the purpose they are intended will make their use all the more appreciated. All my thumbs up for the Magic Bullet Suite!!
 Steve Douglas is a certified Apple Pro for Final Cut Pro 6 and underwater videographer. A winner of the 1999 Pacific Coast Underwater Film Competition, 2003 IVIE competition, 2004 Los Angeles Underwater Photographic competition, and the prestigious 2005 International Beneath the Sea Film Competition, where he also won the Stan Waterman Award for Excellence in Underwater Videography and 'Diver of the Year', Steve was a safety diver on the feature film "The Deep Blue Sea", contributed footage to the Seaworld Park's Atlantis production, the History channel's MegaDisaster show and other networks. Steve is one of the founding organizers of the San Diego UnderSea Film Exhibition and leads both underwater filming expeditions and African safaris with upcoming excursions to Indonesia and the Coco Islands, Costa Rica in 2008, Kenyan safari in Africa and the Red Sea for 2009, and Truk Lagoon in Micronesia for 2010. Feel free to contact him if you are interested in joining Steve on any of these exciting trips. www.worldfilmsandtravel.com
[Top]
copyright © Steve Douglas 2008
© 2000 -2008 Ken Stone. All rights reserved. Apple, the Apple logo, Final
Cut Pro, Macintosh and Power Mac
are either registered trademarks or trademarks of Apple. Other
company and product names may be trademarks of their respective
owners.
All screen captures, images, and textual references are the property and trademark of their creators/owners/publishers.


