September 4, 2006
By Andrew Balis
When I teach Final Cut classes I often get asked if effects filters can be mapped to keyboard shortcuts for a quick way to apply the effect. Although there is a lot of key mapping that is possible in Final Cut, a staggeringly great amount, currently you can't map individual effects. Sort of. With the use of Final Cut's "Favorites" and a couple quick steps you can map effects to shortcut keys and can save yourself a lot of time when you need to apply a few constantly used filters (up to nine) and transitions (also nine).
We'll use the example of color correction filters but you can replace this with any filters you use. We'll look at saving four filters and four transitions, but as I just mentioned, you can save up to nine of each.
To apply an effects filter to a clip, one way is to choose it from the Effects menu.

The only problem with this approach is that each time you choose a filter you have to dig down through all the sub-menus as seen above. Over the course of applying these effects several hundred times in a sequence, this can get annoyingly repetitive and eventually eats up enough time that its not very efficient.
On the other hand, you may have noticed that if you apply an effects filter, that the next time you go to the Effects menu, the last filter applied is listed at the top of the Effects menu, and can easily be chosen from there.

This is a cool feature but if you go back and forth between choosing a few different filters, as would be common with color correction, then this option isn't always helpful.
Instead, let's look at using Favorites to help us out:
1. Select the filters you use most often.
This first step is probably easiest accomplished from the Effects tab in the Browser window. Twirl down the arrows next to the bins to find the specific filters you're looking for.
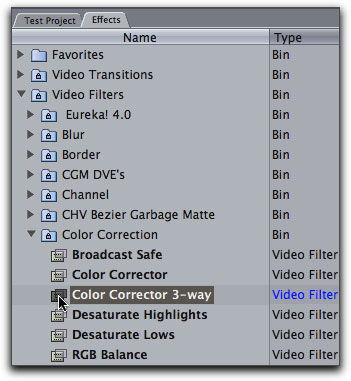
2. Drag the effects into the Favorites bin.
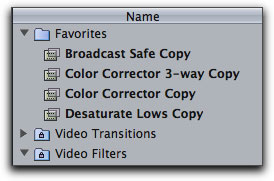
Drag the effects filters from their respective bins to the top of the Effects tab and drop them into the bin labeled Favorites. This action makes a copy of the effects in the Favorites bin.

3. Re-order the effects as you like.
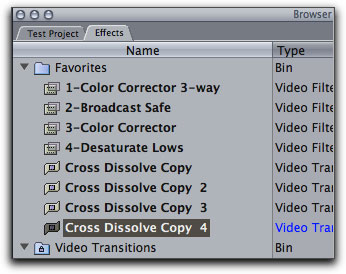
Notice the example below. The effects in the Favorites bin are listed alphabetically. We're going to assign keyboard shortcuts to these effects based on the specific order they're listed, so we'll want to start with an order that makes sense to ourselves.
To re-order the effects, click into the name of the effect and add a 1, 2, 3 or 4 before the name (I'm also going to remove the word "copy" that was added to each effect's name).
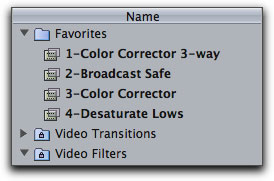
This not only re-orders these effects, but also assures that if you save other favorites, they won't take the "spot" we want each of our four main filters to have, which is the top four listed in this bin. This is important for the keyboard shortcuts, as we'll see next.
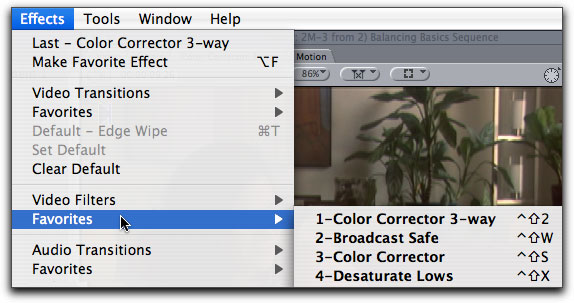
Notice in the Effects menu, under Favorites, is our four effects, and next to them are keyboard shortcuts. The first four effects in the Favorites bin use these default key commands. You can use these commands, but they're not easy to remember (Control/Shift/2, Control/Shift/W, etc). Next we'll change the key commands to something friendlier.
4. Change Keyboard shortcuts.
Go to the Tools menu > Keyboard Layout > Customize. In the keyboard layout window that opens, click on the lock button in the lower left corner of the window. This un-locks the layout.

In the right side of the window, click on the Favorites menu item to open it.
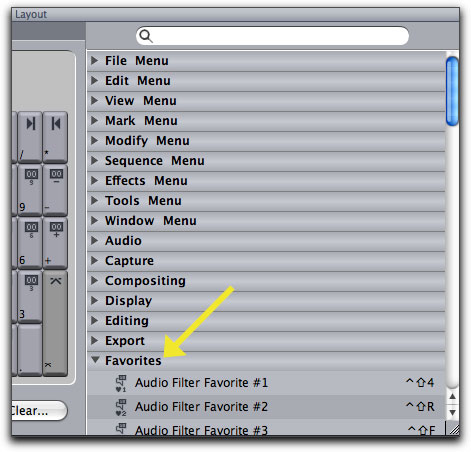
Scroll down to find the Video Filter Favorites. You'll see nine options. Only the first four are given key commands by default, but you can set shortcuts for all nine.
In this example, we'll use the key commands F1, F2, F3 and F4. Click on the icon for Video Filter Favorite #1 and drag it over the key F1 key and let go.
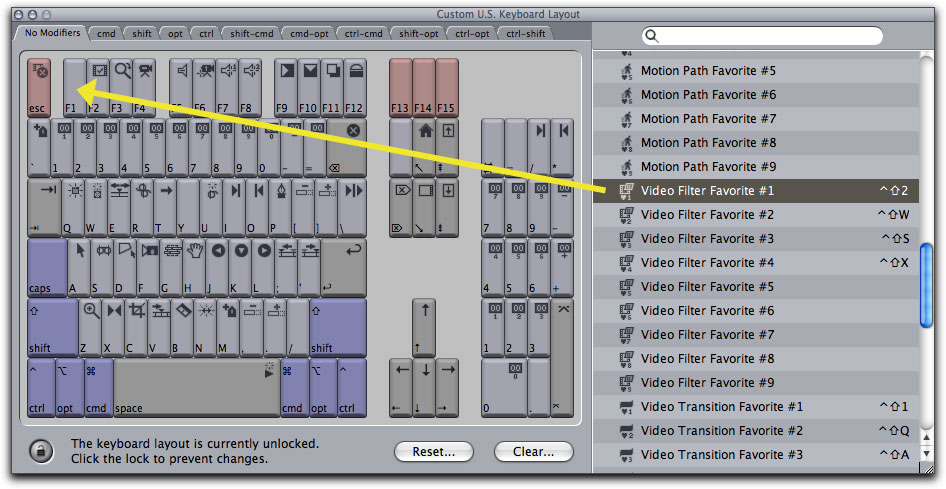
Do the same for each of the other effects favorites. Close the keyboard layout window once finished.
5. Applying effects.
Now highlight a clip in the Timeline and press F1 through F4 to apply a specific effect. Even easier, and sticking with the keyboard shortcut theme, as long as Auto Select is "on" for that particular video track, you don't even need to click on the clip first. Simply move the Timeline playhead over the clip (like by using the up or down arrow keys). When you press F1, F2, F3 or F4, the effect will be applied to any clip under the playhead.
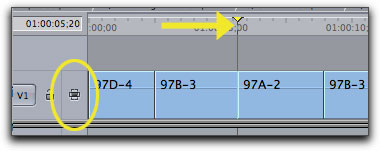
In the above screenshot, the Auto Select button is turned on for the track. Since the playhead is parked at the edit point, the effect will go to the clip to the right (97A-2).
Saving Transition Favorites And Keyboard Shortcuts
The same technique is available for transitions as well. Let's say we want to switch between cross dissolves of various lengths as one example.
From the Effects tab of the Browser, twirl down the arrow next to the Video Transitions bin, and then into the Dissolve bin. Drag the Cross Dissolve from here into the Favorites bin. Next, we'll duplicate the cross dissolve, change each copy to a different duration and re-name the effects. To duplicate the dissolve, select it, then press Option/D (or go to Edit > Duplicate). Keep duplicating until you have four cross dissolves.
Click into the field under the Length column across from one of the new "Favorite" cross dissolves.
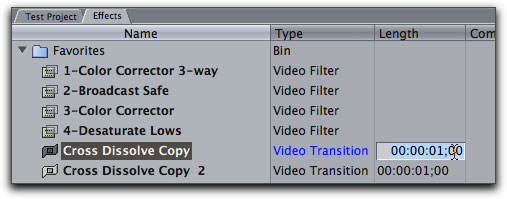
Type in a new number for the duration and click out of the field to set it. This duration is now the new duration for this transition every time its pulled up.
Rename the effect to reflect its new duration. As before, stick a 1, 2, 3 or 4 before the name of the transition to create an order for your keyboard shortcuts. Redo all the transitions as desired.
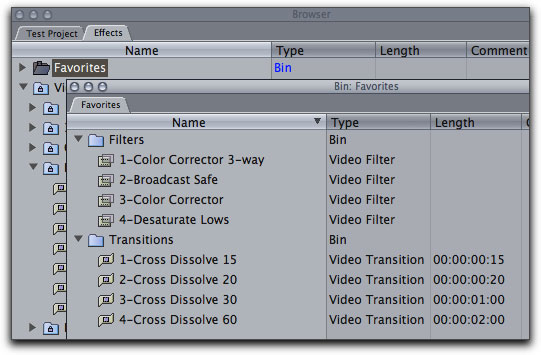
Don't worry about the video filter and transition favorites intermingling together in the Favorites bin. They're saved as different categories of effects, and the correct order is maintained for filters and transitions. But, if you want a bit more clarity or simplicity when looking at the Favorites bin, then double-click open the Favorites bin, create a couple new bins, and place your saved favorites into the bins, as the next example shows.
After this, go back into the keyboard layout, again go into the Favorites menu, and map the first four Video Transition Favorites to the keys of your choice.
Applying the transition favorites is easy. Park the playhead on an edit point (alternately you can click on an edit point to select it). Press the keyboard shortcut of choice and the transition is applied to that edit.
Changing Defaults Before Saving Favorites
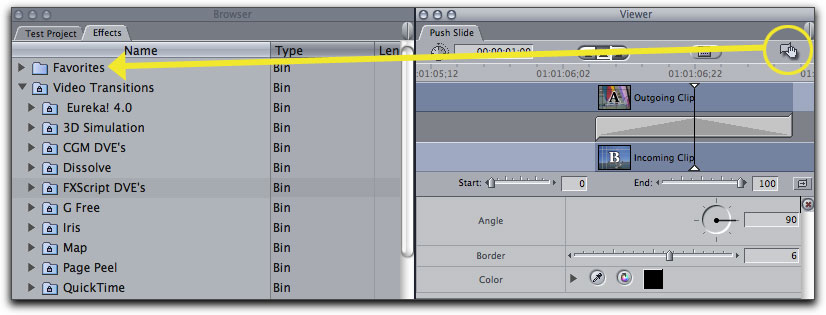
With some transitions, and with some filters, you may want to change the parameters of the effect before creating the Favorite, in effect changing the "defaults" for the effect each time its called up. For a transition, find the original transition to save, like a push slide in the next example.
Double click it to open it into the Viewer. Make changes as needed. Then grab the little hand icon in the Viewer and drag into the Favorites bin to save as a new favorite. The transition could also be placed on an edit point then saved as a favorite.
Saving a Keyboard Layout for Effects
In the original examples I gave, we used the function keys, F1 through F4. But some of these keys were being used by other features. For instance, F2 is the quick key for "Log Clip". If you wear many hats when working in Final Cut, switching between editing one day and color correcting on another, you can also switch between keyboard layouts pretty quickly, letting you easily switch to a layout beneficial to what you're doing, without sacrificing the keyboard shortcuts for your many other duties. From the Tools menu, you can choose Tools > Keyboard Layout > Save Keyboard Layout. After saving, it will appear at the bottom of the Tools > Keyboard Layout sub menu to choose it. To reset the keys back to their standard functionality, just choose Default Layout - U.S.
Additionally, you could stay away from F1-F4, and instead use Option/F1 - F4 for filters and Command/F1 - F4 for transitions. These keyboard shortcuts are not mapped to other functions by default and are open to use.
I hope some of these things help you save a little time while you're working like they've helped me.
Andrew Balis is a cinematographer, editor, post production consultant and Apple certified instructor teaching classes in Final Cut Pro to industry professionals at Moviola Education and UCLA. Andrew has authored numerous books, DVDs and other writings on Final Cut. His latest effort is the best-selling DVD Tutorial Color Correction in Final Cut Pro available at Ripple Training. He also co-authored the Apple Pro Series book Advanced Editing Techniques in Final Cut Pro 4, authored and co-authored the original Apple certified curriculum for beginner, advanced, and effects classes developed at Moviola Education, and wrote the Final Cut Pro curriculum for the Apple Education/CNN Video Journalism classes offered in the K-12 market.
[Top]
copyright © www.kenstone.net 2006
are either registered trademarks or trademarks of Apple. Other company and product names may be trademarks of their respective owners.
All screen captures, images, and textual references are the property and trademark of their creators/owners/publishers.