
Matchframe - FCP HD November 15, 2004
Getting the Most Out of Match Frame
In Final Cut Pro HD
Matchframe - FCP HD November 15, 2004
Getting the Most Out of Match Frame
In Final Cut Pro HD
By Andrew Balis
In this article we'll look at Match Frame, Reveal Master Clip and the Find features to helping you find different clips or source material quickly.
When working with a Timeline version of a clip, you may often want a quick way to find the original Browser version of that clip. Match Frame finds that matching clip for us. Its one of those features that can make other jobs in FCP a bit easier.
One of the main reasons Match Frame is useful is it allows us to re-edit a clip quickly and easily. Here's just a few times it can help:
How to Match Frame
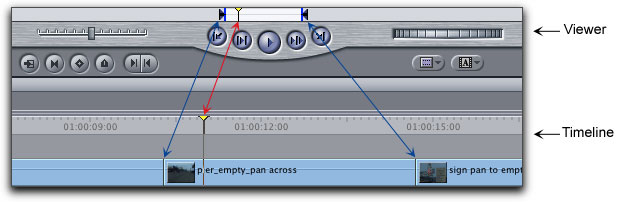
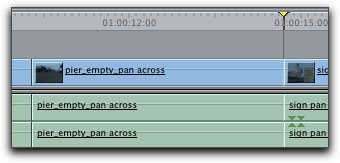
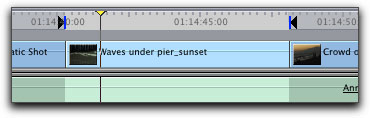
Place the Timeline playhead over a clip, and press the Match Frame button in the Canvas or the keyboard shortcut, the letter F.
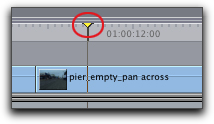
Playhead |
Match Frame button |
The Browser original clip is opened into the Viewer. The playhead in the Viewer is placed at the same frame as the playhead over the clip in the Timeline. In the Viewer and the Canvas you'll see the same matching frame.
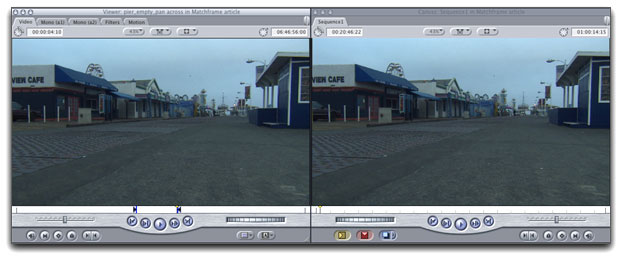
Additionally, an in and out point are freshly stamped on this clip in the Viewer.
Note that the in and out points match between the source clip in the Viewer and the Timeline clip, and the two playheads are aligned to the same frame.
One other important note about this Match Framed clip. It will show all of the source material from this original clip. For instance, you may have edited into the Timeline only the video portion from a video/audio clip. When you Match Frame, you open the original Browser version of the clip so you see all of the tracks of the original clip, both video and audio. This gives you a way to view and/or use any alternate tracks from the clip.
How to Match Frame From Subclips and Merged Clips
When you Match Frame from subclips and synced or merged clips, your Match Frame options are extended.
When you sync video and audio clips in FCP, and subsequently use the new merged clip in a sequence, you have two different Match Frame options. You can match back to the merged clip, or back to the original video and audio sources used to create the merged clip. In other words, you can go back to the "child" or "parent" clip. It's the same with subclips. You can Match Frame back to a subclip, or back to the original source clip used to create the subclip. This is great when, for instance, you're working with a subclip and want to find another portion of the same media used to create that subclip.
To Match Frame back to the subclip or merged clip, the command is the same as a standard Match Frame:
Auto Select and Match Frame
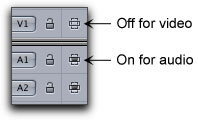
In order to control what track is Match Framed, you use the Auto Select buttons in the Timeline. FCP will Match Frame from the bottom-most track with Auto Select turned on (button is black). Since Auto Select is turned on by default when a new track is created, unless you change it, you'll Match Frame from the base, or bottom-most video track.
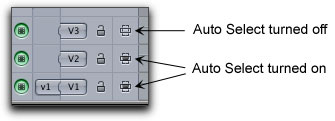
If you want to Match Frame from a track other than V1, you'll need to turn off Auto Select on any tracks below the desired track. A quick way to do this is to hold down the Option key, then click on the Auto Select button on the desired track. This will leave this track on, and turn all other tracks off.
Match Frame and Audio
To Match Frame back to an audio clip, then Auto Select must be turned off for all video tracks, as FCP will Match Frame from video first, then to audio second. Then Match Frame follows the same Auto Select rules as Match Frame for video, but in the opposite direction. FCP will Match Frame to the top-most audio track with auto select turned on, A1 by default.
Tip: a shortcut to turn off or on Auto Select for all video tracks: press Command/zero. For this to work, use the zero key found on the right side of the keyboard, in the number pad section.
Match Frame To Use Another Section of a Clip
When working with a Timeline clip, you may find a need to use another section of this same clip elsewhere in the sequence. You may be tempted to double-click it into the Viewer, and change the in and out points of the clip, so that it can be re-edited back into sequence in another spot. The problem with this is that you will adversely affect the current clip in the Timeline. When you open a clip from the Timeline into the Viewer, and change the in and out points, it changes those points for that particular clip in the Timeline.
Instead, you can use Match Frame to bring up a fresh version of this clip. If you change in and out points on a Match Framed clip, it won't affect the existing clip in the Timeline, because now you are dealing with another version of the clip, the original source material.
Replacing Deleted or Missing Audio
Let's say you've edited a video/audio clip into the Timeline, but ended up deleting the clip's audio from the Timeline, in favor of using other audio instead. Now you'd like to get that clip's audio back in the Timeline. Here's the quick and easy way using Match Frame.
1. Place the Timeline playhead at the first frame of the video clip in the Timeline.
2. Press F or the Canvas Match Frame button. The original clip opens into the Viewer, including its original audio.
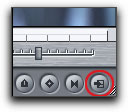
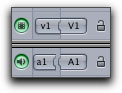
3. Make sure that the Source controls in the Timeline are patched/connected for both video and audio tracks, as shown below.
4. Make sure the Timeline playhead is still located at the first frame of the clip in the Timeline or set an in point at this spot.
5. Drag the clip from the Viewer to the Canvas and drop on Overwrite or press F10. The video and audio are re-edited back into the Timeline, replacing the video only clip.
To Summarize, place the playhead at the first frame of the clip in the Timeline, press F then F10 and all tracks are restored to the Timeline. Pretty quick, no?
Replacing Picture, Syncing to Timeline Audio
This is similar to the above scenario, and still pretty simple overall, but it's a tad bit more steps.
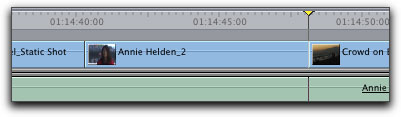
Let's say you're working on an interview style documentary, and you started out by using both picture and audio from an on-camera interview.
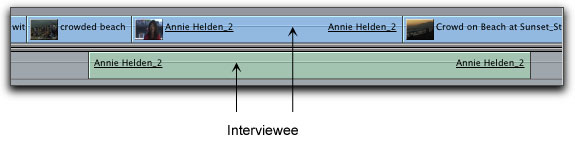
After some editing, you then replaced the picture of the interviewee with some b-roll footage. Now you want to replace one of these b roll shots (or a section of the Timeline) with the video of the interviewee, but not only do you need to locate the original clip, but it needs to be added back into the sequence in sync to the Timeline audio. Again, Match Frame is a good start.
1. Start off with Auto Select on for the video clip you want to replace.Auto Select on
2. Place the playhead somewhere over this clip, and press X to mark an in and out point for the clip to replace.
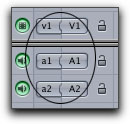
3. Next, turn off Auto Select for all video tracks and make sure Auto Select is turned on for the audio track(s) where the interview audio is located.
4 Move the Timeline playhead to the in point. Tip: Shift/I will take you to the in point.
5. Press F. The Browser interviewee clip is loaded into the Viewer. Although the audio tab will be in front in the Viewer, click on the Video tab to see the visual you are about to add to the sequence.
6. In the Viewer, set an in point at the playhead position. Don't move the playhead before setting the in point, or the clip will be added to the sequence out of sync to the Timeline audio. Note: there is no need to set or change an out point in the Viewer, as FCP will ignore this existing point and only use the out point you set in the Timeline.
7. Turn off patching for audio, and on for video as shown below.
8. Drag the clip from the Viewer to the Canvas and drop on Overwrite or press F10. The video is edited in, in sync to the audio from the Timeline clip.
Using Match Frame to do Slow or Fast Motion Without Rippling the Timeline
Let's say you need to speed up or slow down a clip, but you want more control than doing it in the timeline. When constant speed effects are done in the Timeline, the duration of the clip changes, and the Timeline clips to the right of the affected clip will shift left or right depending on whether slowing down or speeding up. Sometimes this is what you want, other times it isn't. Here's another way to do it using Match Frame.
1. Locate the clip in the Timeline to do a speed change, and move the playhead anywhere over this clip.2. Press F to open the Browser original into the Viewer.
3. Go to Modify > Speed (Command/J).
4. Modify speed as desired. So far, this is not affecting the clip in the Timeline as that will happen in the next steps.
5. To keep the Timeline clip at the same duration with the new speed change, start out by making the Timeline window active and press X to mark the clip.
6. Set a new in or out point in the Viewer as desired.
7. Drag this clip from the Viewer to the Canvas and drop on Overwrite. This adds the speed change to the Timeline.
8. One last step to take, correct the Browser clip back to normal speed. Although the correct clip is in the Timeline, we've altered the Browser clip so that each time its called up, its speed will have already been affected. To change the Browser clip to normal speed, click in the Viewer window to make it active, go to Modify > Speed and change it back to 100%.
Match Frame to Timeline
Another useful Match Frame is not for locating a source clip, but for searching in the other direction, finding a Timeline clip, Matchframing from Viewer to Timeline. If you open a Timeline clip or Browser clip into the Viewer, then press F or the Match Frame button found in the Viewer, FCP will move the Timeline playhead to the same spot as the playhead in the Viewer (unless that frame doesn't exist in the Timeline). Its great when keyframing audio in the Viewer, then updating to find this same spot in the Timeline. Cool, huh?
Reveal Master Clip
Aside from Match Frame, there is another handy feature that also helps you locate a Browser original clip. There has been a similar feature in Avid that was widely requested by Avid editors working more and more in Final Cut. Apparently The FCP development team was listening and Reveal Master Clip was added in FCP 4.
Reveal Master Clip is different than Match Frame in that it does not open the Browser clip into the Viewer. Instead, it finds the Browser clip, opens whatever bin its in, and highlights it. Here's how it works:
1. Place the Timeline playhead over a clip in the Timeline, or highlight a clip by single-clicking on it.2. Do either of the following:
In the Browser, the clip is revealed.
- Press Shift/F or
- Go to View menu > Reveal Master Clip
Reveal Master Clip works similarly to Match Frame in how it uses Auto Select. It will use the clip on the lowest most track with Auto Select turned on.
The only difference, if a clip is highlighted, then Auto Select and the playhead position are irrelevant as FCP will now only look to the highlighted clip. Match Frame, on the other hand, will not Match Frame a clip that is highlighted, only a clip at the playhead position with Auto Select turned on.
Reveal Master Clip can be helpful in a number of situations, like:
On a side note, Reveal Master Clip even works when moving between different copies of clips in the Browser. For instance, if you highlight a clip in the Browser that is a duplicated clip, then press Shift/F, FCP will jump to the bin of the original clip.
Create Master Clips
If Reveal Master Clip (and a couple other features) don't seem to work, there may be a good reason. If the project was updated from FCP 3, or the clips in the Timeline don't have a Browser original (like it was deleted), then there are no relationships between the Browser and the Timeline clips. The good news is that we can ask FCP to create those relationships for us.
1. Make the Browser window active.2. Go to the Tools menu > Create Master Clips
In the Browser, one of two things will have happened. Either FCP will take the existing Browser clips and establish a master clip/affiliate clip relationship with the clips in the Timeline, or FCP will create a brand new bin in the Browser, containing master clips for clips in sequences in that project.
Either way, you will now find that Reveal Master Clip will function just as it does with FCP 4 generated projects, and will highlight a Browser clip when chosen.
Other Useful Finds
There are two different Find features in FCP, both brought up by going to the Edit menu > Find. Which Find feature opens depends on which window was active before choosing it. If the Browser is active, then the Browser find window opens. If the Timeline window is active, a different find window opens that is specific to finding things in that particular Timeline. Here's a couple quick and useful options using each Find window.
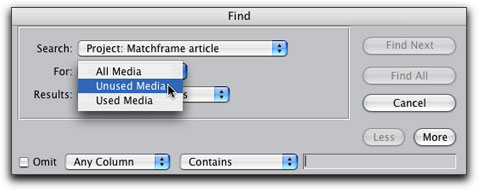
Finding Unused Clips
Want to know what's left to work with? This find option lets you quickly find all browser clips not used in the selected or chosen sequence(s). This is helpful whether you still need fresh material to edit in, or you are trying to find which clips you no longer need.
1. Highlight a sequence or group of sequences in the Browser.2. Go to the Edit menu > Find.
3. In the Find dialog box that opens, choose Unused Media from the For menu.
4. Click Find All.
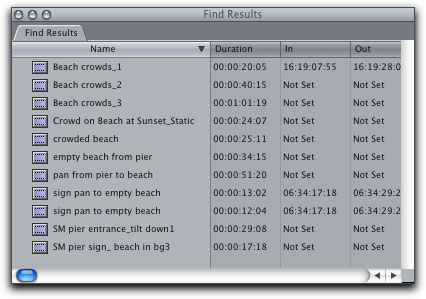
The Find Results window that opens is a list of unused clips, and this list is linked directly to the clips in the Browser. Anything you do to the clips in this window affects those same clips in the Browser.
This is pretty cool, especially if you want a way to label, for instance, all these clips in the Browser. Simply highlight all the clips in the window, Control/click or right/click over one of them, and choose a label from the drop down menu.
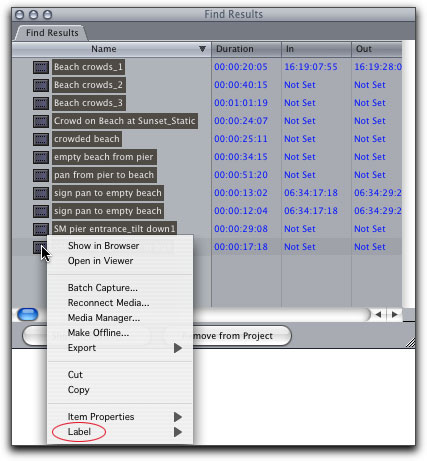
This action also color codes the clips making them easy to spot. Tip: You can change the labels' names in the User Preferences found from the Final Cut menu.
Then, any time you open a bin with one of those clips, you'll see its label.
Finding Timeline Clips
Let's say you finished working on a documentary with some of the news footage supplied by a network like CNN. If you have to pay for every second of each purchased shot, you'll want a quick way to find all clips in the timeline with the word CNN in the name, so you can count up the exact amount of time that you used.
1. Make the Timeline window active.2. Go to the Edit menu > Find
3. In the box that opens, type the keyword you're looking for, then click Find All.
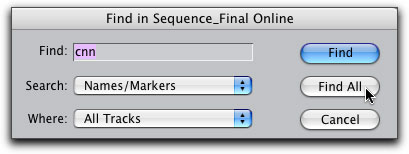
All clips with those letters in the name will then be highlighted together.

4. Go to Edit > Copy or Command/C to copy all these clips.
5. Open an empty sequence (use drop frame timecode for the sequence if you need to be time specific like when counting clip or sequence durations).
6. Go to Edit > Paste or Command/V. All the clips are now in one Timeline and can be counted. By default, the clips will be pasted with gaps in between them if they weren't next to one another in the original Timeline.
To sum up, this article covers just a few simple features, but when used under a range of circumstances, they give us options that can make certain technical challenges simpler and more seamless with the rest of the editing process.
Andrew Balis is a cinematographer, editor, post production consultant and Apple certified instructor teaching classes in Final Cut Pro to industry professionals at Moviola Education and UCLA. He is co-author of the Apple Pro Series book Advanced Editing Techniques in Final Cut Pro 4. Andrew co-authored the original Apple certified curriculum for beginner, advanced, and effects classes developed at Moviola Education, and wrote the Final Cut Pro curriculum for the Apple Education/CNN Video Journalism classes offered in the K-12 market.
Copyright © www.kenstone.net 2004
© 2000 -2004 Apple
Computer, Inc. All rights reserved. Apple, the Apple logo, Final
Cut Pro, Macintosh and Power Mac
are either registered trademarks or trademarks of Apple. Other
company and product names may be trademarks of their respective
owners.
All screen captures, images, and textual references are the property and trademark of their creators/owners/publishers.