
November 26, 2007
By Seth Kenlon
While COLOR is intended for color grading of final cuts of films, it benefits from the same seamless round-tripping as the rest of the Final Cut Suite. Whether you intend to adjust one clip or a number of clips, to send the selected footage to COLOR, simply select the SEND TO menu from the FILE menu, and send it to COLOR.
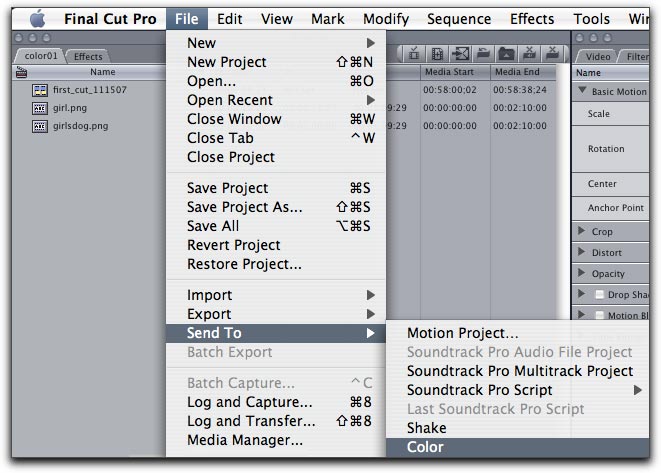
This will create a COLOR project which you are able to name and save in an appropriate place on your capture scratch drive. COLOR opens automatically, first in the SETUP room, where organization, preferences and record-keeping are done.
The next tab, the PRIMARY room, is used for overall color adjustments. The theory here is the same as in the 3-WAY COLOR CORRECTION filter in Final Cut Pro itself. The color wheels at the top are the same as in Final Cut Pro and are complementary color wheels; to add amber (warmth), subtract cyan (coolness). To subtract green (flourescence), add magenta. To add blue, subtract yellow. And vise versa. It is often a question of subtle adjustments rather than drastic changes that will do the trick.
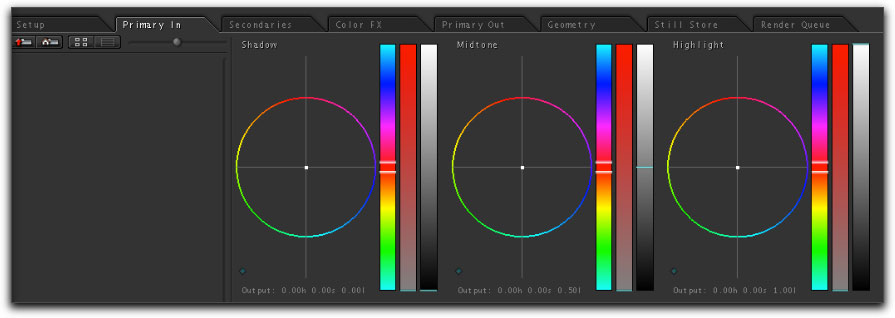
The sliders to the right of the color wheels adjust Hue, Saturation, and Luminance (in that order, from right to left)
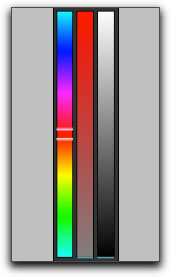
Once you have made your adjustments in the color wheels, you can tweak them with these sliders. To adjust the actual color of your adjustment (hue), click and drag along the first slider. To adjust how saturated your correction is, click and drag along the second slider (saturation). The third slider, the luminance slider, is very handy when crushing blacks and punching up the highlights. Although the slider may appear to be as low as it can go on the shadows, and as high as it can go on the highlights, you can go lower or higher on both (although if you are destined for broadcast, you should be careful about how far you go).
The secondary room is appropriately named because this is typically the second stop in your color correction workflow; first you make your overall adjustments in the Primary room, and then you stop in at the Secondaries for smaller adjustments to more limited areas of color.
It is in the secondary room that a mask can be easily applied.
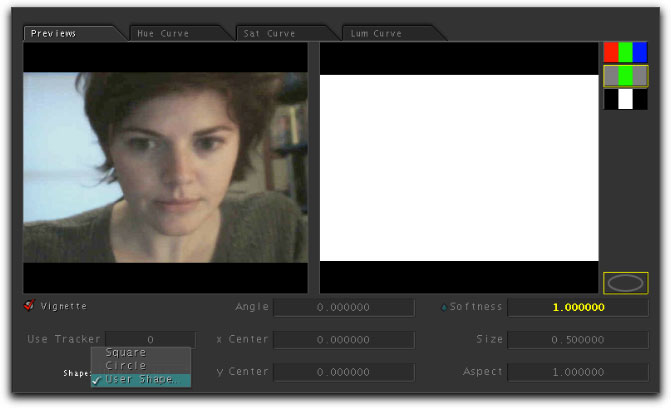
To enable a mask, locate the Preview Window in the Secondaries Room. Below the Preview window, there is a drop-down menu for mask shapes; the presets are a circle or square, with a third option for a custom shape that can be created in the Geometry room.
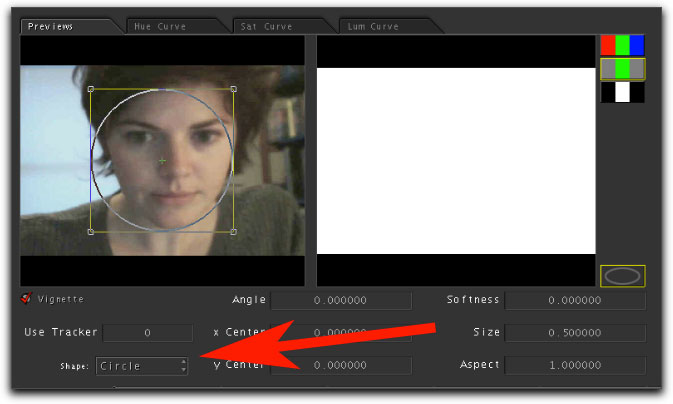
To activate these masks, we first must enable this secondaries room. The ENABLE button is at the top of the window, near the Secondaries tab itself.
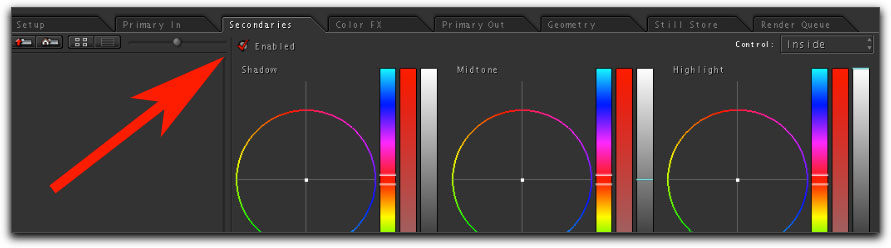
And now enable the mask shapes with the Vignette button.

Now that this mask has been enabled, we are able to modify the size and position of the shape. Anything within the shape will be affected by the changes made in the secondaries room; anything outside of the shape will be unaffected. A common use for this is boosting a poorly lit face; a simple circle mask around the face with a boost in the brightness of the mid range will add a level of exposure to the face. To diminish the harsh edges that may result from this, use the softness attribute, which will feather the edges of the circle mask.

Note that the three rows to the right of the preview windows directly effect what is visible in the canvas of Color. The three-color row (RGB) shows the video clip as processed through your Primary and Secondary rooms. The Grey/Green/Grey shows the video clip as a black & white picture, with the area selected in color. The black and white row will show only what is selected with black where nothing is selected. So if you are making adjustments that are not doing what you think they should be doing, check which row is selected; frequently it is as simple as selecting the RGB row.
You can draw custom shapes in the secondaries room by collaborating with the Geometry Room. To select a custom shape, select User Shape from the Shape drop-down menu.
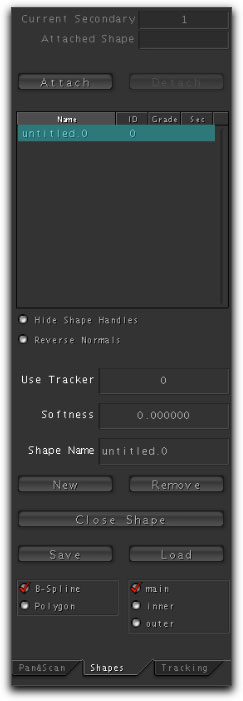
You will be taken directly to the Geometry Room, where you will be able to draw and edit a customized mask by clicking on the image to create an anchor point, clicking again somewhere else in the frame to create a second shape, and so on. If, on the right panel, the B-Spline option is checked then you will be drawing Bezier curves. If the Polygon option is checked then you will be drawing linearly. When you reach the first point you drew, the mask will close and be ready to use.
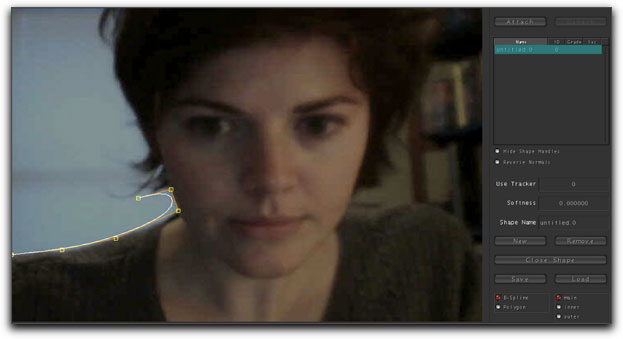
After you have drawn a rough mask around the area you are selecting, you can edit the position of the points, with B-Spline or Polygon adjustments, by simply clicking on points and dragging them to new positions.
Once the shape has been drawn, click the Attach button in the top of the right column.
The mask shape has now been attached to the Secondaries room; return to the Secondaries room and make your color adjustments as needed.
Getting the footage back to Final Cut Pro requires rendering all color corrected footage into Color render files, which will then take the place of the source media in Final Cut. To add the color corrected clips to your Color render queue, move over to the final tab of Color, the Render Queue tab. Navigate to the corrected clips in the timeline by either clicking the playhead over the clip, or using the Up and Down arrow keys to move through the sequence clip by clip. Add a clip to the queue by clicking on the Add Selected button. Alternately, if all clips have been corrected, you may click the Add All button.
Once all clips have been added, click on Start Render, and wait. The faster your CPU, the less time you will have to wait.

To return to Final Cut with your rendered files, go to File > Send To > Final Cut Pro.
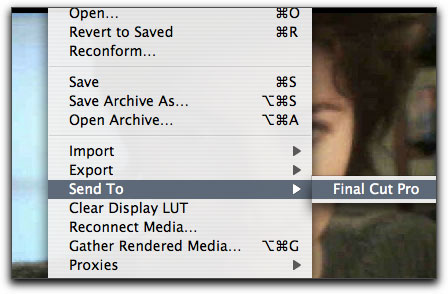
You may receive warnings that not all clips have been rendered, which may or may not be correct depending on how many clips you intended to correct. This sends the footage to Final Cut Pro, creates a new sequence appended with the words "(from Color)", and replaces the source media in that sequence with the newly rendered Color files, and the job is complete.
Seth Kenlon is a video editor and software trainer, having worked for a variety of media delivery companies, including ISIS Productions, notable for producing the first straight-to-iPod feature film, RUNE. Seth currently is lecturing on video codecs and compression methods at technical conferences. A video of one such presentation is available on youtube.