June 22, 2011
Download the ePub iPad/iPhone version of this article.
By Mark Spencer
The new Motion 5 has arrived - and here's the funny thing: while it looks radically different, contains features that represent a completely new paradigm, and will change the way motion graphics are created - it is at the same time no different at all. How can that be? Read on for summary of what I consider the 5 biggest changes in Motion 5, and why they change everything - and nothing at all.
The Interface
The most obvious change is the user interface. Folks familiar with Motion 4 and earlier will be struck immediately by Motion's 5 sleek, dark look: it's beautiful, easy on the eyes, and complements Final Cut Pro X's interface perfectly.
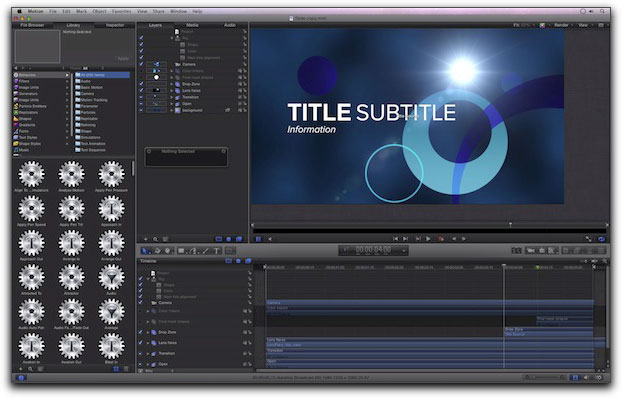
Instead of two separate windows - a Utility Pane and a Canvas - found in Motion 4 and earlier, Motion 5 sports a single unified interface, just like Final Cut Pro X.
The components of the interface, however, really haven't changed. The File Browser, Library, and Inspector can still be found in the left column; the Project Pane next to the Canvas still contains Layers, Media, and Audio - although these "tabs" are now referred to as "lists" - as in, "select the Layers List."
The toolbar has been moved - it used to live above the Canvas but has been moved down below it - providing quicker, easier access.
Below the Toolbar is the Timing pane, just like prior versions. However it is now opened by default - and the Keyframe Editor and the Audio Timeline no longer have their own tabs. They do, however, have buttons in the lower right corner, as well as keyboard shortcuts - and can be accessed from the Window menu. Since the Timeline is the primary tool, here that makes sense to me - in fact, I would have done the same with the Audio and Media lists in the Project Pane.
Many icons have received an overhaul, and there are several other tweaks throughout the interface that you'll discover as you work with Motion 5, but if you've used Motion 4, 3, or even 2, once you get over the initial shock of the darker shade, you'll feel right at home.
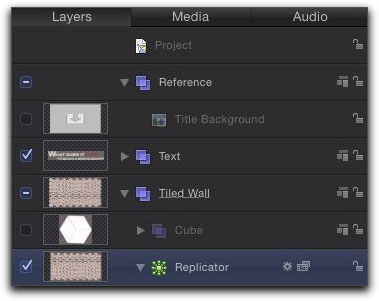
Everything else in Motion is mostly unchanged - all the Library elements - behaviors, filters, shapes, generators, emitters, replicators, etc. are intact and work the same way. The way you work with 3D in Motion 4 - reflections, lights, shadows, animating cameras in 3D space - all work as they have previously.
There are a couple of nice new surprises to be found that I'll be reviewing in a later article.
While the interface change is the most obvious, it's not the most important - not by a long shot. Let's get right to the big stuff, starting with:
2) Final Cut Pro X Integration
While you have been able to bring Motion projects into Final Cut Pro for years, with Final Cut Pro X the way Motion and Final Cut Pro work together has been completely re-imagined. In Final Cut Pro X, you'll be using Motion projects without even realizing it - every time you add a title, transition, effect, or generator to your project!
To see what I mean, in Final Cut Pro X, take a look at the Browser buttons at the right side of the Toolbar.
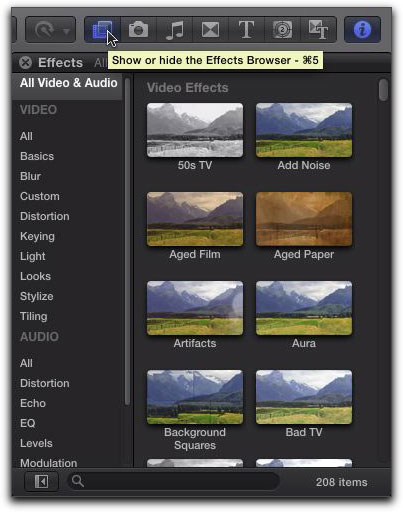
Music/Sounds Browser, Transitions Browser, Titles Browser, Generators Browser, and Themes Browser.
Here we have collections of Effects, Transitions, Titles, and Generators - basically everything that you used to find in the Effects tab of the File Browser in Final Cut Pro 7 and earlier. There is a huge amount of content in here. And here's the kicker: right or control-click on any of these presets and you'll get a menu option to Open a Copy in Motion.
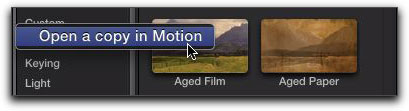
browsers are Motion projects - and can be modified in Motion.
That's right, virtually all of these these effects, transitions, titles, and generators are actually Motion projects! So whenever you add a lower third title to an interview clip, drop a transition on an edit point, give your footage a unique look with an effect, or add a background with a generator - you are adding a Motion project to your timeline.
This means that Motion has become much more than an optional motion graphics design application alongside the tools built into Final Cut Pro - it has became the development tool for creating effects for Final Cut Pro X. A fascinating new development with far-reaching implications.
Motion's integral role in Final Cut Pro X goes even deeper with two powerful new features. The first is:
3) Publishing
Publishing has two levels of meaning in Motion 5. The top level refers to the new ability to publish Motion projects (also called templates) to the appropriate browser in Final Cut Pro. In other words, when you create a new project in Motion 5, you first choose what type of Motion project you want to make. If you check out the new Project Browser that opens when you launch Motion (or start a new project), you'll see that in addition to the standard Motion project we've come to know and love, there are now 4 new project types - one for each of the browsers in Final Cut Pro: Effects, Generators, Transitions, and Titles.
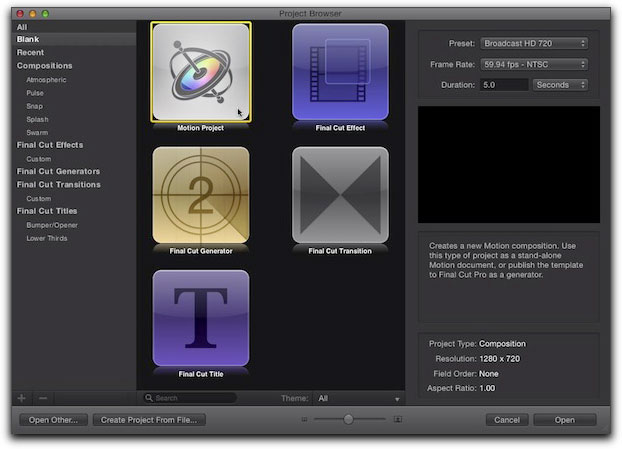
When you select and then save of these new project types, they are automatically published to Final Cut Pro and immediately available in the appropriate browser.
That's all very exciting - but the second meaning of Publishing in Motion is where things get really interesting.
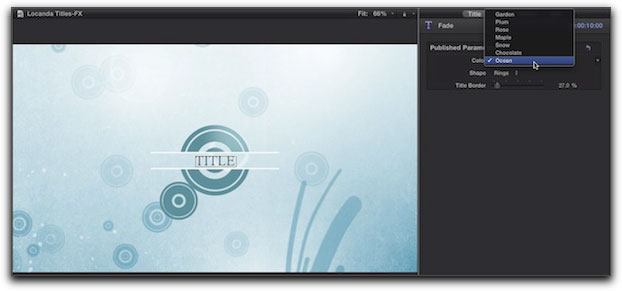
In Final Cut Pro, if you apply an effect, transition, title, or generator to your project, and then take a look at the Inspector, you'll see some parameters you can adjust. In fact, if you use a Title, you'll see in the Title tab, that you'll see that they are called Published Parameters.
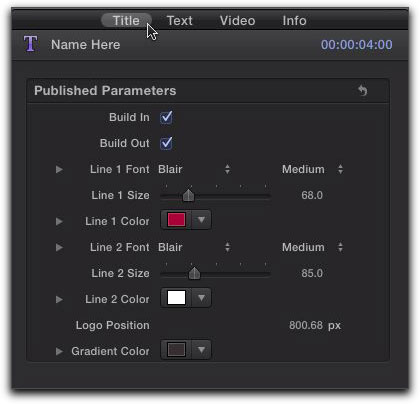
These are parameters directly from the Motion project that the designer chose to expose in Final Cut Pro. In other words, in addition to publishing the Motion title project as a whole so that it is available in Final Cut Pro, you can also choose what parameters of that project to publish to Final Cut Pro. Rather than forcing the Final Cut Pro user to go into Motion and pick from the potentially hundreds of different ways a project can be adjusted, you can choose just those parameters that are the most critical.
This ability to publish parameters is what makes using Motion projects in Final Cut Pro so incredibly flexible - right inside of Final Cut Pro X, the editor can make changes to the Motion project without ever launching Motion!
But it gets even better than that - thanks to the powerful new feature in Motion called...
4) Rigging
As opposed to publishing, which "connects" Motion 5 to Final Cut Pro X, rigging is a feature inside of Motion. However, publishing gives it immense power. So what is it? Essentially, rigging refers to the ability to tie multiple parameters together to single control.
For example, you can create a title that has several two animation options - perhaps the text fly on in different ways, and there are different background elements that animate - perhaps a quick, upbeat version; a slow, sedate version; and a few others. The animations may involve lots of keyframes and behaviors, text, shapes, particles - anything you can think of. You could "rig" each of these animations to a selection in a pop-up menu so that when you select it, only that animation plays.
Or, you could create a multiple, coordinated color themes for your project, where each theme changes the color of dozens of objects. Then, you could rig each set of colors to a single pop-up menu.
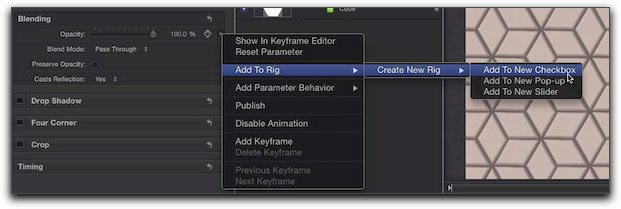
Or, you could create an effect, and rig all the different parameters that you used to create the effect - like filters, masks, and blend modes - to a single slider that adjusts all those parameter at the same time.
Or, you could have a simple checkbox that would turn on and off sets of layers and/or groups at the same time - revealing a completely different type of transition, for example.
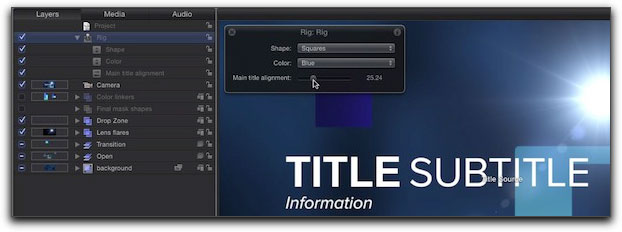
These single controls - pop-up menus, sliders, and checkboxes - that tie multiple parameters together are called Widgets. The widgets in Motion all live inside an object called a Rig. And the process of connecting parameters to a widget is called Rigging.
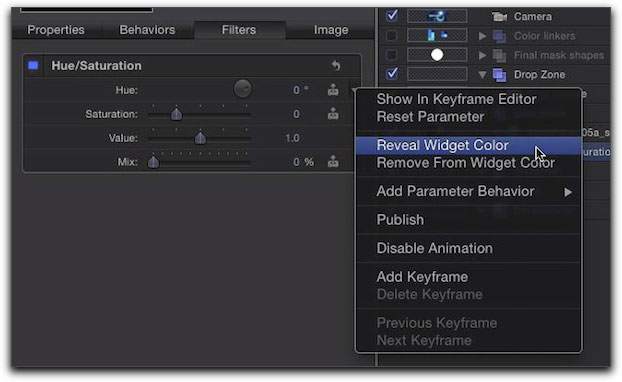
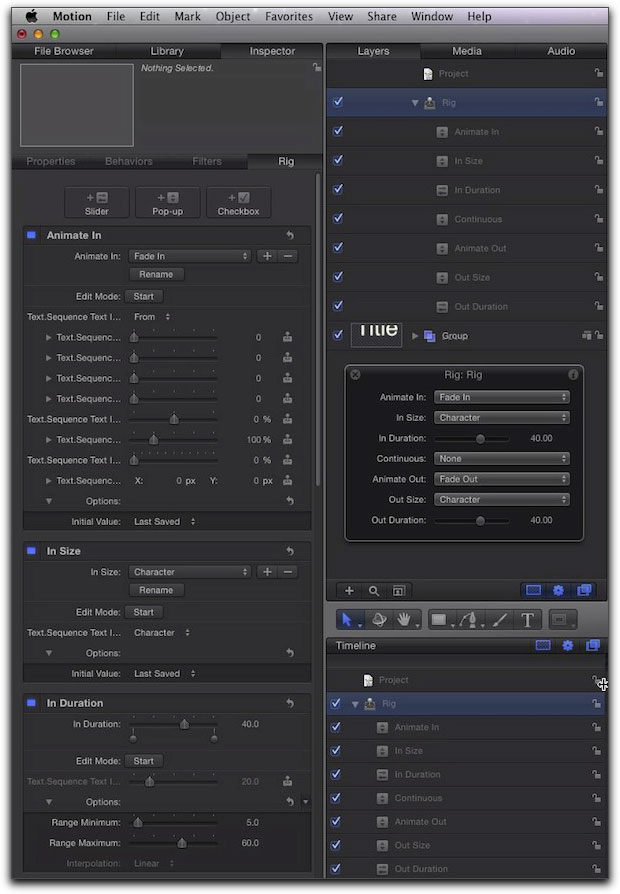
that are rigged to each Widget in the Rig Inspector on the left.
Now, the cool thing is - if this all weren't cool enough - that you can then publish these widgets to Final Cut Pro - so that the Final Cut Pro user will have access to the same pop-up menu, slider, or checkbox (named anything you like) that you used to control your project in Motion.
Rigging, when combined with publishing, allows you to create beautiful titles, transitions, effects, and generators that can then be modified in Final Cut Pro X in a myriad of ways. I can't wait to see all the inventive ways that folks figure out how to implement these great new features. They completely transform how Motion will be used, and they move Motion from an optional motion graphics tool to a center-stage development tool for creating any kind of effect for Final Cut Pro. And with the new technology underpinnings in Motion 5: 64-bit architecture, full color management, resolution independence, and full floating point rendering, Motion 5 will make it easier than ever to create beautiful motion graphics.
Which brings us to the last of the top 5:
5) Price
At only $49.99, Motion is an unbelievable bargain. While you can certainly use Final Cut Pro X without Motion, the fact that you can so easily modify existing preset effects and make your own with rigging and publishing make it a no-brainer purchase.
So you can see - the new Motion changes everything - yet Motion itself really hasn't changed at all. If you are already familiar with Motion 4, once you understand how to put rigging and publishing to work, you'll have no trouble creating your own incredible titles, transitions, effects, and generators for Final Cut Pro X. And if you've never used Motion before - you are probably going to want to start!
If you want to see more about Motion's new features, check out my preview movies for my two trainings - Motion 5 Fast Forward for folks new to Motion - and Rigging and Publishing in Motion - for folks comfortable with Motion 4 who what to get right into learning how to rig and publish their own titles, transitions, effects, and generators for Final Cut Pro X.
copyright © Mark Spencer 2011
are either registered trademarks or trademarks of Apple. Other company and product names may be trademarks of their respective owners.
All screen captures, images, and textual references are the property and trademark of their creators/owners/publishers.