
Motion September 20, 2004
Motion - Under the Hood
Motion September 20, 2004
Motion - Under the Hood
Recommended system
Minimum System Requirements
It was just over a month ago that Apple shipped its new Motion graphics application. If you have started to work in Motion you might have yet to discover that Motion runs deeper and is more powerful then it would appear at first glance. Motion creates movement in a sophisticated yet simple manner allowing you to build motion graphics by 'Drag and Drop', utilizing Behaviors (animation without keyframeing), Filters, Emitters and the setting of Parameters. As you build your motion graphics project, utilizing and adjusting the almost unlimited controls found in Motion, your creation becomes truly unique and special. In this, you are not limited by the application but rather only by your imagination. Motion's most powerful feature is its ability to provide Real Time on screen interactivity. As you work, building up your project, Motion plays out on the screen. Each addition, change and adjustment, even the smallest manipulation, whether by moving a slider, entering a value or by clicking on an element in the Canvas window and dragging it to a new location, is displayed in real time on your screen as Motion loops through your project. This 'Real Time' playback ability is so powerful and so important to the creation of motion graphics that it represents a paradigm shift in the way that motion graphics will be done in the future.
There are three main pieces of hardware that drive Motion's real time abilities. The CPU processor, system RAM and the Mac Video monitor card. When a Motion project is opened, all elements of the project contained within the Preview Range on the Motion Timeline, are loaded into system RAM from the hard drive. This will include video media, stills, Photoshop files, and any other elements that comprise your Motion project. Loading all of this from the hard drive into RAM gives Motion much faster access to these elements for processing. Each of the different Motion elements as well as each layer of a Motion Project will add to the system RAM requirements. Each frame of DV NTSC video takes up about 1.3 MB of system RAM, that's just for one frame of video. As an example, lets say that you have a 10 second Motion project with three layers, this will require about 1,170 Megs of system RAM. 10 seconds of DV NTSC video = 300 frames, times three layers = 900 frames, times 1.3 MB per frame equals 1,170 MB. As you can see, the longer the Motion project and the more layers you have, the greater the need for additional system RAM. Considering that the Mac OS has its own system RAM requirements as well as RAM used by any other open applications, I think that 2 gigs of system RAM should be enough for most Motion projects. Of course, additional system RAM is always helpful and if dealing with longer Motion projects, even necessary.
It is the Video monitor card, with on board GPU (graphics processing unit), working with V-RAM, that does the heavy lifting for Motion. The video monitor card does all the number crunching, and then draws the images to the screen. The Video monitor card processes, then draws each frame, one at a time. As the card works on a single frame, all elements and layers for that one frame are transferred from system RAM into the V-RAM on the monitor card. Instructions in the Motion Project tell the card's graphic processing unit what to do with and how to manipulate the images of that frame.The graphics processing unit can only process information that is being held in V-RAM, so this is the reason that the requirements for V-RAM on the monitor card are so high. If you don't have enough V-RAM to hold all the information for that one frame, real time playback is going to take a hit. Once the frame has been displayed, the V-RAM cache is flushed and is then loaded with all the information for the next frame. As the monitor card only works on one frame at a time, the length of the Motion project is not relevant. As long as the monitor card has enough V-RAM to hold all the elements for the one frame that it is working on, Motion will be able to play back in real time. When there is not enough V-RAM to hold the entire contents of the one frame, there will be a reduced playback frame rate, Motion will take longer to generate each frame and display it on the screen.
The last player in the game is the Mac CPU, and while it is always better to have a faster CPU, the speed of the CPU is not that important when it comes to Motion's real time playback abilities, it is the monitor card that is doing most of the display work. The CPU processor does some of the work, processing Behaviors, Particle trajectories, motion paths and curves. If you have a large number of Behaviors, you will benefit from a faster processor. RAM preview render (Command r) will benefit too.
The minimum requirement for Motion is a G4 single 867 processor, note that older G4s may not be able to run Motion. If you are running a newer G4, you will need to upgrade your video monitor card to one that is Motion compliant. While, in theory, Motion will run with 512 megs of system RAM, Motion can access up to a total of four gigs of system RAM. However, 2 gigs seem to be an acceptable amount. Video monitor cards that can run Motion come with 64, 128 and 256 megs of V-RAM. I can tell you that a card with only 64 megs of V-RAM is not going to do much for you and real time playback frame rates will be in the basement. 128 megs of V-RAM will produce better playback frame rates, but if you are going to be doing complex projects in Motion then you really need to look at the card with 256 megs of V-RAM. With a complex Motion project, even a monitor card with 256 megs of V-RAM will begin to run at a lower frame rate as more and more effects are applied.
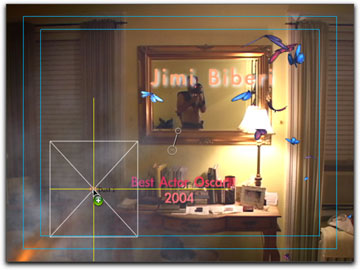
Motion has changed all this as it has the ability to be in constant play and yet allow you to make changes while it is playing on the screen in Real Time. You can see the changes as you make them. You can add, mostly by drag and drop, video, stills, QT movies, audio, Behaviors, text, Particles Emitters, filters, LiveFonts, paths, Shape Drawing Tools, Mattes and Masks while it is playing. As you adjust the parameters of the different elements in your project, you see the changes in real time. When building motion graphics it is most helpful (read intuitive) to be able to see the movement of your graphics as you work. This ability enables you to work in an interactive manner. Shown below, I have dragged a new element into my Canvas window while my project is playing in real time. During this process, yellow dynamic guides appear to help me position the new element before dropping it into place.
As you can imagine, the ability to have constant playback and still work as it is playing requires a lot of horsepower. As the computing demands are so great, Apple recommends using a G5 Mac to run Motion, which ships with either the NVIDIA GeForce FX 5200 Ultra with 64MB DDR video memory or the ATI Radeon 9600 XT with 128MB DDR video memory. You can special order the ATI Radeon 9800 XT with 256 DDR SDRAM for an additional $300.
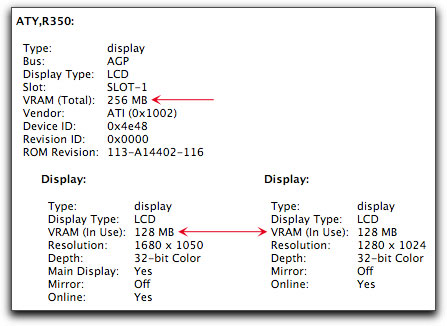
I have installed a new ATI monitor card with 256 megs of V-RAM in my G5 dual 1.8 so that I can run Motion. I am running two LCD displays, which, as you can see below, splits the V-RAM between my two monitors. So, in essence, I have only 128 megs of V-RAM available for Motion.
Full frame rate playback is dependent on several things, the speed of your processor, the amount of V-RAM on your video card, and the number of elements and layers in your project. As you apply additional elements to your project, the work load on the monitor card goes up. Motion's real time playback works in an interesting manner. If the Mac's video card does not have enough V-RAM to run at the full frame rate of your project, i.e. 29.97 fps, it will reduce the playback frame rate in order to continue playing.
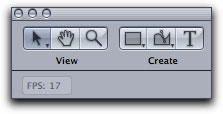
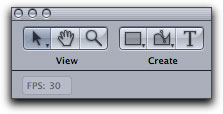
I have run Motion on G5 dual 1.8 Macs with the 64 meg, 128 and 256 video cards. My experiences have shown that while a 64 meg video card does enable Motion to run, real time play back is very limited. After applying just a few elements with a Behavior or two, the playback frame rate can drop as low as 4 or 5 frames per second. This can make for very choppy playback yet it is still helpful in building motion graphics. The same project using a video card with 128 megs of V-RAM might produce a playback rate of 16 fps. The 256 V-Ram card might play at the full frame rate. Motion graphics get complicated, with numerous elements in multiple layers and often with dozens of Behaviors and Filters applied. With complex motion graphics it is possible to bog down even the 256 V-RAM card.
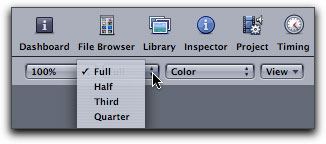
The team that developed Motion understood that video cards with smaller amounts of V-RAM or even cards maxed out with V-RAM running complex motion graphs might not produce playback frame rates that are acceptable, so they gave us a way to boost frame rate play back by lowering the quality of the playback. Top of the Canvas window is a 'Resolution' drop-down menu that defaults to 'Full'. This menu offers playback resolutions of; full, half, third, and quarter. The idea being that if you are not getting a fast enough play back frame rate, you can reduce the playback quality which will in turn increase the playback frame rate. In fact, if you select any of the Resolution settings other than full, you will see a lessoning of quality of the images on the screen. The problem is, that dropping the resolution of playback does not increase the playback frame rate. Unfortunately the Resolution feature does not work at this time.
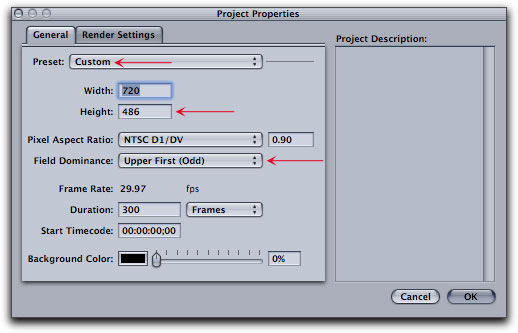
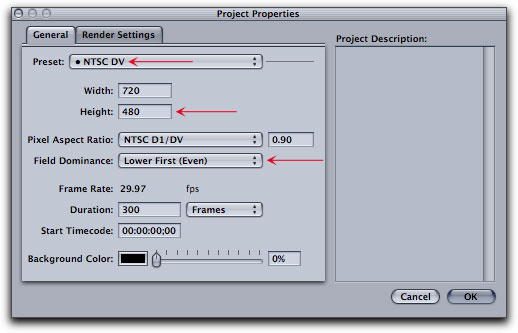
There is a caveat regarding Firewire output from Motion. The Project Properties in Motion must match your Firewire Device and NTSC or PAL monitor. For example, I am running standard DV NTSC which has a size of 720 x 480 and the field dominance is Lower Field (Even). When working in Motion with either the supplied tutorials or using the provided Templates (Shift Command O), check the 'Project Properties' found in the Edit menu and you will see that the tutorial and templates use different settings from standard DV NTSC, shown below. Because of this difference, these items will not play down Firewire. In order to view Motion down Firewire, your Motion Project Properties must match your Firewire device and monitor.
When doing the tutorials or using the supplied templates, change their Project Properties to match your Firewire device and external monitor. In my case I can select DV NTSC from the Preset drop-down menu, shown below. Of course, your Motion properties must match your DVD SP or FCP settings.
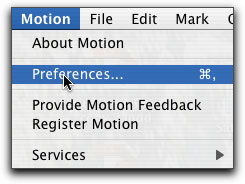
To enable Firewire output, in the Motion menu, select Preferences and then the Output tab.
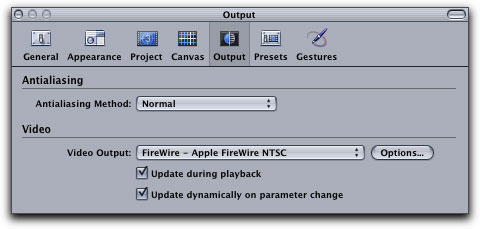
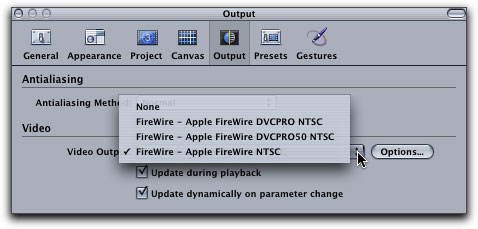
Click on the 'Video Output' drop-down and choose the appropriate setting. Checking the 'Update During playback' will playback live to both your canvas and external monitor. 'Update dynamically on parameter change' will display on the external monitor, in real time, any parameter change you make as you make the change. Using either or both of these option will cause a decrease in the playback frame rate. 'Update dynamically' might be used to check color correction on a monitor as you make adjustments on the fly.
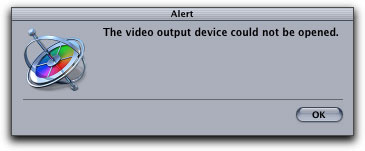
While both Motion and FCP can output via Firewire to an external monitor, there seems to be a bit of a conflict between the two over access to Firewire. If you have FCP open and are viewing output down Firewire and then launch Motion with the Motion Output Preferences set to Apple Firewire (shown above), then during the launch process you will get the alert message shown below. This is telling you that FCP still has control of your Firewire output and that it is not available to Motion. If in FCP you were to go into the View menu, View External Video and turn it off, or into Audio/Video settings, A/V Device tab and disable Firewire Playback Output, it will do no good. As long as FCP is running there is no way to get it to relinquish its hold on Firewire. You will have to Quit FCP to release Firewire so that it will be available to Motion. However, if you are going the other way, running Motion outputting down Firewire, and you launch FCP, FCP will take back control of Firewire from Motion and will output down Firewire.
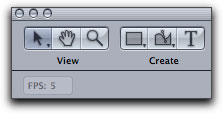
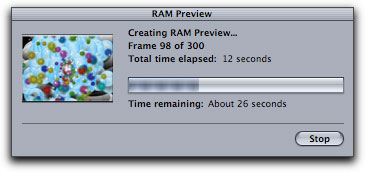
Being able to preview our Motion projects on NTSC can be helpful, however the cost in performance, frames per second playback, is heavy. You may want to disable Firewire playback while you work, turning it on to check your project when the need arises. To get full frame rate play back out to NTSC, do a Ram Preview (Command r) first. After Ram render, the color of the bar in the mini-timeline will change to green.
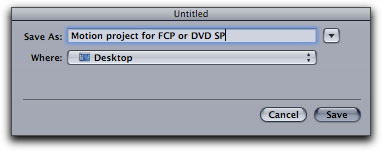
Open a Project in Motion and set Project Properties to match the settings in FCP/SP and Save the Motion Project. You can Save it to the Desktop or to an asset folder that you are using for FCP/SP.
When a Motion project is imported into FCP, FCP will display the Motion project as a clip with a '.motn' file name extension. If there are layers in the Motion project, these layers will be combined (nested) into one clip when opened in FCP. Audio in the Motion project will not be imported back into FCP. Any changes made to Project properties in Motion will be reflected in the Motion project clip in FCP.
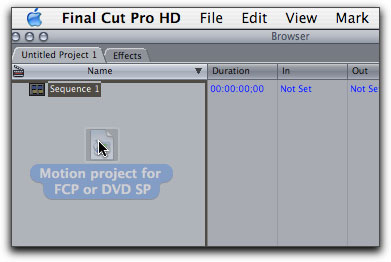
To bring the Motion project into FCP, Import or click on the Project icon and drag into the Browser, you can also drag it to the Canvas or directly onto the Timeline, you can Import the Motion project as well.
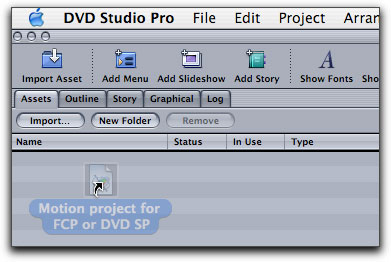
The same process is used for DVD SP. Drag the Project icon into the SP 'Assets' tab or directly into the SP Editor window.
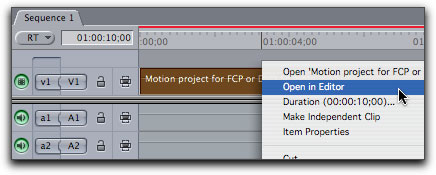
If you find that once inside FCP you need to make changes to the Motion clip, simply control click on the Motion clip in the Browser or Timeline and select 'Open in Editor'. Motion will launch and open the clip. You can make changes and when done, Save. When you return to FCP you will see that the changes have automatically been updated in FCP.
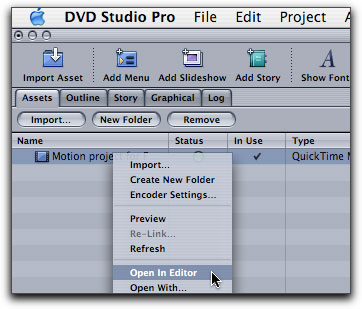
Again, the same process is used when working in DVD SP. Control click on the Motion clip in the Assets tab, Motion will launch where you can make changes and Save.
The above describes creating a Motion Project first and moving the project into FCP or SP. However, there will be times when you are working in FCP and decide that you want to use Motion in your project and you have not yet created a Motion project. No problem, you can do this from right inside FCP.
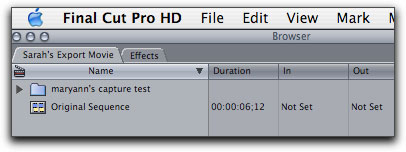
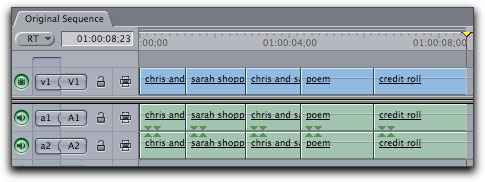
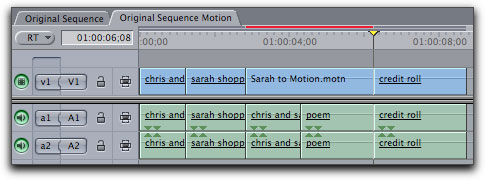
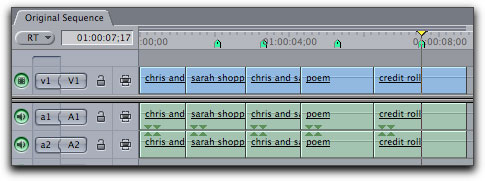
In the FCP Browser I have named the sequence 'Original Sequence', which consists of five clips in the Timeline.
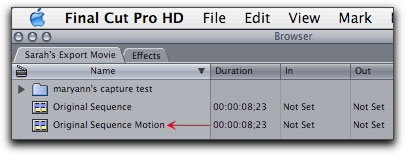
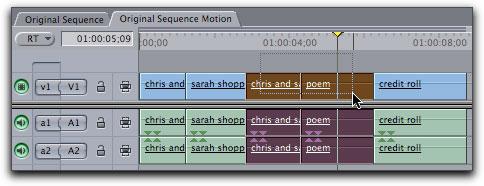
When exporting to Motion from FCP, it probably is a good idea to duplicate the sequence and work with it, saving the Original Sequence as a back up. I have named the sequence 'Original Sequence Motion' and opened it on the Timeline. In the Timeline, I have selected two clips that I want to take into Motion to add titles. When the associated audio tracks are selected, the audio will export to Motion as well. You can select a single clip, multiple clips or the sequence from the Browser for export to Motion.
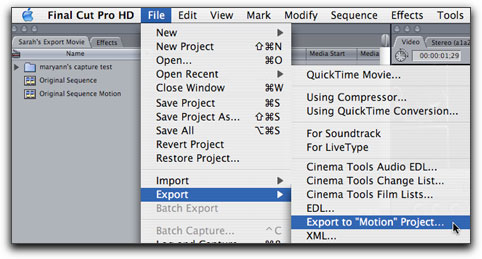
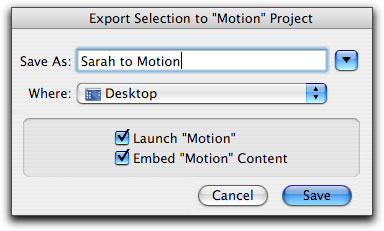
With selection made go to the FCP File menu, Export > Export to "Motion" Project. In the 'Export Selection to "Motion" project dialog box, enter a name, and a location to Save the sequence to. You will want to have both the 'Launch Motion' and 'Embed Motion Content' boxes checked. The 'Embed Motion Content' option creates a Motion project as a clip in FCP. When you Save, Motion will launch and FCP and Motion will be linked together.
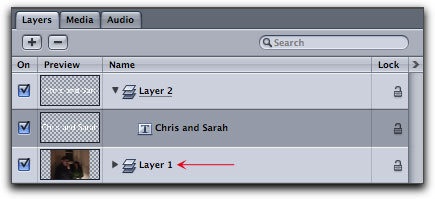
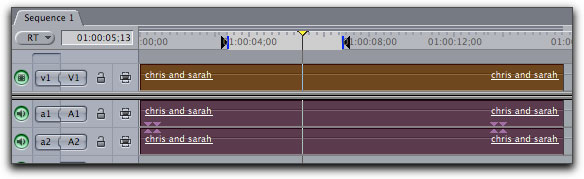
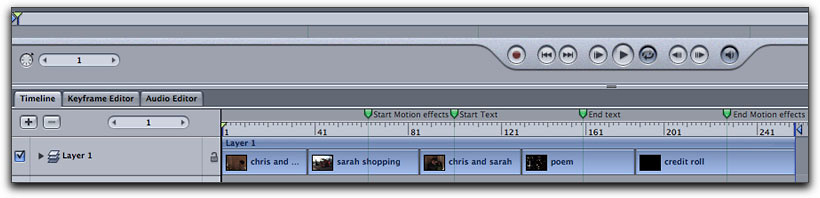
Motion Opens with the exported items in one layer which will appear in the Motion Layers palette and on the mini-timeline. I have set the text 'Chris and Sarah' which shows as a new layer in Motion, shown below. When done working, simply hit Save. There is no need to create a Motion project as this was done automatically when you exported from FCP to Motion.
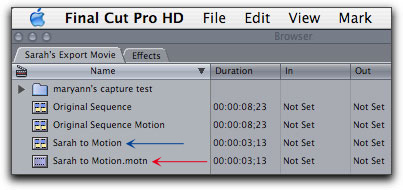
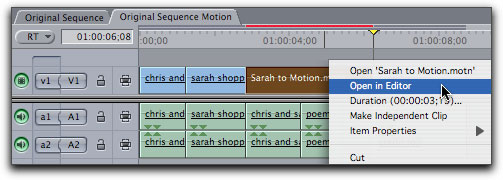
When you return to FCP, several things have happen. In the Browser (below left), a new clip 'Sarah to Motion.motn (with the extension of .motn) has been added (red arrow), a new Sequence, 'Sarah to Motion (blue arrow) has been added as well. In the FCP Timeline, (below right), the clips selected for export from FCP have been replaced with one new clip and a red render bar will appear above the clip.
Because there is now a link between FCP and Motion, all you need to do to take the clip back to Motion for additional work, is to control click on the clip and 'Open in Editor'.
It is not possible to select part of a clip or clips in FCP for export to Motion, you must export a clip(s) in their entirety. To demonstrate I have set In and Out points on the FCP Timeline and selected the clip, then 'Export Motion Project'.
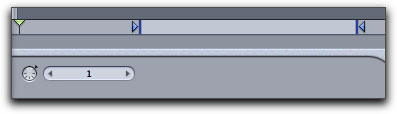
When Motion launches the clip that was selected in the Timeline now appears in the Motion mini-timeline. While the In and Out points were ignored for export, they do carry over to motion and appear as In and Out points in the mini-timeline.
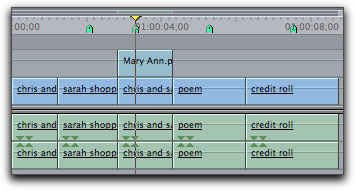
We can add Markers, with marker information, to the FCP Timeline.
When the FCP sequence is exported to Motion the markers export as well and appear in the Motion Timeline (F6). In addition to markers, you can export media, frame rates, In and Out points, multiple layers, composite modes, keyframing of all parameters found in the FCP Motion tab. You cannot export transitions, filters, generators, or audio levels from FCP to Motion.
The integration of Motion with FCP, DVD SP and even Shake is a powerful feature, with a one click workflow to move projects seamlessly between applications.
Whether you can playback at a full frame rate or must accept less than full frame rate playback, you are going to find that Motion, with it's intuitive workflow and ease of use, is a new and powerful tool that will enable us to create very sophisticated motion graphics. Don't let Motion's 'Drag and Drop' simplicity fool you, this program is extremely powerful with an inordinate amount of manual controls that offer infinite creative possibilities, the rabbit hole runs quite deep.
--ken
Firewire Output to NTSC and PAL
Motion affords us the ability to view our Motion projects on a NTSC or PAL monitor as we work. Just as it is imperative that we check our FCP projects on NTSC or PAL monitors before output, the same holds true for Motion. Whether for Broadcast TV or DVD delivery, the images we see in the Motion Canvas will not be the same when viewed on a TV. There are several areas where the Canvas and TV images will be different. Computer monitors display RGB color values, TVs use YUV color values. You will need to do your color correction work using a monitor and not the computer screen. Computer screens use square pixels for display, Standard Definition TV uses rectangular pixels. Title and Action Safe zones need to be checked on a TV as well as the final positioning of the different elements in your Motion Project.

There is full integration between Motion, FCP 4.5 (HD) and DVD Studio Pro 3. You can create a Project in Motion and then, without the need to render, move it directly into FCP or DVD SP by simply Importing the Motion Project or by using Drag and Drop. Once your Motion project is inside FCP/DVD SP, it is possible, with just one click, to re-open the Motion project back in Motion, make and Save changes and then return to FCP/DVD SP to find that the changes you just made in Motion have been updated in your current FCP or DVD SP project.


Conclusion
It has been said that Motion is a $299 application that requires a $3,000 dongle. It's true, Motion does require the latest and greatest Macs to run. To some, this may be discouraging, however I need to point out that the amazing abilities of this program are based on the newest technologies just now coming to market. When the playback 'Resolution' feature becomes operational, we will be able to achieve higher playback frame rates (at lower quality) and this will enhance our ability to work in real time. Until then, we have Ram Preview which takes just a few seconds and produces full frame rate playback at full quality. The fact that we can view our Motion project down Firewire to NTSC or PAL provides us with the ability to view our projects as final output, this is indeed a very important feature. Pro Apps Integration provides easy migration between Motion, FCP HD, DVD SP and Shake.
Enjoy,
All screen captures, images, and textual references are the property and trademark of their creators/owners/publishers.