June 5, 2006
By Steve Martin
If you've ever shot, or considered shooting a live event with more than one camera, the biggest obstacles you will face will have nothing to do your editing software - Apple has seen to that. Since the launch of Final Cut Pro 5 back in April of 2005, multicam editing in Final Cut Pro is no longer on par with root canals or watching an Ashlee Simpson video.
Ken asked me to write this article because he wanted to give his readers a comprehensive look at the workflow specifics involved in planning and editing a multicamera shoot. And while I realize that not everyone will be shooting with more than one camera, the concepts taught in this tutorial will apply to editing almost any content that requires a fluid method of changing point of view.
Before I get into the specifics of how to go about editing multicam footage in Final Cut Pro, perhaps I should begin with a brief discussion on how to set up a multicam shoot where you end up with source tapes that are all synchronized with each other. Depending on your budget and resources, you can approach a multicam shoot in a number of ways.
Method 1 "Jam Syncing"
Let's begin with timecode generators. On a professional shoot, it's a fairly common practice to sync all cameras to a common timecode reference using a timecode generator. A timecode generator is a piece of hardware that, as the name implies, generates a master timecode signal.
All cameras are hard wired to this time-based master clock and are timecode slaved to the device - a process commonly called "Jam syncing". The advantage of this method, is that any camera can begin recording at any point in the event and can even be stopped in the middle of the event for a media reload. When the camera is back online, the timecode is still in perfect sync with the other cameras.
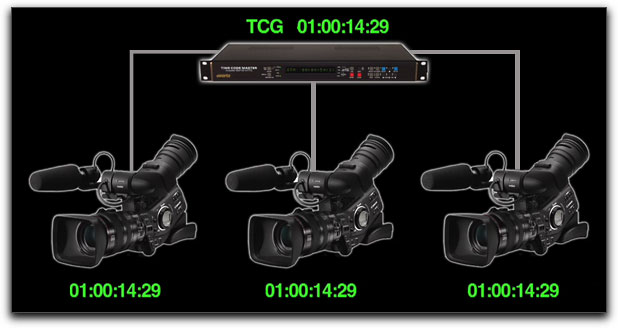
The main advantage of this method is the time you will save on the back end from having to sync up all your cameras manually in Final Cut Pro. While this is the preferred method of the pros, it makes the shoot a bit more complex and costly because of the additional hardware involved.
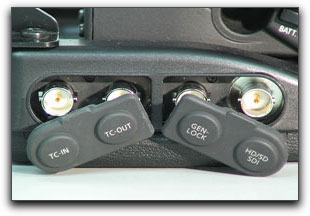
The Canon XL H1 (pictured above) has jacks for both timecode input and output which make it an ideal camera for multicam shoots.
If you are contemplating a multicam shoot you also need to know that many consumer cameras do not have the provision for receiving timecode from an external generator. So how can sync be achieved with these cameras? Let's look at some options.
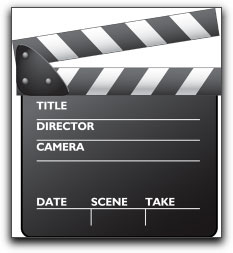
Method 2 "Clapboard Syncing"
If jam syncing your cameras is not an option, you can always fall back on the tried-and-true Hollywood method of syncing that relies on a clapboard/slate. A clapboard (also called "sticks" by the pros) is simply two pieces of hinged wood placed in front of all recording cameras then "clapped" together. Later in post, you line up the first frame of the sticks coming together with the first frame audio "clap" represented by the waveform. And while using a clapboard screams "pro" to those standing around, there are even simpler methods.
In the absence of a clapboard, you can enlist part of your crew, a by-stander or even the talent to become a human clapboard for you. Just start your cameras rolling, zoom in on your human target, then have them clap their hands together, slap the top of their head, or even do jumping jacks (a bride might take issue with any one of these). Later in Final Cut Pro, you can easily locate the sync frames by the picture and sound of the person's hands or arms coming in contact with their body.
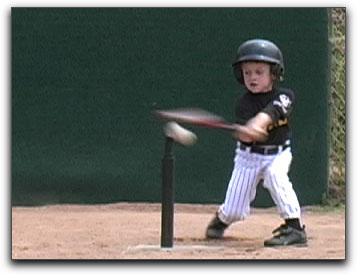
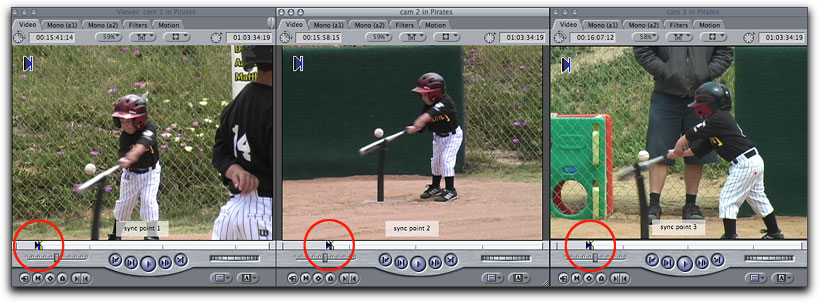
If you tape sporting events like I do, it is often unnecessary to go through any of these motions because the environment itself presents you with numerous opportunities for establishing sync. For example, when shooting my son's t-ball game (yes, I am aware that I am probably the only dad who would produce a 3 camera shoot of a t-ball game) I just locate any frame where the player's bat connects with the ball. If you are at a soccer game, the sync frame could be a parent from team A punching a parent from team B. But I digress...
Method 3 "Flash Syncing"
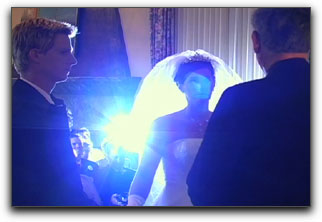
If you are doing weddings or other shoots that require a bit more discretion, one of the more popular methods of achieving sync is a flash from a good 'ole pocket instamatic or other flash-equipped camera. Just zoom in and point your video cameras at your still camera, then set off the flash. Later in post, sync is achieved by locating the brightest frame from all camera sources. If you forgot to bring a camera, the great thing about shooting happy events like weddings or bar mitzvah, is that you can almost be certain numerous flashes will be popping off all around you.
Shooting Tips
When doing multicam shoots in general, there are a few things to keep in mind to help you achieve optimum results. If possible, always try to shoot with cameras of the same make and model. This will ensure the visual quality and color balance will be consistent across all cameras (assuming you used the same method of white balancing) and will keep you from having to color correct the misfit camera source in post. Second, unless you are jam syncing timecode, make sure you don't pause or stop the camera once you begin rolling, otherwise you'll be doing a lot of re-syncing in Final Cut Pro for every break in the video stream.
Capturing Multicam Footage
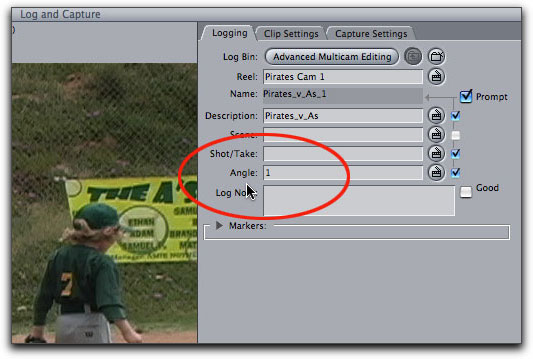
Now that we have the shooting stuff out of the way, we can turn our attention to multicam editing, beginning with how to log and capture your footage. Capturing multicam source clips is no different than capturing single camera source clips in terms of the processes you're already familiar with. When logging your tapes, it's helpful to include angle numbers for each camera source. Because a live event
is generally shot from more than one perspective or "angle," this field allows to assign specific numbers
or letters to your camera source tapes. After your source clips are captured, Final Cut Pro will use the angle information you enter in the angle field to determine the sorting priority of the clips you group together into a multiclip. If you forget to log angle information you can always change the angle sorting in the Viewer, but more on that later.
Creating Multiclips
Once you've logged and captured all your camera source clips it's time to create
what Final Cut Pro calls a multiclip. A multiclip is a virtual "container" for one or more souce clips or angles. You can group up to 128 clips into a single multiclip as long as each clip is using the same codec, image dimensions and frame rate.
Just for the record, you can use the term clip and angle interchangeably. A multiclip can contain any clip (or angle) with varying durations from any source media file - not just those derived from a multicam shoot.
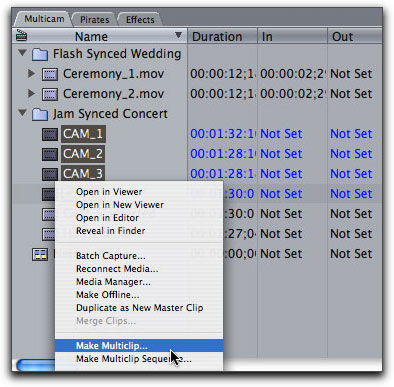
To create a multiclip, select the clips in the browser you want to include in the multiclip, then control or right click on the selection and choose "Make Multiclip" from the menu.
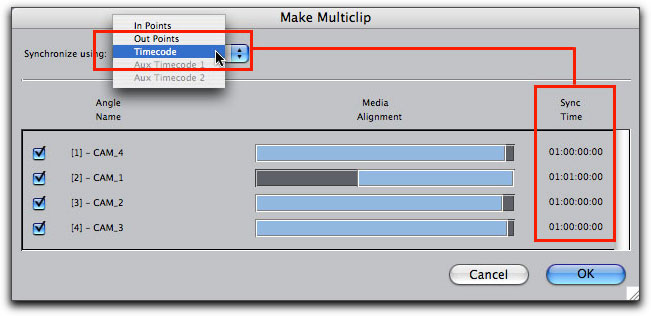
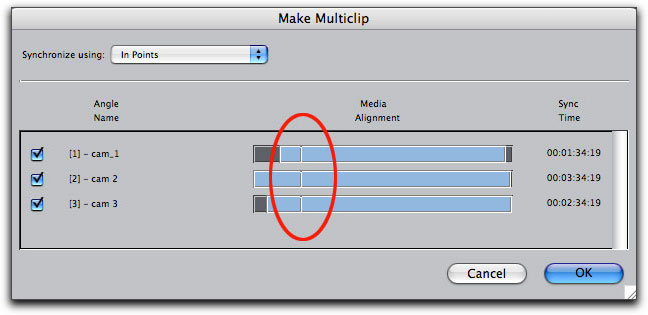
The Make Multiclip dialog will appear asking you how you want to sync your clips. From the "Synchronize using" drop down menu, you can choose your syncing method - either by In point, Out point or Timecode. Since this footage was shot with jam-synced cameras, Timecode is the proper choice. After choosing this option, the blue Media Alignment bars will graphically display how the 4 clips will be synchronized within the multiclip. Since 3 of the 4 clips have starting timecode values of 01:00:00:00, the blue bars are aligned from the head of each clip. CAM 1's alignment is offset from the others because it has a starting timecode of 01:01:00:00. Dark gray areas indicate where the angles will begin or end once the multiclip is created.
Creating a Non-Timecode Synced Multiclip
If you shot an event without jam-synced cameras you will need to manually locate the sync frame before creating the multiclip. Load each camera angle into the Viewer, locate the sync frame, then mark an in point.
Once all the angles are marked, select them, right-click and choose "Make Multiclip" from the menu as described above. When the Make Multiclip dialog appears, choose In Points as your syncing method. A thin line in the blue media alignment bars tells you where the sync frame is located in relationship to each angle's duration.
Click OK or press return to create the multiclip and it will appear in the Browser.
Working with Multiclips in the Viewer
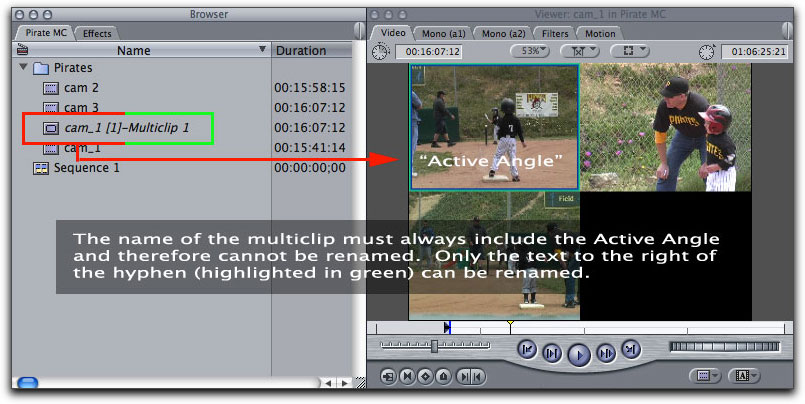
You can always identify a multiclip by its italicized name. Multiclips behave like any other clip; you open them into the Viewer by double clicking, then use the playhead or the J, K, and L keys to navigate through the clip. The angle with the blue/green box around it is called the "active angle." Once the clip has been edited into a sequence, the active angle is the angle that appears in the Canvas window by default. If you click on a different angle, then edit the multiclip into a sequence, that angle will appear in the Canvas. This is why you can only partially rename a multiclip. Part of the name will always include the active angle.
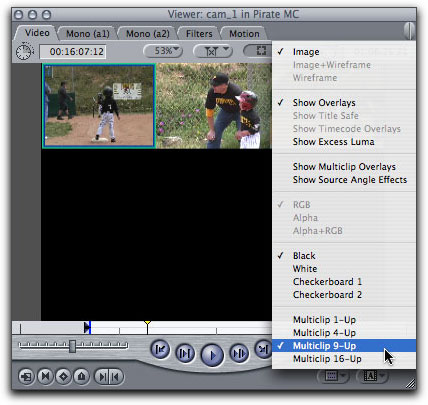
To change how many angles are displayed, click on the image drop down button at the top of the Viewer. You can view a maximum of 16 angles at a time. Black space appears where no angles exist.
If you want to add an angle to the multiclip, just drag an angle from the Browser into the empty space and choose "Insert New Angle" from the drop palette. The purple option labeled, "Insert New Angle Affiliates" is useful when you need to add the angle to more than one affiliated multiclip. For example, let's say you edited this mutliclip into 4 sequences; choosing this option will add the angle to all 4 sequence multiclips in one gesture saving you from having to add the angle to each multiclip separately.
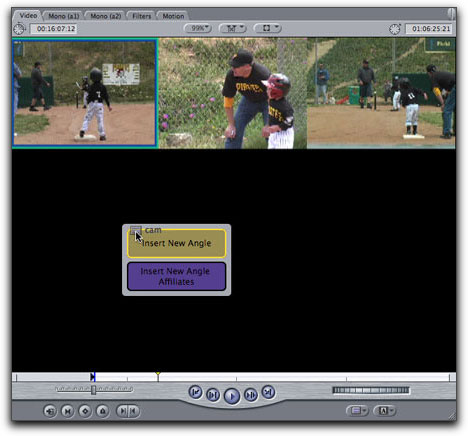
Once you release the mouse, the additional angle appears next to the others. You can also rearrange the sorting order of the angles by holding down your command key and dragging. The other angles will instantly "make room" for the angle's new placement. Changing the angle sorting order is important when you did not take the time to log angle numbers during the logging process.

To delete an angle, hold down your command key and drag the angle outside the Viewer and it will disappear in a "puff of smoke". Keep in mind, you cannot delete the active angle, so if you need to delete it, you will need to select another angle before command-dragging it outside the Viewer.
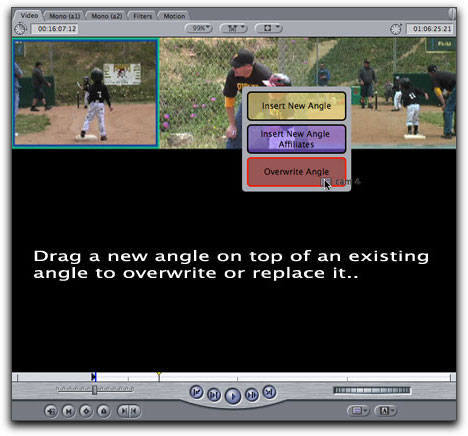
You can also overwrite angles. If you drag an angle from the Browser directly on top of an angle you will see an overwrite option at the bottom of the drop palette. As long as the angle you are dragging to is not the active angle you can overwrite the angle with another one.
Adding Multiclips to the Timeline
Before you can commence a multicam edit you must first add the multiclip to your sequence. The fastest way to do this is to park your timeline playhead where you want the clip to go then press F10 to overwrite it into the timeline. Multilips conform to standard 3 point editing protocols so you can set in or out points in either the Viewer or Canvas before executing the edit.
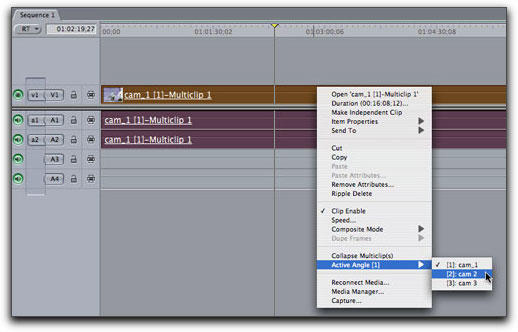
Once the multiclip is in the timeline, press your spacebar to watch the clip in the Canvas. Remember, the Canvas will only display one active angle at time. If you want to view another angle in the Canvas, right-click on the mutliclip and choose a different angle from the "Active Angle" menu.
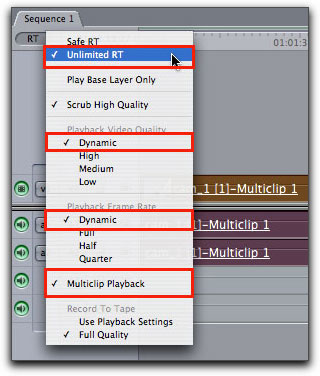
Optimizing Multiclip Playback
Because it's possible to play back as many as 128 angles, (I have not personally tried this) you should know this is very taxing on your CPU. Final Cut Pro will always play back your angles at the quality you have set in the RT menu. You can optimize your playback performance by selecting Unlimited RT and Dynamic from the list. These choices will give Final Cut more head room by altering the image quality and/or frame rates in order to keep your multiclip happily playing back in real time.
Additionally, you want to make sure that "Multiclip Playback" is selected. This option ensures that when you are playing back a mutliclip in real time, then switch angles, the canvas window will update in real time. Without this option enabled, you wont see the Canvas update until after you stop playback
Using Playhead Sync
As mentioned, the Canvas window only displays one angle at time - the active angle. On it's face, multicam editing is simply changing the active angle on the fly while the movie is playing back in real time. In order to choose what angle to cut or switch to, you will need to enable a feature called Playhead Sync. Playhead Sync is a feature that allows you to synchronize the playhead in the Timeline with the playhead in the Viewer using one of two methods - Open or Gang. For mutlcam editing you will need to choose Open. Gang sync is a method used for other editorial functions and its use is beyond the scope of this article.
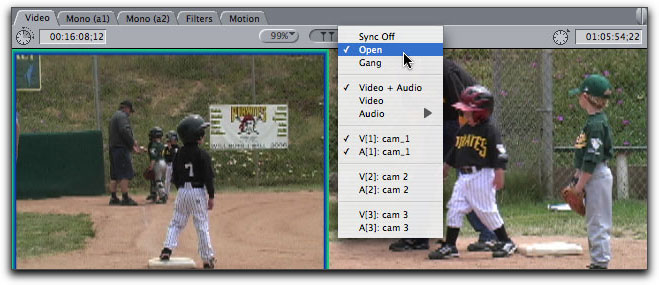
By choosing "Open" from menu, any clip (or multiclip) directly below the playhead in the timeline will automatically open into the Viewer - hence, the name. The reason you want the multiclip opened is that when you click an angle in the Viewer, the corresponding angle in the sequence will automatically change at the current playhead location. Since the movie will be playing back in real time, the angle will change whenever a different angle is clicked in the Viewer.
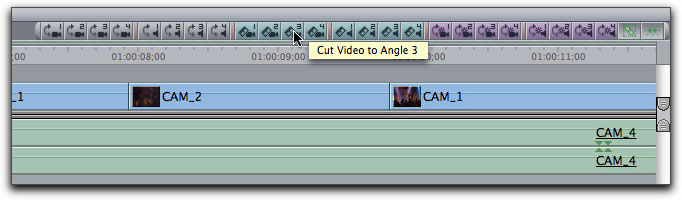
To begin editing, move your playhead to the beginning of the multiclip. In the Viewer, click on the angle you want to start with, then press your space bar to begin playback. As the multiclip plays back in the Timeline, click a new angle in the Viewer whenever you want to make a cut. As you click the various angles in the Viewer, temporary blue markers appear in the ruler area of the timeline.
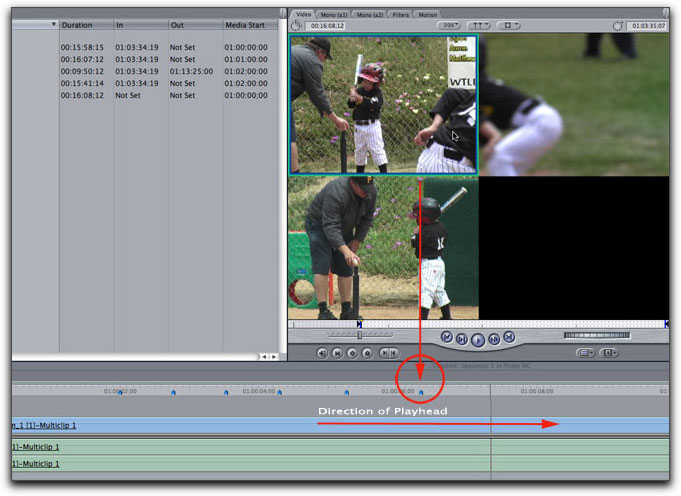
When you're done, press the space bar and the blue markers will magically become edit points. Each edit point references the angle you clicked on in the Viewer.
If you look closely at the edits you'll notice that both the video and audio was cut for each angle. This is the default behavior because the video and audio for each angle is linked inside the multiclip. When the video is cut to, so is the audio. There are cases however when you need to cut the video apart from the audio. Here's an example: let's say you recorded a live event like a concert. Each camera had its own mic and was recording the band from various perspectives - some cameras were closer to the band, other cameras were closer to the audience. When you perform the mutlicam edit on these cameras your audio cuts will be very jarring because each camera was recording the audio from different vantage points.
On many live shoots like concerts, plays, and other staged events, it is quite common to see a central mixing board where all the sound equipment from the performance is being routed and mixed. The sound coming off the board will be much better than the sound picked up by the microphones on your cameras. During the shoot, you can feed house mix into one of your cameras or you can use a separate recording device altogether like a Digital Audio Tape (DAT) recorder.
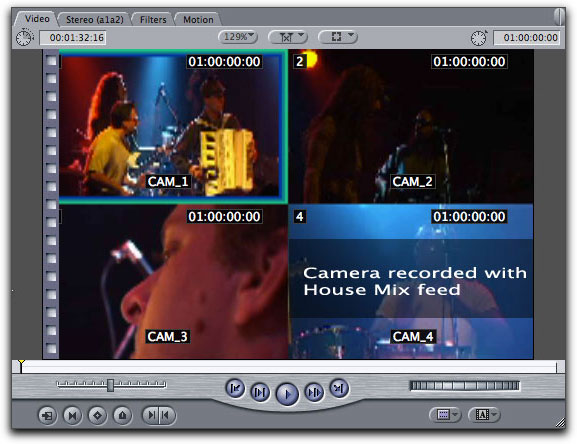
In the example below, you see a multiclip of a concert shot from four cameras. Currently the active angle is Camera 1 (angle with blue/green box). Let's say that Camera 4 was the camera that received the "house mix" feed.
Now this may seem confusing at first, but stay with me. You need to select the camera with the house mix, (Camera 4) then, from the Playhead Sync menu choose "Video".
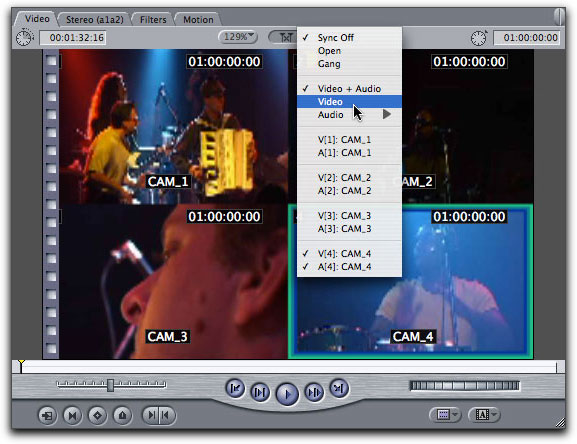
Here's the logic. By choosing Video from the menu you are telling Final Cut that you want to switch the video angle while leaving the audio angle fixed on camera 4. The blue box represents the video and the green box represents the audio. So as you click on the various angles, only the blue box changes from angle to angle - the green box representing the audio angle remains fixed.
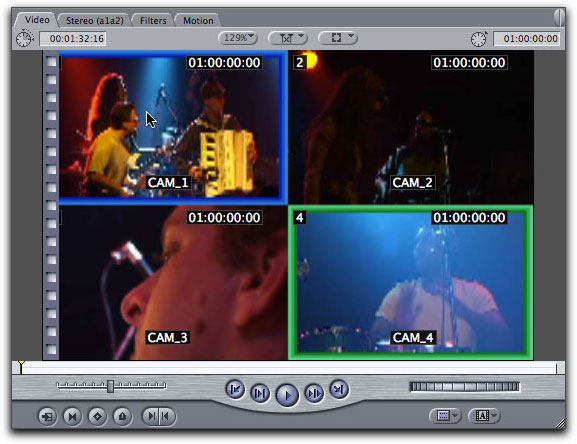
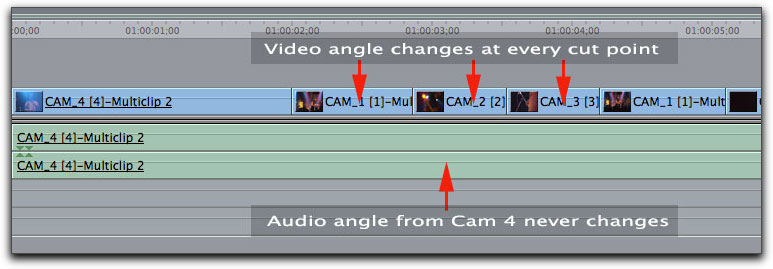
When you perform a multicam edit on this multiclip in the timeline you will see that only the video angles were changed at each edit while the audio angle from camera 4 never changed. And that's how it's done in the big city.
Cleaning Up Your Edits
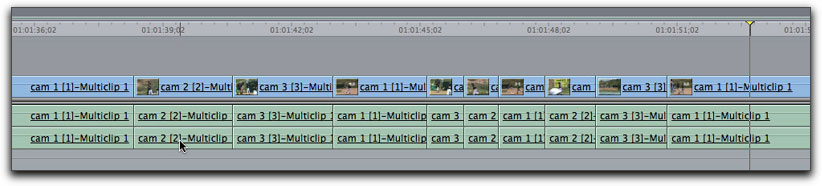
If you made some mistakes along the way, it's an easy matter to correct them. For example, here you see I mistakenly clicked on the same angle twice as indicated by the red through edit markers.
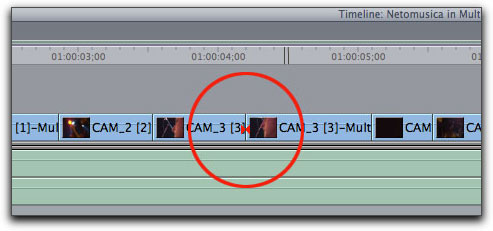
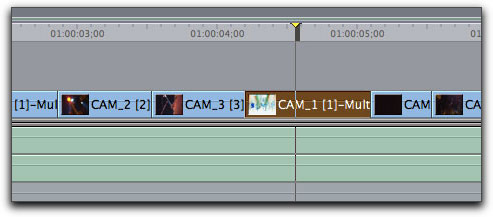
To replace the angle with a different one, I simply park my playhead over the angle in the Timeline, then click a different angle in the Viewer. The angle is automatically swapped out in the timeline for that edit.
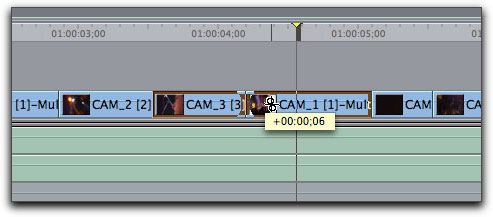
Also, just because your doing multicam editing doesn't mean you can't use the standard trimming tools to make some changes to the edit. For example, you can use the rolling edit tool to move the edit point earlier or later if your timing was off.
Collapsing Your Edits
Once you're happy with your edit and have made all your litte tweaks, you may want to consider collapsing your multicam edit. Because you can change your mutlicam edits so easily, you want to be able to protect your multicam timeline from other producers, editors (or the hybrid "preditors") and perhaps even yourself. Select all your edits by pressing Command-A. Now control or right click on any clip and choose "collapse multiclips". As soon as you do this, all the clips in your timeline return to single-angle clips that cannot be purposefully or accidentally altered.
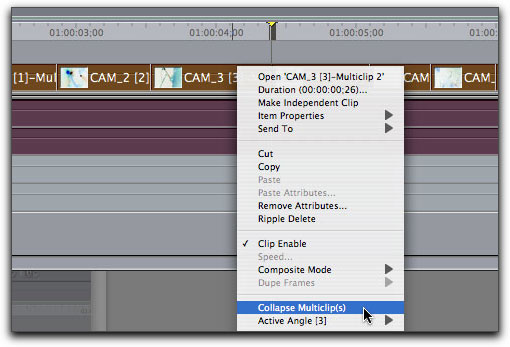
This does not mean you can no longer make any trims or additional edits. It simply means that you won't be able to change the active angle. Choosing this option does not mean your timeline is forever locked in this state. If you need to make some more angle changes select all the clips in the timeline, then choose "uncollapse multiclips" from the same menu - you're back in business...
There is also another important benefit to collapsing your multiclip. By collapsing you will get better real-time performance because every time Final Cut encounters a multiclip it must play back all the angles contained within it. Collapsing forces Final Cut to only have to deal with one angle at a time.
Multicam Keyboard Layout
While clicking around in the Viewer is a great way to make your angle selections, it's not the most efficient method. From the Tools menu, you can choose a keyboard layout that remaps your keys to all the commands associated with multicam editing.
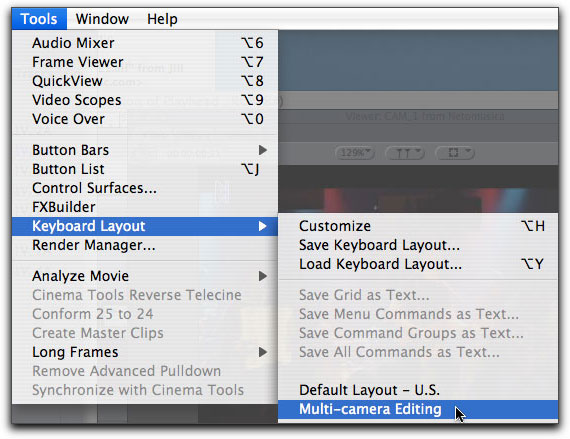
So instead of clicking the various angles to change them in the Viewer, you can now press the keys on the number pad that correspond to your angle numbers in order to cut to them. This makes the whole experience of multicam editing similar to the experience of using a video switcher.
Multicam Button Bar
Another feature that's handy is the custom button bar. From the Tools menu choose>button bars>Multiclip. This command loads a custom button bar that includes numerous shortcuts to oft used commands when multicam editing. They are colorfully organinzed and by placing your cursor over any one of them, a tooltip will reveal what the button does along with it's keyboard equivalent.
Ok, so that about wraps it up. Hopefully through this article you have gotten a good foundational understanding of the workflow involved in multicam shooting and editing. If you are the type who like to see this in action (in addition to reading about it) I've produced two 20 minute tutorials that cover both basic and advanced multicam editing in Final Cut Pro. Click here if you want to check them out.
[Top]
copyright © www.kenstone.net 2006
are either registered trademarks or trademarks of Apple. Other company and product names may be trademarks of their respective owners.
All screen captures, images, and textual references are the property and trademark of their creators/owners/publishers.