
October 19, 2009
Neat Video Noise Reduction
http://www.neatvideo.com
$49.90 Home plug in
$99.90 Pro Plug in
Review by Steve Douglas
The bane of all videographers is the video noise created as a result of many factors, one of the greatest of which is the noise resultant from shooting in low light situations. There are a number of 'reduce noise' filters produced by several 3rd party plug in companies, certainly some are better than others and, based upon my experience, some are almost completely ineffective.
In case you're feeling a bit lazy today and don't feel like reading this whole review, let me then start off by saying that Neat Video's Noise Reduction plug in is, by far, the best I have seen to date, bar none.
Coming in both Mac and PC versions, the Mac version requiring an Intel Core/Core 2 or Power PC G4/G5 processor running Mac OSX 10.4+ and a minimum of 1GB ram and a display of 1024x748, Neat Video is fully compatible for Final Cut Pro 6/7, Motion 3/4, Final Cut Express with a separate Neat Video Plug in for Adobe After Effects. There are two versions of the Noise Reducer, the Home plug-in which can accommodate data with up to DVD-size frames, and the Pro version which can handle any frame size and is the one to get. There is also a Demo plug available on Neat Video's site, however it has limited functionality.
Neat Video works by analyzing a portion of a frame of video containing no detailed image or color gradation. This analysis is almost immediate as it creates a profile of the area you have selected. Building an accurate noise profile is perhaps the most important step to achieve accurate noise reduction with Neat Video. It takes some initial experimenting but with just a little bit of effort it is not that difficult. Once the profile has been previewed in Neat Video's own preview window you simply click on apply, with the resultant highly reduced noise. This profile can then be saved to Neat Video's own custom noise profile settings and applied to another clip shot under the same or similar lighting conditions. This is all possible because the noise reducer processes the video in multiple spatial frequency ranges with the optional ability to individually analyze and process separate color channels.
As a favor, I recently shot my first wedding video. Having to fly to Canada, I had no opportunity to scope out the reception area before hand, and therefore didn't have a clue as to the conditions I would be shooting in. The horribly dark hall came with a few fluorescent lights roughly 45 ft overhead whose light barely reached the head table seating the wedding party. Both side areas, where the guests were seated, had no lights at all. It was like shooting a candle lit dinner, only worse. The walls were painted mustard green and I was limited to a small Litepanel's Micro Pro on my cams hot shoe. The throw of light from the Micro Pro was very limited. As you can imagine, the amount of video noise that was created made some of the video almost unusable. Perfect, just the right type of footage to test the Neat Video Reduce Noise filter. Let's walk through the standard process.
Keep in mind that when doing any color correction process it is important to utilize an external editing monitor. Even an HD TV with HDMI will provide you with a more accurate display than will your computer monitor or by just checking Final Cut Pro's canvas.
Neat Video noise reduction is initially applied as you would any filter found in the effects tab. Clicking on the filter's tab in the viewer, you hit the options button and a new interface opens for you.
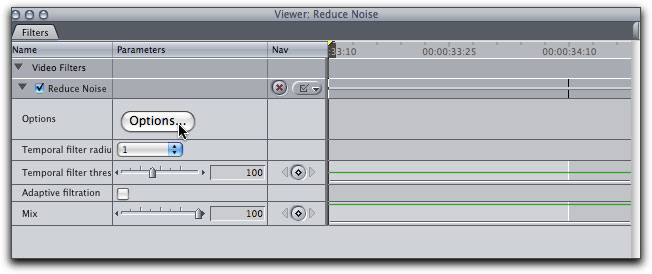
Once the Neat Video 'Noise Reducer' is applied to the clip, it presents itself in the filters tab,
as would any filter. Clicking on the Options button opens the Neat Video interface.
Since I was shooting in HDV, the image in the Neat Video appears seriously stretched.
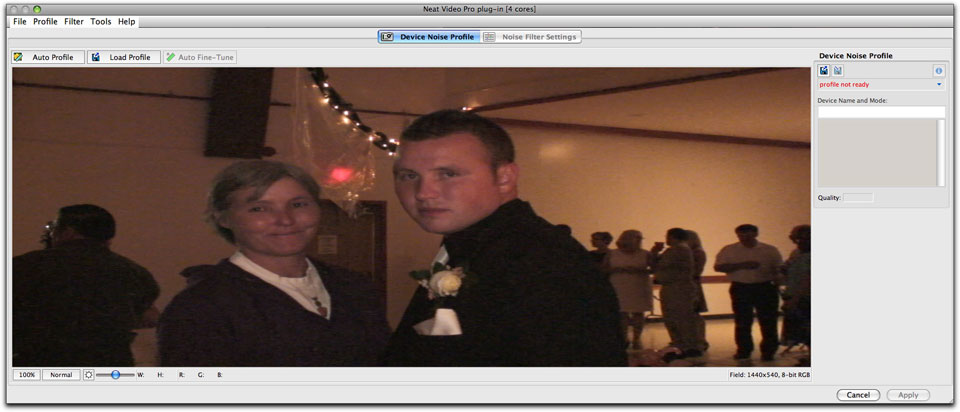
The initial Neat Video interface that comes up when you have clicked on the Options button in the filter tab.
Yes, the image, shot in HDV, does appear stretched but no cause for concern.
The amount of video noise is quite apparent throughout the frame, especially so in the darker areas.
The stretching is because, in the case of interlaced footage, what is shown in Neat Video's internal viewer (and what is actually rendered by FCP) are individual fields from the video stream. Each field (upper or lower) is half as tall as the total frame size. So, if the footage is 1440x1080i then one field is 1440x540, as specified in the bottom of NV internal viewer. By default Neat Video tries to accommodate the whole frame/field into the viewer area.
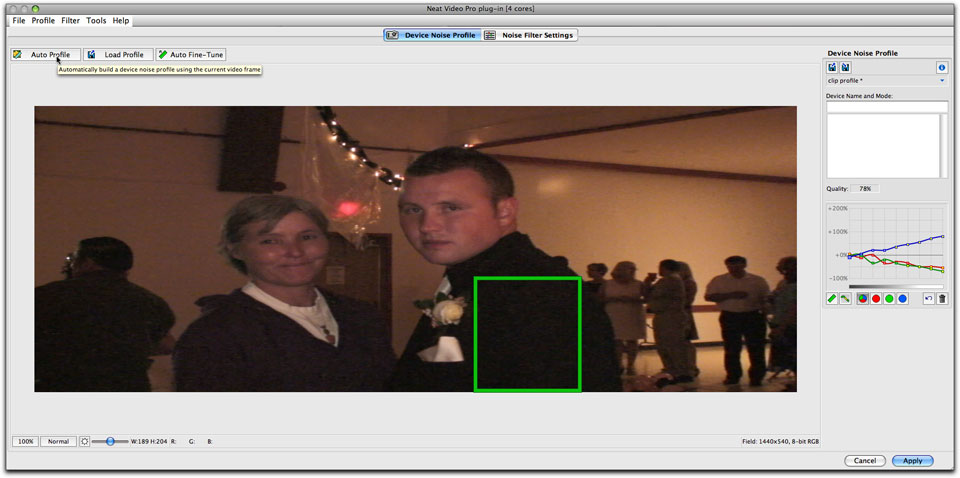
Click and drag on an area free from edge details or color differences in order to allow the Noise Reducer to create a profile using the Auto Profile button in the upper left of the interface.
The noise analyzer actually builds the profile based upon the noise in the area you select. Its algorithms can then efficiently reduce noise in the frame and thus, the entire clip. At the same time the filter processes the video in several spatial frequency ranges allowing it to reduce noise in one range though details are present in other ranges. In advanced mode, you can selectively apply the filter to any of the color channels within the video.
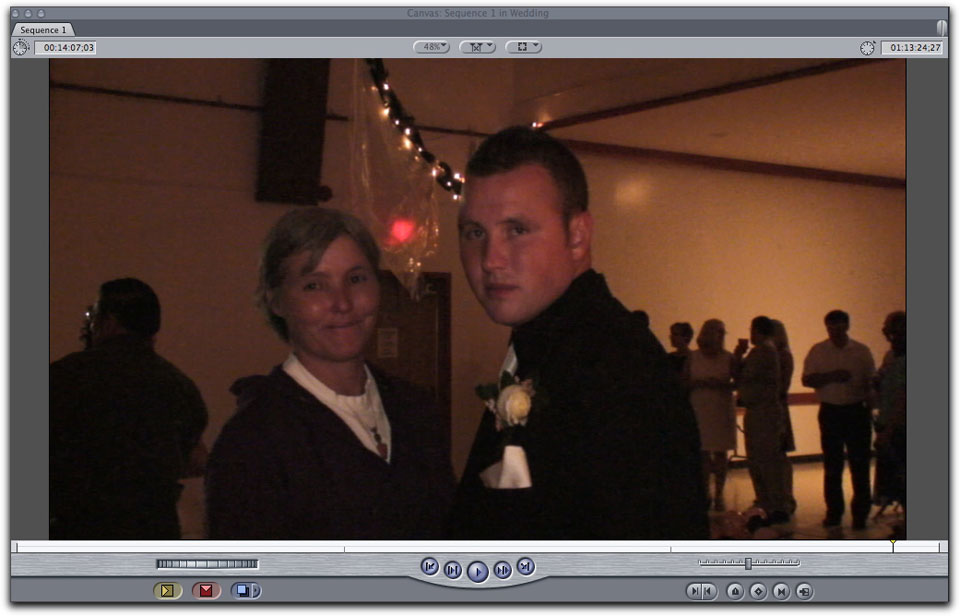
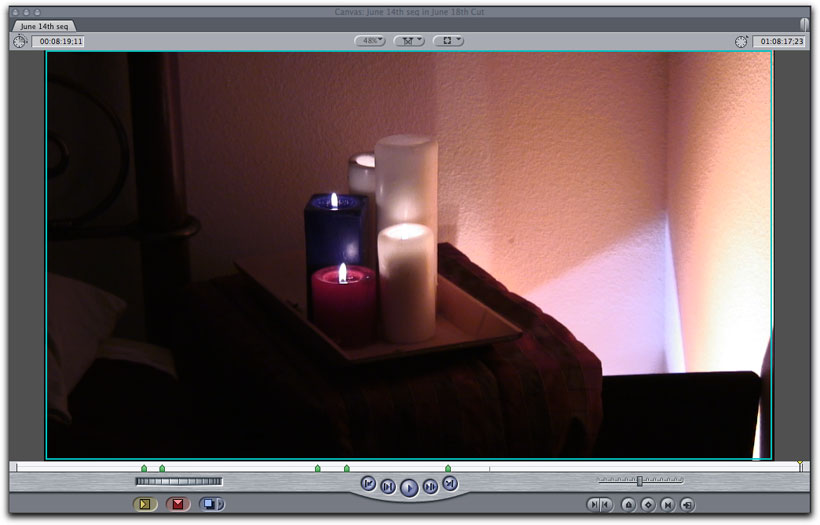
The original source clip as seen in the Canvas. Video noise is plainly present throughout the frame, as the camcorder's CMOS chip is well known for having difficulty in low light situations.

With the Neat Video profile taken and applied, the improvement is immediate and highly obvious. Seeing the results through the HDMI monitor appears even more spectacular.
It is very important to mention again that the area you choose to profile be free of important details. If it is not you may get a number of different warning windows telling you that an area is not uniform in a specific channel or that the area you have chosen is too small.
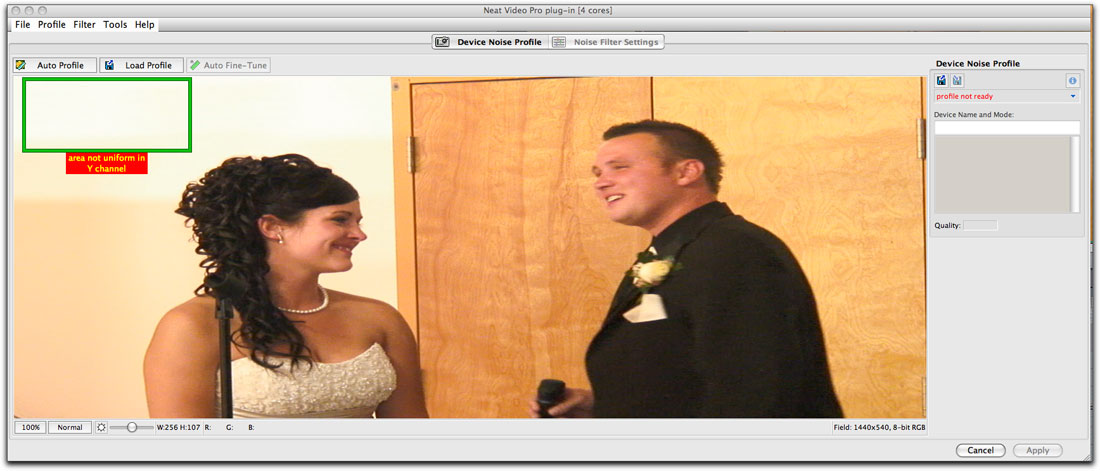

Note that the warnings to choose another area come up before the profile is created. The empty Quality window on the right
shows that the frame has yet to be analyzed, only that the filter has determined there to be problems with the portion of the frame I chose, and thus, no high or low quality specification is shown.
Unfortunately, I got several of these warnings telling me that the area was not suitable for analyzing. This prompted me to find a different frame in the footage that would provide me with a larger featureless area or one more uniformly colored to profile. This could prove to be a bit of a pain as the software really does require a good portion of the clip to be selected. If not, you get that 'too small of an area' warning, and if there are even subtle changes in color, the 'area not uniform' window. I often found it difficult to find a frame with enough uniform area devoid of details on which to apply the filter. If you have a clip with a lot of detail in it that needs cleaning up, you should hope you have at least some flat surface media to go with it. However,it is not strictly required to find and use a larger area. Neat Video still can technically build a profile using a smaller area (the lowest allowed size is 32x32 pixels), but the larger area you use the more accurate the resulting noise profile normally becomes and the more accurate filtration is then produced. You can always decide to sacrifice some quality and spend less time by agreeing to use a smaller area for analysis. In its warnings, Neat Video simply advises that using a larger
(or better, in case the area is not uniform enough) area may produce better overall results. These suggestions can be
accepted or ignored, it will work anyway. In fact, it makes sense to actually try to use smaller areas and
areas with details to see what kind of results can be obtained.
It is important to note that it is best to use an area of middle brighness, not almost white, not
almost black but an area that contains easily visible noise. Of course, you can't have it both ways. You need uniform color and featureless sections of the frames in order for the Neat Video's algorithms to be their most accurate when creating a noise profile, however, the 'too small of an area' warning did get to be bothersome. Perhaps if one could rotate the area on an axis when selecting an area to be analyzed rather than simply a vertical/horizontal rectangle, it might make things easier.
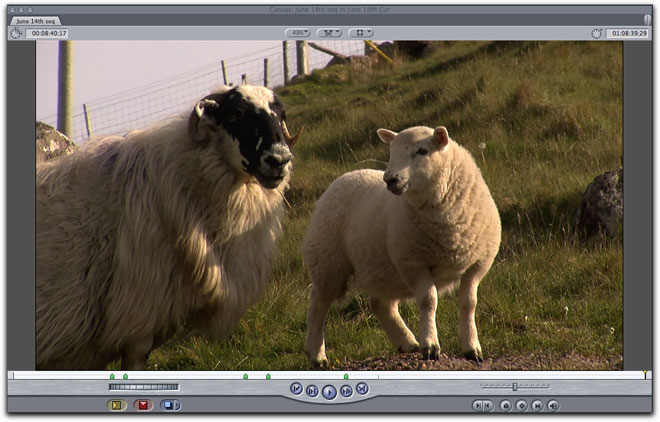
Here is an example of a frame, shot on a JVC XD Cam at 720p50, I could not analyze with the Neat Video filter. There is no area large enough
or free from detail or color ranging. However, the sky area is the best candidate for profiling, even if a 128x128 selection doesn't fit there, a smaller one will do
The other areas are clearly not good, as they contain details. Including details of any kind in the selection used for profiling usually leads to loss of such details after filtration.
That's why it is important to select noise-only area, without any edges, textures, gradients, or any other feature.
Once a profile is created you can check with the Quality Window on the right of the interface. Any footage with a profile quality index of 75% or higher will assure you that the noise profile is accurate. However, even when I used the Neat Video noise reducer to a profile whose quality percentage was less than 75%, a marked improvement was still noted. Applying the sharpen filter from Neat Video helped even further.
While using the Neat Video filter in Standard Mode is what most editors will only find necessary, when using it in its advanced mode you will have access to many more parameter controls. You will be able adjust the amount of noise reduction in the highs, mids and lows as well as the degree of sharpening as well.
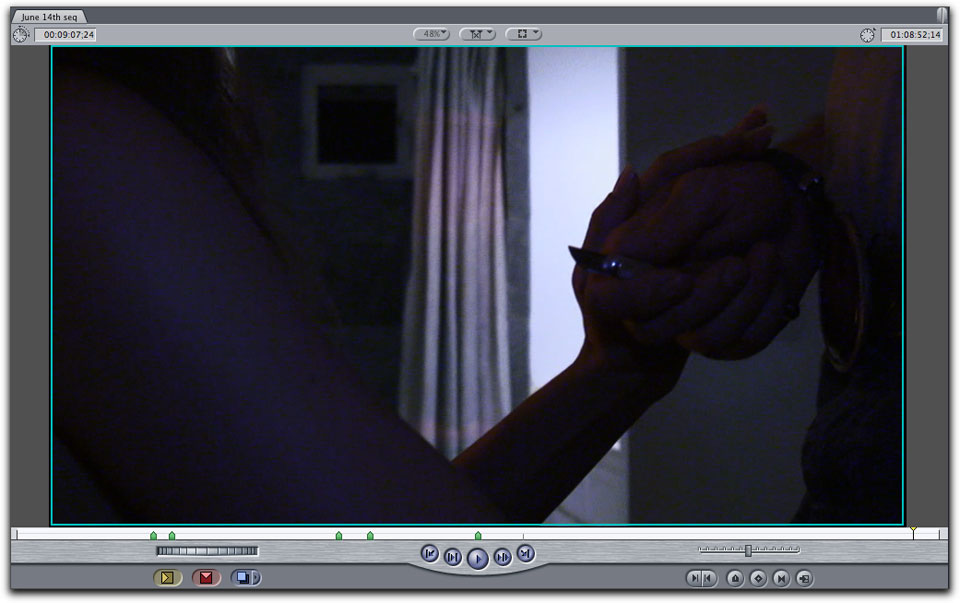
No noise reduction or sharpening.
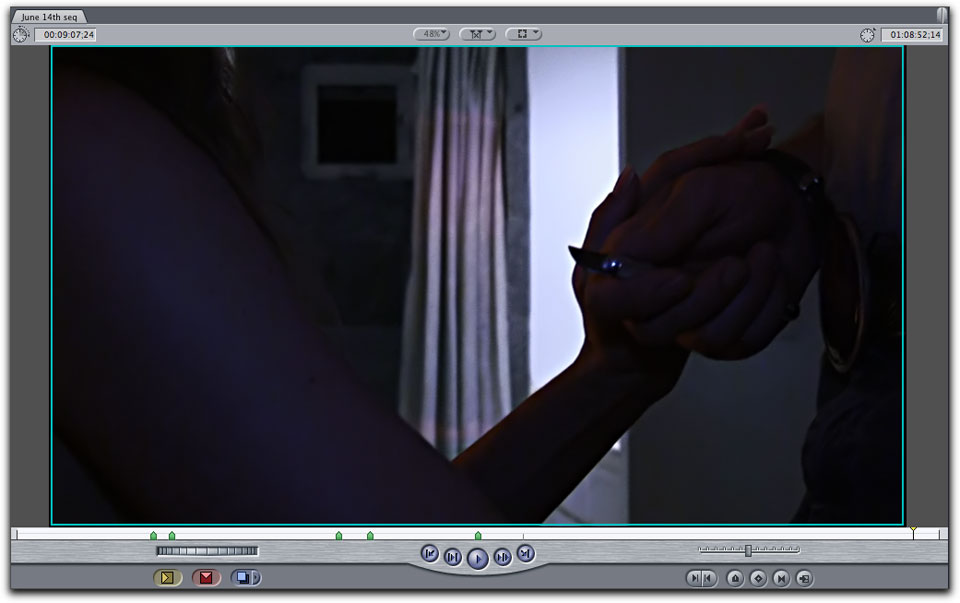
With both noise reduction and the sharpening filter. A bit of blur can be noticed in the female's hair.
The original frame which the auto profile listed as 87% quality.

With Neat Video's noise reduction filter applied but no sharpening added, there is a very slight loss of detail and a degree of blur.
You must use the Neat Video's Preview window for this, as I could not monitor the individual adjustments on my HDMI external monitor. The preview window, however, did a good job though I would have preferred to use my external monitor. Of course, once you apply the filter settings, the frame immediately reverted back to the HDMI set and the adjustments immediately seen.
The PDF manual that is supplied is both thorough and complex. For many users who are not experienced or knowledgeable regarding deep color correction, I believe that much of the manual explaining the various settings and uses for Neat Video's noise reduction filter will not be understood. However, the Quick Start guide is probably all you need. I was able to intuitively apply and use Neat Video and get a more than satisfactory result before I ever took a look at the manual. In the past, I have frequently made an issue of the lack of tutorial videos demonstrating software's use. While using Neat Video in Standard Mode is simple, on-site tutorials for its more advanced uses is called for.
My bottom line is that, of all the noise reduction filters I have seen and used, Neat Video's plug in is, by far, the most efficacious. Remember that I tested this with less than quality footage. When applied to a 10 second clip, rendering took 6.5 minutes, just enough time for me to raid the fridge and get back to work.
While it could be frustrating to find a large enough portion of a frame to analyze, once done and applied the results were amazing. I did not test the limited function, demo available on Neat Video's site. That said you owe it to yourself to try it. My initial reaction hasn't changed; I was shocked at how well it worked.
 Steve Douglas is a certified Apple Pro for Final Cut Pro 6 and underwater videographer. A winner of the 1999 Pacific Coast Underwater Film Competition, 2003 IVIE competition, 2004 Los Angeles Underwater Photographic competition, and the prestigious 2005 International Beneath the Sea Film Competition, where he also won the Stan Waterman Award for Excellence in Underwater Videography and 'Diver of the Year', Steve was a safety diver on the feature film "The Deep Blue Sea", contributed footage to the Seaworld Park's Atlantis production, and productions for National Geographic and the History channels. Steve is also feature writer for Asian Diver Magazine and is one of the founding organizers of the San Diego UnderSea Film Exhibition. He is available for both private and group seminars for Final Cut Pro and leads underwater filming expeditions and African safaris with upcoming excursions to the Red Sea and Egypt for Nov.2009, Feel free to contact him if you are interested in joining Steve on any of these exciting trips. www.worldfilmsandtravel.com
[Top]
Steve Douglas is a certified Apple Pro for Final Cut Pro 6 and underwater videographer. A winner of the 1999 Pacific Coast Underwater Film Competition, 2003 IVIE competition, 2004 Los Angeles Underwater Photographic competition, and the prestigious 2005 International Beneath the Sea Film Competition, where he also won the Stan Waterman Award for Excellence in Underwater Videography and 'Diver of the Year', Steve was a safety diver on the feature film "The Deep Blue Sea", contributed footage to the Seaworld Park's Atlantis production, and productions for National Geographic and the History channels. Steve is also feature writer for Asian Diver Magazine and is one of the founding organizers of the San Diego UnderSea Film Exhibition. He is available for both private and group seminars for Final Cut Pro and leads underwater filming expeditions and African safaris with upcoming excursions to the Red Sea and Egypt for Nov.2009, Feel free to contact him if you are interested in joining Steve on any of these exciting trips. www.worldfilmsandtravel.com
[Top]
copyright © Steve Douglas 2009
© 2000 -2009 Ken Stone. All rights reserved. Apple, the Apple logo, Final
Cut Pro, Macintosh and Power Mac
are either registered trademarks or trademarks of Apple. Other
company and product names may be trademarks of their respective
owners.
All screen captures, images, and textual references are the property and trademark of their creators/owners/publishers.


