November 4, 2002
From Offline To Online
Working With Offline RT In Final Cut Pro 3
By Andrew Balis
Offlining And Onlining
There are several ways that we can do an offline edit in Final Cut Pro and then online on the same system or on another system. In FCP 3, we were introduced to a new offline resolution that we can take advantage of: Offline RT. We will discuss the process of capturing Offline RT, the workflow for re-capturing at full resolution, and other important considerations like graphics and titles. Also, as a side note, although we will look at the specifics of working with Offline RT, the same workflow for moving between two resolutions applies to other offline editing situations as well, such as using offline resolutions with the Aurora Igniter card or the Aja Kona card.
But before we go into detail about using this new format, let's get on the same page about a few terms used in this article. Offline and online (depending on their usage), can describe completely different things, so let's examine them.
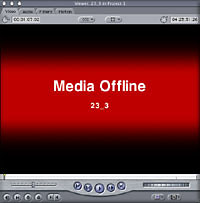
Offline: Used to indicate that a clip does not have media available for playback. The link to the media file may be broken, the media may have been removed from the hard drive or the clip has been logged but no media has yet been captured.
Red line indicates clip is offline
|
|
When clip is opened, there is no media available for playback.
|
Online: Refers to a clip that references a media file on a hard drive. An online clip may be played back.
Icons for online clips
Offline Edit: Refers to the process of building the rough cut, specifically at less than full resolution. This process is used as a way of being able to capture a lot of material that may be needed for a project, without having enough hard drive space to capture at the highest resolution. The edit can be fine-tuned from a lot of material down to just what is needed for the final project.
Online Edit: The process of rebuilding the project from the Offline Edit. When the project is onlined, it is captured (or re-captured) at full resolution. Because the online edit is performed at full resolution, only the material needed for the final edit is captured.
Upres: Also used to describe the process of onlining, or recapturing at a higher resolution.
Traditionally, in the past, the offline edit and online edit were completed on different systems. The Offline edit would be completed on a lower end system at a lower resolution, and the cost of renting the offline suite would allow for time to build the edit and make changes as needed. The online suite, costing a lot more money to rent, would only be used for a short amount of time, only enough time to rebuild the offline edit at the best resolution. Final titling and graphics may be completed at this time.
This paradigm has started to shift with new, lower cost systems like Final Cut Pro that can work at multiple resolutions, allowing a production to offline and online on the same system. A production can do an offline edit to conserve on hard drive space when capturing a lot of material. The online edit may require faster, more expensive storage space, so only capturing what is needed is crucial to avoid spending a lot of money on this type of storage.
Offline RT
There are many ways to do an offline edit, like using a capture card like the Aurora Igniter to capture at various compressions with the Motion JPEG codec. But there is a great offline resolution built right into FCP, whether using a capture card, or using DV. Offline RT is a modified version of an existing format, but has been streamlined specifically for capturing any material in real time at a lower resolution than the original format. Let's look at the details of this format:
- Compression(codec): Photo JPEG
- Frame Size: 320x240
- Pixel Ratio: Square
- Quality: 35%
- Frame Rate(NTSC): 29.97fps
Benefits Of Offline RT
The main benefits of Offline RT are two-fold:
Storage: Approximately 40 minutes of Offline RT footage requires only 1 GB of storage space. This storage can also be inexpensive ATA hard drives, whether internally connected drives or FireWire drives. Because the load of Offline RT is low, you can even use Offline RT on a Powerbook using the internal drive for storage. This is normally a bad idea when using DV, and is not possible at all with capture cards, causing a lot of dropped frames due to the data rate required for other formats. For internal hard drives, any drive that is at least ATA 66/7200rpm drives will do. The current flavor that is being manufactured are ATA133 drives. For FireWire drives, I would recommend any drive that is using the Oxford 911 bridge.
Real Time Effects: This format will also let you apply a fair amount of real time effects without needing any additional hardware, as the effects are processed internally. This format will even allow for external viewing with real time effects.
Also, for editing in the Canvas and Viewer, the quality level of the footage is not very different from DV, and the artifacts of this format are not pronounced unless your Canvas size is fairly large.
Disadvantages Of Offline RT
No external viewing through FireWire is the big one. As this format is not DV, it can not be played back out to an external DV device through FireWire. There are, however, other options for external viewing using an analog (S Video) output from a graphics card, or the S Video port on a Powerbook. We will discuss specifically how to view externally later in the article.
Additionally, if you do monitor Offline RT externally, the quality of the picture will be less than great. Remember, it is a 320x240 frame size, compressed down, being viewed full screen on an NTSC monitor.
Setting Up To Capture Offline RT
To capture at Offline RT resolution, you will need to set the correct preset. In OSX, go to the Final Cut Pro menu> Audio/Video Settings.
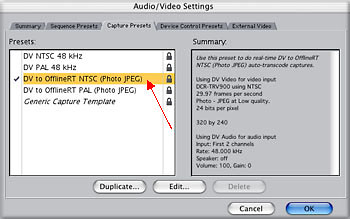
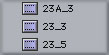
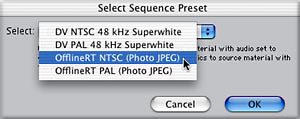
Go to the Capture Presets tab. You will see 2 Offline RT presets that are pre-installed, one for DV/NTSC and one for DV/PAL.
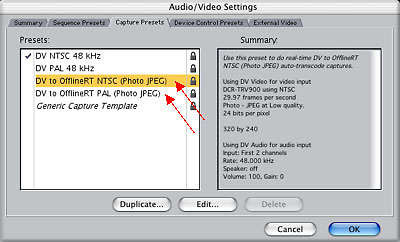
If you will be starting with anything other than DV, you can either create a new preset here, or there are additional Offline RT presets on the Final Cut install CD. Go into the Extras folder of the CD and you will find additional Easy Setups.
To install these, drag them from the folder on the CD to the following location: Volume(hard drive)> Library> Application Support> Final Cut Pro System Support> Custom Settings. These Easy Setups may also be installed into your Home directory if you prefer instead. To install at the user level, drag the files to Volume> Users> User(your user)> Library> Preferences> Final Cut Pro User Data> Custom Settings. You should only install in one location or the other but it does not matter to FCP which location they are stored. If there is no folder for Custom Settings, then you can create one.
Next, even with a capture preset that closely matches your format, there may be some things that you need to modify. To determine whether a preset needs to be modified, double-click on the preset in the Capture Presets window (of the Audio/Video Settings). If the preset is locked, a warning will appear noting that you can not edit a locked preset, and that a duplicate will be created for you.
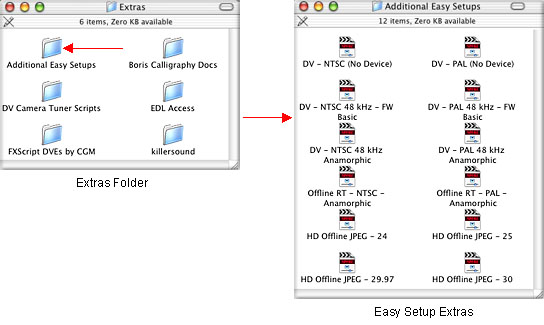
In the Capture Preset editor, there are a couple of things you should look at to determine if they need to be changed:
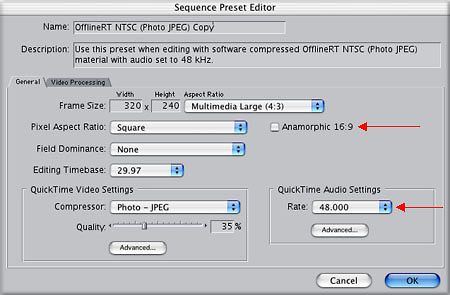
Sample Rate: Choose between 32Khz and 48Khz. Make sure you are choosing the same sample rate that the material was originally recorded at. If the sample rate is not chosen correctly, you will encounter sync problems during the course of the project.
Audio Input: Only needs to be modified if there are more than two tracks of audio on tape. Here you can choose to capture the 1st two tracks, the 2nd two tracks, or to mix the 4 tracks down to 2 tracks.
Anamorphic: Check this box if the incoming material is native 16x9.
The arrows in the illustration above point to the
three settings that should be checked.
Everything else in the Preset editor may be left alone. If you modified anything, then save this as a new preset and rename it at the top of the window so you can easily identify it later.
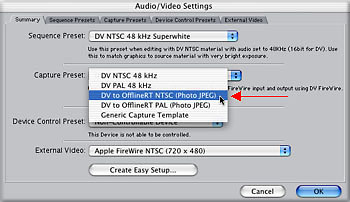
After the preset is modified (if needed), or whether you simply want to choose from an existing preset, make sure that you place a check mark to the left of the preset in the Capture Presets tab (or you can also make the selection by going back to the main Summary tab and choose the preset from the drop down menu for Capture Presets.
Choose the preset in either window
We are not quite ready to capture yet. Before capturing material for the project, there are considerations to take to ensure that you will be able to re-capture this material later at full resolution.
Timecode
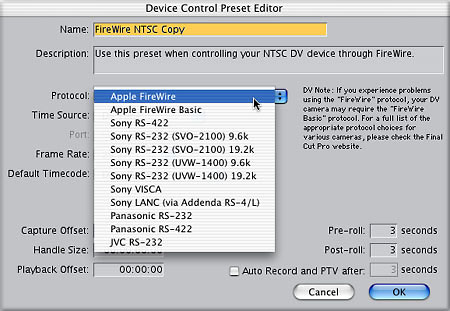
You will need to make sure that timecode is assigned correctly for all the clips that will be captured. This is not automatic, and you will need to do a short test to ensure that the captured timecode is correct. Go to the Audio/Video Settings and go to the Device Control tab. There are only three presets installed here, for DV/NTSC, DV/PAL and for a non-controllable device. If you are using DV, you can start with one of the DV presets, but if you are using another type of deck for input, like 3/4" or Digital Betacam, then you will need to create a new preset. Double-click on one of the existing DV presets to edit it, or to create a new one. Again, as with the Capture Presets, if you double-click on a locked preset, you will be duplicating the original to work on a copy.
Under Protocol, we can choose how to bring in timecode and control the deck. If you are using DV, then you can use one of the FireWire presets. If you will be using another type of deck, then you will need to choose from one of the presets for RS 422 or RS 232. This will require a serial cable connected from the deck to the computer (you will also need to serial adapter like the Stealth adapter).
The next part is the truly important part: choosing a Capture Offset. This is where we can control if the timecode is coming in accurately or not. First, we need to test whether we need to modify this preset or not. To do this, capture about 3 clips, preferably with a timecode window burn. If you do not have a window burn then you will need to figure out the timecode of various frames from the source material. This can be done by pausing a tape in the deck and identifying a specific frame, like where a door closes, or a scene changes, or a slate claps. Then look at the timecode display on the deck to associate that frame with a timecode number (write these numbers down for later reference during the test).
After capturing the 3 clips, load them one at a time into the Viewer. Park the Playhead somewhere near the beginning of the clip (but not on the 1st frame). Look at the FCP display of timecode in the upper right part of the window, and look at the timecode of the window burn in. If the two numbers match, then look at a frame somewhere near the middle of the clip and somewhere near the end of the clip. Do the same procedure for the other two captured clips.
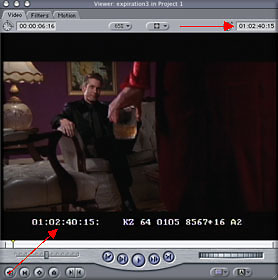
This is an example of a clip with timecode burn in window.
Looking at the burn in display and the Viewer timecode field shows whether the clip's timecode is accurate.
If the timecode matches the burn in window on all of the clips, then we are good to go. If the timecode does not match the burn in, and it is consistently off across all clips, then we will need to set a Capture Offset. In the Device Control Preset editor in the Audio/Video Settings, set a Capture Offset by the same amount of frames as the difference between the timecode field and the window burn in.
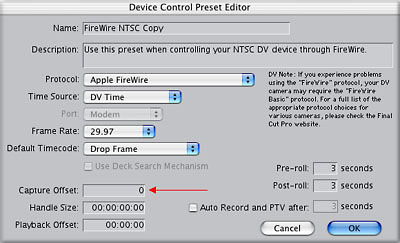
Then, capture three more clips and check the offset. If everything matches this time around, then you are good to go.
Troubleshooting
If timecode matches in one part of the clip, but does not match in another part of the clip, then it is possible that there was a timecode break during capture. Either you captured across a timecode break on tape, or there was a glitch in the capturing process that caused a timecode break.
If timecode is inconsistent across the original 3 captured clips (for
instance: -1 on one clip and +1 on another clip), and there is no timecode
break, then there is a problem with the device control method being used
(Protocol).
Additional notes on Capture Offset
A Capture Offset will hold true for a particular deck that you are capturing from, but a new test should be done for each new deck that is used (and to be safe, even for new sets of cables).
Additional Considerations When Logging/Capturing
Reel Number: Make sure that each tape captured is labeled with a unique reel number or you will have a difficult time when re-capturing. Also, if you will need to create an EDL (Edit Decision List) to do the Online edit on another system, then care should be taken when creating names for the reel numbers. To be safe, create reel numbers with only alpha/numeric characters, all uppercase, with no embedded spaces or punctuation of any kind.
Clip Name: Create clip names that are fairly short, less than 25 characters. Also, with OSX it is important to leave out certain characters, specifically the / character. I would avoid using any kind of slash except the _ character to be safe.
Timecode breaks on tape: First of all, avoid capturing "across" a timecode break, where the clip begins on one side of a break and ends on the other side of a break. Additionally, timecode breaks on a tape can be a real hassle when re-capturing as the same timecode numbers may fall in different places in the same tape. FCP will not make the distinction between these different parts of the tape, and will capture any timecode number that matches the clip. To capture from the right section of tape, during the first capture, or during a subsequent re-capture, it may be a good idea to label the different parts of the tape with unique reel numbers. For instance, log up to the first timecode break with a reel number like 05A. On the next part of the tape after a timecode break, label the reel number as 05B. If another timecode break exists, label it 05C.
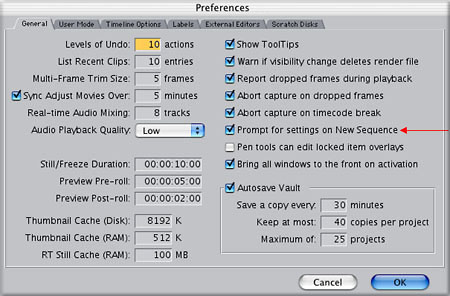
In the Preferences, it is helpful to turn on two specific preferences to avoid capturing with dropped frames or to avoid capturing across a timecode break. They are shown in the next illustration.
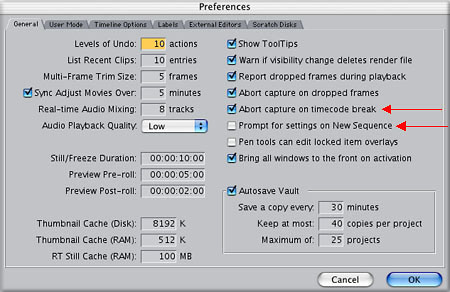
Occasionally, FCP will report a timecode break when you know for certain there is no such break. If this occurs, simply turn off the preference for timecode breaks.
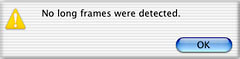
After a capture, if you suspect that there may be dropped frames in a clip, then you can run a feature in FCP that attempts to detect dropped frames. Open the specific clip into the Viewer, go to the Tools menu and choose Mark Long Frames.
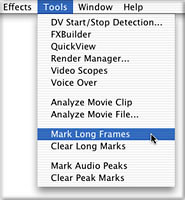
If no long frames are detected, you will get a confirmation box.
Working In Offline RT Sequences
After capturing, it is important that you work with these Offline RT clips in a Sequence that matches this captured footage. Every time a new Sequence is created, it is stamped with certain configurations. The Sequence will be created with the currently selected preset in the Audio/Video Settings. Under the Audio/Video Settings, on the Summary tab, you can choose a Sequence Preset from the drop down menu.

To get more information about the presets, or to make a modification to an existing preset, go to the Sequence Presets tab. On the Sequence Presets tab, you can double-click on an existing preset to make modifications like you did with the Capture Presets. This will open the Sequence Preset editor.
In the Sequence Preset editor, there are only a couple things that may need to be modified: Audio sample rate and whether the Sequence is anamorphic (16x9). Remember, there are additional Easy Setups located in the Extras folder of the FCP install CD, so you may want to look there before modifying an existing preset.
These Sequence Presets are only used for creating Sequences after a Sequence Preset is chosen. For existing Sequences in a project, they will be left with the presets they were created with. To modify an existing Sequence, make the Timeline window active for that Sequence, and then go to the Sequence menu> Settings. The settings found in this window are similar to those in the Presets, except these settings are for the current open Sequence.
Tip: To know what your current Sequence preset is set to, or to change the preset when you create a new Sequence, you can turn on a preference in the Preferences that will always prompt you for the Sequence type before creating the Sequence.
Additionally, you may leave this feature off, and select it with a keyboard shortcut as well:
To create a new Sequence at the current preset: Command/N
To create a new Sequence and choose the Sequence preset: Command/Option/N
Pressing Command/Option/N will open this window, allowing you to choose the new Sequence using any preset.
Viewing Externally
Viewing the Offline RT project to an external monitor will require a custom setup. There are a couple different ways this can be accomplished. With a Powerbook, there is an S Video port built into the computer that can be used for external viewing. For desktop Macs, you will need a graphics card (the card that connects the computer monitor) that will also have an S Video port on it. One card that has such a configuration is the ATI Radeon 8500 card.
For either option, to view externally, go the Audio/Video Settings to the External Video tab. Under View During Playback, click on the drop down menu and choose the "Desktop" option that matches the S Video connection. Below is a sample of this choice on a Powerbook.

Creating Graphics And Titles
Here's some good news. You only need to create your graphics and titles once. You may scale and modify the graphics and titles as you desire, and when you online, the graphics and titles will be proportioned correctly in the final onlined (up-rezed) project.
Graphics
When creating graphics to be imported into FCP, create them at the size to used in the final onlined version of the project.
I won't go into details here about the need to prep your graphics properly for use in an NTSC project, but here's the short summary: for creating full screen graphics for a DV/NTSC project, create the graphics at 720x534. Once the graphics are created, modify the Image Size to 720x480. For creating full screen graphics for other NTSC projects, create the graphics at 720x540, and once the graphics are complete, resize them to 720x486.
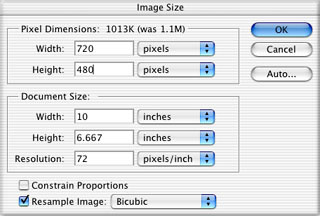
The Image Size dialog box in Photoshop
This process pre-squeezes graphics so that they appear correctly in an NTSC non-square pixel project. Import the 720x480 graphics into FCP. If you place one of the graphics into an Offline RT Sequence, you may be surprised to find that FCP automatically scales the graphic to fit within the frame of the Sequence. If you do not wish this to be the case, or you want to scale it down to a specific size on the screen, simply open the graphic clip into the Viewer, go to the Motion tab and scale it to the desired size.
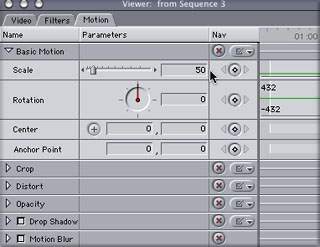
In this case, you will notice that FCP took the 720x480 graphic and scaled it down to 50% to "fit" in the Sequence. During the online process later, FCP will automatically modify this scale setting proportionally to match the new Sequence.
Titles
When creating titles, your concern is to make them look good in the current Offline RT project. Set point size and anything else so that the titles are positioned and scaled on the screen as you desire.
What will happen when you online
Graphics and titles will be resized based on the new Sequence that will be created when you online. For instance, you scale down an imported graphic to 45% of its original size (this can be seen on the Motion tab of the clip in the Viewer) in the Offline RT Sequence. When you upres (for instance to DV), then you will notice that FCP automatically changes the scale of the graphic proportional to the size of the new Sequence. In this next example, the graphic was scaled down to 45% in the Offline RT project. Once onlined in a DV project, FCP will change the scale setting to 90%, which the same proportion of image to frame as in the offline project.

In offline edit
|
|

In online edit
|
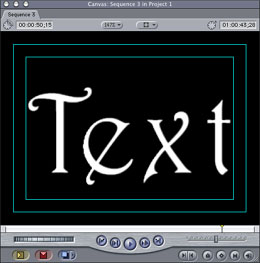
The same sort of thing happens with titles created in FCP. Although the point size of the text will be the same in both the offline and online Sequence, the titles will appear similar in both Sequences.
In offline edit
|
|

In online edit
|
The text in the image to the left above was created in an Offline RT project. The text in the image on the right is in the onlined project (DV). FCP resized the text in the onlined project.
There is only one aspect of the graphics that will look slightly different once onlined. The proportions of the graphics will change slightly. This is due to the fact that the Offline RT Sequence is a Square Pixel Sequence, and your final Sequence will be Non-Square Pixels. This distortion is approximately 10% of the width of the graphics. As long as they were created properly, using the method above, they will look proportionately fine in the final Sequence, but they just may need to be tweaked a little bit during the online.
Onlining The Project
There is only one good workflow for upresing that will capture the correct portions of clips, create the proper Sequence and handle graphics and titles correctly. This involves using the Media Manager to prep the final Sequence to be upresed. We will need to create a new Sequence that is a copy of the original Sequence, and this Sequence will be offline, so that new media may be captured and connected to this new Sequence.
Before we use the Media Manager, let's take a look at this sample Sequence that will be onlined. In the following illustration, the Sequence contains different types of media elements. There are clips that were captured from videotape(at Offline RT resolution), there are audio clips that were imported from CD's, there are imported graphics, and an FCP text generator.
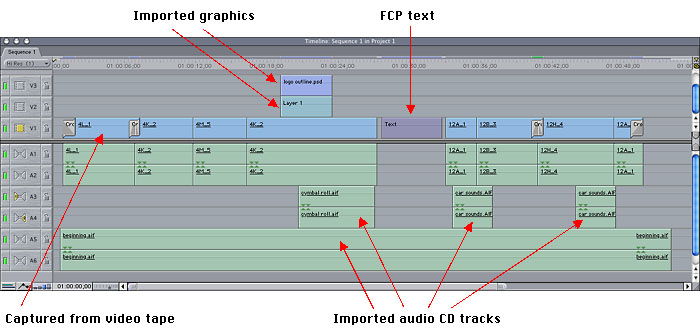
These different types of media will be handled differently by FCP during the onlining process, in terms of what will be recaptured from videotape, and what will remain online from the original elements. We will look at this same Sequence during the online process to see what will happen to the various elements.
Next, select the Sequence in the Browser to be upresed. Go to the File menu> Media Manager. Under the section labeled Media, choose Create Offline from the drop down menu.
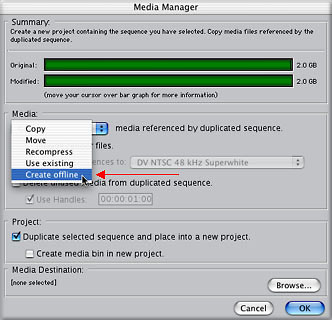
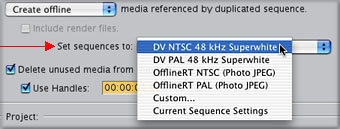
Once you have chosen Create Offline, another option opens up below this, labeled Set Sequences To. Choose the correct preset that matches the online resolution that you want to finish in.
Below this drop down menu, check the box for Delete Unused Media. This option ensures that you will only recapture the amount of material used in the Sequence. Subclips and regular clips will be handled correctly. This option does not affect the media for your current Sequence.
Below this box, check the box labeled Use Handles and type an amount into
the field (one second is often sufficient). Adding handles will recapture
slightly more than what is actually used in the Sequence. This is important,
especially if you decide later to add transitions or make any small trimming
changes. I would actually always choose handles in any Media Manager
operation, to ensure proper reconnecting as well.

When you are done, Click OK at the bottom of the window. You will be prompted for a name and location for a new project. This new project will be the upresed or onlined project. When you are done, you will notice that this new project opens up into the Browser. To avoid confusion, close the previous project (the offline edit). Next, double-click the new Sequence to open it.
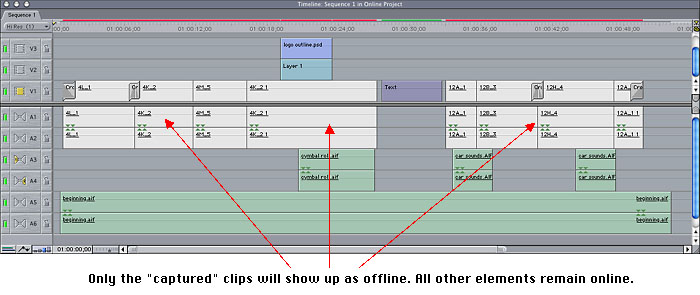
There are several things that you will notice about this Sequence. Some items will be offline, while others will remain online. Captured clips will be offline. Imported graphics will remain online. Titles and other video generators will be online. Additionally, if you imported audio (like from a CD), those clips will also still be online. Imported animations and effects shots will remain online. In fact, anything without a Reel Number will remain online. This is generally fairly important, as these elements will not be re-captured. These clips: the CD audio and graphics are final elements.
The next step is to re-capture the media for the remainder of the Sequence. Everything that was captured as Offline RT can now be captured at full resolution.
First, go to the Audio/Video Settings and choose the Capture Preset that matches the full resolution material. This is very important! Although the Sequence Presets are created properly for the new Sequence, the way that the material is captured has to match the settings of the Sequence (the online resolution).
Then, go to the Browser and Control-click on the icon of the Sequence to be recaptured and choose Capture from the drop down menu (this same task can be accomplished by single-clicking on the Sequence in the Browser, and then go to the File menu and choose Batch Capture).
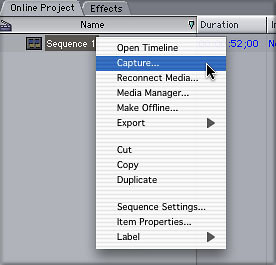
Control-click on Sequence icon and Capture
A warning dialog box will probably appear with the header "Selection Error". It might sound at first as though you did something wrong.

It will state that several clips can not be captured because they do not contain Reel Numbers. This is normal. It is just telling you that clips like the CD audio and graphics will not be captured. Click Continue and FCP will ignore the clips without Reel Numbers.
You will then be prompted to feed the correct original tapes to be recaptured, and you will see a box similar to the box shown next.
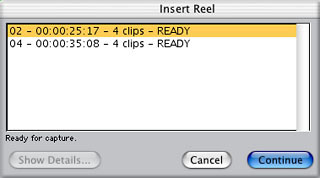
When you first captured material, you may not have seen this dialog box show more than one reel at a time. That will happen when you log one tape at a time and then capture it. But now, we are recapturing whatever was used in the Sequence, potentially containing multiple reels. In the above example, two reels are needed to recapture the Sequence. It is very easy to make a mistake at this point, and you may accidentally capture material from the wrong tape. To capture correctly, select the reel to be captured (in the above illustration, you can see the selected reel is highlighted in yellow). Then, place the correct tape in the deck/camera. Then click Continue in the box. If you click Continue before inserting the new tape, FCP will think the correct tape is already in the deck and will start to capture incorrectly. Once the first reel is captured, select the next reel in the box, insert the correct tape, and continue to capture until completed.
Once this process is complete, the project is nearly finished.
Fine Tuning The Online Sequence
There are certain things that may need to be fixed or modified after the final capture is complete. Connect an NTSC monitor to your output device (such as a DV deck if using DV for the final online) so that you can monitor specific elements in their final resolution.
Graphics: As mentioned earlier, there will be a slight change in the proportion of the width of the graphics in the Sequence. You may need to modify certain elements, especially those graphics that were close to the edges of Title Safe lines. Additionally, now that you are looking at the graphics at full resolution, you may notice that some color hues or saturation may need to be modified.
Titles: Similar to graphics, you may need to adjust luminance or chroma values in your text. It is also at this stage that you should do any final "tweaking" of the titles, like exact positioning on the screen. Also, fonts that looked ok in Offline RT might now be suffering from some NTSC artifacts that are now more pronounced with the new, sharper text.
Motion effects: Here's the rub, or in other words, the bad news. Motion effects like motion paths will need to be re-created in the online stage. Unfortunately, FCP does not handle the positioning of Keyframes properly when upresing between two different size Sequences. You will find, for instance, that a motion path that moved from one side of the screen to the other in the Offline RT Sequence will now only move from left of center to right of center in the frame.
Effects filters: Exact values for effects filters should be re-checked as they will surely look different at full resolution.
Color correction: Except for really rough color correction while offlining, all color correction should be done at this final stage. Applying color correction and spending time on it in an Offline RT Sequence will be misleading. Save this for the last stage, after upresing.
Replacing Temp Graphics
One other consideration that we haven't touched on is that when you are offlining, your final graphics may not be ready to use. You may end up using temporary graphics during the offline edit, but will need to replace them later, during the online. This can be a fairly painless procedure.
When offlining, use any temp graphics that are needed. To make the final transition go smoothly, try and start with graphics that are at least the same dimensions as the final graphics. Also, place all temp graphics in the same folder on your hard drive.
When the final graphics arrive, make sure they are named exactly the same as the temp graphics (they can be named differently, but it will just make the transition a bit tougher). Also, store all of these graphics in the same folder.
After the Sequence is onlined, select all of the temp graphics in the Sequence. Go to the Modify menu and choose Make Offline (Shift/D). From the Make Offline dialog box, choose the default selection: Leave Them On The Disk.
Once the files are offline, it is helpful to remove the temp graphics folder from the hard drive. Next, with the same offline graphics still selected in the Timeline, go to the File menu and choose Reconnect Media. In the next dialog box, choose Offline as the type of media to reconnect. Next, FCP will automatically find the first online graphic to replace (this is because the names of the new files match the names of the temp graphics, and the temp graphics folder is nowhere to be found). If FCP does come up with a match, first check to make sure that the box labeled Reconnect All File In Relative Path is checked, and then click Choose at the bottom of the window. FCP should reconnect all files automatically.
If you are working with Photoshop graphics the procedure is still the same, but a little more care needs to be taken. Since a Photoshop file is made up of layers, it is the specific layers that are used as clips in FCP. This means that in order to reconnect correctly, not only should the Photoshop file itself have the same name as the original temp graphic, but the layers used should all be named the same from the temp graphic to the final graphic in order to reconnect easily. The good news is that FCP will look for the name of the Photoshop file itself that matches the name of the original, and as long as the layers inside match, they will all reconnect on their own.
FCP looks at these Photoshop layers similarly to how it looks at Subclips, so in the Reconnect dialog box, you will not be looking to connect the individual layer, but the Photoshop file. So, when doing this type of procedure, as long as FCP finds the name of the Photoshop file, then the "clips" inside (the layers) will connect fine.
When you are done reconnecting, you will notice that any effects applied to the temp graphics will still be in place in the final clips, as those clips in the Timeline retained the original attributes that were applied to it.
If this is a little too much work for you, or there will be no way of matching names easily, or you used text generators as placeholders for the graphics then you can use the next set of steps instead. The only downside to the next method is that any effects used on the temp graphics will need to be re-done.
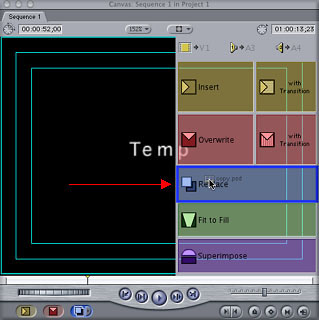
Import the final graphics into the onlined project. Load the first (final) graphic clip into the Viewer. Locate the temp graphic in the Timeline to be replaced. Place the Playhead over that clip in the Timeline, and make sure that this track is targeted (the little yellow box to the left in the Timeline).
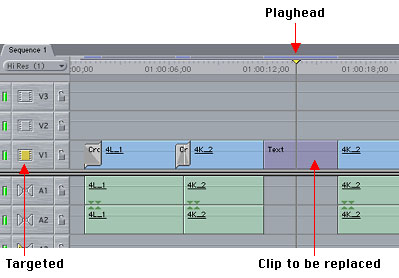
Then drag the clip from the Viewer to the Canvas and drop on the overlay for Replace edit (F11). Each temp graphic will need to be replaced this way.
What happened To The Original Offline Edit?
When we created the new offline Sequence using the Media Manager, the original project and media were left un-touched.
As you can see from this picture of the capture scratch drive, the media from both projects remain online.
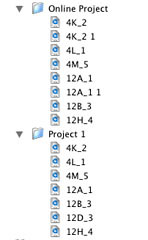
As a side note, notice that there is a different number of clips in the Online project than the original project: Project 1. In some cases, you may notice that there are more clips in the online project than the original offline edit. This will happen when you use different sections of a clip in more than one location in the timeline. FCP will create a media file for each of these "sections".
Although there may be more clips in the online Sequence, the duration of
media recaptured in total is still less than the original captured media, as
shown in the batch capture boxes below.
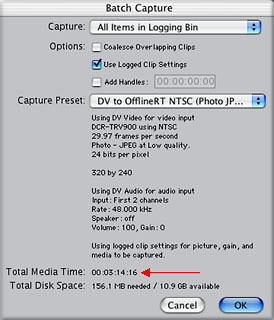
Offline edit
|
|
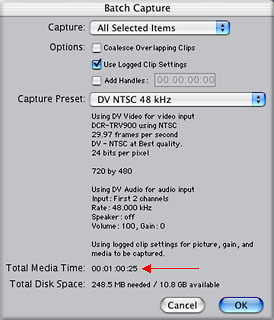
Online edit
|
I would suggest that you don't delete anything from the original project until the new one is onlined and finished (assuming you can spare the drive space). If you do need to trash the media before onlining, just make sure that you back up that original project file. If anything goes wrong, or you need to re-edit, you can always re-capture to the original project.
Onlining On Another Platform
There is one scenario we did not address so far. You may wish to do the offline edit in FCP and finish the online on another system like a linear online suite or in a high-end Avid like a Symphony.
If you are finishing on an Avid, then there is a great new tool available that will avoid the necessity of creating an EDL (Edit Decision List). EDLs are a very old technology, and can often be plagued with errors. Instead, there is a product called Automatic Duck (actually the company name is Auotmatic Duck). If you buy the "pro" version of Automatic Duck, you can export all of the informaton needed to re-build the project using an OMF (Open Media Framework) file. The non-pro version will let you export a Sequence to After Effects with all your edits intact, with Keyframed motion effects and a lot more translated properly in After Effects. This is a very valuable tool, either for moving to After Effects or Avid. For more information, go to automaticduck.com
For finishing on a system other than FCP (except for Avid), we will need to generate an EDL. You can generate EDLs successfully, but some care needs to be taken. The first thing I would suggest for creating an EDL is exporting an EDL without audio. If the audio of the project will be finished in a sound-sweetening environment like Pro Tools, then the audio is not needed (not digitized) in the online. The finished audio will be layed down later.
Other tips for generating an EDL:
- 1 video track only (per EDL)
- Only 4 audio tracks
- Remove split edits (if EDL contains audio)
- Reel names are no more than 6 characters (for CMX3600 EDL)
- Reel names are alpha/numeric characters only, no spaces or hyphenation (for CMX 3600 EDL)
- Remove effects from Sequence, including speed effects (they will need to be re-created in the online, so you will probably want to take notes of the effects used)
- Simple transitions only like cross dissolves
- Make sure nothing is nested in the Timeline
Conclusion
What are the requirements for using Offline RT. For one, you will need Final Cut Pro 3.0 or later. Additionally, it is recommended that you use a G4 processor for capturing. Although I have captured Offline RT successfully to the internal hard drive of an iBook, I wouldn't recommend it as it may prove unreliable.
That's it. From offline edit to online edit. As mentioned earlier, these steps can be used as a workflow for working from any one resolution to another, not necessarily just when working with Offline RT.
Written by Andrew Balis
After graduating from NYU's Tisch School of the Arts for film, Andrew Balis has been in the film industry for over a decade, working in both production and post production. Currently, his time is shared working as a cinematographer and editor, consultant and instructor in Final Cut Pro. Andrew has also written and co-written the Apple certified Final Cut Pro student guides for the FCP 101, 201 and 210 classes used by Apple certified education centers, developed at the Moviola Education center, as well as having written chapters in other books on Final Cut Pro.
copyright © www.kenstone.net 2002
[Top]
All screen captures, images, and textual references are the property and trademark of their creators/owners/publishers.