White Paper October 1, 2001
In Session: Integration between Final Cut Pro and Pro Tools Free.
By Adam Green
Freelance video and audio editor Adam Green focuses this How2 on
getting audio out of Final Cut Pro 2.0.2 into Pro Tools Free, version 5.0.1
With the introduction of version 2.0 of Final Cut Pro, Apple has given us the ability to delve more into audio editing with the OMF export feature. OMF stand for Open Media Framework, and is a way for audio and video files and playlists to be transferred from one editing system to another. There are numerous video and audio companies that support OMF (Apple, Avid, Digidesign, SSL, Sonic Solutions, Discreet, etc.) and allow their products to become more integrated with each other without the need to reprogram their interfaces.The most useful part of OMF for Final Cut Pro and Avid users is the ability to export audio from the timeline directly into Pro Tools. All of your audio edits and fades can easily transfer over to an audio editing system for sweetening. When finished, the audio editor can layback the finished mix directly to the master tape, or export a file for import back into the video editing system. The most useful part of the whole process is that the audio editor will receive not only the final edit, but also handles on the edits as well. Access to these handles makes it easy to blend edits together and smooth out the mix- a task that is much easier on an audio system than a video editing system.
In this article I'm going to focus on Final Cut Pro version 2.02 and Pro Tools Free (www.digidesign.com) version 5.01. Where applicable, I'll mention the limitations of Pro Tools free, and where Pro Tools LE and TDM beat its free rival.
We'll start this lesson at the very beginning- acquisition of material. If you're using a DV camera you must check your audio settings. Too many cameras are coming from the factory with the audio settings set to 12 bit/32 KHz. DV cameras have two settings- 12 bit and 16 bit. The 12 bit setting records at 32 kHz and the 16 bit setting records at 48 kHz. There is no reason to ever use the 12 bit setting unless you are planning on doing overdubs directly into the camera. Since you're reading this article, I'll assume that you will be using Final Cut Pro, so a 16 bit setting is mandatory in my opinion.
When capturing into Final Cut Pro, make sure your capture setting is set to 48 kHz as well as your sequence setting. It is possible for Final Cut Pro to play back 48 kHz audio in a 44.1 kHz sequence, but you are putting undue strain on the realtime sample rate conversion capabilities of Final Cut Pro, and could possibly drop frames as you are playing. Always try to match your audio file settings with your sequence settings.
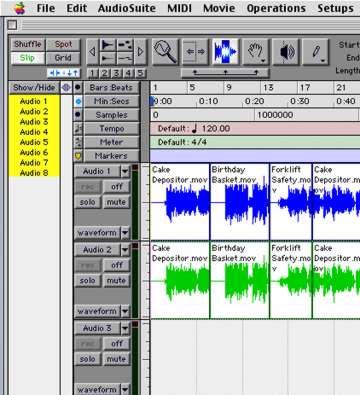
As you're editing, try to place like types of sounds on the same tracks. For example, I always place dialog on tracks 1 and 2, music on tracks 3-6, and sound effects and miscellaneous effects on tracks 7 and 8. Final Cut Pro supports up to 99 audio tracks, so if you need to add a couple more audio tracks, it is possible. However, keep in mind that Pro Tools free only supports up to 8 audio tracks, so if you make 9 audio tracks, then the ninth will be excluded from the OMF transfer. I suggest keeping your sequences under the 8 track limit. There are ways around the 8 track limit if you are using Pro Tools LE or TDM, but for now lets stick with the basic stuff.
Feel free to add as many edits as you'd like on your audio tracks. Audio transitions will also pose no problem to your OMF transfer if you've updated to Final Cut Pro version 2.02 (there were some sync issues with transitions that have been resolved). If you want to do some volume automation, or rubber banding, these will not transfer. All files will open in Pro Tools at their default, zero level, so your Final Cut Pro mix will simply be a temp mix.
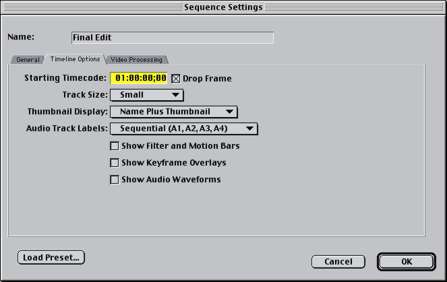
There are a couple of items on our checklist before we export the audio. First, it is important that you verify the starting timecode and code type of the sequence before we continue. Click on the sequence and choose sequence settings (command-0) from the sequence menu. Click the timeline options and note the starting timecode. This code reflects the first frame of the sequence. I will usually choose 00:58:00:00 which gives me enough time to place bars and tone as well as a slate and countdown before a 1 hour start (30 sec black, 1 minute of bars and tone, 10 sec of black, 10 seconds of slate, 10 sec of black, 1 hour program start) If you are working in a television environment or need exact program length, then leave the drop frame box checked. It is unnecessary is you are doing film work or other non-television specific projects. PAL users will not need to worry about this option.
Figure 1: The sequence settings window allows you to change the starting timecode
f the sequence and its drop frame/non-drop frame status.If you add bars and tone, you will need to choose a reference level for the audio tone. It is important to understand that the tone you place in your sequence will be of little use to the Pro Tools editor. Since OMF is a direct file transfer, there is no need to align anything inside of Pro Tools. It simply will open your OMF session and the files will reside on the timeline. The only use for placing the tone in the sequence is if you are laying back, or making an edit to tape of your sequence. The tone is necessary to align the recording deck to your mixing reference level. Sony has essentially set the standard for the amount of headroom necessary in digital recording. They say that there should be around 20 decibels of headroom before distortion in a digital world. Therefore, -20 db on a digital meter should equal 0 VU on any analog device. The only problem with that school of thought is that this is all based upon your material starting in a 20 or 24 bit environment. You see, every 6 db drop in gain is equivalent to losing 1 bit of information. In a 20 bit world (most of Sony's digital decks), losing 2 or 3 bits of headroom is OK since you still end up with around 17 or 18 bits of useable information. In our 16 bit world (all of your DV decks), if the average volume of your material is at -20 db, you are essentially only using around 13 bits of information- thus increasing the presence of your noise floor. So, you see that it is important to set your reference level as high as possible (smallest headroom possible) so you use the most amount of significant bits in your mix. I recommend setting your tones to -14 db and using this level as your 0 when mixing and laying back to analog devices.
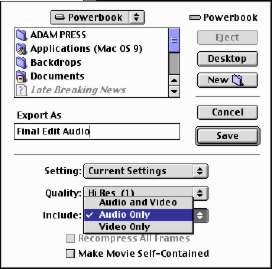
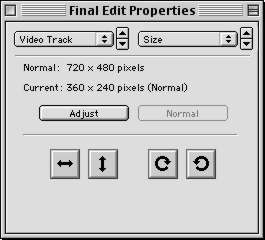
Figure 2: When exporting a stereo bounce, or temp mix,
choose Export Final Cut Pro Movie and check audio only.
One other housekeeping task you might want to consider is doing a temp mix for the Pro Tools engineer. This would essentially be an audio mix performed in Final Cut Pro with approximate levels of how you want the mix to sound. Simply adjust the volume levels of the clips in the sequence to their preferred levels. Mark an in mark at the beginning of the sequence and an out mark at the end of the sequence and choose export Final Cut Pro Movie in the file menu. Choose audio only in the pop up menu and hit save. Import the newly created file back into Final Cut and place it on the final two tracks of your sequence. Make sure you don't exceed a total of 8 tracks. If adding the new temp mix exceeds the limits, you can perform the export without your bounced file and simply include it on the transfer disk as a separate stereo file. This file can later be imported into Pro Tools using the Import Audio from other movie menu item found in the movie menu. A safe way to make sure all audio and video is in perfect sync is to add a 2-pop to your tracks. This would entail generating a white frame which start exactly 2 seconds prior to picture as well as a frame of 1 kHz audio tone corresponding to the white frame. There are some countdown, or leader assets which you might be able to find around the web, which would already have the work done for you. If audio and video ever get separated, simply align the white video frame to the audible pop on the audio tracks.
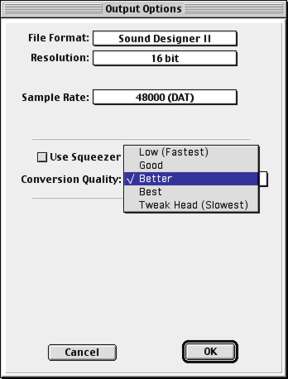
Now we're ready for export. Click on the sequence you would like to export and choose OMF Audio Export. In and Out points will be ignored, so the entire sequence will be exported. If you are using Pro Tools Free, you MUST choose 44.1 kHz. Pro Tools free only supports 44.1 kHz sample rates.. If you are using Pro Tools LE or Pro Tools TDM, then 44.1 and 48 kHz are both viable options. Don't ever choose 32 kHz since it cannot be read by any of the current translation tools. You can also choose the Handle Length of the audio files that you are exporting. Remember that audio files occupy much less space than video files, so exporting with the largest possible handles is always recommended. This allows you more flexibility in Pro Tools if you are faced with the problem of trying to remove a pop or breath. I usually choose 3-5 second handles. You can also choose to include audio crossfades in the export. The default is checked, meaning that fades you make in FCP will transfer to Pro Tools. Crossfades can easily be removed in the Pro Tools session if necessary, so leaving it checked is safe.
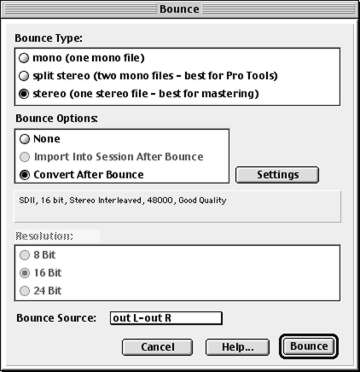
Figure 3: Choose the sample rate of your OMF export. Pro Tools Free only supports
44.1 kHz while Pro Tools LE and TDM support both 44.1 and 48 kHz.
32 kHz is not supported by either- so don't choose it.
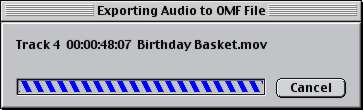
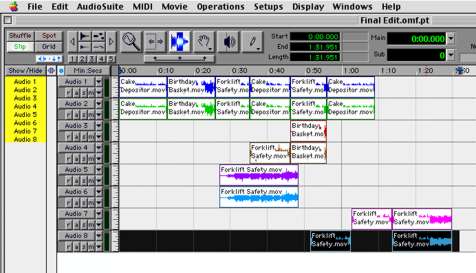
Figure 4: Final Cut Pro analyzes your audio clips and creates a single OMF file.You will see Final Cut Pro analyzing all elements on each one of your tracks from the start to the end of your sequence. It is essentially taking your audio clips and converting them over to AIFC media and packaging all your audio elements into one OMF file. Currently, OMF files cannot exceed 2 gigabytes in size, so if you think you are going to go over that amount, simply cut your sequence up into two pieces and perform two OMF exports. A one hour sequence with 4 filled audio tracks would take up approximately 1.2 gigabytes.
The resulting OMF file will now contain all the audio elements from the sequence in one file. If you go to the finder and get info on the newly created file, it should be at least a couple of megabytes in size. Assume around 5 megabytes per mono minute, and see if your file is close. If it is under a megabyte, you might have problems. Your new OMF file should also have the .omf suffix after its name. It's a good idea to keep that suffix in case you don't remember what kind of file it is. Currently, there is no OMF specific icon, so your file will be iconless. It is also important to keep the suffix if you are transferring the OMF file to a PC so the file type will be recognized.
Figure 5: When exporting your video, you can make a reference movie
by unchecking the "Make Movie Self-Contained" preference.Since Final Cut Pro only supports OMF audio export, and the resulting file will not have your video elements embedded in the file, it is necessary to export the accompanying video elements. Click on the sequence and load it into the timeline. The OMF audio export you just exported is based upon the start of the sequence. If we want the video to be synchronous with the audio, we need to make sure there is no mark in on the timeline. The safest thing to do is to clear both the in and out marks by hitting option-x. It is also necessary to render all un-rendered material by hitting option-R. Now go to the file menu and choose export Final Cut Pro movie. Our goal is to export the movie without changing its size, compression, or frame rate attributes. We also have a choice of making a reference movie or self-contained "bounced" movie. If you intend to do your Pro Tools audio sweetening on the same system that your Final Cut system is located on, then create a reference movie. If you are simply copying all the elements to another drive that will leave the studio, then self a self-contained movie is a better choice. Keep in mind that a self-contained movie will take up about 1 gigabyte for every 5 minutes (DV compression), where a reference movie is much smaller and only "points" to already captured clips. Also choose video only since the audio has already been exported via OMF.
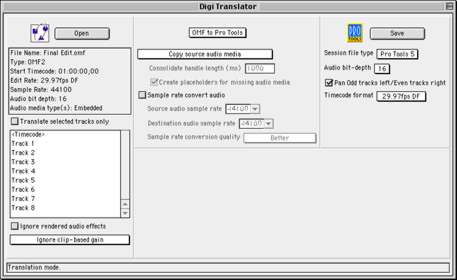
Once completed, we are essentially finished with Final Cut Pro. We have created an audio OMF file as well as a Quicktime DV reference movie and are ready to convert the OMF file into a Pro Tools session. The OMF cannot natively be read by Pro Tools and must be converted into a Pro Tools session first. We can use one of two Digidesign products to accomplish this- OMF Tool or Digitranslator. OMF Tool is free from Digidesign and does most of what you will probably need. Digitranslator is a commercially available program and adds the flexibility to convert your Pro Tools session back into an OMF file for transfer back into an Avid or other editing application. It has the ability to perform a couple of additional tasks which the free OMF Tool cannot. Digitranslator gives you information regarding the OMF file in the upper left of the window. It states the starting timecode (our sequence starting timecode), frame rate, sample rate, and bit depth. It allows you to translate all or only selected tracks into the newly created Pro Tools Session. It also has the ability to consolidate media directly from within the application. This means that if 30 second handles were exported from Final Cut Pro, and you only wanted 2 second handles, Digitranslator would delete 28 seconds of audio handles as it created your Pro Tools session. Sample rate conversions are also possible from within the application, so if the OMF file was exported at 44.1 kHz and you really wanted a 48 kHz session, you'd be able to convert the files as it created a new Pro Tools session.
Figure 6: Digitranslator has many more options than its free counterpart.Lets work with the free version, so our next step is to run OMF Tool 2.08 and open your newly created OMF file. Choose to save it as Pro Tools 4. Pro Tools Free 5.01 will open up older (Pro Tools 4.0) sessions with no problem.
Run Pro Tools and open the newly created session. There are a couple of session maintenance procedures that we need to do before we import our video track. First we need to unsafe all the record buttons on the tracks for future recording. Hold command-option and click on any record button to unsafe the tracks.
Figure 7: