
Audio In The Field November 12, 2001
One-Man-Band* Audio
By Ben Bryant
I don't know about you but a lot of my clients either don't have a lot of money or, if they do, they have a hard time understanding why I want so much of it. What I mean is that I have to shoot a lot of jobs - which in a perfect world would require a three or four person crew - by myself. One area where this often presents an interesting challenge is the sound track - no money for a Boom Operator or Mixer.Before launching into the specifics of the particular challenge to be addressed in this article I need to say a few general things about audio as it relates to video production. Audio is something that beginners have real problems with. So many record bad audio and then ask how to fix it in post. As you may not realize, most poorly recorded audio can not be really fixed and it takes Sound Engineers with SoundForge, ProTools and the like to be able to salvage it. Therefore I want to begin with some (but far from all) of the basic audio stuff that every Videographer needs to know.
Except for "home movies" and scratch track (audio recorded only for reference purposes) never, never, use the built in microphone on your consumer or "prosumer" camera!!!!! There are several reasons for this. The mic will usually be too far away from the subject (The closer it is, the cleaner the sound.), the built in mic will pick up the noise or at least the vibration of the camera motor, every time you touch the camera to focus, zoom or correct exposure you'll hear it on the track - to name a few. If you are doing work for hire (sometimes referred to as "professional") make sure you use a camera that has both a jack for an external mic and a headphone jack. There are several types and subtypes of external mic. A very general list would include omnidirectional, directional, unidirectional (aka shotgun), hand held, lavalier etc. There is lots of info available on mics at your local A/V store and on the Internet. Do some research if you need to learn more. Most types of mic are available in either wired or wireless (radio) models. By the way, I recently learned that lots of people think that "lavalier" is synonymous with "wireless". It is not. Lavalier mics come both wired and wireless. The term comes from "lavaliere: n: a jeweled pendant worn on a chain around the neck". So, in our field, lavalier only means a mic that is worn by the subject.
THE (SPECIFIC) CHALLENGE
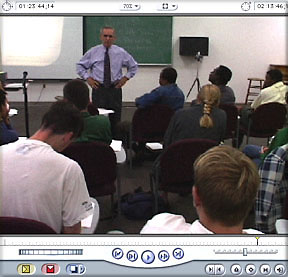
I have several clients who lead seminars. Fine, no problem. Hang a wireless lavalier mic on their shirt, turn on the auto audio level control and roll tape. But wait! What do you do when someone in the crowd asks a question and then enters into a discussion with the speaker? Subtitles? This is an issue I've struggled with more than thrice. The fact is, working alone, there is no perfect answer. I have noticed that this is the case with most of life's problems so you just have to find the most workable solution.
In order to handle this situation you need the capability of recording two discrete audio tracks on separate channels. When captured in FCP the levels can be adjusted to use either channel 1 or channel 2 and create a mix of both when called for. If you want to do this but have a camera with only a stereo mini plug input for one external mic you'll need a BeachTek adapter. You can get one from B&H for between $150 and $170, depending on your camera. Here's what it looks like.
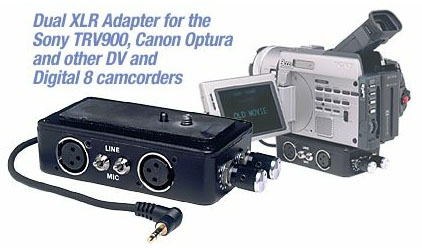
As you can probably tell from the picture, you screw this gizmo onto the bottom of your camera. The bottom of it, which you can't see, will accept the 1/4" lockdown screw from your tripod. The BeachTek's stereo mini plug goes into your camera's mic jack and presto, changeo, instead of one mic you can now use two. The BeachTek adapter allows you to use XLR-cabled mics which, because they are shielded and balanced (grounded), have superior noise rejection ability. Pretty cool!
Every camera model has a different setup for recording sound. You'll need to look in your manual (and the BeachTek manual if you use the adapter) to find out how your particular camera does it. I repeat: the thing that will make this technique work is the ability to record two separate, discrete audio tracks. Any camera with a mic input should work because with the BeachTek you can get two discrete tracks.
NOTE: If you use the BeachTek adapter - which has two knobs and several toggle switches and a manual that explains their uses and functions - set the switch in the front to "Stereo". If you set it to "Mono" both mic feeds will go to both tracks and you'll be stuck with the mix you recorded when you shot the job. I tried it out a couple of minutes before writing this paragraph. Using my old, but still serviceable, Panasonic EZ1 I hooked up two mics to the BeachTek and recorded in every configuration available and that's the only one that works for the purpose of the technique. (I'll get to the FCP capture clip settings in a minute.)
If your camera takes separate mic inputs (like my Sony PD150 or the newer Canon XL1 and other high-end DV cameras) refer to the manual and experiment - try all the different settings to be sure what works. Once you have it figured out preset those parameters before you go out to shoot a job so you don't have to worry about that when you're setting up. (When you get to the job check to be sure none of the switches got moved in transit.)
The method I'm going to discuss here will work in any situation where you need a primary and a secondary audio pickup; a live show with a performer on one mic (or an audio feed from the house board) and you also want audience reactions, a lecture or seminar where audience members interact with the speaker, an interview where the two participants are too far apart to be cleanly picked up from a single mic - you get the idea. We'll assume for sake of this explanation that we're dealing with the second scenario though the principles apply to them all.
CAMERA/MIC PLACEMENT AND OTHER PRE-SHOOT CONSIDERATIONS
The first question confronting you when you arrive at the location is: Where do I put my camera? Given the physical limitations of the room and fire laws that apply, in the lecture/seminar scenario, your first consideration is the best shot of the Speaker and second is the audience. That's why one side or the other is generally preferable to the back of the room. Next comes mic placement. If the Speaker is using a house mic and sound system, a line feed from that system is best. If for whatever reason that won't work a wireless lavalier is ideal. You can use a mic on a stand if she or he is going to stay put but if motion is the style then a wireless lavalier is my first choice for a mic. A wired lav can also work but a tangled cable on a peripatetic speaker can put you out of business in a hurry. So talk with your subject and find out whether they're likely to go in among the audience and if they are, do not choose the wired lav.
A note about wireless mics: You can spend from $90 to $900+ on one. I have had excellent results shooting both interiors and exteriors with the Azden WLX-PRO Camera Mountable VHF Wireless Lavalier System which only costs around $150. Be sure that whatever kind you get either has or can be adapted to an XLR input plug. Be sure to read the manual and follow its instructions. That's how I learned so you can, too.
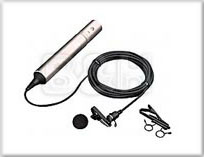
Sony wired Lavalier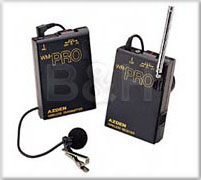
Azden wireless LavalierRegardless of what kind of microphones you use you really ought to do a sound check before the shoot. Mic up your speaker and enroll a volunteer to act as an audience questioner, put on your headphones and get them both to talk. If you can't do that, and in the real world this is sometimes the case, you will have hooked up everything and checked it out before going to the shoot (Won't you?) so you'll keep your surprises to a minimum. If you're using a line feed from the house system a sound check is mandatory! Since you're going to be able to control the levels in FCP, set both record/input levels - the two knobs in the back on the BeachTek - to around "8". Many, maybe most, wireless systems' receivers mount on the "shoe" on top of the camera. Since you're going to have your #2 mic mounted there bring along some gaffer or camera tape so you can attach the receiver to your tripod.
Mic #2 needs to be (uni)directional and, as I just said, mounted on the camera with a mounting bracket that has good sound insulation. With consumer and even "prosumer" cameras that have mini-plug mic inputs forget about the built in mic not only for the reasons I cited above but when you plug into the mic input jack (with your new BeachTek adapter) you cut off the built in mic. Radio Shack sells some cheap shotgun type mics that work quite well for this kind of job. Naturally, if you can afford it, a real pro mic will be better but they can be pricey. (Low Cost Shotgun Microphone Comparison) The mic that comes with the PD 150 (and other high end DV cameras) plugs into one of the two XLR jacks and is sufficiently "shotgunesque" to work fine in this type of setup. The reason this works is that when an audience member is called upon to ask a question or make a comment you're gonna whip around and point your lens at them and that means the shotgun type mic on the camera will be pointing at them, too.
While you're shooting, resist the temptation to ride the gain (adjust audio levels) on either or both audio inputs. If you are going to edit with FCP (or, God forbid, some other NLE system) you can make all the adjustments in the quiet calm of your editing site rather than in the "heat of battle". Not only that, you have enough to do staying in focus and properly exposed when shooting a live event. You're much better off using the camera's automatic audio level control (ALC) while shooting. The Panasonic EZ1 and all the Sony and Canon cameras I've used have excellent ALC. With this style of audio recording you really can "fix it in post" - at least the volume levels. (NOTE: If you're shooting a musical show you may be better off presetting an optimum audio level instead of using ALC but you have to be there for a sound check to do that. Trying to set it on the fly is difficult and dangerous.) Even though you're not going to be tweaking the levels while you're shooting, wear your headphones anyhow. They will let you know if a problem crops up during shooting; a cable comes unplugged, a hum develops, a battery in a wireless unit dies (Always start a shoot with fresh batteries!!!!!) - and I just find it reassuring to know sound is actually going on to the tape.
GETTING DISCRETE TRACKS INTO FINALCUTPRO AND WHAT TO DO ONCE THEY'RE THERE
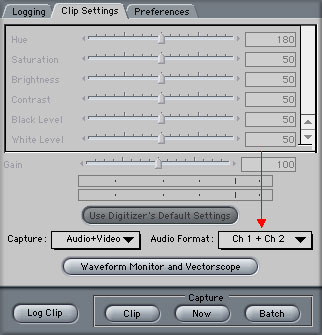
Very important! Your FCP capture clip settings for audio MUST be Ch 1 + Ch 2. Any other capture setting will render everything I've said so far about separate, discrete tracks useless. Once the clips are all in their bins and you start to cut it together the way to make it work becomes obvious.
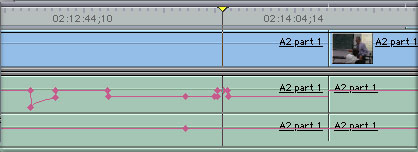
On the time line the two audio tracks now carry different information. One of the tracks is your primary (Lecturer) mic or line input and the other is your secondary (Audience) mic. It's not hard to figure out which is which. Turn off "Linked Selection" in your prefs, select a track and, using the Pen Tool, drop out the level. Play a bit of the timeline and you'll know immediately which mic you have adjusted.
After you've identified which input is on which track the rest is easy. Using the Pen Tool and Key Frames you can control - isolate or mix - your two tracks as needed. Find the optimum level in your #1 mic source material and adjust +db or -db to it.
One more bit of advice: Once you're finished, pour yourself a refreshing beverage, put on your headphones, sit down and play the whole thing back paying close attention to the overall sound level. It's really a good idea to close your eyes when you do this. The lack of visual input focuses your attention on the sound so aberrations will be more noticeable. I have learned that (especially with a long piece) when you start tweaking sound levels and mixing tracks it's really easy to end up with some sections that are too loud and some that are too soft as well as some unbalanced mixes. In fact, if you have time, wait a day (or at least a couple of hours) and listen to it again.
A practical note based on my ten years of personal experience as an editor: It is always best to listen straight through the entire audio no matter how long it is. Any good audio mixer or experienced editor will tell you this. However in the real, day to day world that is, for various reasons, not always possible. When this is the case you can at least move through the project from cut to cut, back up a few seconds at each edit point and play through the cuts so you notice any abrupt differentials in the level.
A lot of visually oriented editors tend to forget the importance of good sound. Sight and hearing are linked in the brain and what you hear has a profound influence on what you see. So don't forget to listen!