
How To March 7, 2001
How To March 7, 2001
Porting between Final Cut Pro and Adobe After Effects
When Apple released v. 1.2.5, it finally resolved the clamping and 16x9 issues among others that had been plaguing our beloved little editor for months. Thank goodness for that, but what about those who wish to go a little beyond what FCP's compositing tools will give them?
Advanced motion graphics requires dedicated tools, and for many, the tool of choice is Adobe After Effects. For many motion graphics pro's, a non-linear editor's biggest selling point can be determined by two things; image quality and integration with After Effects. We are concerned in this article with both issues as they relate specifically to Apple's Final Cut Pro and Adobe After Effects, both going to and coming from each.
Please understand one thing, dear reader. This article is not a substitute for either of the two major pre-requisites for mastering After Effects. They are: 1) Work your way through After Effects Classroom in a Book, best 40 bucks you'll ever spend, and 2) spend every waking hour trying to do something you've never done before. See it on TV, try on your system. You'll be surprised how quickly you learn to see motion graphics for what it is (animation and sleight of hand) and how surprisingly easy it is to control every aspect of the visual plane of Film/Video.
I'm not covering using After Effects in this little article, so go get the Classroom in a Book if you're looking for that. I'm also sadly not covering the larger range of non-linear editors on the market today. With very few exceptions, I will only be referring to media generated by FCP as QuickTime Movies or FCP Movies as originated from Firewire-captured media. While the process with other media does not differ greatly, the technical considerations often do and those will be beyond the scope of this article. I want to address the Final Cut Pro user out there who is working with FW, a consumer/prosumer camera, Adobe PhotoShop and After Effects and who has out-grown the compositing and titling possibilities of FCP. This is for you, DV Guerillas.
"The mission, should you choose to excerpt it...
Our job here is to somehow quickly get media we've captured in FCP to AE loss-lessly, work with it there, then get it back to FCP in one piece with a minimum of artifacting. This is easier than it sounds as long as you keep your eye on the ball every step of the way. One of the latest and greatest presents that Apple could have given us (besides the end of luma clamping) is the Reference Movie. It isn't really new technology at all. The capability to generate them has been there in QT for a long time (Media 100 for instance has had this feature for years). And now finally, FCP'ers have it.
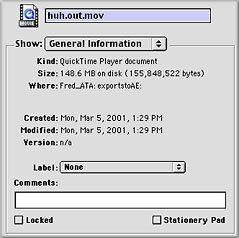
Why is it useful? For PRECISELY the work we have before us; getting media quickly and losslessly back and forth from FCP and AE. In pre-1.2.5 FCP, exporting media from FCP required generating a big file to disk, importing that file into AE, rendering another big file to disk and then importing to FCP again.
If you used the Animation codec on these generated files, as many folks did, the subsequent render necessary when the media was brought back to FCP produced yet another file (or group of files) taking up even more drive space. You could easily end up with four different files for the same piece of media before you were done. I don't know about you, but there are two things I don't have. 1) unlimited drive space and 2) time wasted watching FCP slowly generate a video file which already exists on my Capture drive. And guess what? After 13 months of waiting, Apple gave us the key to getting around that problem. Here's how it works.
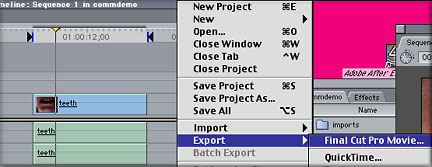
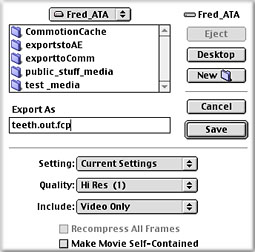
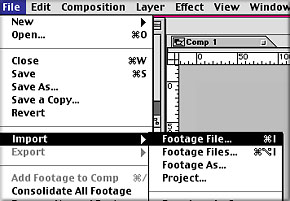
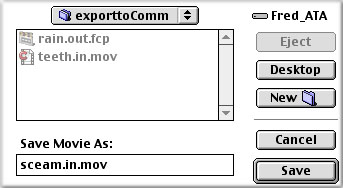
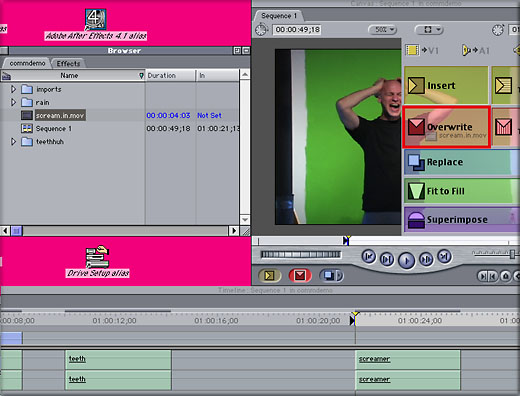
After selecting the clip or sequence you want to work with in AE (setting in-and-out points as necessary), hit File>Export>FCP Movie. In the dialog box that follows, you need to make a couple of selections. First, navigate to where you want to store your Ref Movie. Give it a specific name (my favorite convention is XXXXX.out.fcp, where XXXXX is relevant info, out implies that it was exported out of FCP and .fcp implies, duh, FCP-movie.) Select Quality 'Hi Res', Include 'Video Only' (I'll explain in a moment) and make sure that 'Make Movie Self-Contained' is unchecked. Its that simple.
Charles Roberts
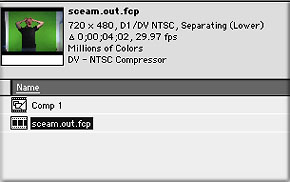
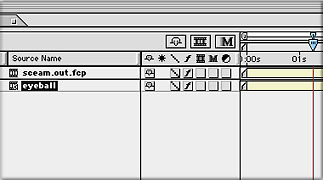
What is created is what amounts to an FCP clip that can function outside of FCP. All other applications view this clip as a QT Movie, but in reality, it is simply an index, a pointer back to the various FCP captured and rendered media files that the FCP project utilized to make it. IOW, a clip, like any other FCP clip. The bonus is of course that as long as it is video only, the clip takes up nearly zero disk space and is instantly created. That's to be compared to render dialog boxes and gig after gig of extra movie files. Beginning to see the perks?
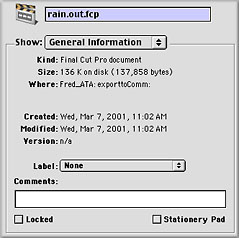
"FCP Ref Movie size" |
|
(whispered side note- You should select Video Only here because of a restriction in the Reference Movie capability. If Video and Audio are exported together as an FCP Movie, the Audio MUST be mixed down and accompany the indexed video clip. IOW, if you choose Video Only, the export is instantaneous, but if you choose Both, you will get a render bar and a subsequently larger file size as real uncompressed audio data is included. To be fair, the render is exceedingly fast, the resultant file size is really quite small by video standards and if audio sync is a real issue for you, it may be worth it to include the audio anyway, render be damned. Also, here's an export/import hint. If you export using in-and-out points, make sure you save your project after setting them. When your AE render is complete and you're ready to replace the original clip in the sequence, you can simply drop it on the in point instead of flubbing around trying to find the first frame. Anything to save time...)
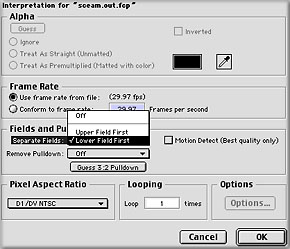
OK, so you've got a Reference Movie now and you're ready to tackle it in After Effects. Go ahead and crank up AE. Import your Reference Movie as if it were normal media, making sure to Interpret Footage correctly (always lower field dominant for FW DV).If you are using AE 4.1, you will notice that with FCP Movies, the fields are separated automatically, but with 4.0 or before, you must manually set this. Now work to your heart's content.
|
|
|
4.0 does not" |
As a final note to this section, I highly suggest getting the back issue of DV Magazine April 2000. The article by Groovy Graphic Overlord Chris Meyer on Luminance Ranges and the way DV systems handle them should be considered absolutely must-read. The web-site version will not do, you need this on paper to read about sixty times. It can be confusing, even for a pro. You think you understand it but you do not. Trust me.
All Dressed up and ready to Render
OK, after you've finished your noodling in After Effects and you're ready to send it back to FCP, you need to do a couple of things. First, you need to determine which codec you want to use for rendering. There are two main choices here, the QuickTime Animation codec and the Apple DV Codec. Which should you use?
The default codec for After Effects is Animation, but that might not be appropriate. The rule of thumb is this. If you need to carry an Alpha Channel, or transparency information, back to FCP with the QT movie, then you need to use the Animation codec. The Animation codec is a lossless codec, so the file you generate using it will be enormous. In addition to this, once you get the file back into FCP, you will have to render it again on the timeline. Since your FCP sequence is set for the DV codec, you will be forced to render any Animation codec material that you put back there. This is a way to quickly run out of drive space if you are using AE a lot.
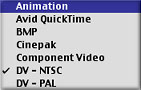
If you do not need transparency information, you should render using the Apple DV codec. In one render, you will complete the AE composite and compress it with the codec that you are using back in FCP. This is the most efficient way to work. Using the FCP reference movie feature and rendering with the Apple DV codec, you will not generate any extra material nor waste any time rendering.
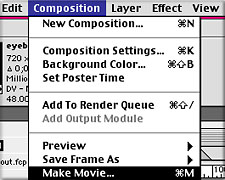
How to do this? Select the final composition you wish to render and put your work area points in. Don't forget that the first frame of the rendered movie needs to line up with the in point on the sequence you exported from, so be careful to get the in point of the work area set at the first frame of your movie layer in the composition. After setting the work area, hit Composition>Make Movie, saving it to a media drive (because this time we are really generating a media file, not a Reference Movie). Proceed to the Render Queue, where you will contour the render exactly for FCP happiness.
|
|
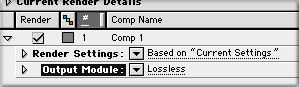
First click on the Render Settings. Set the Field Render for Lower Field First (FW DV media is always Lower), then OK.
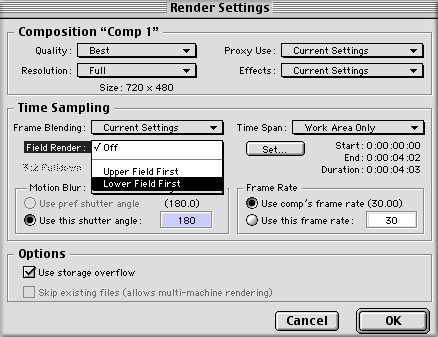
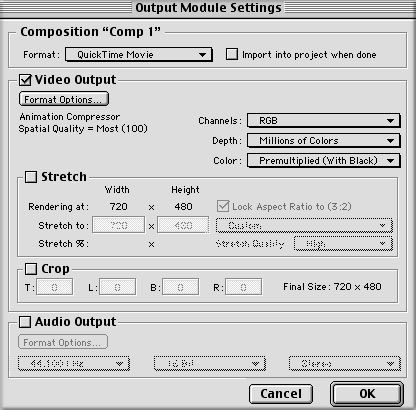
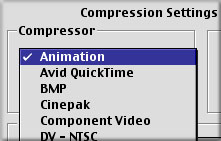
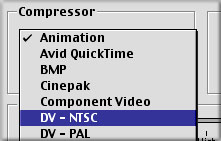
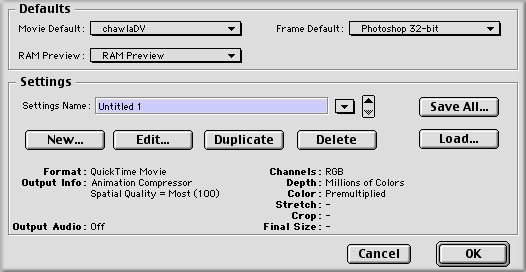
Next, click on Output Module. This setting is more critical. Click on the Video Output: format options button and in the compressor dialog box that follows, select either the Animation or Apple DV codec and set for 100%. Hit OK.
|
|
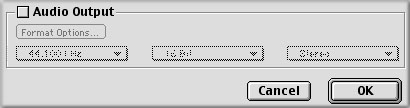
Finally, look to the bottom of the box and unclick Audio output. Remember that even if you brought audio in to sync with, there's no need to include it with the returning video because the original audio is still sitting and waiting on the sequence timeline. If you screwed up and you need to carry the audio back for syncing purposes, make absolutely sure that you set the sample rate correctly (AE output module defaults to 44.1kHz, while most audio exported from FCP will likely be 32kHz or 48kHz. That's enough difference to hurt you on return to the sequence).
Hit OK and render and then you're off. Go take a nap...
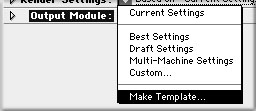
(another whispered side note- here's two more tips. You will likely repeat this render process thousands of times. Set up templates for these render and output settings, and select them as the default ones. Then you can skip the clicking and selecting for the next thirty years. Also, always cover the composition window with the Render Queue box when rendering. This actually speeds up the render slightly because AE doesn't physically have to refresh the screen for every frame it finishes rendering a frame. This can make quite a difference on twenty minutes of footage.)
OK, now you're ready to go back to FCP. Start up your FCP project and open the sequence that your render is to be inserted into. Drag the freshly rendered file into the Browser. Now overwrite edit it into the sequence at your in point and play it back. Remember that if you get a red render line here, it means that either you chose Animation or some other codec to render with, or you got your settings incorrect somewhere. Settings are everything.
In Conclusion
The choice of a codec is an important one. Until very recently, it was generally agreed that the Apple DV codec gave sub-standard rendering results. DV compression artifacting was incredibly destructive to high contrast images, particularly text. Two developments have recently caused us to take a second look at the Apple DV codec.
First, the release of the QuickTime 5 beta codec has been shown to give much higher quality rendering as well as enormous speed increases (the impending release of the full version promises to offer the same results). For those who shy away from beta versions, the 9.1 updater for Mac OS 9 offers another way out. The 9.1 updater installs an updater extension for the Quicktime 4.1.2 DV codec that delivers improved rendering quality and speed. Either way, you should get better rendering results than previously possible.
Remember that you cannot use Animation in your FCP project after rendering in After Effects. You need to take advantage of the low DV data rates, so you will have to render using the DV codec in AE or render it in FCP after importing there. Have fun˙
Charles Roberts (AKA Chawla) teaches Digital Video and Audio Production at Fitchburg State College in Fitchburg, MA. He uses his long tedious rendering times to generate content and tackle hard hitting issues on the discussion boards of 2 Pop (www.2-pop.com). His house seems to shrink with every passing day...
copyright © Charles Roberts 2001
All screen captures, images, and textual references are the property and trademark of their creators/owners/publishers.