
May 28, 2007
By Andrew Balis at Moviola Education
Getting up and running as quickly as possible with the right settings is probably at the top of your list when jumping into Final Cut Pro 6. Here we'll cover as briefly as possible the steps needed to get going in the first couple sections. We'll also assume that you haven't mastered these settings in any previous versions of FCP, but it's still a good quick-start for new and existing users alike. Afterwards, we'll dig into more specific settings and options that you may find helpful depending on your particular needs.
Workflow
For all users- when we work in FCP- we want certain things to be consistent throughout the project for a proper workflow. Among other things, this will avoid potential mismatch of various settings that can affect the final quality and even things like audio/video sync:
- source- determine source settings (particular info from the videotape recording)
- capture- choose settings for capturing video into the computer that match those of the source
- sequence- create sequences for video that match how it was captured
- output- for the best quality (or similar quality), output to the same format as your sequence
By the way, we're just looking at a basic workflow for capturing material at its current full quality, and outputting at the same quality. For simplicity, we're not covering offline/online workflows in this article where you capture at one resolution and then later re-conform at higher resolution settings.
A Quick Start
Final Cut does not create project specific settings, instead it generates global audio/video settings that remain consistent no matter what type of project is open. Therefore, when opening an existing project, or starting out with a new one, make sure you reset the settings appropriate for the video format that you're working with.
Here's a quick rundown of the steps-
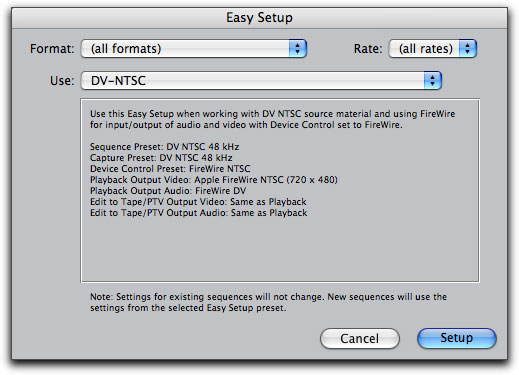
1. Choose an Easy Setup.
This sets up all the audio/video settings needed for capturing and outputting video and creating new sequences to edit in. Go to the Final Cut menu and choose Easy Setup (if you're launching FCP 6 for the first time- you'll get a similar settings window as FCP launches and you can choose your settings there). Look for, and choose a format that matches the video format you're working with. An Easy Setup sets three things:2. Modify Audio/Video Settings as needed.
- Capture Preset- ensures you capture video with the right settings.
- Sequence Preset- every time you choose File > New > Sequence, FCP will generate a sequence using this preset, which by default will match your capture preset. This is a good thing.
- Output- An Easy Setup also sets up correct video/audio output options for the video format you're working with.
This step may not be needed. If the Easy Setup you choose matches your video format exactly, you can skip this step. There are a number of Easy Setups, but there just aren't every possible combination of Easy Setups that may match your specific needs. There is another settings window where you customize the settings to match your video format more closely. We'll look at making possible changes here in the section Inspecting/Changing Audio/Video Settings below.3. Start working- create a new project (if necessary), start capturing, editing into sequences and outputting.
In previous versions of FCP, we may have still had one major mismatch that we would have had to address before moving on- the current empty sequence in our new project may not have the same settings as our Easy Setup and may not match the video format you're about to work with. Its very easy now in FCP 6- even if the sequence has the wrong settings- FCP can change the settings automatically to match the video you're working with- just drop the first clip into the empty sequence and FCP will change the sequence to match. We'll cover this feature below in New Sequence Options.
Native Editing Formats Supported In FCP 6
Before we explore the new Easy Setup window, let's understand just what type of video formats are listed in the Easy Setup window. All the Easy Setup presets that ship with FCP are "native formats". In other words, they all connect to the computer via a single FireWire cable and there are similar settings in FCP that matches the particulars of the video format being captured. Native editing is easy as it allows you to capture material without any quality loss, no additional hardware, and we work at the bit rates (speed) of the video format, which would only require much lower bandwidth (video storage needs) than if the video was captured uncompressed through a capture card (for instance).
These native formats in FCP 6 include:
SD:
DV 25- which encompasses MiniDV, DVCAM and DVCPRO (25)HD:
DVCPRO 50 (Panasonic)
MPEG IMX (Sony)
DVCPRO HD (Panasonic)*Note: We'll start by just exploring the settings that ship with FCP- these settings are for "native" formats. Later in the article we'll address how to capture non-native formats, like Digital BETACAM, HDCAM and others.
HDV (compatible with Sony, Canon and JVC formats)
XDCAM HD (Sony)
The New Easy Setup Window
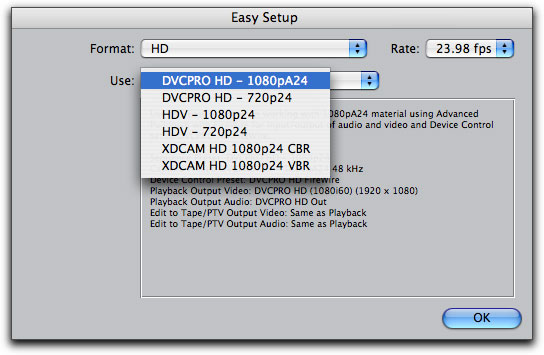
One of the nicer enhancements to FCP 6- a simplified way to choose Easy Setups. If you open the Easy Setup window, you can see it has three menus.
If we temporarily skip "Format" and "Rate"- and just open the drop down menu labeled "Use", then we'd be faced with way too many options to easily choose the format we want, which is similar to how things looked in previous versions of FCP.
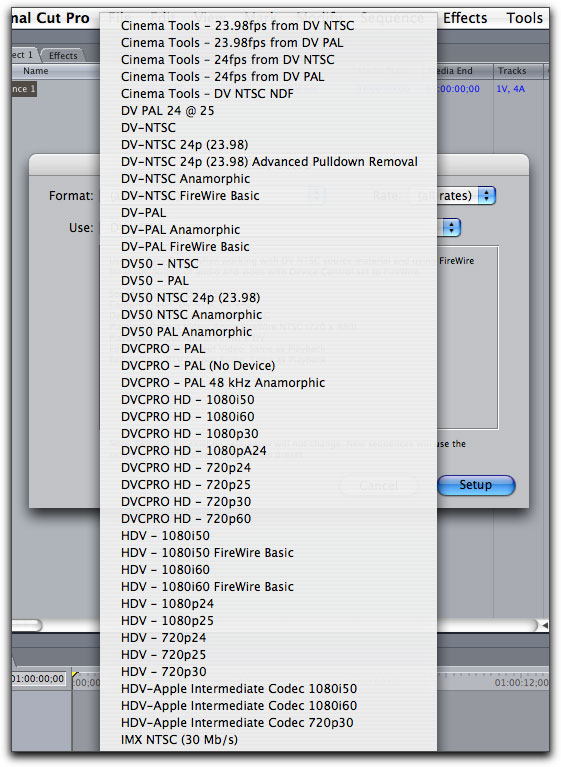
And the previous picture only shows part of the list, which stretches all the way up and down the screen. Instead, if we use the top two menus in this window first- we can definitely simplify the selection process as it will limit then what shows up in the Use menu.
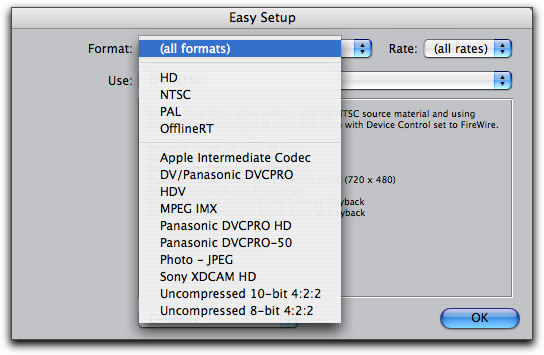
1. Choose a Format. From this drop down menu- choose between the options here to limit the Easy Setup choices. You can choose between things like HD or NTSC but you can also choose based on specific native formats supported by FCP like DV or DVCPRO HD.
2. Then, from Rate, choose the frame rate of your video format.
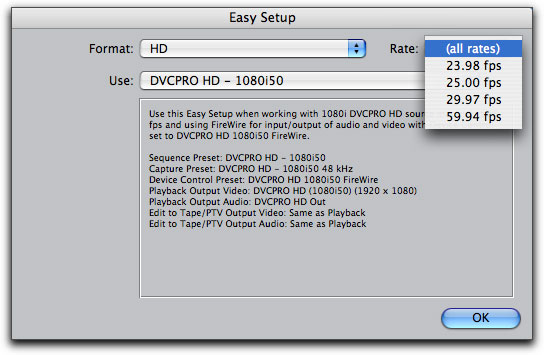
3. Finally, click into the Use menu and choose your specific format.
As you can see, there are now much fewer choices- and probably less chance that you'll choose the wrong setup by mistake.
4. Click Setup to choose these settings. You're now ready to start working.
Frame Rate Confusion
Choosing frame rates in this new mixed world of NTSC, PAL and the huge variations of HD formats has opened up a can of worms for a large percentage of users where previously only a few people had to master a knowledge of these topics. This seems less straightforward than you might hope at first, but once you know FCP's shorthand, it becomes pretty easy. Notice that in the next screen shot- Rates is set to 23.98. After, in the drop down menu, the choices have been pared down to a select few.
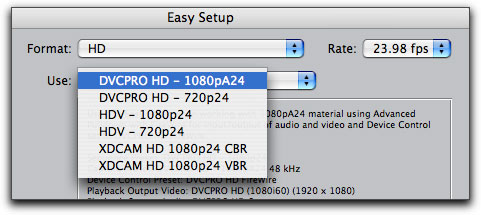
But here's where the confusion might set in. Notice the choices all read like this example: DVCPRO HD 720p24. 24 is indicating the frame rate- or is it? We chose 23.98- yet this setting says 24.
In fact, all of our choices are restricted to 23.98, 25, 29.97 and 59.94. But why? What if we shoot 24p? It doesn't seem like this is an available option. Actually, this is FCP's shorthand for 23.98. Although 24p could stand for 24 fps or 23.98 fps, FCP is only giving you an option for one of these variations- the one at 23.98 (although it still labels the specific Easy Setup choices simply as 24p).
Here's why- and not to be overlooked- when we shoot 24p in NTSC countries, we will usually be choosing 23.98, not straight 24. This gets to the heart of why FCP only lists a few specific frame rates. Whenever you capture a "native" format, FCP only supports native formats that are compatible with NTSC and PAL. For NTSC, which is 29.97 fps, there are only a few frame rates that can be used to be able to simply down-convert HD material for playback in the NTSC world (our current TV standard). The three native frame rate that are easily down-converted for NTSC are:
23.98FCP will always label these formats using a shorthand commonly used in the industry:
29.97
59.94
FCP Setting Actual Frame Rate24 23.98
30 29.97
60 59.94
By the way, this is generally a good thing. If your camera only lists 24p (and doesn't seem more explicit), then you can be relatively sure that the camera is set specifically to 23.98. Or if a setting is 30p, you can assume this defines the specific rate of 29.97. This ensures easy down-converting from a HD format to an NTSC format for standard definition delivery as well as HD delivery. And all US networks broadcast HD using these fractional frame rates- like 29.97- but never 30. As long as you shoot a fractional rate like the three rates listed above, you're fine for HD and SD delivery.
*Note: Any frame rate listed as 25 is actually 25. This is for PAL countries where the frame rate is exactly 25 fps.
Interlace Frame Rates In HD
By the way, when you choose 29.97 from the drop down, you'll see HD formats listed as 60- like in this example: DVCPRO HD 1080i60.
Whenever you see a large number like 60 with any interlaced format, they are referring to the field rate, not the frame rate. Since there are two fields for every interlaced frame (whether HD or SD), then 60 refers to 30 frames. And since FCP is rounding off with this shorthand- it really refers to 29.97 frames per second. To summarize- when you see a format like 1080i60- you can generally assume this refers to 29.97 fps (and not 30 fps).
Again, for PAL countries, the frame rate is exactly 25, even in HD. Therefore, you'll see an expression like 1080i50. 50 is the field rate- which is double the frame rate. In other words, it indicates 25 fps.
New Sequence Options
My favorite new feature is the option to auto-change a sequence to match the first clip dropped into it. I've already used it several times and it really does save time and energy. I know- it's a simple feature- but its cool. This is how it works:
If you drop a clip in a new sequence, yet the sequence has different settings from the clip, FCP will prompt you with the following dialogue:
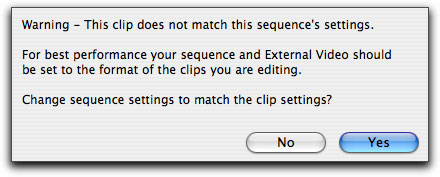
If you choose Yes, then the sequence auto-conforms to match the clip. The sequence presets for newly generated sequences does not update- but to some extent- who cares- as long as it generates a sequence that matches the clip- we're good to go. I probably shouldn't be that glib- your sequence presets do affect how Photoshop graphics import, as well as how other things import- like batch lists of clips. But for just getting a clip into a sequence that matches- this works like a charm.
You do have a preference for whether FCP asks whether to auto-conform. If you go to the Final Cut menu > User Preferences, then click on the Editing tab, you have three options for "Auto conform sequence": Ask, Always or Never
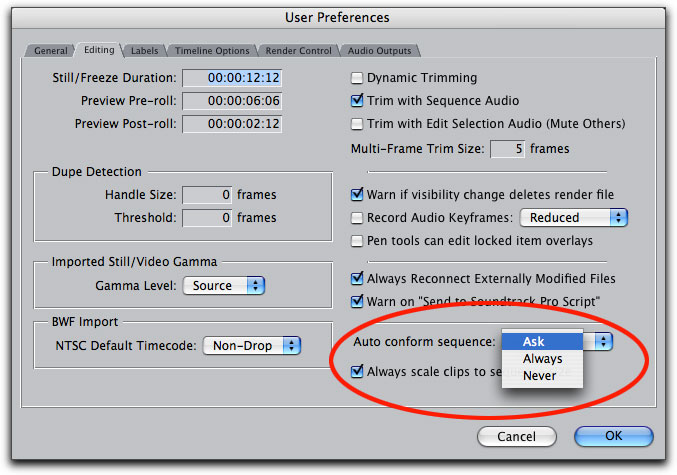
I personally suggest leaving the default at "Ask" as we don't always want the sequence to be changed- as well as it is a good warning that our sequence presets are not set correctly and we may want to reset them for the rest of the project. This default also allows us to easily mix and match different formats in the same Timeline if we need, called a Mixed Format Timeline.
Mixed Format Editing
Sometimes you will need to mix formats, like HD and SD in the same sequence. Therefore, when you go to drop a clip into the Timeline, when the dialog pops up, choose No to leave the sequence at its current settings, and incorporate this new clip that doesn't match the sequence. In many cases, mixing formats will produce very good quality results.
If you are planning on mixing formats, when you go to drop a first clip into a sequence that is set up for a different format, and FCP brings up the dialog asking whether you want to change the sequence settings (as we saw before), choose No. When the clip is placed in the Timeline, depending on the type of video you are adding, FCP will modify the clip's aspect ratio, field dominance (which field of video is displayed first) and other settings like Scale for mixing this footage together in this sequence. You can always change the scaling or other properties manually if needed after the clip is added to the sequence. For example when you place a 16x9 HD clip into a 4x3 SD sequence, FCP will letterbox the 16x9 clip. If you need the 16x9 clip to be full frame in the 4x3 sequence, you can open the clip into the Viewer and change the Scale and/or Center setting on the Motion tab as needed.
Although FCP will also allow you to mix frame rates, which I haven't tested yet, documentation suggests that this is one thing you may not want to do for the best possible quality. For mixing frame rates, you will most likely get better results pre-conforming these clips first using Compressor to change the frame rates. Be aware that if you do mix frame rates in one sequence you may get unexpected/incorrect results in an EDL generated from that sequence.
More Detail On Settings
Let's look at the windows where we can alter various settings from their defaults if needed.
Inspecting/Changing Audio/Video Settings
Although there seems to be an overwhelming amount of Easy Setups, because there are so many format variations, the pre-installed Easy Setups can't account for everything. In some cases, we'll need to modify these settings from their defaults- this is very important that you do this before you start capturing any new video.
1. Choose an Easy Setup that's as close as possible to your source footage.
2. Next, inspect the Audio/Video Settings to see if you need to alter anything that doesn't match your footage. Go to the Final Cut menu > Audio/Video Settings. These settings will by default match your Easy Setup, as they are generated from the Easy Setup.
So use the Easy Setup window to get as close as possible to your video and audio source tapes. But there may be some variations that we'll need to change afterwards, specifically:
- Audio sample rate: all FCP Easy Setups use presets for audio at 48kHz. If you shoot/record audio at 32kHz and use a stock Easy Setup which will capture at 48kHz, then your captured audio will drift out of sync over time. If this happens you'll need to recapture the video/audio at the correct sample rate.
- Aspect ratio for standard definition (SD) video: 4x3 or 16x9. 16x9 in SD will be referred to as "anamorphic". Although some Easy Setups give you both options, not all of them do. By the way, we'll never have to change aspect ratio for any HD video- which is all displayed in 16x9 by default. This is only an issue for SD video.
- Device Control. This is how we communicate with the video deck/camera from within FCP. If not set correctly, you will not have correct control/communication for capturing and outputting your video.
If the settings you need to change are outside the scope of the three things just mentioned- stop, and reset an Easy Setup that more closely matches your format. For example, if you feel you need to edit frame rate in the Audio/Video Settings, this is the wrong place. Do this from the Easy Setup menu.
To modify these settings, in the Audio/Video Settings window, note that the first page that opens is a Summary page, listing all the defaults from your current Easy Setup.
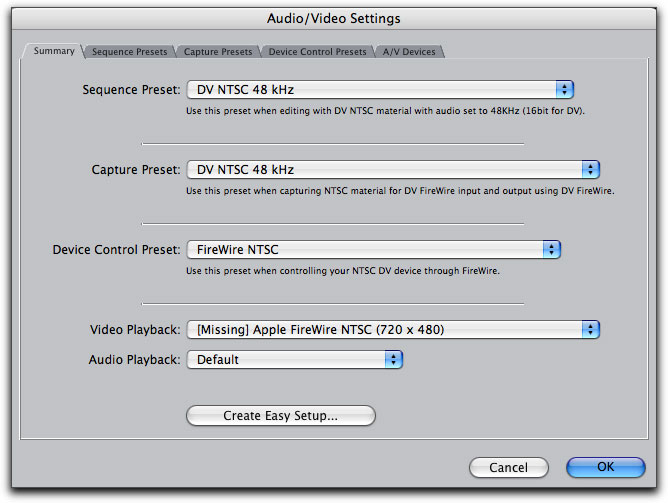
At the top of the window you'll see tabs that relate to the specific capture, sequence and output settings (labeled A/V Devices).
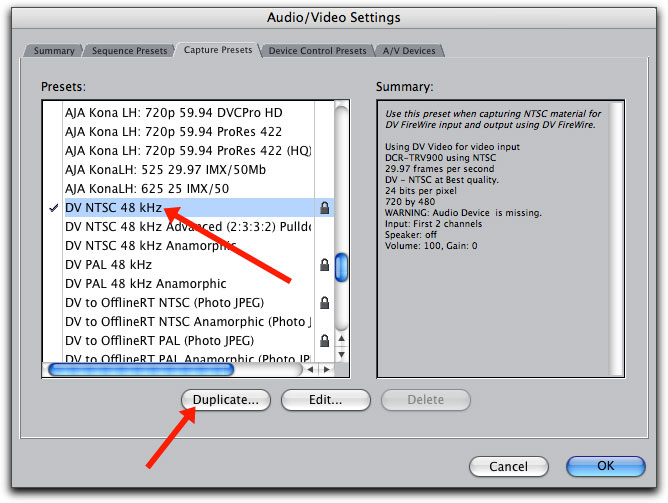
I'll click on the Capture Presets tab in this window to show you how and where we change settings from the defaults. This is the same as in previous versions of FCP. So if you've done this before, you can easily skip this section.
In the Capture Presets, we would scroll down to find the specific preset that has a checkmark next it, which is the current settings. Highlight the preset and click the Duplicate button. This is a good practice whether you are just inspecting presets or altering them and creating new ones. This way you don't accidentally alter settings that are pre-installed on your computer and would need to be re-installed if they need to be reset (in this case I happen to be clicking on a locked preset, but most presets are not locked, so clicking Duplicate is just a good habit to get into).
In the Capture Preset window, notice that two of the options we might need to alter are listed along the right side. The setting labeled Anamorphic 16x9 is what you would choose if you shot 16x9 video on a standard def format (again, for HD we leave this setting alone- anamorphic here is specifically for SD video).
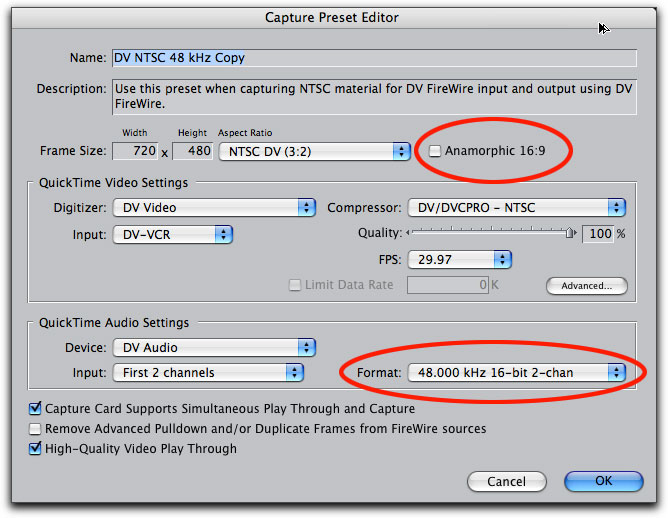
Also, here is where you choose the audio sample rate, which as we mentioned earlier, if not set correctly, will cause audio to drift out of sync over time.

You have a few choices here, but if you're working in DV, you may not find the same options available on your camera. Instead, you may just have choices for 12 bit and 16 bit. Its unfortunate that cameras list settings like this as its like comparing apples to oranges, as there are both bit settings and sample rate. Consumer/prosumer DV cameras often use bit settings to refer to sample rate. Use the chart below to see what you should properly choose in FCP.
Camera Settings Choose These Settings In FCP
12 bit 32kHz
16 bit 48kHz
Once you're done making changes, rename the preset and click OK which will create a new Capture Preset (and by default, it will be checked and become the current preset). Do the same for your Sequence Preset to match the Capture Preset that you created.
*Note: Panasonic formats, DV and DVCPRO HD allow the possibility of different frame rates, but the way the video is being recorded to tape can be a little confusing for the average user. For this reason, when working with any DVCPRO HD, choose an Easy Setup with a frame rate appropriate to what you shot, and then just walk away from the settings windows. Definitely don't worry about frame rate settings that look like they change from one settings window to another (for example it may read 59.94 fps in the capture presets but then reads 23.98 fps in the sequence presets). This is correct for these formats. You can read more about the way Panasonic records to tape (or P2 cards) from the Help menu inside Final Cut > and choose the option HD and Broadcast Formats. It's a good read for those that want to know more about what's really going on.
Device Control
Another important setting is Device Control which controls how you communicate with the camera/deck. We'll keep this brief, and just look at FireWire presets, but if you're capturing from a capture card, you would choose one of the serial control option here (RS-422 or RS-232). Clicking into the Device Control preset tab, then highlighting the current preset and clicking the Duplicate button launches the Device Control preset editor. Note the options for the menu labeled "Protocol". This is the communication method.
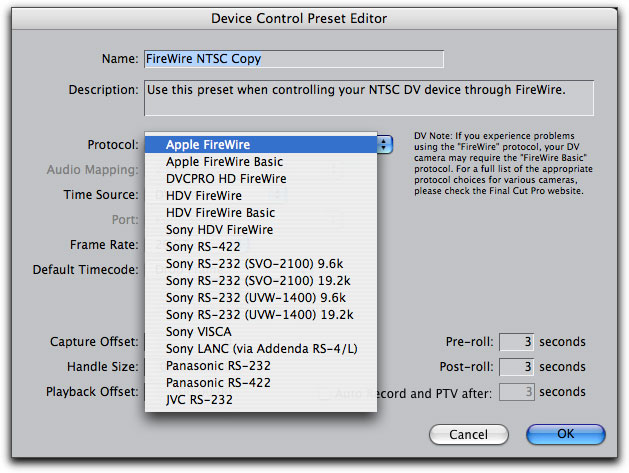
Even when working with FireWire, you'll see there are several possible options, and you need the one specific to your video format as well as the one specific to your particular video device. To find out what is correct for your camera/deck- go to the Apple web page that list all relevant settings.
Here you'll choose a device type, manufacturer of the device and version of FCP you are working in (Final Cut Pro 6 is listed as Final Cut Studio 2.0) from the three menus.
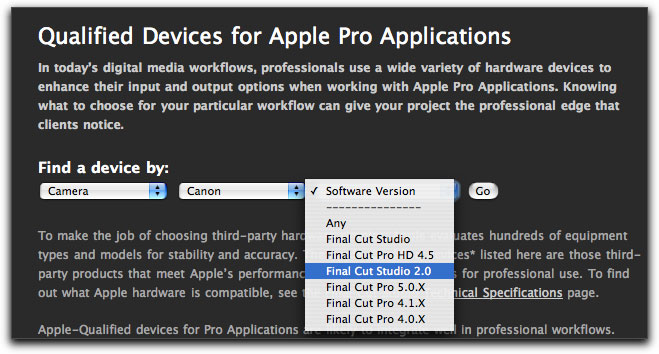
Then click the Go button to take you to the results page where you can find just what settings to use for your particular device.
Log And Capture Settings
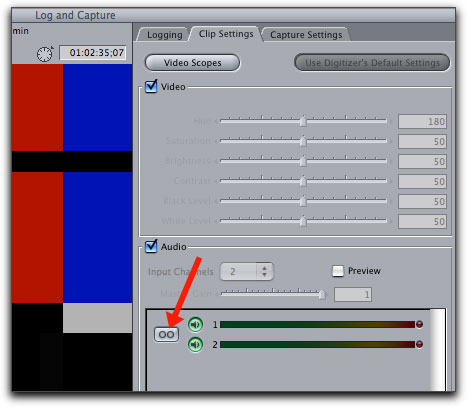
One last area to check before you start capturing video: determining whether each pair of audio tracks are captured as stereo or mono tracks. This is important as it sets up how your clips play out the left and right speakers in a stereo environment. Capture your tracks exactly as they are recorded on tape. Although stereo and mono panning can be changed after capture in your sequences, it could be a very tedious process, so you'll want to get it right before you start.
From the File menu > choose Log and Capture. Click on the Clip Settings tab. Here you'll see this little button next to this pair of audio tracks to be captured. When you click on this little button, it toggles between stereo and mono capture for these two tracks. If there were more tracks here, you would have one of these buttons across from each pair of tracks shown.
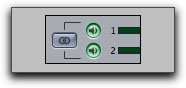
When the button looks like the following, you are set for a stereo capture.
When the button looks like the following, you are set for a mono capture.
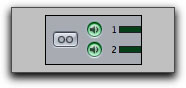
Verify these settings whenever you use the Log and Capture window.
Capturing Non-Native Formats
Most industry formats will not be able to be captured natively (using a direct FireWire connection from the deck/camera to the computer and using preinstalled Easy Setup choices).
These formats include (but are not limited to):
Beta SP
3/4" tape
Digital BETACAM
D5
HDCam or HDCAM SR
HD D5
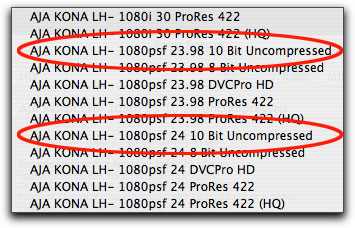
In most cases, these formats need to be captured via a third party interface called a capture card which will have standard industry video/audio connections. There are several choices from companies like AJA and Blackmagic Design. When a capture card is installed, you also install software that adds a lot of new Easy Setups. Not only will the capture card allow the capture of these FCP non-native formats, it also allows you to capture more frame rate options, like whole number rates of 24, 30 and 60. Notice in the Easy Setup drop down menu, we can see choices for the AJA Kona LHe capture card that specifically list 23.98p and 24p (instead of the generic shorthand that we saw earlier just listing 24p).
By the way- one of the advantages to a capture card is the ability to capture "uncompressed" for high-end finishing of effects and color correction, or to capture from one format and convert into a FCP native format or even capture to an even more compressed format for storing large amounts of video.
I hope this is enough to get you started. Have fun exploring the new Final Cut Studio 2.
At Moviola, we'll be starting up new classes in Final Cut 6 starting in early June (first FCP 6 class starts June 12th) for those in the L.A. area. Other FCP Studio 2 classes in Motion, Soundtrack Pro, Color, DVD Studio Pro will roll out as Apple provides new course materials. You can check our current class schedule.
We're also about to start offering new custom classes as well- the first of which is a one day FCP troubleshooting class starting in late June. Its meant for the average editor and will cover a range of subjects: from maximizing performance, to issues from the omni-present myriad of dropped frame problems to audio/video sync issues, capture and output issues and many more- even including effects issues like bad freeze frames and graphic display issues, field dominance issues, system and FCP maintenance and more.
Coming late summer we'll start what we expect to be a huge draw: Working With High Definition in Final Cut Pro, a two day class which will cover tape and tapeless workflows and troubleshooting. There will be hands on time with the Panasonic HVX-200 and P2 cards, XDCAM HD, HDV, HDCAM on the higher end, monitoring for various formats, I/O through native ingest or a through a Kona card, up and down-converting and more.
Andrew Balis is a cinematographer, editor, post production consultant and Apple certified instructor. Andrew is currently working for Moviola Education in Hollywood- as lead Final Cut instructor and in-house workflow specialist. Andrew has authored and co-authored books, DVDs and other writings on Final Cut including the best-selling DVD Tutorial Color Correction in Final Cut Pro from Ripple Training. He also co-authored the Apple Pro Series book Advanced Editing Techniques in Final Cut Pro 4, authored and co-authored the original Apple certified curriculum for beginner, advanced, and effects classes developed at Moviola Education, and wrote the Final Cut Pro curriculum for the Apple Education/CNN Video Journalism classes offered in the K-12 market.
[Top]
copyright © Moviola and Andrew Balis 2007
are either registered trademarks or trademarks of Apple. Other company and product names may be trademarks of their respective owners.
All screen captures, images, and textual references are the property and trademark of their creators/owners/publishers.