February 13, 2012
Promise Technology, Inc.
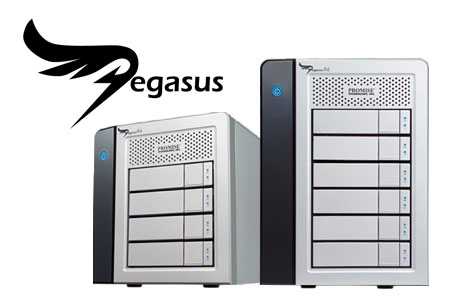
Pegasus RAID with Thunderbolt
Supports RAID 0, 1, 5, 50, 6, 60 and 10.
Pegasus R4 (4x1 TB drives) $1,149.00 - Pegasus R4 (4x2 TB drives) $1,799.00
Pegasus R6 (6x1 TB drives) $1,799.00 - Pegasus R4 (6x2 TB drives) $2,499.00
Warranty: Two years with a one-year limited warranty on fan and power adapter.
By Ken Stone
Since FCP first shipped, I have been running it on Mac Desktops. Starting with the G3 and finishing up 11 years later with MacPros. I have always filled my Macs with as many hard drives as they can hold. As you know, video not only takes up a lot of space but the amount of footage accumulates over the years, consuming more and more hard drives. To supplement my internal hard drives I have purchased a large number of external FireWire hard drives, first FW 400 and then FW 800. Because internal and FireWire hard drives can and will fail at some point, more drives were needed to back up and archive all of my primary hard drives. You should see my work stations; I have hard drives all over the place.
In the early years many of us were working with DV, NTSC and PAL, which is heavily compressed to have a very low data rate of 3.5 MB/s (25 Mbit/s), and does run well from Internal and Firewire drives. However, over the past 11 years, the video codecs and formats have changed dramatically. In the beginning we worked with Standard Definition 4:3 video, but now 16:9 HD video is the standard. Instead of 720 x 480 SD video we now work with 1280 x 720 and 1920 x 1080 formats (and larger). A number of these new formats also carry additional color information and at greater bit depth, yielding significantly higher quality video output. The newest format is 4k, which is even more demanding of storage and drive speed. But all this high quality HD video comes at a cost. The demands for video storage space and the need for much faster throughput from our hard drives has skyrocketed. The days of running our video from single hard drives, either internal or external FireWire drives is passing.
One of my NLE MacPro computers was over 6 years old and it was time to replace it. Rather than go with a new MacPro, I decided to go with a new Thunderbolt iMac 27", with 2 gigs of ram on the monitor card, a i7 processor and 16 gigs of ram. It is a pretty powerful desktop, there is lot to like, but it does have one major shortcoming. You can not add internal hard drives and the iMac has only one FireWire 800 port. True, you can daisy chain a number of external FireWire hard drives, but even this is problematic. I have never been able to daisy chain more than three FW hard drives together. And even with three FW drives, read and write speeds is a huge issue for todays new demanding video formats. The issue of video backup is not addressed either, so additional FW drives are needed for archiving video media.
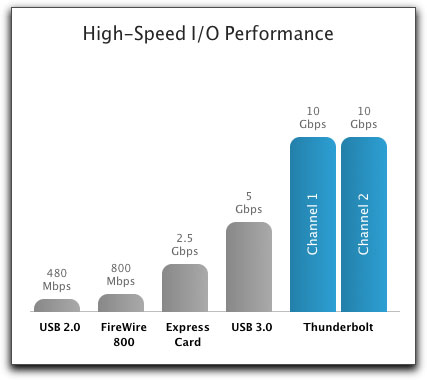
The new iMacs (MBP, Air and MacMinis) now come equipped with a new technology from Intel called Thunderbolt. Thunderbolt is a new interface for connecting peripheral devices to the Mac. Using a new type of cable, about the thickness of a pencil, it carries, USB 2, FireWire, Ethernet, supports high-resolution displays for up to 2 Apple Thunderbolt displays and connectivity to Thunderbolt drives. You can daisy chain from one Thunderbolt device to up to 6 other Thunderbolt devices, and Thunderbolt cables are 'hot swappable'. A number of new Thunderbolt devices are now starting to come to market, Thunderbolt hard drives and RAIDs, hubs and video breakout boxes. Having just one cable (interface) that can do all this is truly remarkable, but the real power of Thunderbolt is its speed. As you can see below, Thunderbolt offers 2 channels of 10 Gbit/s bidirectional throughput and has significantly higher throughput than many of the existing protocols. You can daisy chain up to 6 Thunderbolt devices.
The Pegasus RAID - Plug and Play
So my issue is, because you can not add additional hard dives to the iMac and the fact that the iMac has only one FireWire port, I'll need a different solution to my video storage problem. Fortunately, the one viable option available to me also happens to be an excellent option, the Pegasus RAID from Promise Technology Inc. uses the new Thunderbolt connectivity.
While I have been aware of storage RAIDs (redundant array of independent disks) for many years, this is my first foray into RAIDs. I must admit that I was not knowledgeable about the technical aspects of RAIDs, and was concerned that this would be a hinderance to my setting up and using a RAID. I quickly discovered that I had nothing to worry about.
The Pegasus RAID is completely 100% 'Plug and Play'. Open the box that the Pegasus comes in, plug the Pegasus into a power outlet, attach the Thunderbolt cable to the Pegasus and the iMac, and turn the Pegasus on. Then turn on your Mac. The Pegasus comes from the factory configured as a RAID 5. I'll go into the different types of RAIDs later in this article, but suffice it to say that, for most people, a RAID 5 is the appropriate configuration for our video needs and is configured for a 128k 'stripe' size, which is optimal for audio and video use.
The synchronization processes for RAID 5 takes around 10 hours. This process verifies every sector on every disk to help ensure data integrity. During the synchronization process, you can still use the Pegasus, however, Read/Write Performance will be slightly reduced until the process is complete. During this time, the drive lights blink telling you that the RAID is busy. When the drives are configured the drive lights will stop blinking and the RAID will be mounted on you desktop, ready to use. It does not get any easier then that.
Before you fire up the Pegasus you do need to be sure that your Mac software is up to date. Launch 'Software Update' from the Apple menu and look for 'MacBook Pro/iMac Software Update 1.5.'. If it is listed you'll need to install it before working with the Pegasus. If you don't see the 'MacBook Pro/iMac Software Update 1.5' this means that it is already installed on your Mac.
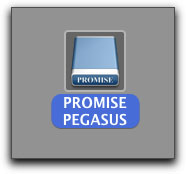
When you first open the Pegasus drive, inside you'll see two items, shown below. The first is a short 'Utility Read Me' in the PDF format. The second item is a Utility package that you can install into your Mac. While not necessary, the Utility provides access to information about your RAID, its 'System Status' and also the ability to reconfigure your RAID if you have the need and know-how. You can install the Utility before or after your RAID has been configured. I do suggest that you install the Utility which we'll look at later. You can also download the Utility and manual from the Promise web site.

The Pegasus RAID uses the Apple 'HFS+' file format and you can use the Mac's Disk Utility or a utility like Disk Warrior on the RAID if need be. You can also install the Mac OS on the Pegasus RAID and use it as a 'boot drive' as well, though I suggest running the OS from the Mac's boot drive. The Pegasus RAID can also be used with Apple's Time Machine.
Pegasus Models
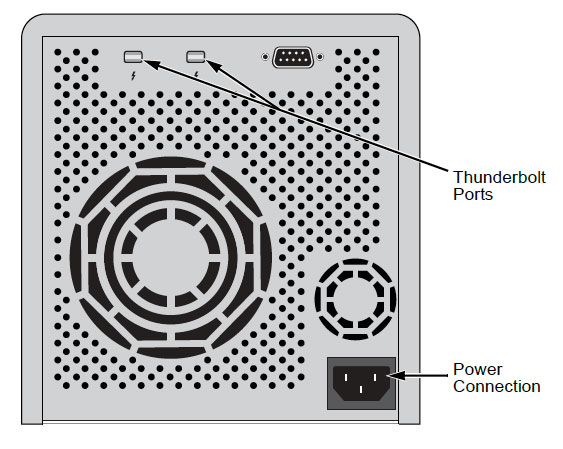
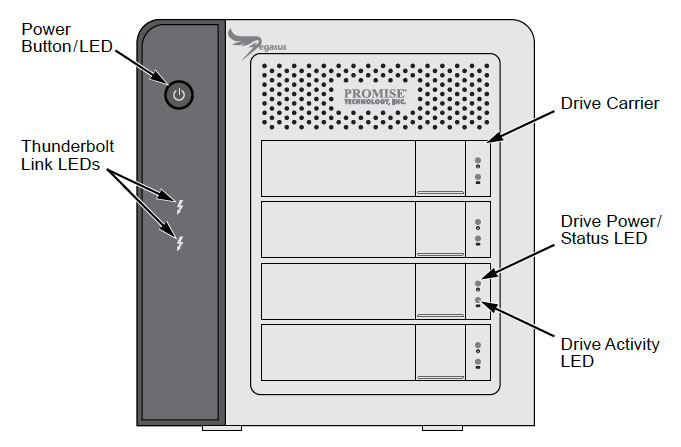
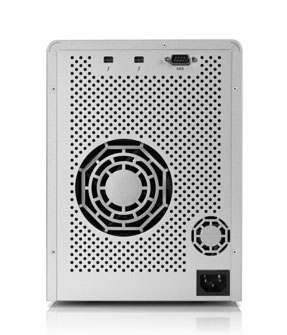
The Pegasus RAID from Promise Technology comes in two basic configurations, the R4 and the R6. The R4 has four drive bays and the R6 has 6 bays. With the R4 and R6 you have the option of having 1 TB drives or 2 TB SATA drives, for a total of 4 different price and storage options. The Pegasus ships with drives running at 7200 rpm and are formatted as HFS+. Both units are compact, measuring 9" deep and 7.5" wide. The R6 at 9.8" tall, with its six drives, is two inches taller than the R4. The units weigh in at 10 and 13 lbs. The illustrations shown below are for the R4, the R6 is similar in design. Looking at the back of the unit, at the top are two Thunderbolt ports, one will be used to connect to the Mac and the second is for daisy chaining to another Pegasus RAID, Apple Thunderbolt monitor or other Thunderbolt devices. You can daisy chain up to 6 Pegasus RAIDs together. Just to the right of the Thunderbolt ports is a RS- 232 port which is used for UPS (Uninterrupted Power Supply) and debugging work. There are two fans in the unit. The large fan is for cooling the hard drives and the smaller fan is to cool the AC power supply. My unit is fairly quiet. The last port is for the AC power connection.
Looking at the front of the unit top left is the power button. When the Pegasus has power, the button will be amber in color. Holding the power button in for about six seconds will turn the unit on and the power button color will change to blue. Just beneath the power button are two Thunderbolt LED icons, one for each Thunderbolt port on the back. When a Thunderbolt cable is attached to a port, the Thunderbolt icon will glow blue showing that there is a proper Thunderbolt connection. The R4 shown below has four drive bays. To the right of each drive bay are two blue LEDs. The top LED shows a constant blue light denoting that the drive has power and is operational. Just below is the activity LED that blinks blue when the drive is active. As all four of these drives are combined into a RAID, all four top LEDs will always be constantly on. When reading or writing to the RAID, all of the activity LEDs will blink.
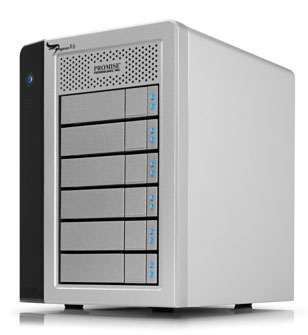
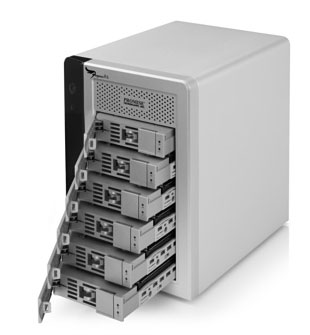
Below, the photograph on the left shows the R6 powered up, the two LEDs for each drive are blue. The picture in the middle shows the R6 with each of it's six drive bays open and the drives pulled out of the RAID enclosure. The photo on the right shows the back of the Pegasus. Aside from having lightening fast read/write speeds, RAID 5 also offers redundancy. This is to say that if a drive fails, all of the data on the RAID is still available and you can continue to work using the RAID, though read/write speeds may be somewhat diminished. Even while the RAID is up and running, you can remove the failed drive which is mounted on a sled by a few 'Philips' screws, replace the drive and re-insert the new drive back into the RAID and the Pegasus will immediately begin rebuilding the new drive to return the RAID to full working status. The replacement drive should be of the same capacity and speed as the old drive. And yes, the drives are 'hot swappable'.
RAIDs
The acronym RAID stands for 'Redundant Array of Independent Disks', but what does this really mean? Our Macs come with at least one SATA internal hard drive (yes, SSD, solid state drives are just starting to emerge and are used in the MacBook Air). The drive can spin at 5400 rpm or 7200 rpm and be anywhere in size from 500 megs up to 3 TBs (terabytes). A SATA drive may be used as a boot drive while additional drives can be used for storage. Having just one SATA drive is completely adequate for all the basic Mac needs. It will run the Mac OS, handle iPhoto, iTunes and all of the other apps and files that we load on to our Macs. Additionally, we can add USB and FireWire external drives to our Macs to expand our storage. Where we start to run into problems is when we are working with video. 10 years ago many of us were running FCP to edit DV- NTSC and PAL. DV video is a highly compressed video format, with a low color space and small frame size of 720 x 480.
HD video has come to the desktop and compared to DV, the new video formats and codecs are huge by comparison and the demands of HD video are often beyond the capabilities of single SATA drive. RAIDs are the solution to the problem. Anytime that you have two or more drives somehow working together you have a RAID. Suppose that we were able to write one file to two drives effectively writing half the file to one drive while simultaneously writing the other half of the file to a second drive, the write time for the file would be cut in half. Tying two (or more) drives together in this manner is called 'striping'. Reading or playing back from 2 drives that are striped together provides equal speed benefits. Striping drives together is one type of RAID. The more drives that are striped together the faster the read/write speeds will be. So, at first blush, this sounds like the solution to the problem of HD video and it's speed requirements. While this does improve the read/write speed, there is one other important issue to consider. When a video file is written across several drives, if one drive fails you lose all of your media.
Fortunately there are different types of RAID configurations which can include not only the ability to stripe drives together for speed, but can also add redundancy to the writing process. There are several different ways to achieve fault protection. One way is to write the complete file twice, to two different hard drives, this is called 'mirroring'. Parity is the other method where the video is written across multiple drives (striping), but then data about the files is also written to the drives. The advantage of this is that if one hard drive fails, the information on the failed drive is still contained on the other drives of the RAID and, even though you have lost a drive, all of the media is still available. When a drive fails, the RAID will run at a slightly slower speed because you have one less drive for the RAID to work with. Redundancy is very important because we need protection against drive failure, (at some point all drives will fail). When a drive fails, we can replace the bad drive with a new one and the Pegasus RAID will build up the new drive returning the RAID to the full status of speed and redundancy.
Types of RAIDs
There are a number of different types of RAIDs and RAIDs also have different ways of connecting to our computers, USB, FireWire, Ethernet, eSATA and now Thunderbolt. Each form of connectivity offers different speed and performance profiles and some RAIDs are defined by the way that they connect to the Mac. For example, an eSATA RAID connects up to a MacPro via a hardware card that is installed into a PCI slot in a MacPro. eSATA is also available as an eSATA Express 34 card that fits into the Express 34 slot on MacBook Pro laptops. So we have different types of RAIDs and different ways to connect them to our Macs. Some RAIDs are 'Plug and Play' and others require software 'Controllers' that need to be configured for the RAID to run. We even have software and hardware RAIDs.
Software RAIDs are economical in that you can use any type of drives on hand, internal SATA, USB, and FireWire. You can mix different types and sizes of drives to make a software RAID. The amount of storage space used by each drive in the RAID is limited to the size of the drive with the smallest capacity. Best if all the drives are of the same size so no storage space is wasted. So why not just go out and purchase a number of drives, and use the Mac Disk Utility to tie them together into a RAID? You can get some speed or fault protection using a software RAID, but software RAIDs are not as reliable as hardware RAIDs. Also, because the RAID is software driven, this means that when a file is being read or written, the CPU is doing all the work and this will degrade the overall performance of the Mac. Another shortcoming of software RAIDs is the fact that if a drive is in trouble or fails completely, there is no way for the RAID to notify you that there is a problem. This can be a recipe for disaster.
In any case, we can look at setting up a software RAID using Disk Utility, it's pretty straightforward. Open Disk Utility. In the left hand column, select the drives that you want to include in the RAID and drag them down into the box lower right.
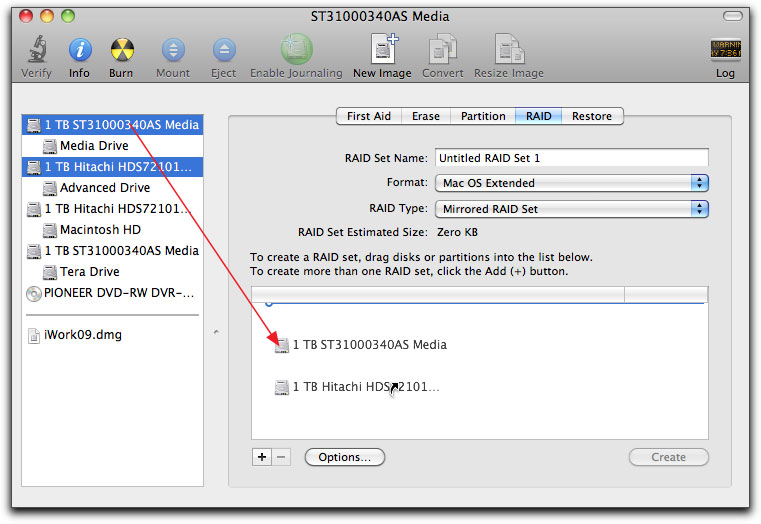
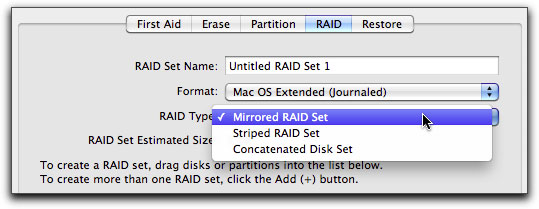
Click on the RAID tab in Disk Utility. Name your RAID, select the format, in this case Mac OS Extended (Journaled or not), and then pick the type of RAID. There are three RAID types available in Disk Utility. 'Mirrored RAID set', where the complete file is written twice to two different drives for redundancy but there is no speed gain. If one drive fails you still have the second mirrored drive with all the information. 'Striped RAID Set' is when the file is written across two hard drives resulting in a speed gain. But with a striped RAID, if one drive fails you lose everything. The last option 'Concatenated Disk Set' is what is sometimes called a 'JBOD array' (Just a Bunch Of Disks). All of the drives in a Concatenated Disk Set are bundled together as one drive and will appear on the desktop as one single drive. The drives can be of different sizes. Files are written to the first drive and when it fills up, files are then written to the second drive and so on. All of the drives will read/write at the speed of the slowest drive and there is no benefit of increased speed or data redundancy.
RAID Configurations
When we work with a RAID, we use multiple physical drives combined together into what we call a 'Disk Array' or 'Logical Drive'. The 'Disk Array' or 'Logical Drive' will mount on the Desktop as a single storage device. There are a number of different ways that drives can be combined, representing different ways that the drives handle the data. Each type of RAID has it's own advantages and disadvantages. It is also helpful if all of the drives used in a RAID have the same amount of storage capacity. While there are a number of different types of RAIDs we will look at the four most common types, 0,1,5 and 10.
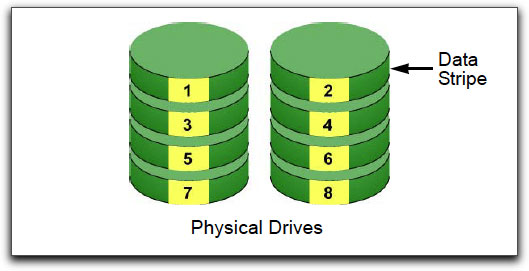
RAID 0 improves read/write performance by 'striping' drives together, which is the process of writing a file across multiple drives. A minimum of two disks is required. If there are two drives striped together in a RAID 0, then the read/write times will be approximately half the time that would be required for a single drive. The total storage of a RAID 0 will be the same as the total of the two drives combined. No storage space is lost using a RAID 0. The disadvantage of a RAID 0 is that there is no fault tolerance, if one drive in the RAID 0 fails, all of the data will be lost.
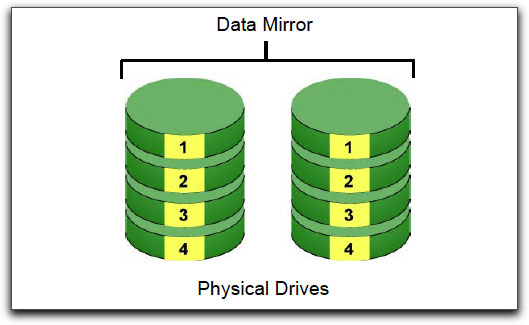
RAID 1 provides fault tolerance by 'mirroring' or writing the complete file twice to two different drives. Because identical data is written to two drives, if one drive fails, the data is still available from the other drive. A RAID 1 cuts total disk capacity in half because the data is written twice. A RAID 1 does provide loss protection but offers no speed gains.
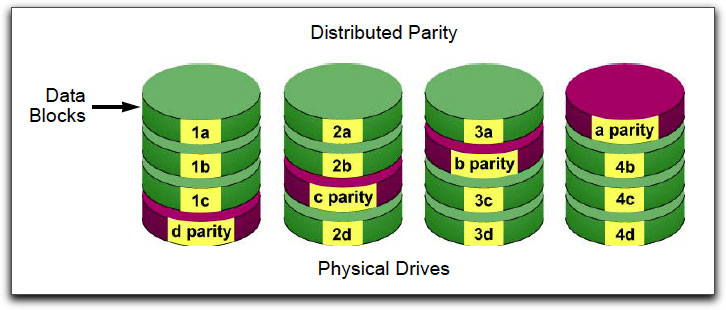
RAID 5 is probably the most common and popular type of RAID because it combines speed with fault protection. A minimum of three drives is required. In a RAID 5, data is written across multiple striped drives for speed. Redundancy (fault protection) comes not from mirroring but rather from writing 'parity data', which is redundant information that can be used for disk recovery. Parity data is written across multiple drives as well. If a drive fails, because both the data and parity data is written across different drives, no information is lost, but there will be a small decrease in read/write speed. Another advantage to a hardware RAID 5 is that the drives are 'hot swappable'. This means that the bad drive can be removed and replaced with a new one while the RAID continues to function. When the new drive is added, the RAID will rebuild the data onto the new drive. Unlike a RAID 1, where mirroring cost 50% of the total drive space, using a RAID 5 will cost you only approximately 20% of your storage space. This amount can vary depending on your RAID. The Pegasus RAID ships as a RAID 5, an excellent choice providing speed and fault protection with a small loss of data capacity.
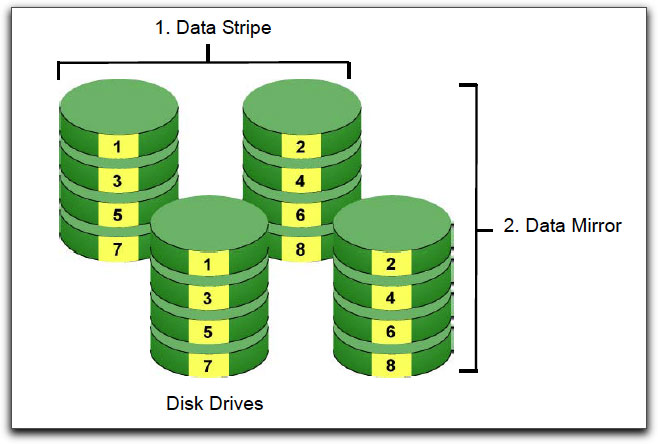
RAID 10 is the combination of a RAID 0 and a RAID 1, sometimes called a 'RAID 0+1', and requires a minimum of four drives. A RAID 10 has the speed of a striped RAID 0 and the fault protection of a mirrored RAID 1. Unlike a RAID 5 where fault protection uses 'Parity' for protection, a RAID 10 uses mirroring for fault protection and this will cost you half of the storage space of the RAID.
Speed
Whether talking about our internet connections, our processors, or our storage devices, it's really all about the speed, isn't it. The problem is that speed can be measured differently and use different standards, not unlike 'Miles per Hour' and 'Kilometers per Hour'. For example, the speed or data rate of a video codec like ProRes is expressed in 'Mb/s', note the lower case 'b'. However, when we talk about the speed of a storage device like the Pegasus RAID, we use MB/s, note the capital 'B'. So we have Mb/s and MB/s.
It takes 8 Mb/s to equal 1 MB/s.
Below I'm going to test the speed of my Pegasus R/6 RAID 5 using both BlackMagic and AJA speed tests. I need to point out that both of these speed tests use a 'single thread' benchmark process, which does not accurately represent the Pegasus' maximum performance.
The results of these speed test will be given in MB/s. As I often work with the ProRes codec, I am going to be testing with ProRes HQ video, which is expressed as Mb/s for its data rate. The chart below comes from the Apple ProRes White paper and as you'll notice along the left hand side, the data rate is Mb/s. I have also marked the ProRes 422 (HQ) column which shows a data rate of 220Mb/s. The data rate for ProRes does vary depending on frame size and frame rate.
Data Rates - Uncompressed and Apple ProRes at 1920 x 1080, 29.97 fps
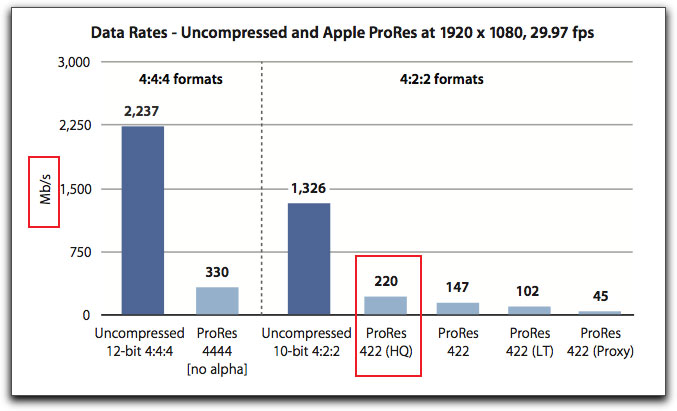
Because the data rate results from the speed test are in MB/s, I'll need to divide the Mb/s data rate of ProRes 422 (HQ) which is 220 Mb/s by 8 to get the conversion number for MB/s that is used by the speed tests.
So for ProRes (HQ), 220 Mb/s ÷ 8 = 27.5 MB/s.
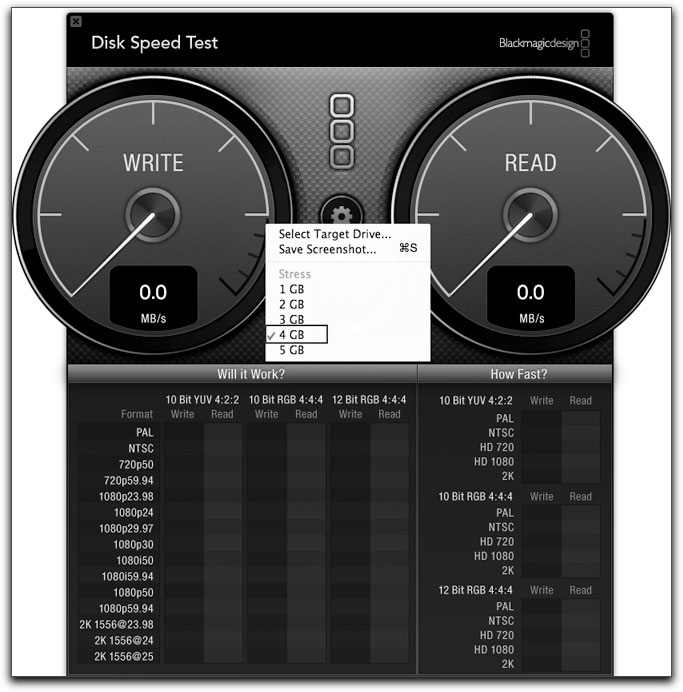
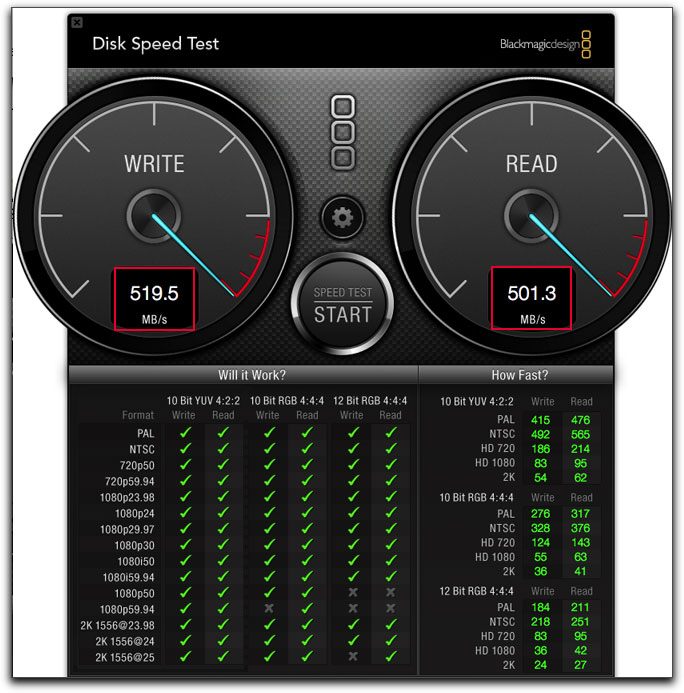
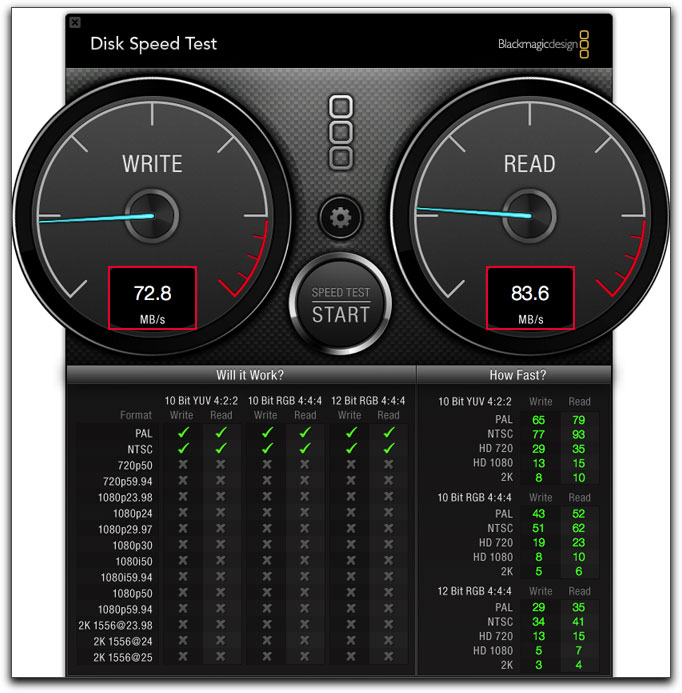
I have included screen shots from both the BlackMagic and AJA speed tests below. Speed tests from different companies work in a different manner and give slightly different results. In the BlackMagic speed test shown below, I have set the 'Stress' to 4 GBs. Beneath the tachometers is a chart of 'Will it Work' and 'How Fast'. The video that I'm working with is ProRes 422, 1920 x 1080,10 bit, YUV, so, in 'Will it Work' we will look at the test results in 10 Bit YUV 4:2:2 column.
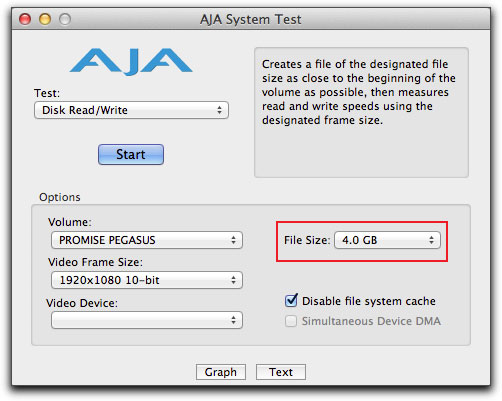
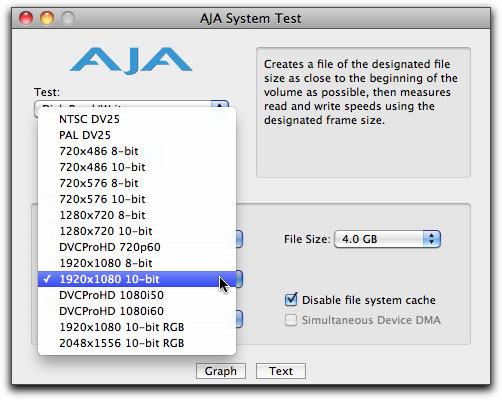
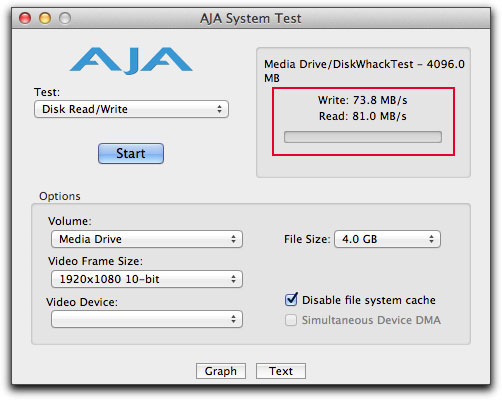
For the AJA speed test, note that I have set the 'Stress' to 4 GBs to match the Stress level in the BlackMagic. The AJA speed test is different in that you set the format in a drop-down menu before you run the test. As you can see below right, I have chosen 1920 x 1080 10 bit.
Both tests produce read/write speeds and it's the read/write numbers that we'll be looking at.
The BlackMagic Pegasus test produced a Write speed of 519.5MB/s, and a Read speed of 501.3 MB/s.
The AJA speed test for the Pegasus produces a Write speed of 515.1 MB/s and the Read speed is 498.0 MB/s.
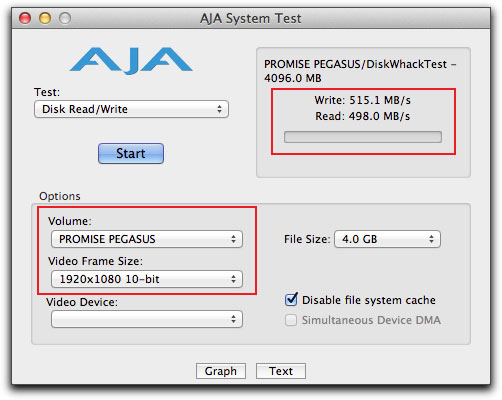
Even though the two tests work differently, they both report similar read/write speeds. I need to point out that every time that you run a test, using either BlackMagic or AJA, the results will vary by a bit. If you Run the test a number of times you can average the results for your benchmark.
Just to demonstrate the huge speed performance of the Pegasus, I ran the same two tests on a FireWire 800 drive. The BlackMagic test below shows a Write speed of 72.8 MB/s and the Read speed is at 83.6 MB/s.
The AJA test below, reports a Write speed of 73.8 MB/s and a Read speed of 81.0 MB/s. Again the two tests are fairly close. The results of the test on a FireWire 800 demonstrates how slow it really is compaired to the Pegasus RAID 5.
I am working with a Pegasus R/6 with six drives. Because the read/write speed is dependant in part on the number of drives in the RAID, (everything else being equal), the Pegasus R/4, with its four drives, will be about 25% slower in read/write speed than the R/6 with its six drives.
Real world speed
At over 500 MB/s read/write speeds, the Pegasus is obviously, very fast, but how does this speed relate to working with video files in FCP. To play one video stream in FCP is not much of a challenge, a FireWire 800 can do this without problems. But when editing video there are times when we need more than one video stream. We may want a PIP (picture in picture) or even several PIPs. Compositing work involves at least two video streams as does chromakey work. The situation where you will really need to deliver a large number of video streams is when working with multicam. With the newly released FCP 10.0.3, we now have multicam with support for mixed formats, mixed frame rates, and up to 64 camera angles. That's lot of video streams and if you were to use such a very large number of video streams, you would probably want to use ProRes 'Proxy' media to enable proper playback.
So how many video streams can the Pegasus RAID 5 deliver in real time? I'm working with ProRes (HQ), 1920 x 1080 at 29.97 frames per second, which has a data rate of 27.5 MB/s (220 Mb/s ÷ 8 = 27.5 MB/s). If we take the Read speed of about 500MB/s from the speed tests and divide it by the ProRes (HQ) data rate, we will have the number of ProRes (HQ) streams that the Pegasus plays out in real time.
500 MB/s ÷ 27.5 MB/s = 18.18 streams of ProRes (HQ) video. This is wickedly fast and way beyond what my Mac and FCP can actually handle. If you are working with a more demanding video like Uncompressed 10 bit 4:2:2, with a data rate of 1,326 Mb/s, which works out to 165.75 MB/s, you'll get 3 video streams in real time.
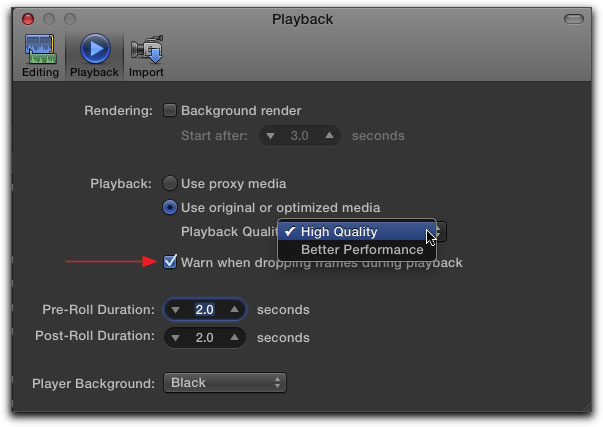
I wanted to test this out so I opened a project in FCP X and in the FCP X Prefs I set 'Playback Quality' to 'High Quality' as opposed to 'Better Performance. If Better Performance is selected, FCP will, when under load, continue to reduce the frame rate and video quality in order to continue to play back without dropping frames. When set to 'High Quality', FCP will play at full frame rate and full quality until it can no longer do so and will then start dropping frames. FCP Prefs shown below with 'High Quality' selected and 'Warn when dropped frames during playback' turned on.
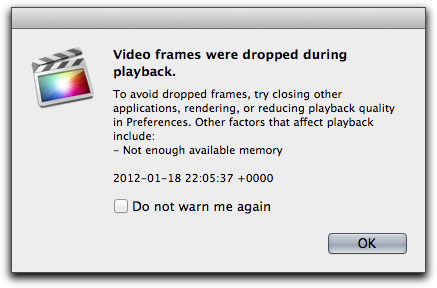
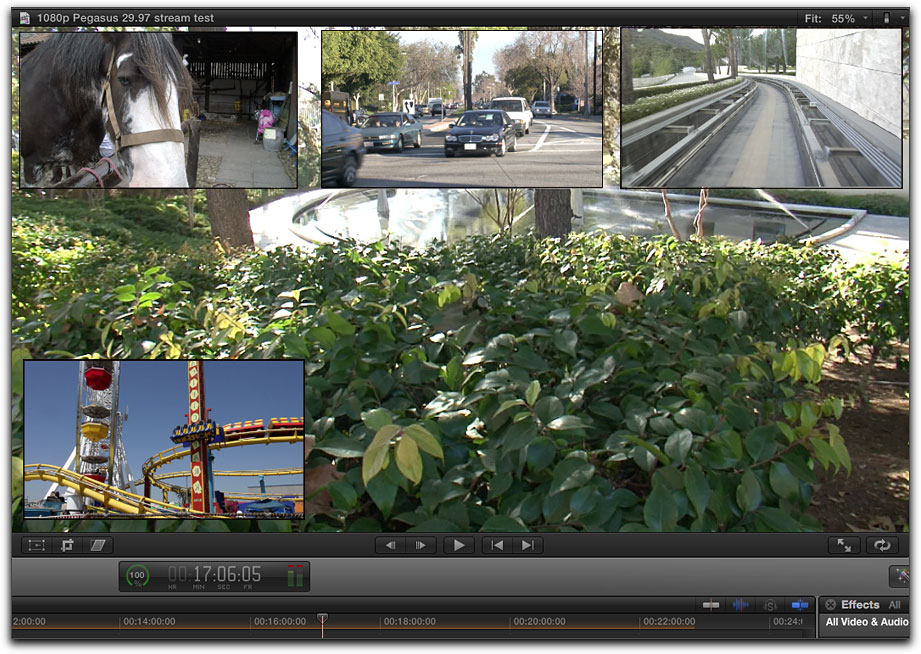
I started to build a PIP sequence. The first video stream was full frame. I then added additional PIPs to the timeline . The clips that I was working with were ProRes (HQ) 1920 x 1080 running at 29.97 fps, and each clip was over 20 minutes in length. I added a PIP and then allowed FCP to play the timeline. I continued to add video streams (angles). With 5 video streams running, FCP X was able to run all 5 streams from the Pegasus at Best Quality without dropping frames. I turned on 'looping' and let it play for several hours. No problem! When I added a sixth video stream I started to get dropped frame warnings. If I select 'Better Performance', which will reduce the frame rate and video quality as the load on the processor increases, I can run up to 18 video streams from the Pegasus (theoretically).
I have the timeline with five video streams shown below. Note the red 'render' bar at the top of the timeline (red arrows). I could have rendered the timeline, but then FCP would be playing back only the one rendered file and not the 5 streams that I'm testing. So I left the timeline unrendered. I mentioned above that the Pegasus RAID 5 can playback 16 streams of ProRes (HQ) 1920 x 1080 at 29.97 fps, so why do I start to get dropped frames when the sixth video stream was added.
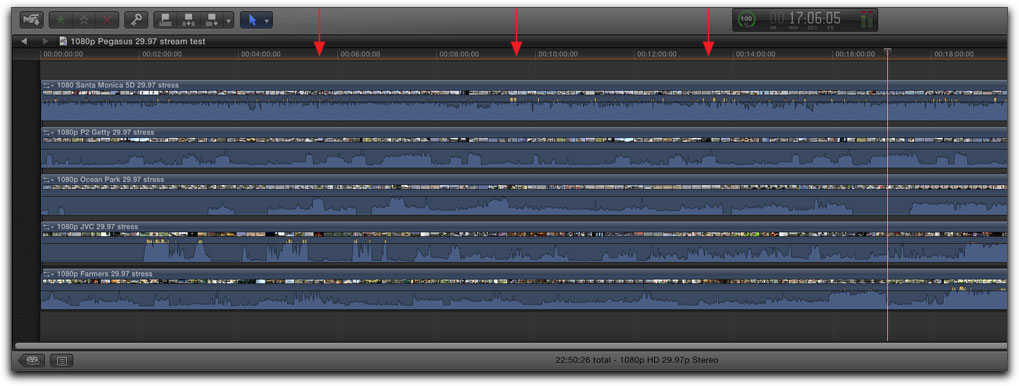
In my test, with 5 unrendered video streams, each time that the playhead moves from one frame to the next frame, (because it's not rendered) FCP X must process all 5 streams and then display that frame in the Viewer. Play a frame, move to the next frame, process for the Viewer and display, then move to the following frame. FCP X must do this for 29.97 frames per second. While my iMac is loaded with the fastest processor, maxed out at 16 gigs of ram, with a 2 gig monitor card, it simply can not process more than 5 video streams at a time. The ability of the Pegasus to serve up video way surpasses my iMac's ability to process what the Pegasus can deliver. If I were to set 'Playback Quality' in Prefs to 'Better Performance' (which will reduce quality and frame rate if needed) I can run as many video streams, theoretically up to 18 streams, as I can manage to squeeze into the Viewer window.
Pegasus Utilities
I'll show you how to download the Promise Pegasus Utility and PDF manual later in the article. The Utility is also available in the Pegasus RAID once it has been formatted and configured. While it not necessary to install the Utility, as your RAID will run just fine without it, having the Utility installed provides you with status information, the health of all of the components of your Pegasus, plus the ability to manage and reconfigure your RAID if you need to do so.

After you have turned on the Pegasus and it is mounted on your desktop, launch the Utility Application.
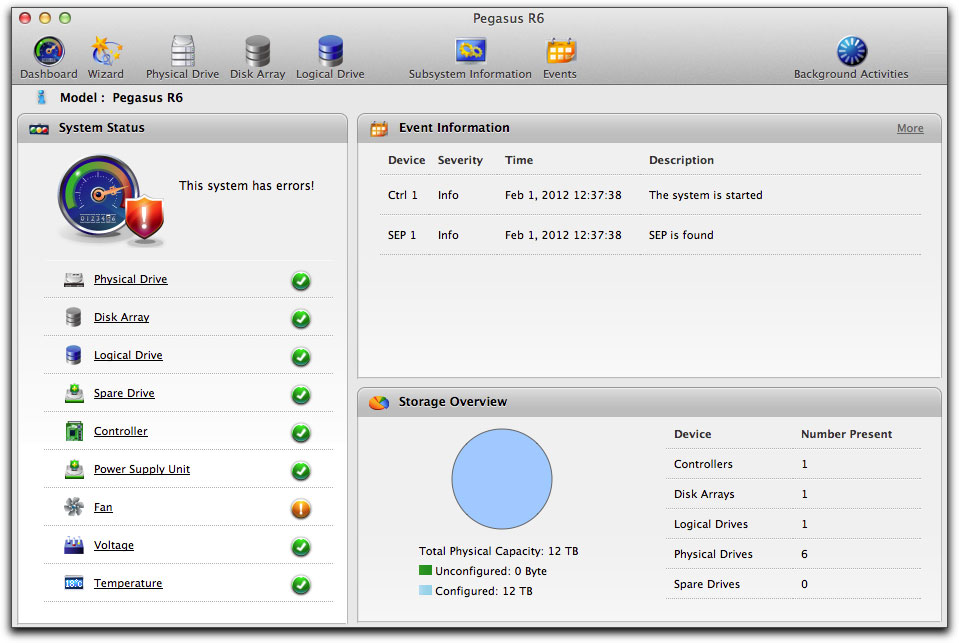
The Utility's start page, called the 'Dashboard', is shown below. Across the top are the 'Toolbar' icons which access specific functions such as the Wizard, Physical Drive, etc. Down the left hand side is the 'System Status' window which displays the status of the different elements of your hardware and RAID configuration. The System Status provides a quick check that everything about your Pegasus is functioning properly, green okay, orange caution, and red for a major problem. If there is an Alert, click on the item to get information about the alert. For example, as shown below, if you launch the Utility right after powering up the Pegasus, you'll see the message 'This system has errors!' and have an orange caution icon next to the Fan item.
Click on the 'Fan' link to display relevant fan and temperature information. As you can see below, the fan speed is reported to be 900 rpm and it should be running at 1000 rpm.
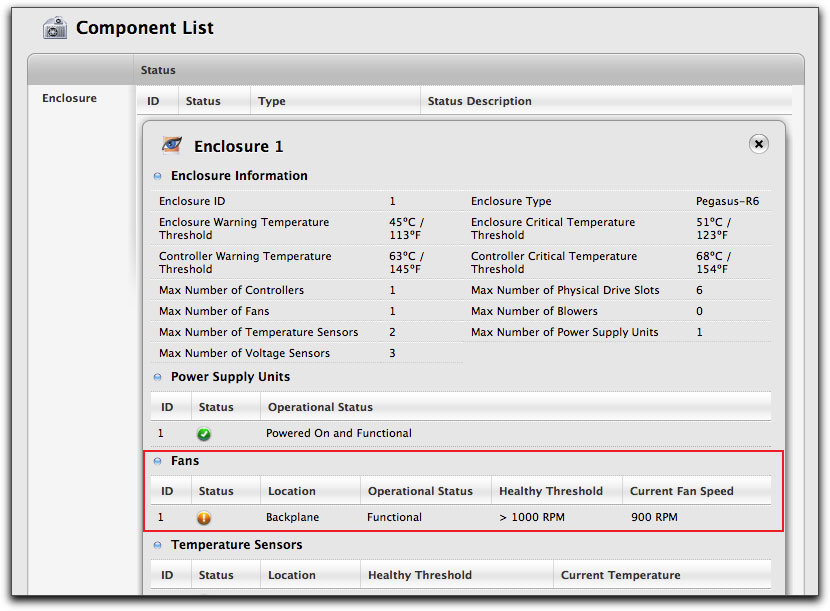
This is expected behavior. The Utility will sample the controller and backplane temperature and calibrate for several minutes before determining the proper fan speed. If you reopen the Utility after a few minutes you'll see that the Fan status has changed and now shows an 'Okay' status.
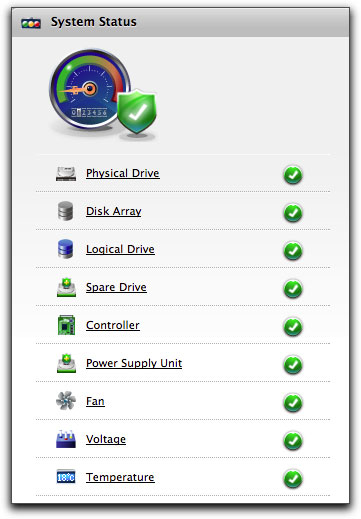
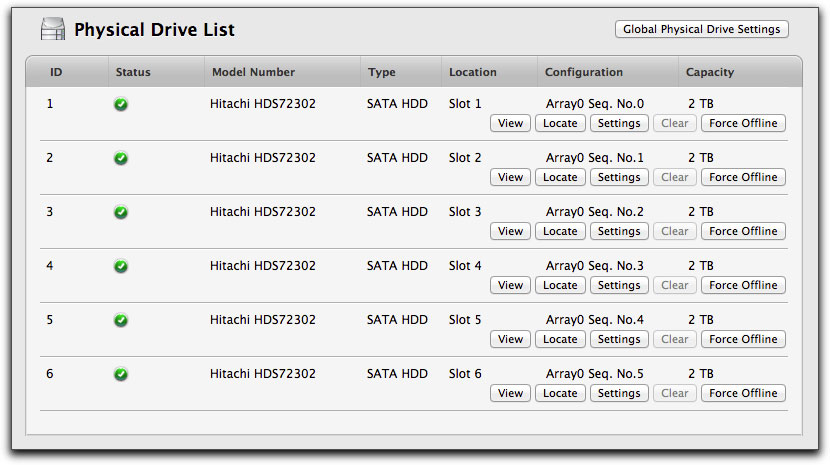
Clicking on different items in the System Status window reveals specific information. The Physical Drive List is shown below.
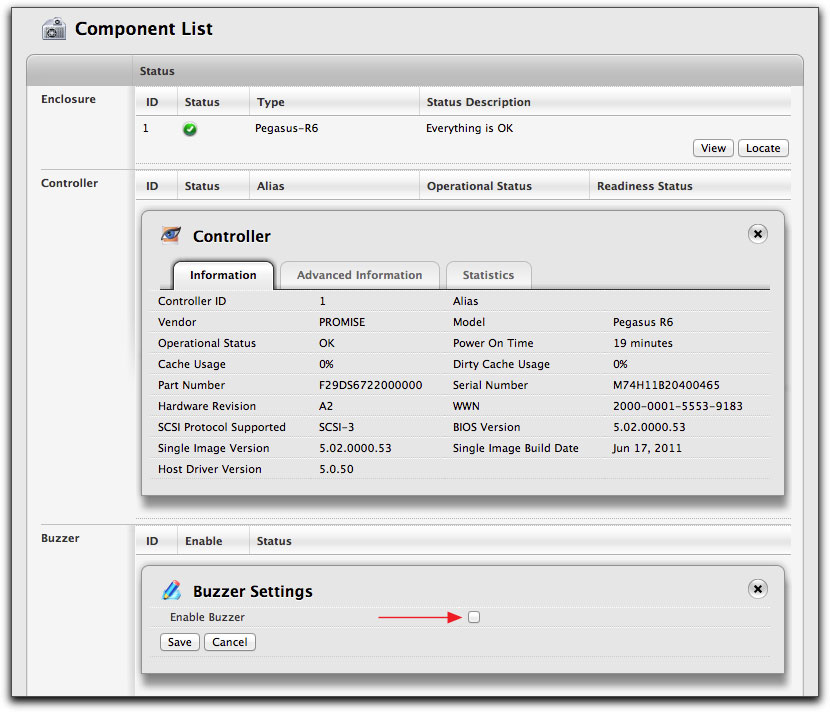
Some of the items in the System Status list have additional features, for example, the Controller, shown below, has a Buzzer Settings pane. If the buzzer is enabled, the Buzzer or audible alarm has several different 'beep' patterns. The buzzer beeps twice to acknowledge power up and twice again when the unit is online and ready for work. If there are two beeps repeated continuously, the Pegasus is reporting that there is a problem. If you're rebuilding a drive in the RAID, the Pegasus emits two quick beeps every five seconds. When the beeping stops, the rebuilding is done. To enable the buzzer, check the box, red arrow below, and then click on 'Save'.
There is a Tool Bar across the top of the Utility interface. A number of these items display the same information as the items in the System Status window.

In the View Menu there is Customize Toolbar.
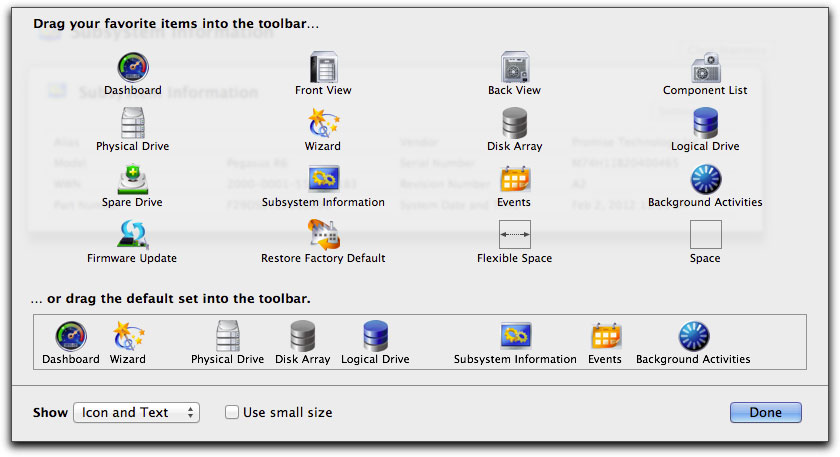
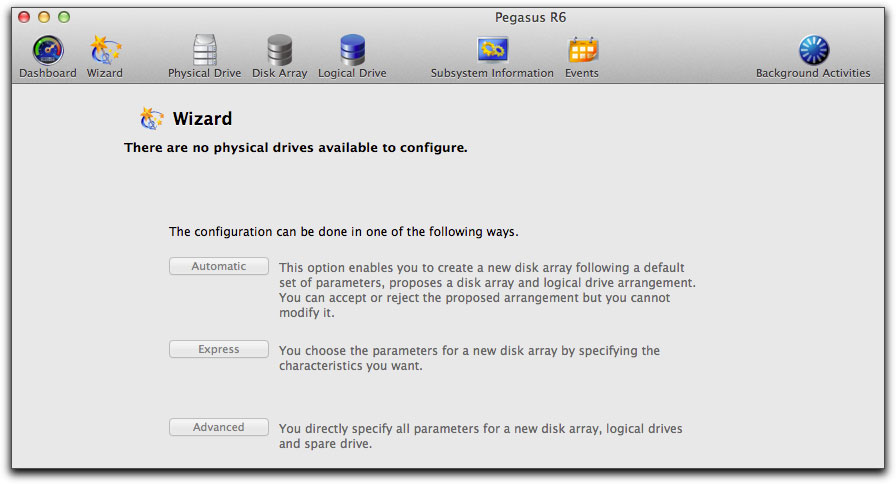
The items exclusive to the Toolbar are, the Wizard, Subsystems, Runtime Events and Background. The Wizard offers three different ways to configure your Pegasus and of course you can use the Promise Utility to manually configure your Pegasus. The Wizard contains all the setting that are available through manual configuration as well.
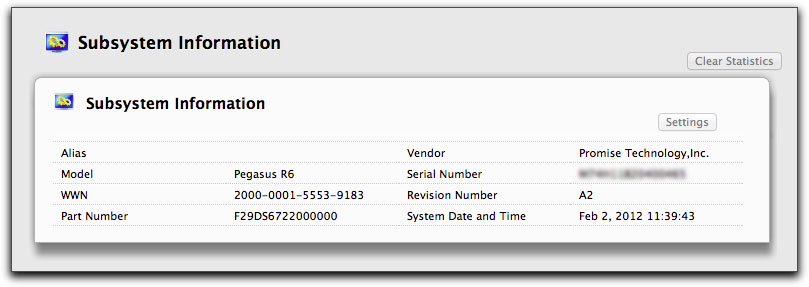
The Subsystem Information and Runtime Events windows are shown below.

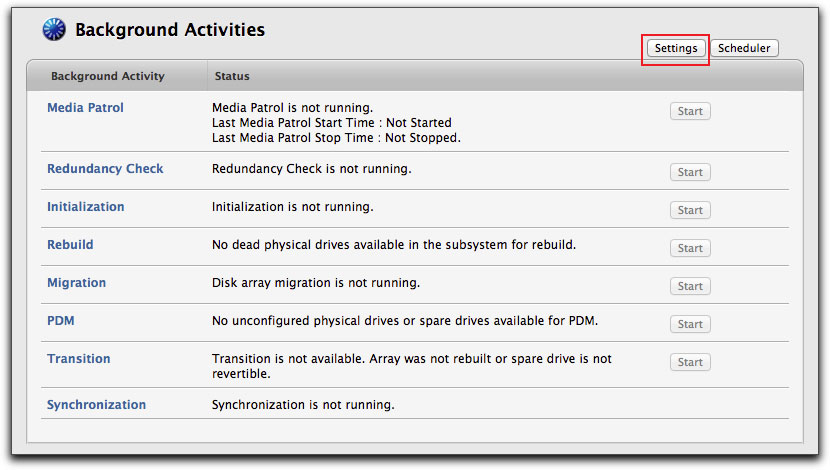
The last item in the Toolbar is Background Activities. This window displays the status of a number of different Utility options. To modify any of the listed items, click on the 'Settings' button, red box below.
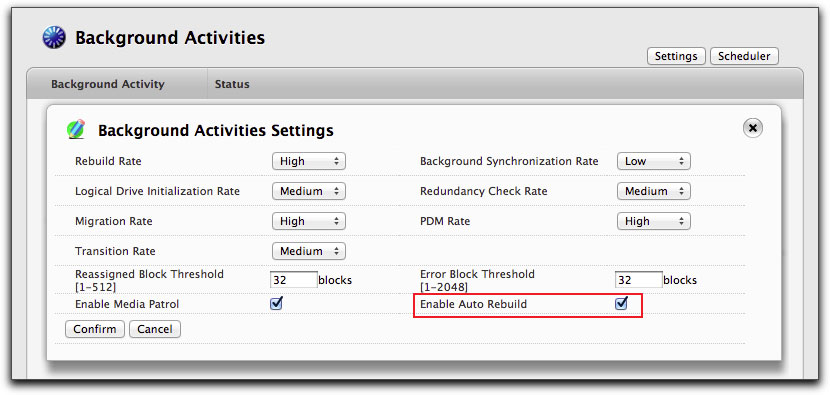
The Background Activities Settings window, below, list settings for each of the items found in the Background Activities window. Note that the 'Enable Auto Rebuild' option, red box below, is checked by default.
When working within the Promise Pegasus Utility, in order to make changes to any settings, click on the lock, found in the lower left hand corner of the window and then enter your Macs' Administrator Password.

Promise Utility Preferences
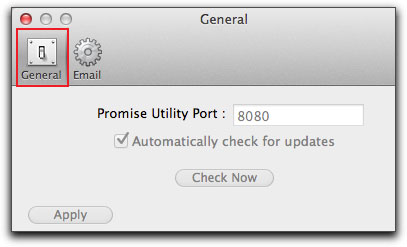
When the Utilities app is open, you can access Preferences from the Promise Utility menu. There are two tabs in Prefs. The first is 'General', shown below right. While 'Automatically check for updates' is checked, it seems that this feature is not yet operational, but will come on line with a software update.
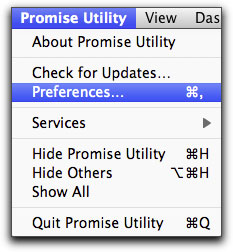
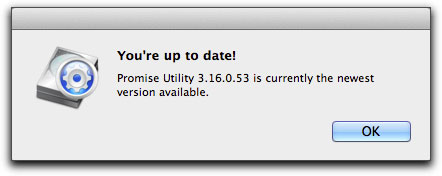
You can manually check for software updates from the Promise Utility menu, this does work.
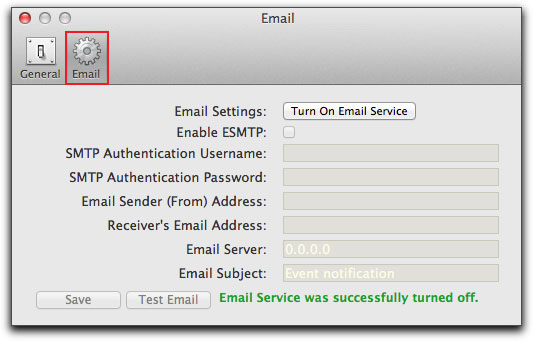
The second tab is for email notification alerts. Should the Promise Utility discover a problem with your Pegasus, the Utility will email you an alert. I'm running Apple's Mail using a 'POP' email account. I have not had much luck setting up the email alert feature as some of the required information eludes me.
If there is a drive failure, the top LED for the problem drive will show Red and the activity LED just beneath will be dark.

Downloading the Pegasus Manual and Utility installer
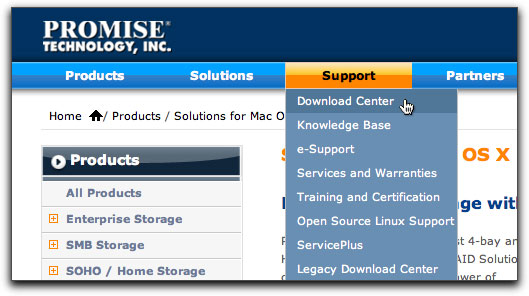
You can go to the Promise Pegasus web site and download the Manual and the Utility. At the site, click on the 'Support' tab and then select 'Download Center'.
In the 'Download Center' mid-way down the page are two drop-down menus, below left. Click on the Product Select drop-down and then slide down to 'Pegasus RAID Storage with Thunderbolt™

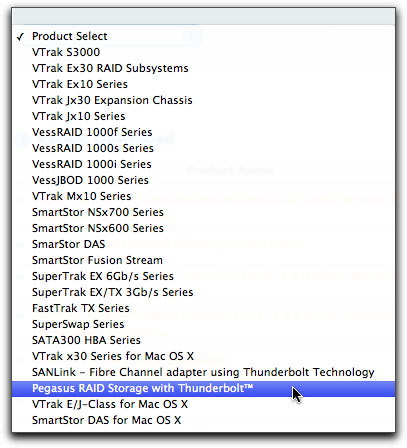
Then, in the drop-down menu on the right, select the Pegasus RAID, either the R4 or R6.

Download options will now become available just below the two drop-down menus. Click on 'Manual' and it will be added just below. Click on the orange 'Pegasus User Manual' to download.
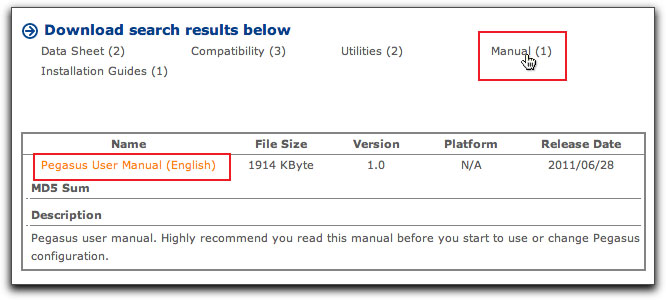
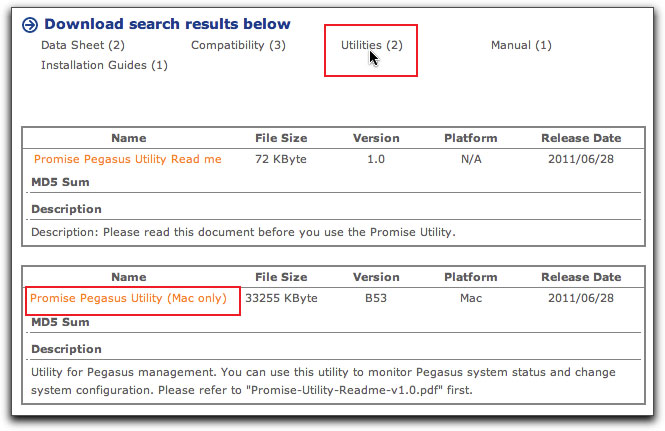
Next, click on Utilities, then click on the orange 'Promise Pegasus Utility (Mac only).
Final Thoughts
When it was time to replace my NLE MacPro I went for the iMac 27", in part, because it ships with Thunderbolt connectivity. A new technology that I am very excited about. Even before my purchase I knew several people running the Pegasus Thunderbolt RAIDs from Promise Technology and after 11 years of dealing with video storage issues, the Pegasus RAID looked to be the solution to my problem. I work with FCP and Photoshop but know nothing about the intricacies of setting up and maintaining a RAID. So this was the big attraction of the Pegasus, you don't have to know anything to have it work properly. It's 'Plug and Play' right out of the box, and is properly configured for audio and video editors.
The Thunderbolt cable is not included with the Pegasus RAID and needs to be purchased separately for $49 from the Apple store or other locations.
For those of you who are knowledgeable about RAIDs, rest assured that you can configure the Pegasus in anyway that you want, the 148 page manual is comprehensive and covers the full spectrum of the Pegasus' setup and operation.
This is my workflow for running the Pegasus after it has been formatted and configured. Both my Pegasus and iMac are powered from the same surge protector. After turning the surge protector on, the power button on the Pegasus turns amber showing that it has power. While the Mac is booting up, the Pegasus turns itself on, its power button turns blue, and when the Mac is up and running the Pegasus is mounted on the desktop. I have found that when ready to shut down, it is best to unmount the Pegasus first (you do want to unmount all external hard drives before shutting down the Mac), then shut down the Mac. Turn off the Pegasus using its power button, hold the button down for about 6 seconds until it turns red, then release the button. Lastly turn off the surge protector. You really can do this in any order you like but I have found that this works well for me.
As of this writing the Pegasus does not 'go to sleep' or 'spin down' but this feature should be available in the next software/firmware up date.
There are a large number of different RAIDs coming from a multitude of manufacturers. They run the gamut from inexpensive boxes, where you supply your own hard drives, to more expensive RAIDs that ship with more professionally built enclosures and 'enterprise' quality drives. Some RAIDs have only 2 drives, while others can hold up to 12. Basically, the more drives you have to work with in a RAID, the better the performance will be. Another issue that effects throughput speed is how the RAIDs are connected to your Mac, which can be connected via USB 2, FireWire, ethernet, eSATA, and now Thunderbolt. Thunderbolt is a new technology, so as such, the Pegasus RAIDs might be considered to be slightly more expensive than RAIDs using older connectivity, though it is significantly faster. The prices for the four different configurations of the Pegasus RAID are at the top of this article (from the Apple Store), however, if you look on line you'll find lower prices for these units.
In writing this article I have done some research to learn about RAIDs. One thing that continues to pop up is that despite the fact that RAIDs can have fault protection and redundancy, it is still necessary to have all of your media backed up elsewhere. At least now I know what to do with all those FireWire hard drives that are laying around.
Enjoy,
--ken
copyright © www.kenstone.net 2012
are either registered trademarks or trademarks of Apple. Other company and product names may be trademarks of their respective owners.
All screen captures, images, and textual references are the property and trademark of their creators/owners/publishers.