

Basics - QuickTime Web Movies April 19, 2004
QuickTime Pro - QT Movies from FCP
Basics - QuickTime Web Movies April 19, 2004
QuickTime Pro - QT Movies from FCP
By Ken Stone
You've finished your masterpiece in FCP and you want to put it on the web. There are a number of third party products that can do this, but we are going to use QuickTime Pro which comes with FCP and FCE.
As you know, with QT movies on the web, it's all about video quality and file size. These two items are tied together like 'Yin and Yang', (not Cheech and Chong). The smaller the file size, the lower the quality, the better the quality, the large the file. To add to the mix is the fact that some of your audience will be using dial up connections, others will be using broadband. Because of the huge difference in speed between dial up and broadband, the only solution is to create two different QT movies, one for each connection speed. If you want people to download your movies, you are going to have to consider download time.
Throughout this article we will be working with a one minute movie: DV - NTSC, 29.97 fps, 720 x 480. When this movie is exported from FCP as a 'self contained movie', it is 217 megs in size, far too big for the internet. So how do we make this one minute movie small enough for the internet? During the process of creating the QuickTime movie, we will be adjusting a number of different parameter, each one will help reduce the size of the file . It is by varying each of these QT parameters that we control quality and size. Before we get to the actual process of creating a QT movie for the web, we need to look at each of the QT parameters that we have at our disposal.
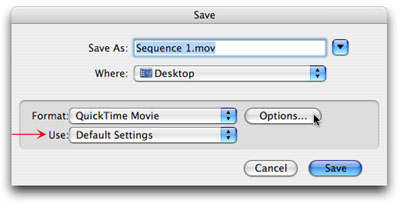
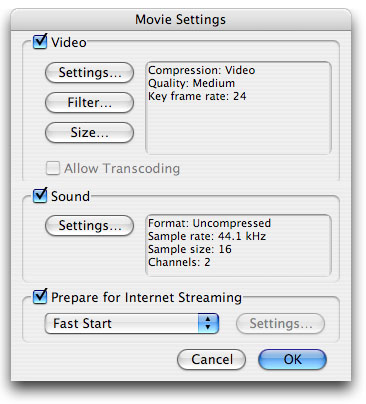
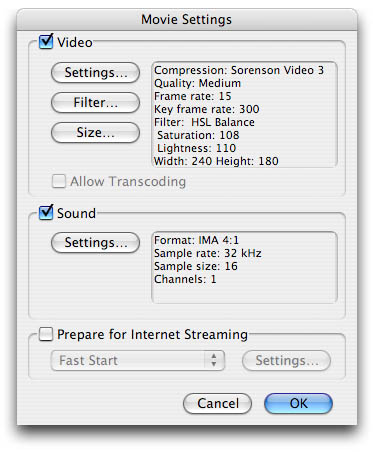
When you export to QuickTime from FCP, you will first be presented with a Save dialog box. Notice that the 'Use' setting, shown below left, is set to Default Settings, which would be the same as your Sequence settings in FCP. Click on the Options button. It is in the 'Movie Settings' window, shown below right with default settings, that all of the QT parameters are set. The Video section of the Movie Settings window has three buttons. 'Settings', in which you will choose your compression codec and set it's parameters. 'Filter' which you can use to added effects like Sharpen, Blur, Film look and Adjust, it is in the Adjust section in Filters that you can correct the gamma of your QT movie, more on this later. And 'Size' which will allow you to set your own custom size. In the Sound section, you will select a codec for compression of the audio portion of your QT movie. At the bottom of the Movie Settings box is 'Prepare for Internet Streaming' which we will discuss later.
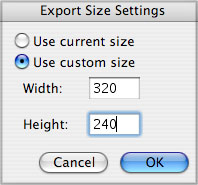
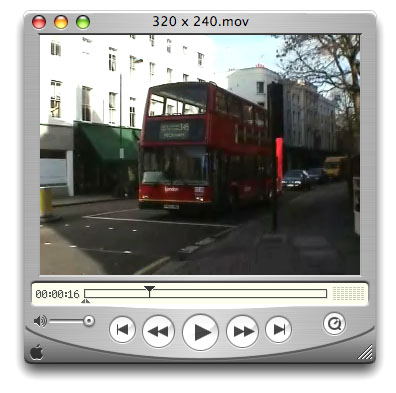
1. Export Size. We are starting off with a 720 x 480 pixel frame size from FCP, much larger than we want for the web. Reducing the frame sizes reduces the file, this is a good way to dramatically cut the size of a file. In the example below, I have created four QT movies of different size, using my one minute clip from FCP.
- 320 x 240 = 3.2 megs
- 240 x 180 = 2.4 megs
- 160 x 120 = 1.7 megs
- 120 x 90 = 1.4 megs
320 x 240 = 3.2 megs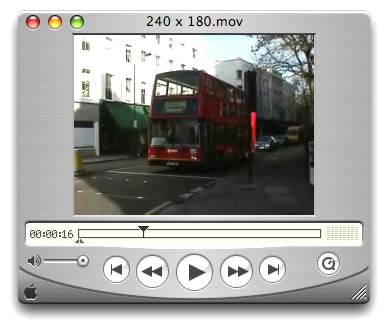
240 x 180 = 2.4 megs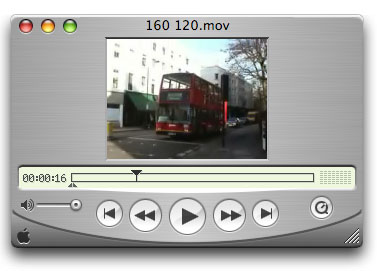
160 x 120 = 1.7 megs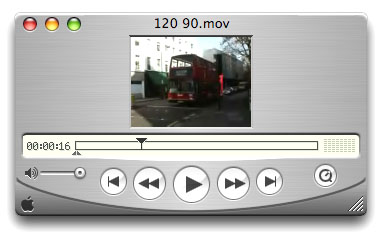
120 x 90 = 1.4 megsSo, size does matter. When picking your movie size, there is an important issue to consider. The media that we are using to make our QT movies is 'video' and video uses rectangular pixels for display, pixels that are taller than wide. However, we will be viewing the finished QT movies on a computer screen and computers use square pixels. The outcome of this is that the video in the finished QT movie, when displayed on computer screen, will show some distortion. The images will be slightly squished down. We can compensate or correct for the differences between square and rectangular pixels by picking frame sizes that will slightly stretch up our video footage. Our DV video has an aspect ratio of 3:2. The sizes that I have chosen below, have an aspect ratio of 4:3. It is by changing the aspect ratio, that we will correct for the difference between rectangular and square pixels and the video will display without distortion. When determining the size that you want your QT movie to be, there is a good rule of thumb. Both dimensions should be divisible by 4 and better yet by 16.
Suggested frame sizes
- 120 x 90
- 160 x 120
- 240 x 180
- 320 x 240
- 480 x 360
- 640 x 480
2. Compression Codec. We will achieve the major reduction of file size of the QT movie by applying a Codec, which will compress the video. File size reduction by compression is accomplished by discarding video information. Each Codec does this a little differently, yielding different file sizes and quality levels. QT offers a variety of Codecs.
3. Compression Quality. Most of the Codecs have a 'quality' slider with a range from 'Least' to 'Best' and normally default to Medium quality.
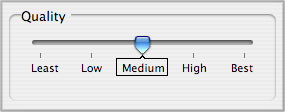
I have three examples shown below. All settings for the three movies were exactly the same except for changes in the Quality slider. Best quality produces a file that is huge in size, however, if you compare it to the Medium quality movie you will see very little difference in quality, but the medium quality movie is significantly smaller in size. The third movie, which was set to Least quality is much smaller again but the quality is so poor that it is worthless. Please remember that these are screen shots that were Jpegged for this article.
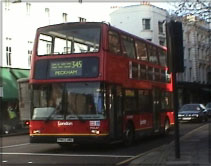
Best Quality - 47 megs
Medium Quality - 8 megs
Least Quality - 1.8 megs
4. Frames per second. Lowering the frame fate, the number of frames displayed every second, will cut file size. The amount of reduction that you choose will depend, in part, on the amount and speed of motion in your video. 15 fps for NTSC looks quite good even with a modest amount of motion. Below are four different fps settings, for the same one minute movie, showing the corresponding decrease in file size. NTSC has a native frame rate of 29.97 fps and PAL 25, setting the 'frames per second' too low will result in choppy motion during playback.
15 fps = 3.3 megs 12 fps = 2.9 megs 10 fps = 2.7 megs 8 fps = 2.4 megs
5. Key frame every. The keyframe lies at the heart of compression and has everything to do with quality. Older QT codecs, like MPEG 2, worked using a process called 'frame differencing'. A codec is able to compress, reduce the size of a file, by taking one frame of full video information and then generating the next number of frames by storing only the differences between each frame and the first full image frame. By storing only the changed information, the file becomes much smaller. That first frame is called a 'keyframe'.
Newer codecs, like Sorenson Video 3 and MPEG 4, use a different technique for compression but still involve Keyframes. The problem is that while in QT 6.5 everything under the hood is new, the QT interface that we use, is not. It was built in 1996 with the introduction of QT 3 (the foundation of our current QT). A lot has changed since then, however, the defaults that QT provides have not been changed in 8 years. The default setting found in "Key frame every" is 24 frames, this would be correct for the Animation codec, but is incorrect for the newer Sorenson Video 3 and MPEG 4 codecs, which are the two that we are working with here. For either of these two codecs, use the figure of 300 for NTSC and 250 for PAL.

Key frame rate for NTSC
Key frame rate for PAL
Key frame rate for Anmimation codecYou can actually see this keyframeing process in a finished QT movie. Open a movie in QT Player and move the playhead into the movie. Using the right arrow on the keyboard, step through the movie one click at a time. You will see a number of soft frames and then one frame will be very sharp, this is the keyframe. Continue on and you will see soft frames again until you get to the next, sharp, keyframe.
6. Limit Data Rate to. This setting is turned on by default, and is used when you plan to stream your movie from a streaming server. Internet Streaming is used for live web cast, like 'www.DVGuys.com' and 'Your Mac Life', internet radio shows, or the radio stations found in iTunes. Internet Steaming is different from the common QT downloads that most of us use. If you are not creating Streaming QT movies, and most will not be, this feature should be turned off. More about Limit Data Rate later.

7. Sound Settings. Audio files, while not as large as video files, still take up a great deal of space and contribute to the size of the QT movie. As you can see below, the Sound settings default to uncompressed full quality audio, including stereo. This is much more than is needed for good audio quality playback from a QT movie on the web.
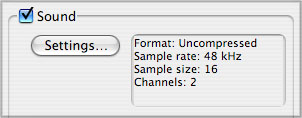
Below right I have changed the audio settings. The first thing to go is stereo, this will cut the size of the audio file in half. I have applied the IMA 4:1 compressor and lowered the audio sample rate to 32k. This will produce excellent audio and handles voice, music or both quite well.
Default Uncompressed Audio = 13.3 megs
Compressed Audio = 3.3 megs
Creating a QuickTime movie for the web.
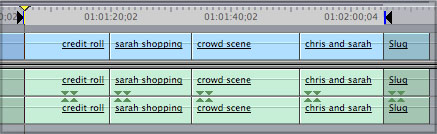
Time to get to work. Back in FCP 4 (FCE), I have rendered out my video and audio and then set In and Out points on my Timeline to define the movie that I want to convert to QT for the web. If you want to export your entire Sequence you can select it in the Browser window.
In FCP 4 and FCE 2, File Menu > Export > Using Quicktime Conversion. For FCP 3 and FCE 1, File Menu > Export > QuickTime.
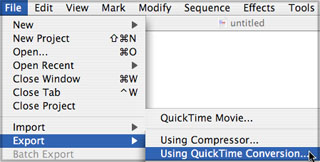
You will be presented with the Save dialog box. Notice that the 'Use' menu, below left, is set to Default Settings, not what you want. Click on the Options button. It is in the 'Movie Settings' window, shown below right with default settings, that all of the QT parameters are set.
I always set my 'Size', in the Video section first, and the first QT movie that I will make will be for broadband internet connection. When I build my QT movie for dial up I will pick a smaller Size thus reducing the file size for the slower connection speed.
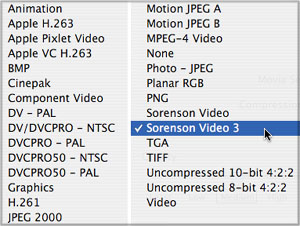
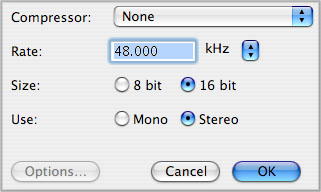
Click on the Settings button in the Video section, it is in this section that you will choose the Codec to compress your video. There are a number of choices and new to QT 6 is the "MPEG-4 Video" codec. Even though the new MPEG-4 Video is available, I have chosen the "Sorenson Video 3" codec for this article. There are several reasons for this. As MPEG-4 Video is found only in the newer QT 6 and considering that not everyone is running QT 6, there could be people who can not access playback of your MPEG-4 QT movie. As Sorenson Video 3 is available in older versions of QT, more people will be able to view your movie. The choice between Sorenson Video 3 or MPEG 4 is purely subjective. Some prefer one, some the other. I have been working with Sorenson for years and it is my codec of choice. On the plus side, MPEG 4 files sizes are inherently smaller. More importantly, MPEG 4 is also a smarter codec. Later on in this article I discuss gamma correction for viewing QT movies on PCs. With MPEG 4 the gamma correction process is not necessary as the MPEG 4 codec automatically buries 'Color Sync' profiles in the QT movies. At playback, the MPEG 4 QT movie will check the platform of the viewer and adjust gamma automatically, serving up a gamma corrected version for that platform, Mac or PC. This is a powerful feature.
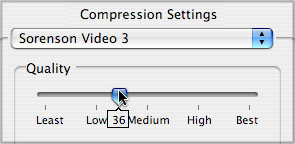
With Compression Quality slider I will use the default setting of "Medium' as this seems to be a good compromise between quality and size. As you can see below, it is possible to tweak the Quality settings, to make slight adjustments for movie quality and size.
In the Frames per second section, the default setting shows no value, the box is blank. You must enter a value, I have set 12 fps as my QT movie has little motion.
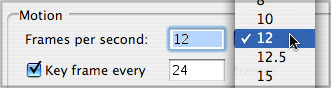
"Key frame every" defaults to every 24 frames which would only be correct for the Animation codec. For the Sorenson Video 3 and MPEG 4 codecs be sure to change this setting.
|
Key frame rate for NTSC |
Key frame rate for PAL |
"Limit data rate to". There are two different ways to have QuickTime movies download to your audience. Internet Streaming is done in real time, and is used for live broadcasts, like web casts or the radio stations found in iTunes. Progressive or .html downloads, the more common method, is similar to downloading any file file from the internet and is not done in real time, it takes as long as it takes. Both dial up and broadband have limits to how much data per second each can handle. This concept is most important for Internet Streaming. The Data Rate of a movie is critical for streaming movies. As streaming is done in real time, if the data rate is higher than the connection speed, dial up or broadband, the real time playback will be disrupted.
In order to prevent overloading the connection with too high a data rate for Internet Streaming, we can set "Limit Data Rate to", which will act like a governor and will restrict the finished size of the file by adding additional compression. If a data rate is entered into the Data Rate box, the Quality slider, found in the codec setting section, will be disabled. As I feel that this setting is a most critical parameter for controlling quality, I would prefer to change other QT parameters to reduce files size rather than degrade the quality of my QT movie. As most of us will not be creating Internet Streaming movies, I would suggest that you can leave this box empty. If our QT movies files have a larger data rate then the connection speed, they will simply take a little longer to download. 'Limit Data Rate to' is enabled by default and is set at 90 KBytes/sec, which would be a broadband rate.

Audio compression quality is very important, it seems that it's better to have good sound and slightly less video quality, than to have poor audio with great video. I have found that using the IMA 4:1 audio compressor produces excellent audio for both voice and music. I reduce my audio sample rate to 32 kHz and set audio to mono. Bit depth is left at 16 bit and often is the only choice. There are a number of QT parameters that I will adjust to improve the quality of my QT movie or alter it's size, but this audio setting is the one parameter that I won't change. Though in some cases you might be able to set the audio sample rate to 22 k.
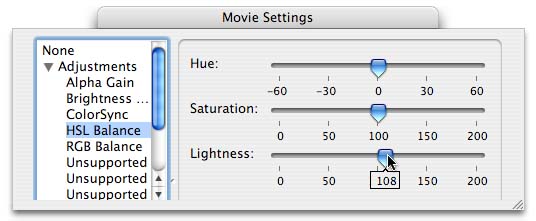
Gamma Correction for Compression and PCs (for Sorenson Video 3). There are two immutable truths about creating QT movies for the web. Compression always darkens the video image and QT movies always playback darker on PCs than Macs and by a fair amount. During compression, the Gamma or mid-tones of the video, darken and contrast can be lost. QT does not have true gamma control, but it does offer us a way to adjust the gamma of our video. In the Movie Settings window, click on the Filter button.
Inside Filters, open Adjustments. You will see a Brightness and Contrast filter but select the 'HSL Balance' filter, (you can apply only one Adjustment per movie). I normally move the Lightness slider up about 8 to 12 percent, to compensate for the loss incurred during compression. The amount of Lightness adjustment required will vary with your footage and your QT settings. In some cases you may want to increase your Saturation as well. Bright outdoor scenes will require less adjustment than darker imagery.
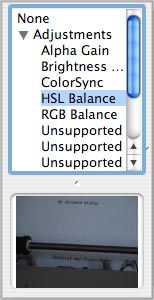
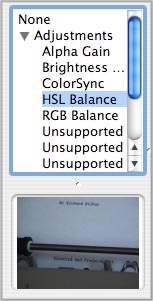
QT offers a small preview window to monitor your adjustments. The main drawback to this little preview window is that it only displays the first frame of your movie and the first frame may not be the best frame to use as a guide for the rest of your video. Shown below left is the video before adjustment, below right, with Lightness at 108. While not extremely accurate, the preview window will help get you into the ball park.
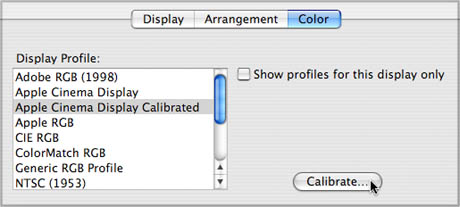
I did mention that PCs display darker than Macs, so how do you audition your QT movies if you don't happen to have a PC laying around? We can turn our Macs in to PCs, don't worry, it will just be for a few minutes. Open your QT movie in the QT Player, have it sitting on the desktop. Go into System Preferences and click on 'Displays', then select the Color tab. Click on the Calibrate button.
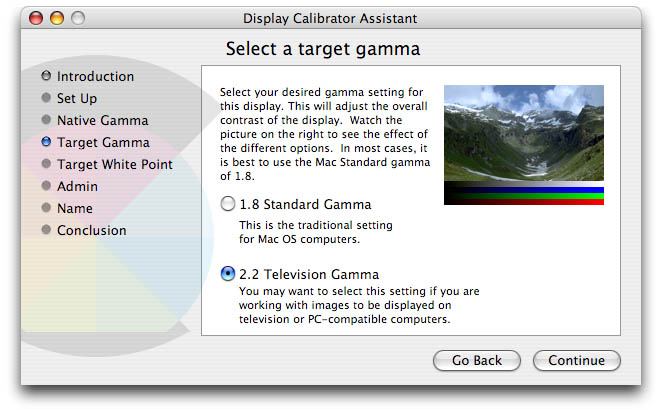
This will open the 'Display Calibrate Assistant', click on the continue button to get to the Target Gamma section, shown below. It will open with the 1.8 Standard Gamma, default for the Mac. If you click on the 2.2 Television Gamma, also for PC computers, your monitor will darken going to 2.2 gamma, this is the world of PCs, dare I say it, the dark side. Okay, with the Display Calibrator Assistant open, begin to play your QT movie, now, while the movie is playing, switch back and forth between the two gammas and audition your movie, both as a Mac and a PC. Isn't OS X cool? How much to lighten your movie to compensate for 2.2 gamma is up to you. Altering your QT movie to make it look good on PCs is going to make it look less good on Macs. If platform is an important issue, you can make two versions of your QT movie, one for Macs and one for the other guys.
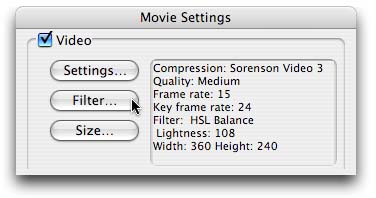
Movie Settings/Summary. When you have entered all your settings and click Okay, you will be returned to the Movie Settings window. This window acts like a Summary for all your QT settings and it's important that you review your settings here before you move on. When you get your movie just right, take a screen shot of this window, or write the settings down, too bad we can't make favorites.
Prepare for Internet Streaming. Internet Streaming is a special QuickTime mode of media delivery. Media is streamed from a server to your Mac, in real time, like a web cast or the radio stations found in iTunes. When you audition a 30 second song in the iTunes store, the audio is streamed to your computer and it plays, but it is not written to your hard drive. This is one reason for using Internet Streaming, no copy is made.
Each Internet Service Provider has different requirements for Internet Streaming, you'll need to check with your ISP for particulars. Additional 'how to technical info' on Streaming QuickTime. For the rest of us who do not need to Stream, uncheck this box.
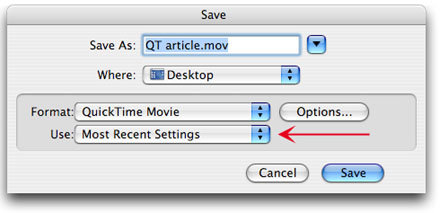
Save. When you have completed all your settings, click okay and you will return to the Save dialog box. Name your movie and Save it to the Desktop. "Format" should be QuickTime Movie. You will notice that the "Use" box now reads 'Most Recent Settings,' this is correct and it is referring to the settings that you just completed.
Real World. There is one more immutable truth about making QT movies, you never get it right the first time, although after building a number of QT movies and getting some experience with the settings you should come close. There really can't be any one single standard because every movie is different.
I always start by selecting the Size. Of course, we all want our movies to be of good size, but if I find that my file size is just too big, I'll reduce the Size of my QT movie, as changing this one parameter, can greatly reduce the size of the file. If my movie is short, I'll export the entire thing to get a good look at quality throughout and to determine the final file size. If my movie is large, I'll set In and Out points on my TL around an area that might contain transitions and rapid motion, an area that would have the most difficult footage and test with that section. When I have the quality the way I want, I'll then export the entire movie to check it's final size.
If I find the quality lacking, which can be the case, I'll try to analyze what element of the QT movie is not working properly. If the motion is choppy I'll increase the frames per second. Of course, if you're planning to create a QT movie for the web from the 'get go,' when selecting your clips, you might want to avoid scenes that are very dark, have rapid motion or motion close to the camera lens. Hold back on the use of transitions, especially the Cross Dissolve. You can create a better looking QT movie by avoiding elements that are difficult to compress in the first place.
If your QT movie will be viewed on PCs, and you are using Sorenson Video 3 as your codec, then you need to adjust for the Gamma differences between Macs and PCs. The MPEG 4 codec will take care of the gamma issue by embedding color sync information into the file for you. If building two QT movies, one for broadband and the other for dial up, I'll create the broadband version first and then, normally, drop down the Size of the movie for dial up, leaving the other parameters alone. What QT file size to shoot for? Dial up connections are around 3 minutes (approximately) per meg, so a file of between one and two megs seems to be reasonable. Broadband connects are quite a bit faster and files sizes can go to 10 megs or higher without taxing the patience of your audience.
Producing good QT movies for the web is a bit of a black science. There are a number of ways to reduce the size of a QuickTime movie but it comes at a price. Quality testing is a must. I often will build a number of QT movies (you should see my desktop), changing QT parameters as I go, trying to get that 'right' combination of quality and size.
Enjoy,
--ken
Publisher's Disclaimer. The procedures and settings suggested by the author of this article are his own personal views and do not reflect the views of the publisher of this web site. (g)
Copyright © www.kenstone.net 2004
© 2000 -2004 Apple
Computer, Inc. All rights reserved. Apple, the Apple logo, Final
Cut Pro, Macintosh and Power Mac
are either registered trademarks or trademarks of Apple. Other
company and product names may be trademarks of their respective
owners.
All screen captures, images, and textual references are the property and trademark of their creators/owners/publishers.