
|
Real-Time And Rendering In FCP 4
|
November 3, 2003
Understanding Real-Time And Rendering In FCP 4
By Andrew Balis
This article was Ken Stone's idea. I give him the credit and the blame. What could be a more mundane subject to write about? But it does seem like a new area of confusion, not just for new users, but for some well schooled FCP users as well. With the new real-time playback and rendering options, playback vs. output quality, the myriad of settings that seem to pop up everywhere, it does seem like a good time to get to the bottom of it all.
All in all, certain similar questions keep popping up, like:
Is there a difference in quality between a real-time clip and a rendered clip? Just how do I render correctly? How do I choose the render quality? Which settings shouldn't I mess with? Just what is the difference between a Mixdown, Item Level or For Playback rendering options? How do I get my render keyboard shortcuts to work the way they used to? Why is it that when I choose to render nothing seems to happen? Do I need to render before output? What's the difference between high quality and full quality real-time effects? And, what's with the new rainbow of colors in my Timeline?
If any of these questions sound familiar, you may have already pondered them yourself, asked someone, or felt it must be too obvious so you don't ask at all. I felt the same way. Yes there has been some re-labeling of features, new options, menu items for rendering that overlap one another, and some other oddities. In addition, the rules change with different types of systems and there have been some exciting new hardware options that are also shaking things up.
I tried to keep this article as short as possible, cause let's face it, who wants to read about rendering. But there are some important things to discuss, so I also tried to be somewhat comprehensive about our options. Feel free to skip around if some things aren't pertinent to you. The article covers topics in the following order:
- Real-time playback. How to get it, manipulate it, increase it, and what it all means.
- Other previewing options. Covers how to get previews of effects when they aren't real-time capable.
- Output. Options and considerations to check before output.
- Rendering. How to render, get through the maze of overlapping rendering options, and modifying render qualities.
Real-Time Effects Playback
First off, let's talk about the traditional option to render out an effect at a lower than full quality. Up through FCP 3, it was potentially a helpful option to lower the render quality to speed up rendering time. This could be invaluable if you are just in the testing phase to see how the effect plays from start to finish. Testing by rendering at a lower quality could save time so that you will quickly know whether or not you're going in a good direction with the effect. When fine-tuning the effect then you could always switch back to high quality and render.
Well, in FCP 4, there seems to be no quick way to alter the render qualities. In fact, these choices have moved a little further away to the Sequence Settings and can't be accessed as quickly. But why, you ask.
Now, instead of using rendering by default, we can try and play it in real-time first. Because real-time playback options have much expanded with the new software and the latest computers, we have to change how we look at the notion of rendering altogether. Even with a relatively slower computer you can get some amount of real-time effects. You need only a G4 500 or any dual processor G4 to get a minimal amount of real-time. Since only G4s are qualified to work with FCP 4, then almost all of us have some degree of real-time. With faster processors, hard drives or a capture card (depending on the card), even more real-time capabilities exist.
The way FCP has been re-designed, we should look at rendering as a last resort, or the final thing we do before output, if its even necessary at all. That's right. There is not a need to render on some computers at any point, and it brings up an area of confusion for even the most schooled FCP user.
Working With Real-Time
The exact effects that are real-time changes from system to system. What will be global, however, is how the effects are displayed in the Effects menu or in the Effects tab of the Browser, the RT pop up menu, as well as the render indicators in the Timeline. This same information can be applied to DV, standard definition or HD projects.
Effects In Bold
Filters and transitions that are real-time capable will be listed in the Effects menu and the Effects tab of the Browser in bold type. Ok. Nothing new here.

Render/RT Indicators
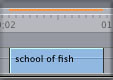
When an effect is applied to a clip in the Timeline, that section of the Timeline will be marked by a colored line at the top of the Timeline ruler. If the color is red, then the effect needs to be rendered before playing it back (if you do play back, you'll get a screen that says "Unrendered". This is the standard render indicators that we've seen through all versions of FCP.
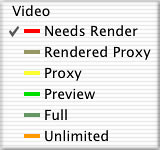
If its one of several other colors, however, then it indicates that the effect can be played back in real-time. This arena has changed dramatically. There are several colors that may show up in your Timeline because there are now several different real-time classifications. At first we'll just cover the indicator's color and a basic definition and then we'll expound on their differences as needed throughout the article.
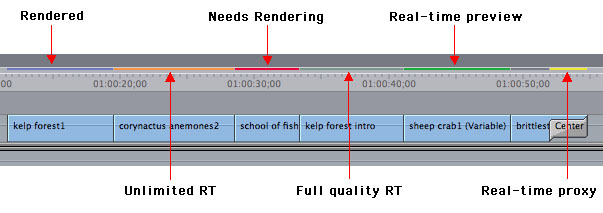
- Red = Rendering required for playback.
- Bright green = Real time preview. This Timeline section can be played back without rendering.
- Yellow = Proxy effect. This color will be seen on certain real-time effects where the filter or transition is only real-time at certain settings. When choosing other settings, FCP will still play back the effect, but at the nearest real-time increment. In other words, the effect is close, but if you really want to see the exact settings you applied then you'll need to render.
- Orange = Unlimited RT playback. This color is found when an effect is too intense to be played back in real-time without dropping frames. The effect will be played back at the current quality, but will "stutter". It may stutter a lot or a little, depending on the effect and the system.
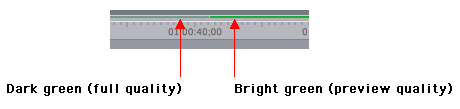
- Dark green = Full quality real-time playback. We'll come back to this in more detail.
- Dark blue = Rendered.
The RT Pop Up Menu
Most of our real-time options are found in the RT pop up menu in the Timeline.
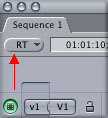
This new menu has definitely caused more than a little confusion. Although this menu appears in the same spot as another menu in FCP 3, it is not a menu for changing render qualities, it's mostly a menu for choosing playback quality with real-time effects. Render quality is handled separately from here.
Clicking on the little RT button brings up the real-time menu with several options. For now, we'll limit the discussion to just a couple of these choices.
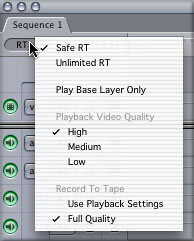
Quality Choices
The middle section of the menu, labeled Playback Video Quality and includes choices labeled High, Medium and Low determine the quality level of effects as they are played back. More accurately, it describes the real-time playback quality for effects that have not been rendered.
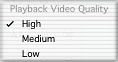
These options can be a great aid when attempting to play an effect. If an effect can not playback initially, one option is to lower the quality level. As less quality equates to lower processing demands, you may be able to play more effects at a lower quality. Of course, if you are trying to judge the final quality of text, for example, then lowering the quality isn't the best choice. But if you are trying to determine an overall direction for the effect, then this can be handy.
A few important distinctions to mention:
- These options only affect sections of the Timeline that have effects applied, but have not been rendered. Rendered images play at the render quality, not at these playback choices.
- These quality choices do not impact clips without effects. Any clips without effects will playback at full quality.
- No matter what the quality is set to, it only affects playback, not paused images. When the playhead is paused over an effect, FCP draws a high quality still whether the effect is a real-time effect or requires rendering.
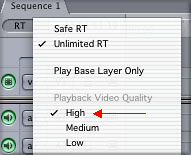
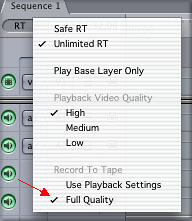
Safe/Unlimited RT
At the top of the RT pop up menu is a choice between Safe RT and Unlimited RT.
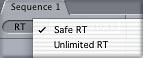
If this one still baffles you, you're not alone. This option is something else you can try when an effect can't initially be played back in real-time.
Before describing exactly what it does, it's important to mention what it doesn't do: it does not affect quality, playback or render quality. So don't worry about checking this setting before output. I say this first because this is another area of confusion that I've seen. Although, that begs the question, if it doesn't affect quality, what's it for and do weed need to worry about it at all?
By default, this setting is set to Safe RT. When left at this setting, FCP will return a red render line when an effect can't be played back in real-time without dropping frames. When the menu is switched to Unlimited RT, FCP will play back even more complex effects, but it may result in dropped frames on those effects. Since this setting does not affect rendering, then as long as this effect is rendered before output, you will get full quality without dropped frames.
How does it work? If an effect has a red render line, try switching to Unlimited RT from the RT pop up menu.
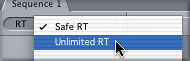
If the effect can now be played back, the render indicator will change to orange. Orange will only be seen when the effect can't safely play back without dropped frames. As a result, you may also notice stuttery playback. Also, because this process allows dropped frames to play back, you may want to turn off the dropped frames warning in the User Preferences so that its not triggered whenever you play an Unlimited RT effect.
Personally, I've been leaving my Timeline set to Unlimited RT. Why not? If FCP can play it back, it will. If I need to see full quality without dropping frames, I can always render. Also, any real-time effects less than full quality will need to be rendered before output anyway.
Full vs High Quality
What's that? There's a difference? Is one better than the other? I know I was scratching my head when I saw this at first. Depending on your setup, you may have seen the dark green real-time indicators shown in the next illustration.
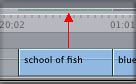
This hardly visible dark green color indicates something called Full Quality. This is not the same thing as real-time at the High quality setting in the RT pop up. Its better. What?... Yeah. I'm with you... That doesn't seem to make sense... I know.
Well, it might be simpler if we looked at it another way. All of the colored render/RT indicators can be broken down into two categories:
- Preview quality: whether the Timeline indicator is bright green, yellow or orange, the effect is playing back at the current playback quality set in the RT Pop up menu. If the menu is set to High quality, then the output may be good, but it would be better if rendered.
- Final quality: There is only one render/RT color that indicates that the playback is happening at the best quality: dark green. If this color is being displayed, you could directly record the output and this would be the best quality you could get with the current codec being used. This quality is referred to as Full, and is only seen in conjunction with the dark green indicator. In these situations, no rendering is required at all. This also indicates that if you rendered, the quality would not get any better.
Note: The quality levels mentioned above are relative to a specific codec (compressor) being used for a sequence. Since codecs are not created equal, and some have a better quality output than others, the above only relates to performance when using one codec, and how things are handled differently between real-time and rendered images, not between different codecs.
How To Get Full Quality RT
Even if an effect can be played back in real-time at full quality, as well as out to external video at full quality, it doesn't mean that this will happen by default.
- To see if an effect can play at full quality, click on the RT pop up menu and switch the playback quality to High.
If the indicator in the Timeline turns dark green, then you have Full quality playback.
So, although the High Quality playback setting does not necessarily equate to Full quality, you still need to select it to get Full quality. Get that?
What System Configurations Are Getting Full Quality RT
Under what situations will you be able to get full quality real-time playback, with external video on? Well, this one is contingent on a number of factors.
- Processor(s) speed: Faster is better under certain situations. When the sequence relies on the processor(s) to render, a faster computer equates to more real-time effects, higher quality previews, more full quality playback and more real-time tracks. Yes, a G5 yields more than a G4. In the standard definition arena, the Decklink capture card by Blackmagic and Apple's Uncompressed codecs, or working in DV are examples of systems that dramatically benefit from faster computers.
- Hard drive speeds. All system configurations seem to benefit from faster drives. SCSI Raids, ATA Raids, and for the extreme needs, an XServe Raid from Apple can be used to increase the level of real-time effects.
- Capture card: This one has kind of been turned on its ears with the release of FCP 4. We used to say that the advantage of a capture card was the dedicated hardware used to process the effects. Now, cheaper solutions are potentially offering a wider range of options. Listed next are two different capture cards. They both work very differently and each offers attractive options..
- The Pinnacle CineWave is an example of a card that can offer a lot of real-time effects because the chipset on the card processes the effects. On the downside, because the Pinnacle codecs use the capture card, a faster computer processor would not help achieve more real-time. The full featured Pinnacle CineWave RT Pro is priced upwards of around $10,000 . As of this writing, the Pinnacle CineWave seems only capable of producing a High quality real-time playback of effects, but not the Full real-time quality discussed earlier. Therefore, you should render before final output with this card to get the best output.
- Blackmagic's Decklink Pro is an example of a card that is dependent on the computer processor. As such, a slow computer will realize few real-time effects, but a faster computer will see many more. The Decklink Pro card is priced at $1295. The Decklink can actually produce Full quality real-time while currently the CineWave, a much pricier card, can't seem to do this (although of course the CineWave is worth its cost in other valuable features).
Other Preview Options
I won't linger on these options, just an overview, cause I want to stay on topic of real-time and rendering. Skip ahead to Rendering if this doesn't interest you or you already know these options. None of them are new to FCP 4.
When you have exceeded your high quality real-time capabilities, there are a few different alternatives for seeing a preview of an effect. In the end, as these options are just previews, these effects will still need to be rendered before output.
RAM Preview
There are a few different ways we can utilize a RAM preview to display multiple frames of an effect, and in turn get a broad sense of the effect over a range of frames. To understand the basics of a RAM preview, we can look to what happens every time we pause the playhead over a frame that needs rendering. FCP processes a high quality still image of the current frame and loads it into RAM. It is displayed in the Canvas and to external video if its turned on.
RAM Preview Options:
- Moving the playhead: Click in the Timeline ruler to move the playhead and spot check the effect in different parts of the clip. The advantage of looking at paused, individual frames is that they will be seen in a high quality, not the real-time playback quality, which may be set to a lower quality.
As you move the playhead around, don't scrub (drag the playhead). Instead click in the Timeline ruler. Pause briefly and then click in another spot. Dragging the playhead too quickly may be faster than FCP can render the frames into RAM and you would notice any of three symptoms: a black X in the upper right corner of the Canvas, the cursor cycling from white to black and the playhead seemingly getting stuck or skipping across the Timeline.
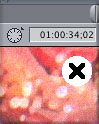

These symbols are telling you that FCP is still busy trying to process a frame, and the system is momentarily busy. Just pause the playhead momentarily enough for FCP to catch up. If you spot check three or four places throughout the effect, you have a quick way to check a wide range of frames.
- Option/P: This is another way to do a RAM preview. Park the playhead a few frames before the clip with the effect, press Option/P. This will cause FCP to move one frame at a time throughout the clip, process the frame into RAM and display it, doing this same process as fast as it can, moving from frame to frame. The advantage of Option/P is the ability to see frames as fast as FCP can display them. The downside, these frames are not necessarily at a high quality. This seems to be the new rule with Option/P:
- If the effect has a red render indicator, then the effect will render into RAM at high quality.
- If the effect has a real-time indicator (orange, bright green, or yellow), the effect will play at the real time playback quality, which could be set lower than high quality.
For an effect that is beyond your real-time capabilities, Option/P is an alternative to rendering to see the clip play back as fast as it can.
QuickView
This is another RAM preview, built into a dedicated window for previewing. This window is opened by choosing Tools > QuickView.
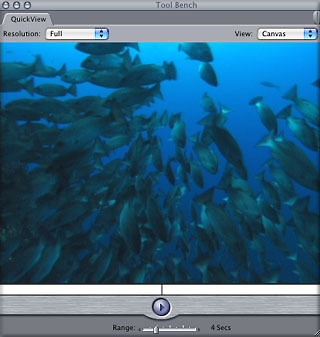
You have more options with QuickView than just the Option/P combination in the Timeline. As an overview:
- You can set a range of frames in the Timeline with an in and out point or you can use a range slider in the QuickView window.
- You can choose Full, Half or Quarter quality for the playback. The lower the quality, the quicker the playback.
- Operated by pressing the space bar to play and pause. The first time played back, the playback will stutter similar to Option/P as the frames are being rendered into RAM. Additionally, you can drag the playhead back and forth in the scrubber bar of the QuickView.
- After the first playback of the effect, the frames rendered into RAM may still be available. If they are still in RAM, playback the second time around will be in real-time. This is dependant on whether the range of frames played back exceeded what could be placed into RAM. If there are more frames than RAM can handle, you'll notice frames from the left of the QuickView playhead are "dropped" out of RAM and need to be re-cached. The more RAM, the more frames can be stored and available for immediate playback.
- QuickView only displays in the computer screen and not out to external video. Option/P on the other hand, does play these preview frames out to external video (in some cases).
RAM Previews And Proxy Effects
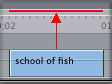
One of the benefits of all RAM preview options is the benefit of seeing a proxy effect at the specific settings that are applied. This is not the case when playing the effect in real-time. As mentioned earlier, a proxy effect means that the effect only plays back at certain RT settings. Therefore, if you set a custom setting that is not real-time, FCP will playback at one of the RT settings. Without rendering, the only option to seeing the effect at the custom settings is to use RAM preview options. One example of a proxy effect in DV is the Center Wipe transition. If the transition is set to any 45 degree increment, it will play at that setting. If it is set to another angle, the effect will playback at the nearest
45 degree angle. For example, if set to 12 degrees, it will play back at 0
degrees instead. However, when viewing the effect paused, using Option/P or QuickView you will see the effect at the chosen angle.
Now, here's the weird part, and its something to keep in mind. Although a proxy effect may show up with a yellow indicator, it also may not! What?!? That's right, depending on your system and setup, something that should be labeled with yellow may also display another indicator: orange. If your Timeline is set to Unlimited RT, then the proxy effect may be labeled with orange. Therefore, if you notice that an effect is not playing back at the desired setting, and the render bar is orange, it could be this anomaly. Try using a RAM preview option or render that section to see the effect as it should look.
External Video
Whether external video is turned on or off also has an impact on the level of real-time playback when you are using a processor dependant codec for your sequence, a codec like DV. Think of turning on external video like adding another effect. You may need to lower the quality of the real-time playback when external video is turned on in order to maintain real-time.
Turning off external video may be helpful as a way to preview in the Canvas a complicated effect that is too processor heavy to be viewed out to external video in real-time. Then, when wanting to judge final quality, you could render and turn on external video.
- To turn on external video: Choose View > External Video > All Frames.
- To turn off external video: Choose View > External Video > Off.
- The keyboard shortcut to toggle external video on/off: Command/F12.
Wireframe
One last mention on previewing and testing effects. This may be obvious to some of you, but still a valuable tool to mention. For animated motion effects, like moving an image across the screen, the image information isn't always critical when designing the path for the image.
- If the motion effect isn't real-time, even at low quality, click on the View pop up menu in the Canvas (the button on the right) and choose Wireframe (not Image/Wireframe, just Wireframe).
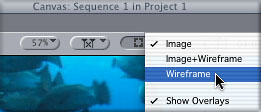
This will display only a green outline for a clip that's selected in the Timeline. This outline will play in real-time no matter what the real-time capabilities of the system. This can give you valuable feedback for the pacing or timing of the motion effect.
How To Output At Full Quality
Before discussing rendering and output options, I just want to re-assert that if any applied effects register a dark green color in the render bar, then these sections would not require rendering before output as they are at Full (best) quality.
As for those items that are playing a preview quality (bright green, yellow or orange), these items do require rendering before output if you want the best possible quality. Whether or not FCP renders all these sections automatically or whether you need to manually render items depends on what type of output you use.
- Edit to Tape or Print to Video: If you use either of these output options when recording back to tape, then anything that hasn't been rendered prior to output will automatically get rendered by FCP beforehand. In order to make sure that FCP outputs with either of these methods at the best quality, there is a setting to check. Click on the RT pop up menu in the Timeline. At the bottom of the menu is a choice for output quality. Make sure there is a check mark next to Full Quality.
- Timeline playback recording: As you may know, we don't need to use Edit to Tape or Print to Video to output to tape. Simply make sure external video is turned on, press Record on your deck or camera, wait for it to get up to speed, then playback the sequence. When using this type of output, you will record whatever is the current real-time playback quality. Therefore, for best quality:
- Render everything (except those sections labeled at Full quality with the dark green indicator).
- Turn on warning for dropped frames during playback. Found in User Preferences. This is an important precaution to avoid recording any glitches during the playback.
Rendering Video
How to render. This one used to be super simple. You had two basic choices, rendering a selection or rendering everything in the sequence. Now, in FCP 4, there are three render sub menus found in the Sequence menu each with a ton of options.
Since a lot of these options are definitely an overlap of one another, and there are now several ways to do the same thing, let's take as simple an approach as possible to rendering. Instead of covering every item, let's just look at a few select options.
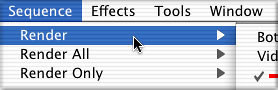
Setting Up The "Render" Menu
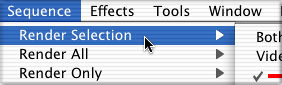
After this is set up, you will have a quick way to render from the menu or from a keyboard shortcut. First off, to get on the same page, the Render menu is the top menu option in the Sequence menu.
The exact name displayed in the Sequence menu depends on what's going on in the Timeline.
- If a clip is selected in the Timeline, the menu will read Render Selection.
- If an in and out point are set in the Timeline, then the menu will read Render In to Out.
- If nothing is selected, and there is no in or out points, then the menu will simply read Render.
The Way The New Render Menus Work
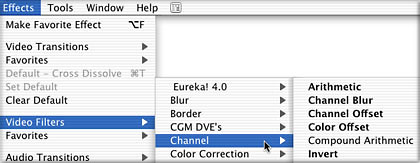
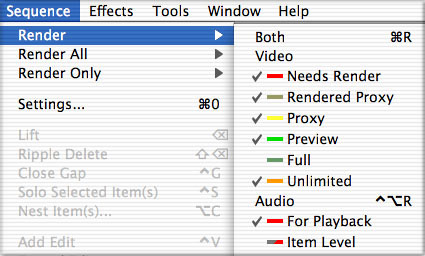
In the Render sub menu in the next illustration, notice that there are three "choices": Both, Video or Audio.
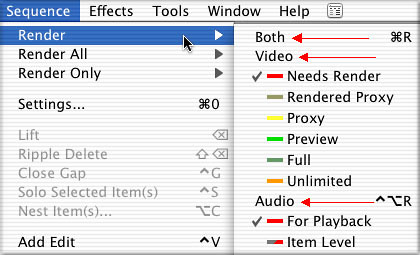
Choosing any of these options renders whatever is checked below it. Inset under the Video option is a list of all the render and real-time indicators, listed by color and name. Notice that by default, only one item is checked under Video: red - Needs Render. This means that only red sections of the Timeline will be rendered when choosing to render Video from this menu.
Consequently, if something in the Timeline has an orange, yellow or green render bar, it can't be rendered by simply selecting Sequence > Render > Video. Nothing will happen. That's because there is no check mark next to any other indicator except red.
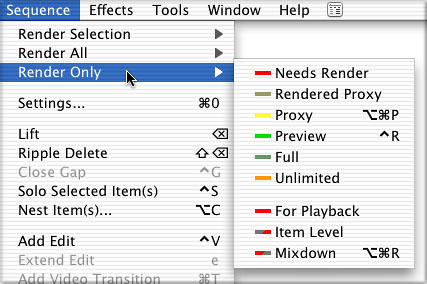
To set it up to be more flexible, you need to add a check mark across from all choices under Video (except Full), as outlined next.
Change The Defaults
Choose Sequence > Render > Video > and click on the option labeled Rendered Proxy.
Choose Sequence > Render > Video > and click on the option labeled Proxy.
Choose Sequence > Render > Video > Preview.
Choose Sequence > Render > Video > Unlimited.
Once complete, the Render menu should look like the following illustration.
Render Selection
This renders only those items in the Timeline that are selected first. After selecting one or more items, do either of the following:
- Press Command/R.
- Choose Sequence > Render Selection. There is no need to choose anything from the sub-menu, just choose Render Selection.
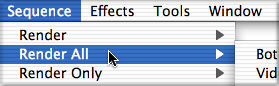
Render All
This renders all video and audio items with effects, except those section labeled as Full (dark green indicator). To render, do either of the following:
- Press Option/R
- Choose Sequence > Render All. Similar to render selection, there is no need to choose anything from the Render All sub-menu, just choose Render All.
Cancel A Render In Progress
One little nicety is the ability to cancel out of a render and see what's been rendered so far. As FCP renders from left to right in your sequence, canceling out lets you playback the first portion of the effect.
To cancel out of a render, do either of the following:
- Press the Cancel button in the render status box.
- Press Esc.
Rendering Audio
Audio plays by a different set of rules than video. When we render video, we render a section of the Timeline, not individual clips. Anything at a particular frame across all tracks will be rendered into one render file. Audio is able to be rendered as an individual clip, or as a combination of all tracks. What is most appropriate depends on the situation.
Rendering Factors
First off, what requires rendering before playback is dependant on a number of factors, including:
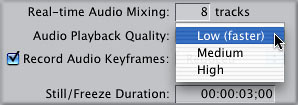
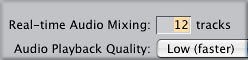
- Audio Playback Quality: This is set in the User Preferences. The lower the quality setting, the more tracks and effects can be played back in real-time. Leave at Low while editing, and High when doing a final audio mix.
- Real-time Audio Mixing: This is also set in the User Preferences. Sets a limit on how many tracks will attempt to play back before prompting you to render. This has generally always felt like a false limit to me, and I always bump this up. If FCP can't do it, it will still return with a red render indicator.
- Processor and hard drive speeds: In general, faster computers will play more tracks and effects in real-time.
- Mixed Sample Rates: It is possible to use audio of different sample rates in a sequence, but we have to be aware of the consequences. When switching the playback quality for audio to High, any audio that does not match the sequence settings is up or down sampled to match the sequence. This is processor intensive and will result in less real-time playback. For example, a dual 1Ghz G4 may play back several tracks of mixed sample rates at Low or Medium Quality, but when switching to High, any Timeline sections with alternate sample rates will display a red render line.
Timeline Audio Indicators
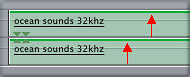
If you didn't already know, there are actually two thinly separated render bars in the Timeline. The upper bar is for video, and anything on the lower bar is the audio. If the audio can't play back in real-time, you will hear a repeating beep and the section of the Timeline will display a red render bar.
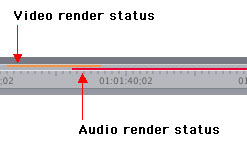
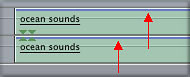
If the audio of the Timeline is rendered, known as a mixdown, then a dark blue bar will run along the audio portion of the render bar.
If the dark blue bar runs along the top of a clip instead of in the render bar, then the clip is rendered individually, known as item level rendering (we'll cover what that means in the next section).
Another indicator that may appear on a clip in the Timeline is a green bar running along the top of a clip. This does not indicate that you need to render, simply that this clip has a different sample rate than that of the current sequence settings.
Item Level Rendering
This is a new option for rendering in FCP 4. As mentioned earlier, this has to do with rendering individual clips. You might wonder when and why we want to do this type of rendering. Think of rendering clips individually like a pre-mix. This can increase the level of real-time audio playback with other tracks, but how?
Let's say you have 8 tracks of audio. On one clip and there are several filters. The timeline displays a red render bar. If you render the 8 tracks into one render file, and then make an audio level change on any of the 8 tracks, you would need to re-render, as the group of tracks need to be processed again. On the other hand, if the clip with filters was rendered on its own, then a levels adjustment was made on any of the tracks, you may not need to render again. Since FCP references the affected clip from a render file, instead of real time audio mixing, there is more real time available once that clip is rendered. So, adding tracks, effects, changing levels might stay in real time more easily when using item level rendering to render individual clips.
The only downside is that you can potentially eat up more hard drive space with item level rendering than by mixing the sequence in one render file.
Change Defaults For Render Menu
You guessed it. Just as we had to change the defaults for rendering video, it would be helpful to change the defaults for audio so that it can be accomplished by a quick keyboard shortcut.
Choose Sequence > Render > Audio > and place a check mark next to Item
Level.
Render Item Level Audio
Select an audio clip or group of audio clips.
Do either of the following:
- Press Command/R
- Choose Sequence > Render Only > Item Level
Whether or not multiple clips are selected before rendering, the clips are rendered individually.
Audio Mixdown
When the audio is rendered as a mixdown, instead of item level, then all tracks are mixed together and turned into a single render file. The advantage of a mixdown is the same as its always been. During output (or just playback), a mixdown will lessen the chances for getting dropped frames. Instead of mixing several tracks in real time, FCP references the render file.
Also, as item level rendering only processes clips that have effects or a different sample rate, any other tracks are ignored. By doing a mixdown, you ensure that all tracks are mixed together at the highest quality.
In fact, rendering the audio is completely independent of the audio playback quality that is set in the User Preferences. No matter what quality you choose there, as long as you do a mixdown, you render and output at the highest quality.
How To Mixdown
Make sure nothing in the timeline is highlighted. You can click in a blank space or press Shift/Command/A. If something remains highlighted, only that section of the Timeline will be rendered.
Do either of the following:
- Choose Sequence > Render Only > Mixdown. This is the only menu that lists the mixdown option.
- Press Command/Option/R.
Trashing Item Level Renders
You can option to clear up hard drive space from a lot of item level rendering before a mixdown, although it is not necessary.
Choose Tools > Render Manager.
In the Render Manager, twirl down the arrow next to your project, then sequence. The Render Manager lists renders by sequence and type.
Place a check mark for Audio Items in the column labeled Remove. Audio Items stands for item level rendering. Notice in the next illustration that mixdown renders are listed separately. Additionally, no matter how many render files exist for that sequence, there will only be one item to check in the Render Manager as it stands for all items of that type, not just for individual render files.
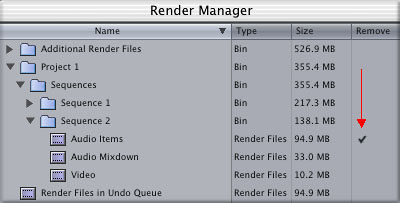
Click OK. Only item level renders will be deleted.
"For Playback" Rendering
These audio rendering options, labeled For Playback, found in all three render menus, seem to be a complete overlap of item level rendering. I personally have found no difference between choosing For Playback or Item Level. Either one performs a render of a clip on its own, separate from other clips. I thought that maybe there was a quality difference but I can't see or hear it. The render files are the same size, sound the same, and are classified by the Render Manager as the same type of file. But FCP won't render For Playback when choosing it under all scenarios, so you'll find that sometimes it works, other times it won't. My feeling about this one- just stay away from it all together. The Item Level rendering options we covered before are sufficient.
Modifying Render Qualities
All sequences are not created equal. By default, a sequence preset may be set to the best possible quality, an output level quality, but it also may not. As a reminder, the RT pop up settings in the Timeline do not affect how things are rendered. Instead, render qualities for the current sequence can be examined and altered by visiting the sequence settings.
- Choose Sequence > Settings.
On the General tab, you will find the basic settings for the sequence, including the compressor being used. If the settings on this tab do not closely match your current material, instead of changing these, choose a more appropriate Easy Setup from the Final Cut Pro menu and create a new sequence to work from.
There are two other tabs in the Sequence Settings that you may want to customize, however. These are the Video Processing and Render Control tabs.
Video Processing Tab
Click on the Video Processing tab to see a list of options. When working with YUV codecs like DV or the new Apple Uncompressed codecs, choose one of the "...high precision YUV" options to take advantage of the best available quality. These options will take longer but yield the best results. To render a little quicker, choose to render in 8 bit.

Note: Different options may be grayed out here, depending on the codec you're working with.
Render Control Tab
By default, all these settings will be set to the best quality, with every option being rendered, and frame rate and resolution set to 100%.
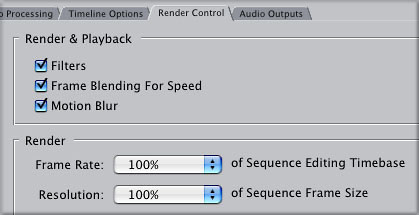
To speed up rendering, uncheck any options or lower the frame rate or resolution. I would generally try to stay away from altering these settings unless absolutely necessary. If you do change anything here, remember to set everything back to their defaults and render again before final output. For anything already rendered at lower quality, you'll have to force a render since items are already rendered.
The easiest way to force a render is to delete the render files that already exist. Use the Render Manager to delete any lower quality renders and then render at best quality.
Altering Render Presets
Only for the faint of heart. I really don't recommend changing anything here as it affects all future sequences that are created. Presets related to rendering options are found in the User Preferences. There, you will find a Render Control tab. This tab is used as a preset for new sequences.
I actually mention this more as a way to say try and stay away from here. Anything modified here does not affect the current sequence, but will affect sequences created after this is set. As a reminder, if you want to change the render quality of the current sequence, then go the sequence settings for that sequence.
A Final Word
Many thanks to Ken Stone, Charles Roberts, Cawan Starks of ProMax, and Rob King of Braverman Productions. Their observations, tests and insights were very generous.
Andrew Balis
After receiving an undergraduate degree in film from NYU, Andrew moved west to Los Angeles where he has worked in the film industry for more than a decade. Andrew works as a cinematographer, editor, post production consultant, and regularly teaches classes in Final Cut Pro to industry professionals. Andrew has lectured for institutions including Apple, UCLA, Moviola, AFI and IFP among others. He is the co-author of the soon to be released Apple Pro Series book titled Final Cut Pro: Advanced Editing and Finishing Techniques and was the co-author of the original Apple certified curriculum for introductory, advanced, and effects classes, developed at Moviola Education.
[Top]
copyright © www.kenstone.net 2003
All screen captures, images, and textual references are the property and trademark of their creators/owners/publishers.


