
June 4, 2012
Download the ePub iPad/iPhone version of this article.
By Ken Stone
There will be times when we want to change the speed of a clip to achieve an effect, either speed it up or slow it down. In FCP X, this process is called 'Retiming' and there are two basic Retiming effects, Constant speed, which uniformly changes the speed that a clip plays out, and Variable speed, which will change the speed of the clip over time. In FCP X a variable speed change is called 'Speed Ramp'. FCP X provides a few additional speed effects, 'Hold' (freeze frame), 'Reverse Clip', 'Instant Replay' and 'Rewind'. We are also offered the ability to choose the process for rendering our speed changes, Normal, Frame Blending and Optical Flow. Normal renders quickly, Frame Blending takes longer to render but produces better quality and Optical Flow which takes the longest to render but gives the best quality. In FCP X we even have the option to 'Preserve Pitch' when changing the speed of a clip, for example, if we speed up a clip with 'Preserve Pitch' enabled, our audio will not sound like a bunch of chipmunks.
Constant Speed Changes
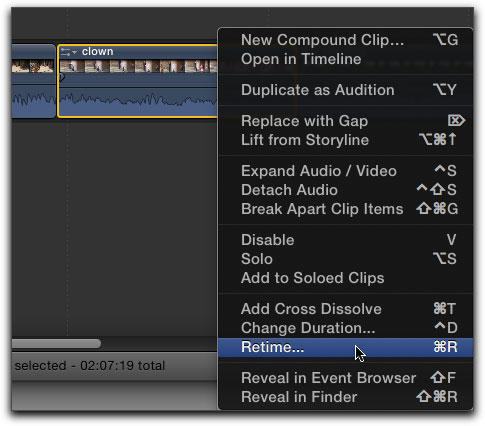
Applying a Constant speed change to a clip, either speeding it up or slowing it down, can be done from several places in the FCP X interface. First we'll look at making Constant speed changes right in the clip in the timeline. Control or right click on the clip in the timeline and slide down to 'Retime'.
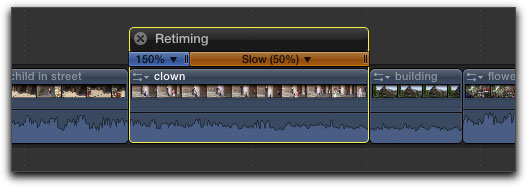
This will open the 'Retiming Editor' at the top of the clip.
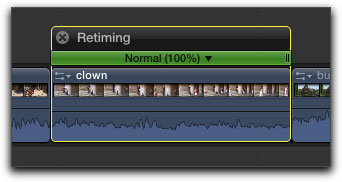
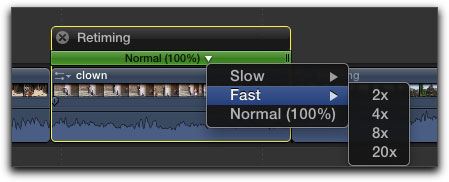
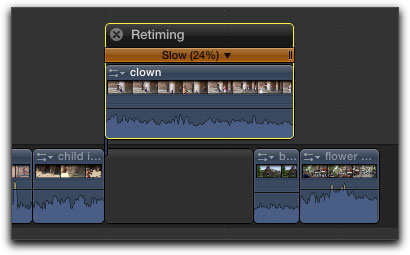
Click on the twirl-down in the Retiming Editor to reveal different speed options.
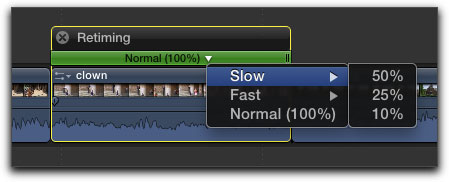
As shown below, Slow is given as percentages and Fast is given as speed multiples. It is important to point out that changing the duration of a clip will change the total length of the timeline. Making a clip run slower will lengthen the duration of the clip and the timeline. Making a clip run faster will shorten the length of the clip and the timeline. When we change the length of the clip, faster or slower, all of the clips that follow the affected clip in the timeline, will ripple to adjust for the speed change.
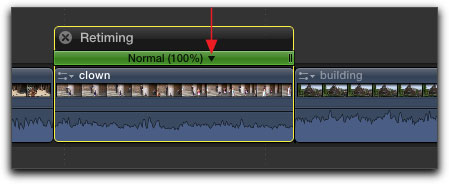
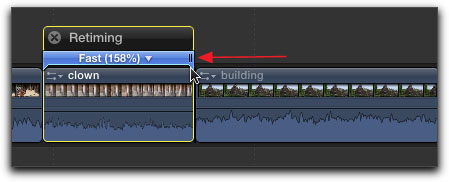
Even though the Retiming Editor provides several speed options for both Slow and Fast, we are not limited to these preset speed changes. We can change the speed to any amount that we want. When we first open the Retiming Editor, there is a green retiming bar, green denotes that the clip will play at normal speed. To manually change the speed of a clip, click on the handle at the right of the retiming bar (red arrows below) and drag. If we drag to the right and make the clip longer, we will be slowing down the clip. Note that the retiming bar turns orange to show that the clip has been slowed down. The percentage of speed change is shown in the retiming bar as well. Below left, I have slowed the clip down to 68%. Below right I have dragged the retiming handle to the left, making the clip shorter, thus speeding it up. Clips that have been sped up have a blue retiming bar.

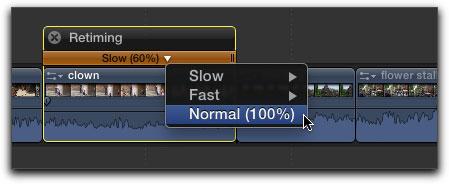
If you have changed the speed of a clip and wish to reset it back to normal speed, in the Retiming Editor, click on the twirl-down and select Normal (100%). Click on the 'X' to close the Retiming Editor.

Speed Ramp (Variable speed)
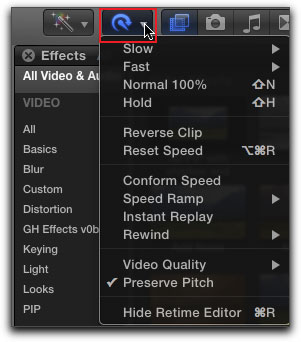
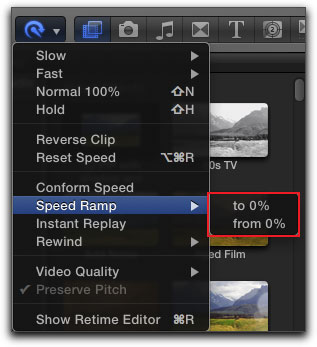
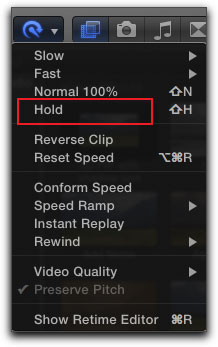
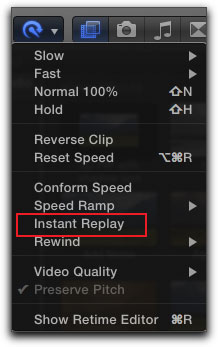
While we can do Constant speed changes right from inside a clip in the timeline, FCP X offers addition speed effects that can be found in the Retime menu, red box below left. As shown below right, I have selected Speed Ramp (variable speed) from the Retime menu which offers two choices. "To 0%" means that the clip will start off at 100% speed and finish up at 0% speed. The second offering "from 0%" will start the clip at 0% speed and ramp the speed up to 100% by the end of the clip. Just as with a Constant speed change, if you Ramp the speed of a clip it will change the duration of the clip and the length of the project in the timeline.
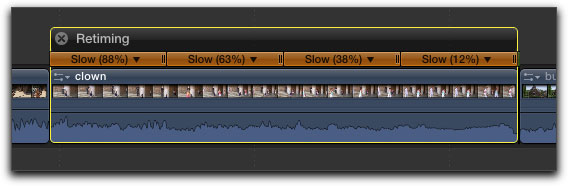
For my first example I have selected a clip on the timeline and then, from the Retime menu, chosen Speed Ramp 'to 0%', meaning that I want the clip to slow down over time. One might expect that the speed ramp would be a continuous slowing down of the clip. However, this is not the case. As you can see below, FCP X breaks the clip into four sections, each progressive section is slower than the preceding one. Even though the slow down occurs in four different stages, when rendered, the ramp does look smooth.
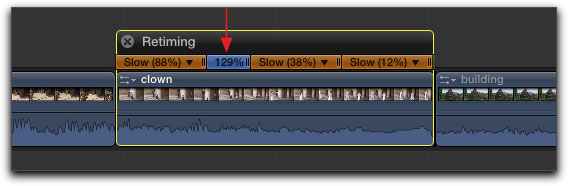
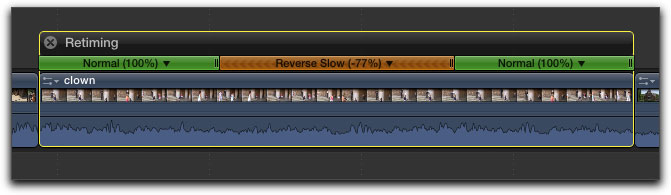
In case you are wondering, as each of the four speed segments has a retiming handle, can you modify the speed of one of the segments. The answer is yes. Shown below is the same clip with 'ramp to 0%' applied as shown above, but I have dragged the Slow (63%) segment's handle to the left, shortening that section thus speeding it up. This can make for some interesting speed effects.
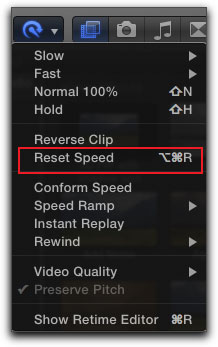
If you have applied a Speed Ramp to a clip and then decided that you want to remove the Speed Ramp from the clip, select the clip in the timeline and then, from the Retime menu, click on 'Reset Speed'.
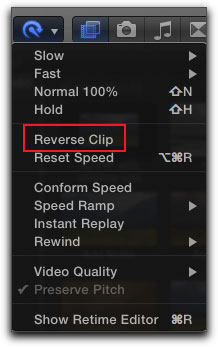
Reverse Clip
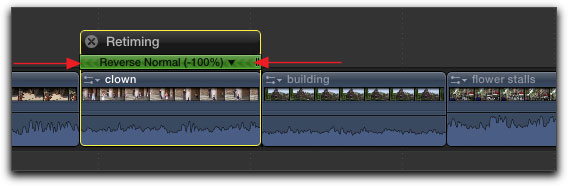
Choosing Reverse Clip from the Retime menu will run the clip backwards. As you can see below, the retime bar shows 'Reverse Normal (-100%), note the minus sign (-) in the percentage, you can also see a number of ghosted arrows, (red arrows below), in the green retime bar, pointing to the left, showing that the clip will play in reverse.
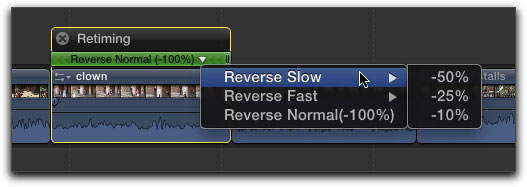
Clicking on the twirl-down reveals the same speed options seen before, except that with Reverse clip, the speeds are shown as negative numbers as the clip will be running backwards.
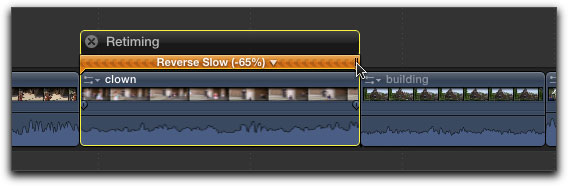
As with other retimed clips, there is a handle in the retime bar, click and drag on it to change the duration of the reversed clip, either faster or slower.
Hold
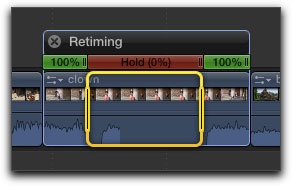
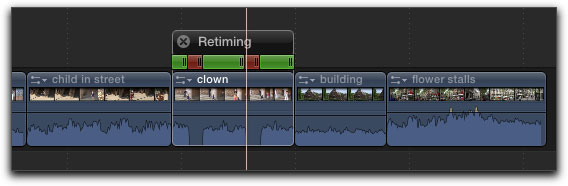
When you select 'Hold' from the Retime menu, FCP X will place what we used to call a Freeze frame into the clip. The Hold frame will be colored red in the retime bar. The clip will play at normal speed, hit the hold, which has a default duration of 2 seconds, and then finish up the clip at normal speed.
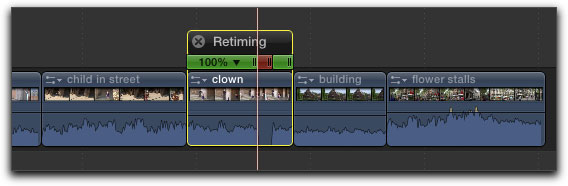
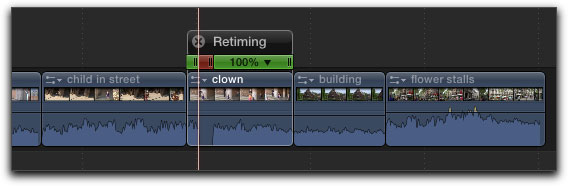
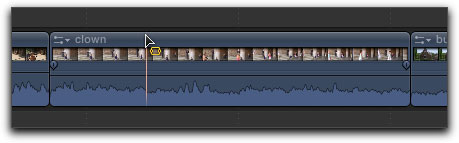
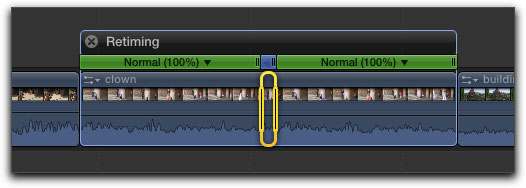
So, who controls the position of the Hold frame in the clip? We do. With the clip selected, park your playhead on the frame that you want to be the start of your Hold frame and then select Hold from the Retime menu. I'm showing the same 'clown' clip above and below. Notice that the Hold frame is applied to the position of the playhead.
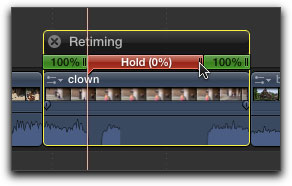
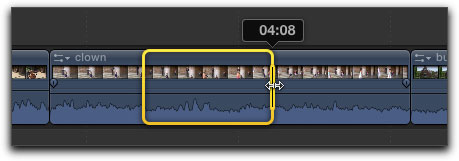
As shown below left, you can drag the handle of a Hold frame to change its duration. If you need to ascertain the duration of the Hold frame, using the select tool (A from the keyboard), click on the red Hold retime bar to set a range, below center. From the keyboard, Control D will show you the length of the Hold in the FCP X Dashboard, below right. Actually, you can check the duration of any of the segments in a retime using the same process.

You can select part of a clip using the Range tool and then apply a speed change to the selected area.
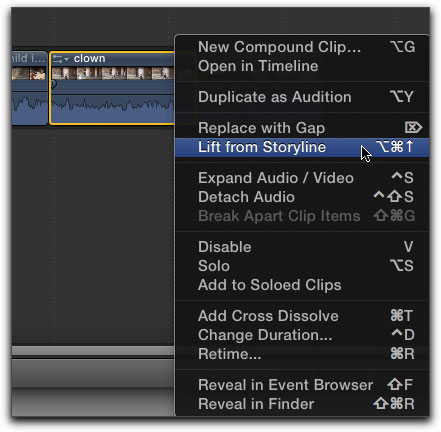
Changing the duration of a clip will change the total duration of the timeline. If you don't want to alter the total project duration, control click and select 'Lift from Storyline. Now, when you change the duration of a clip, the clip length will change but the overall length of the Project will remain the same.
You can create more than one Hold frame in a clip. Park your playhead where you want the first hold frame and select Hold from the Retime menu. Then move the playhead to a new location and apply a second Hold.
Instant Replay
Instant Replay is rather simplistic, in that all it does, is play the clip twice.
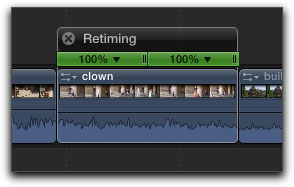
About the only thing that I can see being done to Instant Replay might be to change the playing speed for each instance of the the clip.
Rewind
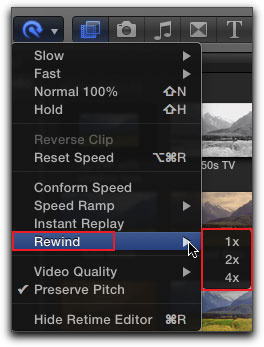
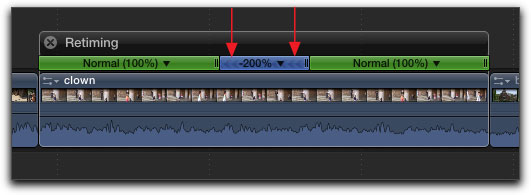
Rewind is an often used effect, probably most often for sports and action sequences. Select the clip in the timeline and choose Rewind. Note that three preset rewind speeds are offered, 1X, 2X and 4X. As shown below right, I have applied a 2X Rewind, which means that the rewind clip will play back a double speed. The speed of '-200%' is shown in the retime bar. The red arrows below point to the ghost arrows pointing to the left showing that this section will run in reverse.
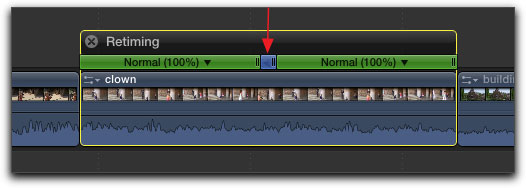
Even though Rewind offers a 4X speed, it could be that this speed is not fast enough for the effect you want. As with any retime bar, you can click on the Rewind section handle, (red arrow below), and drag to the left to shorten the rewind section thus increasing the speed that the section rewinds.
If you need to check the duration of the rewind, use the Selection tool, click on the Rewind section in the Retime bar which will set a range for the rewind section. Then, from the keyboard, Control D. The rewind section's duration will show in the Dashboard.

Of course you can click on the retime handle and drag to the right to lengthen or slow down the rewind effect.
Optical Flow
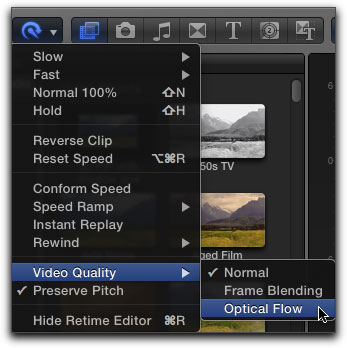
Choosing Optical Flow from the Video Quality option in the Retime menu will yield the highest quality.
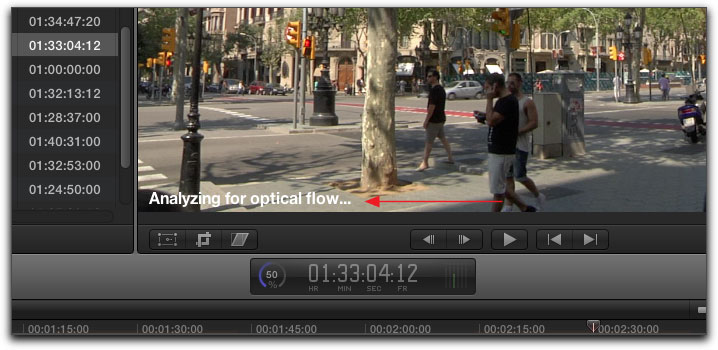
After you apply a Retime effect to a clip and then choose Optical Flow, FCP X will 'Analyze for optical flow' automatically as can be seen in the Viewer window.
Once the 'Analyzing for optical flow' process has been completed, you'll still have to render the clip to see the final results. There have been a few instances where the rendering of a Retime effect using Optical Flow has produced some very strange results. If this happens, for now, you'll need to choose Frame Blending for your Video Quality render.
Final Thoughts
You can select multiple clips in the timeline and then apply a Retime effect to all the clips at once. This will work for Slow, Fast, Reverse clip and Rewind, but does not work with Speed Ramp and Instant Replay.


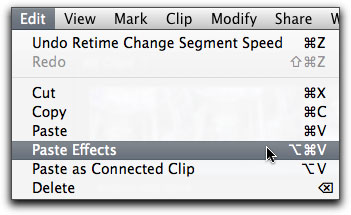
After you have created a Retime effect to a clip, you can Copy the clip (select the clip in the timeline and Command C from the keyboard) and then select a clip or clips in the timeline and from the Edit menu > Paste Effects.
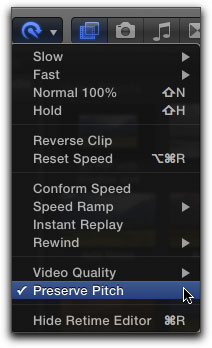
When you change the speed of a clip and select Preserve Pitch from the Retime menu, the pitch of the audio will be preserved, but you need to remember that even though the pitch might be correct, the audio is still going to sound strange because it will be either sped up or slowed down.
Enjoy,
--ken
copyright © www.kenstone.net 2012
are either registered trademarks or trademarks of Apple. Other company and product names may be trademarks of their respective owners.
All screen captures, images, and textual references are the property and trademark of their creators/owners/publishers.