
Software Review June 30, 2001
AlamDV
Special Effects for the rest of us.
AlamDV $65 (downloads only)
csb-digital www.AlamDV.com
Software Review June 30, 2001
AlamDV
Special Effects for the rest of us.
AlamDV $65 (downloads only)
csb-digital www.AlamDV.com
Review by George Lemonofides
AlamDV sets out to provide three things.
First - Impressive special effects,
Second - Effects which are easy to produce,
Third - A program at affordable prices.
This review will look at how well csb has met its objectives with its first, very original, piece of software.
If you want to get a real taste of what can be achieved, go to AlamDV's web site at www.AlamDV.com. There you will see a large selection of downloadable movies, which will confirm that AlamDV is capable of producing some very cool effects.
As you can see AlamDV specialises in all kinds of lighting effects, from
laser swords and gun muzzle flashes, to lightning strikes, lens flares and many more. At present there are some 35 effects, and csb hopes to keep adding effects until there are at least 100. csb has already provided a development kit and is encouraging its customers to develop their own effects and make them available for downloading from the AlamDV site.
AlamDV sells for just $65. This price is little more than the cost of shareware and includes future updates of the program untill version 3, and all future plug ins (effects) developed for AlamDV. So AlamDV produces impressive special effects at a very affordable price. So how does it meet its third objective " very easy to use".
AlamDV is a stand alone, cross platform, program. Before you can add an effect you must import your video clips into AlamDV. Movies can be in either AVI or QT format. I imported clips from Premier 5.1 , Final Cut Pro 2.0 & iMovie 2.0. Once imported you are asked to select the frame rate of your movie.
Each effect is a seperate plug in, with everything needed to produce that effect. the backbone of the program is Director, but the workings of Director are cleverly hidden, and as you will see, this greatly simplifies producing all of the efffects
When I first saw the sample movies, I thought that AlamDV was going to be difficult to learn and I was prepared to burn the midnight oil. To my surprise the reality was very differrent, once I had grasped the basic prinicipals, I was producing very acceptable results within 30 minutes.
I ran into a problem when I down loaded the help files, these have to opened in a browser, and to be effective you need to open the index page first, this page accesses all of the other pages in contents order. However there were no instructions to warn me about this , and I spent a long frustrating time before I worked it out. I have now labeled the index page with a colour, so that I can easily identify it in the help folder. Clearly it would be much better, if the help files were produced as a single PDF file.
Another niggle is that each page of the help file must be printed separately, which is a bit of a pain, however once you have read the files, and understand the basic principals, you will be creating laser duels, in no time.
AlamDV can best be described as a simplified paint program, each effect is applied frame by frame. You, determine, size and position of each effect and the program paints the effect onto each frame.
The AlamDV working area is shown below and is dominated by the canvas window which holds the frames being worked on. These are surrounded by various pallettes which provide the tools needed to create the effects. They are:
csb digital is a new company recently started by three young guys just out of university. Its mission in life is to produce "Professional software for the amateur market". Its first product AlamDV is aimed squarely at the video enthusiast.
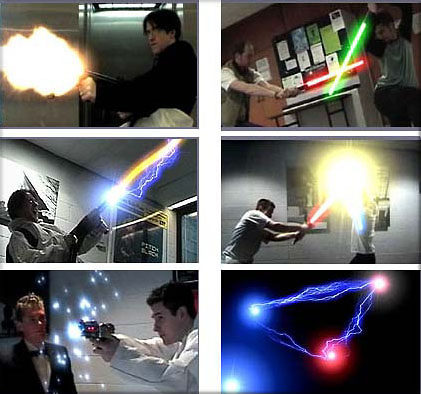 First lets look at some impressive special effects.
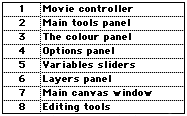
We will be covering the use of all of these panels .
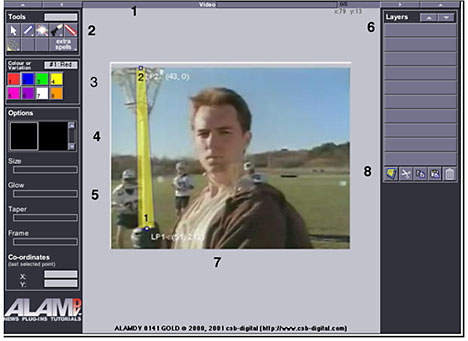
Effects can be applied very simply, by either clicking once, twice or four times on each frame of your clip. Lets look at the a most impressive effect, the Laser Sword. For this effect you need to click twice on each frame. This is called a point to point selection.
The pictures below show before and after shots. First select the Taper laser sword from the tools selection pallete. Your selection appears in the options box.
Now click at point 1) at the hilt of the sword and then click at point 2) the tip of the blade, a yellow bar appears. (upper picture,) This bar is shows an area where the effect will be painted . The yellow area is editable in several ways. You can shorten or increase the the length of the blade by dragging point 2 at the tip either way. You can increase the width of the blade by adjusting the size slide bar on the properties panel.
You can adjust the width of the glow around the laser blade by adjusting the glow slider. Finally you can change the colour of the surrounding glow using the colour variations selector.

Once you are happy with your selections, just hit the return key. The frame is rendered instantly and the result is presented to you immediately. If you are happy with the result you can move onto the next frame, using the right arrow on the keyboard. You are now ready to paint the next frame.
In producing a laser duel, a sawn off broom handle is a useful aid, the handle will provide a visual guide, as the length and angle of the blade changes in each frame. When the frame is rendered, the handle will disappear behind the laser blade. It would also help if your video was shot, using a higher shutter speed to increase the sharpness of each frame.
Sword duels will take a while to create, as there will be many frames in each sequence, however once you have developed a little skill, you can whip through each frame using two fingers on one hand, and the mouse in the other.
Most other effects only last a few frames, for example a single shot from a pistol lasts only three frames, so they take no time at all.
AlamDV provides a great deal of help with animating certain effects. Lets look at an example, the machine gun muzzle flash. To produce this effect, you will use a four point path known as the quad selection.
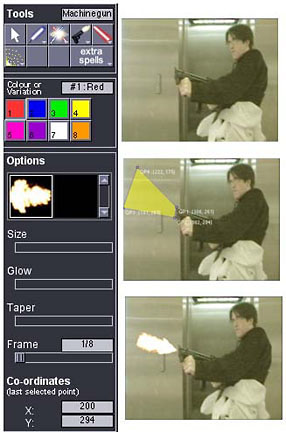
The picture above denote the three stages of producing this effect. The first is the frame in the movie, where the effect will be applied. The second shows the four point path needed for this effect. The bottom picture shows the rendered effect.
Notice in the properties menu, the frame slider is now activated, with the number 1/8 above it. Where ever a programmed animation is available for an effect, this slider will be activated. csb has cleverly analysed this effect and decided that it needs an 8 frame animation to make it more believable. When you advance your clip from frame to frame and reset your 4 point paths, AlamDV will vary the painted flash a little over each of the remaining frames, resulting in an effective animation. Many of the effects have these animation options built in to them.
These animations can vary from 3 frames, for a single pistol shot, up to as many as 50 frames for the Quad lightning effect. You can also choose a randomised selector which is available under the edit menu.
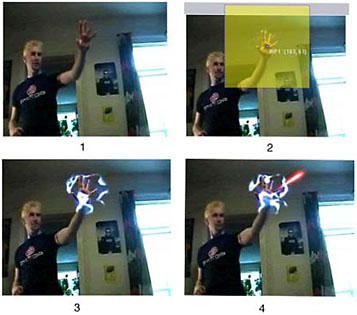
You can add as many as 10 effects to any frame. The four images below show how this is done. First we will apply a force field to these frames.
Picture 1 shows the frame at which the force field will appear. This effect is a single click or centre point effect. Click in the centre of the actors palm, and a yellow square is drawn. The size of this square can be adjusted using the size slider. Picture 3 shows the effect after it is rendered.. In picture four we have added a laser photon, which is being deflected by the shield..This was applied by adding a second effect to this frame.
Each layer window provides basic data about the effect applied to that layer. The active layer is shown by the change in colour. The two arrows located besides the layer title allow you to move the layers forward and backwards in relation to each other.
You can edit an effect at any time on any frame. First find the frame you wish to edit. Double click on the layer window for the effect you wish to edit. The original effect will be de-rendered and the yellow box re-appears in the canvas window. Make the appropriate adjustments and re-render by hitting the return key.
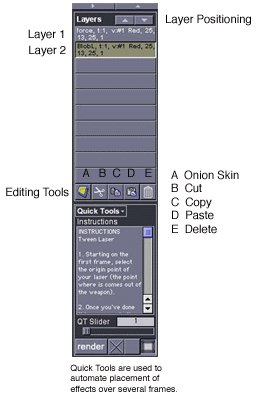 The editing tools are used to speed up adding effects to each frame. There is an onion skin feature, which provides a very useful guide as you move from frame to frame. The cut, copy, paste and delete tools are handy for transferring effects from frame to frame.
Quick Tools is a feature used to automate the application of effects over several frames. It uses a tweening method which can operate over several frames. So far ony two of the effects have a quick tools capabilty, but it is the intention of csb to automate many more.
Once you have completed painting the effects over the required number of frames in your clip, you can export the clip back as a movie in either QuickTime or AVI format.
I would like to see a few changes to the program, larger control buttons and tool boxes would be helpful. The ability to apply effects to an alpha channel would be very useful and a transparancy slider for the appropriate effects would increase the range of their usefulness.
csb has already developed a cool web site, which has improved week by week. It includes an excellent gallery section and a lively selection of forums where enthusiates can swap notes.
Anyone using AlamDV will need to find suitable sound effects to accompany these spectacular visual effects, copyright laws permitting, you will need to record those favorite Star Wars sounds and Hollywood gun battles.
In summary, AlamDV is an incredible, value for money product. It lives upto its promise of providing spectaular effects, easily produced and at a price the rest of us can aford. It is great fun to use, and I promise you, you will be looking for excuses to use these effects. I believe that the cbs's corporate philosophy needs to be encouraged. I urge you to visit their web site and download some of the available movies.
Finally a message for the developers at csb "Nice one guys, may the force continue to be with you."
George Lemonofides is now retired, and is a serious amateur videographer. He has been working with non linear editing since he owned the first Radius digitising board, back in 1991. Enjoys making local history videos and producing information videos for charities. Recently completed a tutorial CD program for iMovie 2.0 for the Virtual Training Company. Now uses Final Cut Pro as his main editing package.
copyright © George Lemonofides 2001