
Software Review CHV Plugins December 9, 2002
CHV-Electronics - The 3 D Collection - FCP Plugins
Digital Video Effects for Apple Final Cut Pro
OS 9 and X, FCP 2 and 3
by CHV-ElectronicsThe 3D Collection - 3D Explode - 3D Clips - 3D Matrix - 3D Cube
$ 39.00Review by Ken Stone
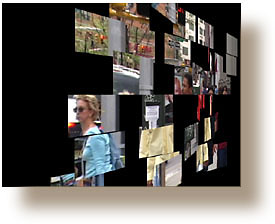
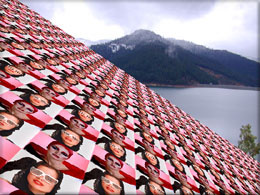
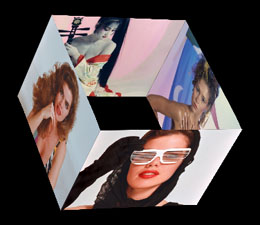
3D-Explode will explode or implode a video clip to reveal a clip beneath or it can be used by itself over a black background. There is complete control of the direction and motion of the effect. You can tumble, spin and rotate (X - Y - Z Rotation) then entire effect as well. Explode 3D is actually two different plugins, a Transition and a Filter version which are found in the Video Transition bin and in the Video Filters bin in the FCP Effects browser. The Transition plugin can be applied to the edit point between two clips or at the tail or head of two contiguous clips. The 3D Explode filter is applied to an entire clip like any other FCP filter.The 3D Explode works by creating tiles from the original video image. The video image is cut into rows and columns creating tiles, the number of rows and columns and therefore the number of actual tiles is set by the user, these attributes like all of the controls for this plugin are Keyframeable. Perspective (camera angle), Radius which defines the amount of space that the effect will work in, Variation which controls the random nature off the effect and Global Acceleration which controls the starting and ending speed of the effect is like 'Ease In/ Ease Out' in FCP.
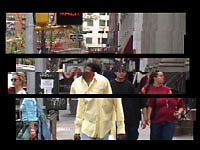
Rows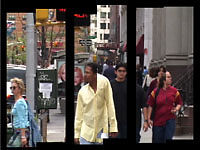
Columns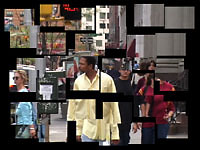
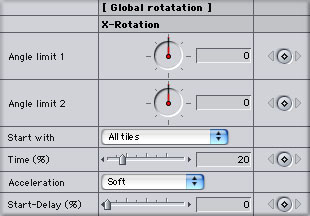
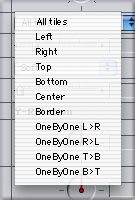
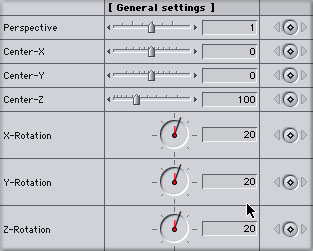
Rows and Columns combinedThe Global Rotation section is where the Global 3D elements of this effect are controlled. Imagine that all the tiles are like a flock of birds. As they fly through space the entire flock changes direction in unison. The flight path of all the tiles, each element of 3D space, X, Y, and Z rotation have their own controls. X-Rotation is shown below left. There is a Time control which determines the amount of time until the effect has rippled through all the tiles. Acceleration, controls the ramp speed of the effect. Start-Delay controls the starting time off the effect. The 'Start with' drop down menu, shown below right, determines which tiles will be effected first and the direction that the effect will ripple from.
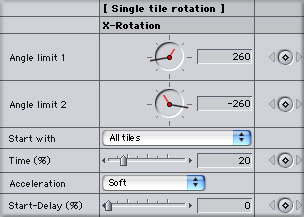
Global rotation effects the entire set of tiles. The Single Tile Rotation section controls each tile uniquely. So while the entire 'flock' of tiles might be spinning in a circular barrel roll pattern, using the Single Tile Rotation settings can have each tile rotating on its own axis, independently.
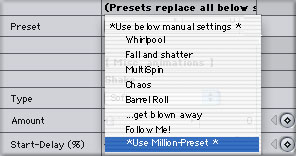
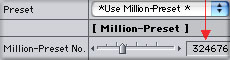
There are numerous other controls as well. For example, as the tiles rotate on their axis moving video, still images and even color tints can be applied to the reverse side of the tiles. There are border controls for cropping the tiles and a global control to limit the area in which the effect is displayed, see below. Choose between soft, medium and hard shake effect. You can manually control and keyframe each of the different aspects of this effect or select from the many pre sets to control the effect. If the standard pre sets are not enough there is a setting that contains an additional one million pre sets. That's not a typo, one million is correct. Each one with its own number (red arrow, below right). The advantage being that if you find an effect you really like, you can write down its number and use it again latter or you can swap the preset-numbers with other people, so they will get the same results. With this massive amount of pre sets, there are definitely going to be some winners. You just have to find them. (grin)

3D Clips is a Video Generator. You can use up to 10 different clips. Like the 3D Explode plugin, 3D Clips gives you global controls for all clips in unison as well as unique control of each clip or tile. Each tile or clip can be move, sized, cropped, rotated, given a vertical or horizontal direction.
3D perspective is controlled along the X, Y and Z axis, each independently. There is a opacity control for each clip. The reverse side of the tiles can display the original clip, color tint, inverted original clip or a solid color.
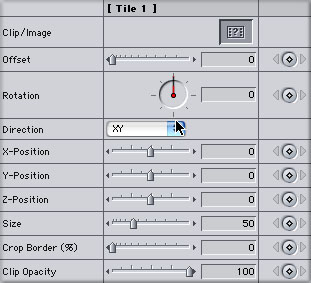
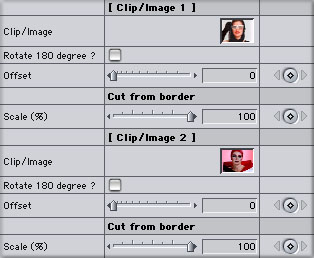
3D Matrix is both a Video Generator and Transition. 3D Matrix can use up to four different clips to create a checkerboard type effect that you can fly, spin, rotate through your video frame. You achieve this effect by dragging a still image or video clip into the 'image well'. With video you can use the 'Offset' slider to start the video at the frame of your choice. You can also crop the video using the 'Cut from border' slider.
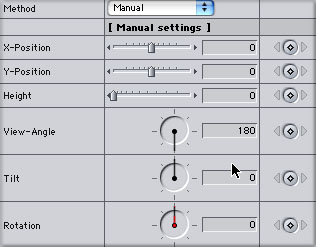
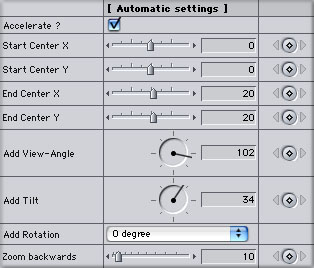
As shown below you can use either the Manual or Automatic Settings section.
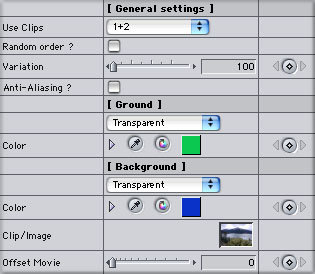
As 3D Matrix is a video generator you can use it by itself with a black background, or superimpose it over another video clip. You can add your own background clip by dropping a clip into the image well.
In the General controls there are two controls 'Ground' and 'Background'. Ground is a bit different than Background (Background is shown below right). Clip 1 must be applied but you can chose to leave out clip 2, 3 or 4. Doing so would leave a hole in the matrix. Ground defines what you see when you don't apply a clip. This hole can be transparent allowing the background to show through or it can be given a color tint. You also have the ability to randomize the order of the clips as they are displayed in the matrix.
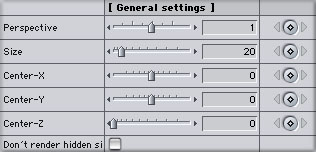
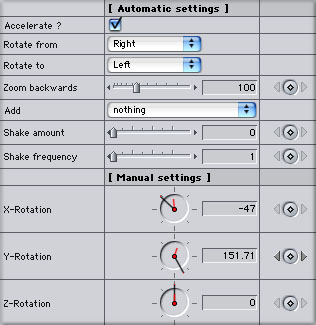
3D Cube is both a Video Generator and Transition. There are six image wells, one for each side of the cube. You can use still images or running video, you can also have any side of the cube display a tint color, inverted original or solid color. The General settings, show below left, are where you set the general parameters for position of the cube. You can control the size of the cube as well as the camera perspective of the cube. As with the other CHV 3D effects there is a choice of Automatic or Manual settings, below right. I much prefer to use the Manual settings. I first build my cube applying video to each side of the cube. Once I have done that I then keyframe my cubes motion; spin, tumble and rotate (X - Y - Z Rotation).
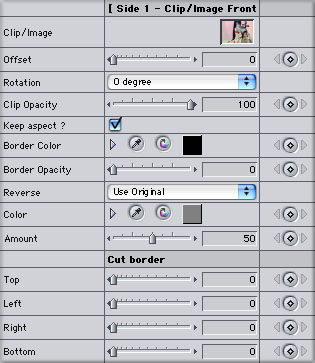
Each side of the cube has its own control section, shown below left. The Offset slider allows you pick the starting frame of the video, you can change the opacity of the clip over time and crop any of the borders of the video. There are 'Shake' controls, amount and frequency. A cube is a square, but most often video would be used, 720 x 480 with a 3:2 aspect ratio. Not exactly a square shape. There are controls to adjust for different aspect ratios when using non square images. You can uncheck 'Keep Aspect', which will fill the side of the cube with image. There are also border controls that can be used to add color to the non image areas of the side of the cube as well as Border opacity to allow transparency to the non image areas. When first starting out I would suggest that you set the 'Border Opacity' to 0 for all sides of the cube. Any or all sides of the cube can contain artwork with transparency allowing you to see through the cube.
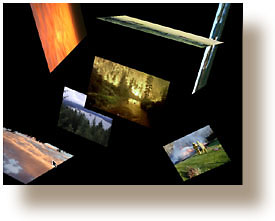
ConclusionThese plugins have true 3 dimensional functionality and give you the ability to fly your video and still images through 3D space. One thing that I have learned about the CHV plugins is that they offer an enormous amount of controls. You can achieve some amazing effects. CHV plugins run in OS 9 and X and with FCP 2 and 3. Because these plugins are vector and sub pixel based, the quality of the images is excellent, motion is extremely smooth. While the large number of controls can seem daunting at first, I found that I quickly started making use of most of the features, which are powerful indeed.
Enjoy,--ken
ps - CHV is giving away for free its new Silk and Fog plugin.
copyright © Ken Stone 2002