Click to play movie
(382 kb download)
Software Review - Morph Plugin April 21, 2003
CHV-Electronics -The Morph Collection FCP Plug-in
Digital Video Effects for Apple Final Cut Pro
OS 9 and X, FCP 2 and 3
$59.00
by CHV-ElectronicsReview by Steve Douglas
It was a long time ago, perhaps in another dimension, long before Final Cut Pro was even an inspired idea that I watched Michael Jackson's latest video. There he was, pre his 50th nose job, morphing from one character to the next to the next. How the heck did he do that? I certainly couldn't on my old videonics analog-editing bay. Zoom ahead a few years and morphing could be found almost everywhere from "changelings" on Star Trek to numerous other TV programs and movies.
Morphing is now available to all of us thanks to the CHV company's latest Morph Collection plug ins for Final Cut Pro. However, this ability comes with the price of time, which must be spent, as it is a time consuming process to set up. The CHV Morph Collection comes with three sections. The first, the Morph Transitions, are primarily used with still photos only, The second group may be found under generators and are applied to moving images, while the third is a morph filter that closely resembles the distortion effects which can be found in the motion tabs of FCP.
Whether working with stills or moving clips, both the source image and the destination image must be similar to each other in that the size of the image as well as the direction they are facing must be consistent with each other. The point grids are set the same way, be it stills or moving images. If you have two images facing in different directions you will find, as I did, that the image will come out looking like something from the transformation pod from the movie "The Fly". Best to have both images facing roughly the same direction in similar environments.
The video morphs are developed by dragging the morph generator to the timeline and placing both the source and destination clips in an image well. There are a number of different generators to choose from, ranging from a 2 line grid to a sixteen line grid. The grid with the most points to set will give you a higher quality morph but you will expend time spent setting all those points. Both the source and destination clips must have points set within their grid. This still video frame of a Frog fish has the 16-line grid attached waiting to be adjusted. Fortunately, if a point is set improperly so that it crosses over another setting, a red warning line pops up to give you notice. On my first attempt I came up with more warning lines than anything else. Below you can see a 16-line grid placed over a frogfish with plenty of warnings. These are easy to undo but I left them there to illustrate what I meant.
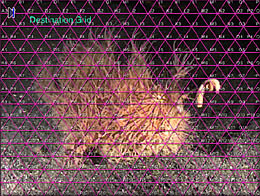
Frog fish has the 16-line grid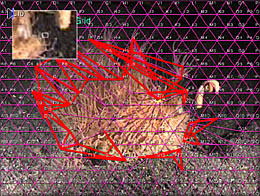
red warning linesPlacing points are not difficult, just time consuming. The points are placed on positions of the clip that should not move during the morph, and that must be done the same way with the same points for both the source and destination clips. For instance, if you don't put a point on an "eye" in both clips it will simply produce a cross fade from the source to the destination without a true morphing effect.
Below is an example of a video clip of a warrior from Papua New Guinea with the grid placement focusing upon the head of the individual. Next to it is a grid of a sea turtle also with the grid points set. Note that the points used between the two, especially of the eyes are very similar. I used points C3 and D3 for the eyes of both images.
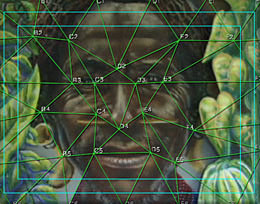
C3 and D3 for the eyes of both images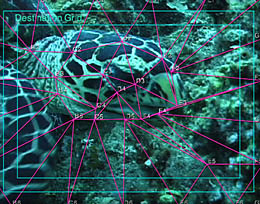
C3 and D3 for the eyes of both imagesCHV has solved the problem of having to scroll up and down between the source and destination grids by providing a "DV Output Shows" option in the controls. This enables you to see both grids at the same time to make sure your point placement is accurate between the clips. I did find reading the numbers sometimes difficult to decipher. If I set the numbers or lines larger, than the image was sometimes obscured. Also, in the controls is a 3-grid setting to show your source, destination and final result.

upper left, source - upper right, destination - lower right, morphing in progressAt least for me, learning to properly use this plug in collection is going to take practice. Using clips that are similar and short seems paramount but the learning curve is not too steep. Placing the points is as easy as applying a mask, however, like many effects, key framing the movement frame by frame is time consuming.
I found rendering of the CHV morph generators to be surprisingly quick on my G4 DP 800. Can't complain about that! The morph collection, as well as all the other fine CHV plug ins, is compatible with OS-X and at a cost of only $59.00 is certainly an economical investment for those who find the ability to morph images a godsend. A CHV Morph tutorial can be found at The Morph Collection
Enjoy all- Steve Douglas
copyright © Steve Douglas 2003