Software Review October 1, 2001
Product Review: Commotion 4
by Charles RobertsProduct: Commotion 4
Manufacturer: Pinnacle Systems
Description: Desktop application that offers compositing, painting, keyframing and other tools for creating visual effects.
Cost: Commotion Pro 4.0: $995; Commotion 4.0: $495; Upgrades cost $149-$249; Upgrading from Commotion DV to Commotion Pro 4.0 costs $749
I love a company that consults its user base when upgrading its products. That occurrence is all too rare but in the upgrade to 4.0 for Pinnacle Systems' Commotion Pro and DV, we see some feature inclusions that take a great compositing application and turn it into an even better product. For those not familiar with the purpose and toolset of Commotion Pro and DV, you might want to take a stroll through my review of Commotion Pro 3.1. The upgrade to 4.0 retains the same functionality and toolset of version 3.1, but adds significant new features and performance boosts.
The 3.1 version of the software was a fantastic, one-of-a-kind rotoscoping application. Film and video effects artists took advantage of its unique matting tools for jobs that no other application could approach. Adobe After Effects, the only other software package in Commotion's price range that features a similar toolset, never developed the specific frame-to-frame drawing and masking functionality that Commotion offers. Although many of Commotion's and After Effects' toolsets overlap, Commotion has generally had the edge when painting, masking and motion tracking were necessary, while After Effects has had more flexibility with features like project organization, nesting and integration with other media-generating applications like PhotoShop and the range of non-linear editors. This made it necessary to own both applications for the really heavy jobs, switching back and forth as the task dictated.
Pinnacle Systems themselves never placed their product in direct competition with After Effects, viewing Commotion's robust rotoscoping toolset as a perfect complement. With all due respect to Pinnacle Systems and their intended relationship to After Effects, that may have all changed with the 4.0 upgrade of Commotion. In a rare move by the software industry, features missing in the 3.1 version that sent us scurrying to After Effects have been added, making those trips outside of Commotion almost completely unnecessary. Let's take a look at some to the new features included in 4.0.
No More Hardware Dongles
I guess we griped enough about those little plastic dongles to finally be heard. Commotion now works from a completely software-based license security system. No more worrying about whether some loser will make off with your license in the palm of their hand. You install Commotion from the installer CD, enter your serial number and start working. No USB extensions to worry about conflicts, no more USB hubs necessary for holding that lump of plastic. Just install it and get to work.
The software is network smart, and will check to make sure that no other copies using the same license number are running on a network at the same time. This means that you CAN install it on more than one local machine; you just can't run it on more than one at a time. This makes your single copy effective over a range of machines, which can be a great thing if you use different machines for different video acquisition. This is smart, effective and far more convenient for larger multi-user labs. Pinnacle Systems, for this I thank you.
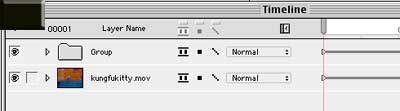
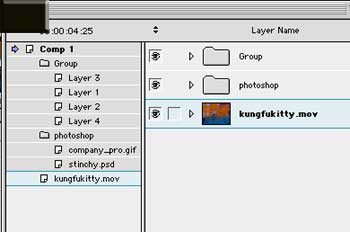
Groups
Probably the most immediately important new feature in Commotion 4.0 is called Groups, which functions almost exactly like Nesting, a procedure common to the digital video community.
No matter what you call it, nesting is one of the most necessary features in any compositing application. The ability to build a composition and then include it as a layer in a new composition is fundamental to creating complex effects. When you are limited to a single stack of layers in one composition, you are limited to a single dimension of compositing practice. Nesting gives you the ability to Pre-Comp, or build a composition to use as an individual layer in another composition.
For instance, say you created a composition with nice set of lower third titles scrolling across the bottom of a video clip and then you wanted that composition to function as a picture-in-a-picture spin and zoom out, lower thirds and all. You would have to render out the first lower third composition and then bring it into a new composition to do the following spin and zoom effects. But with nesting, you could simply use an entire composition as one layer in another composition.
Further, nesting allows you to go back in and tweak the settings of the nested composition. Suppose the bit you rendered out needed to be a little tighter in the timing. To tweak it without nesting you would have go back in, change the timing and re-render it, then re-import it to the final composition. With nesting, you simply return to the composition that is nested, adjust it a little, and then the adjustment is applied globally, meaning that the change occurs wherever the composition is nested as a layer. Thus you only really have to do a single render when you have everything just as you want it.
Why Commotion did not have this capability in previous versions always escaped me, since it was possible to nest in nearly every other professional application, even ones with much less robust compositing toolsets. Even most professional non-linear editing applications like Final Cut Pro and Avid included this ability in their editing timelines. The ability to nest is the main reason that most Commotion users never totally said good-bye to After Effects; you just can't live without nesting, unless you REALLY like rendering.
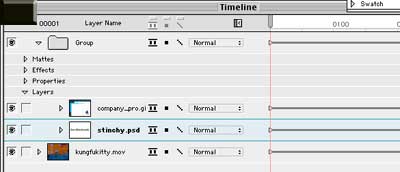
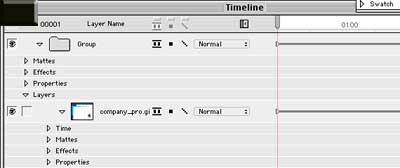
Well, nesting has arrived in the Commotion toolset in the form of Groups. As before, you still can't have more than one composition in a project, but you can have as many groups within that comp as you want. Each of these groups can contain as many layers of their own, making it easy to nest many layers deep and build complex compositions that still only require a single rendering operation. Groups can be animated and controlled exactly as are normal layers, the only exception being Time Remapping, a feature to be described shortly.
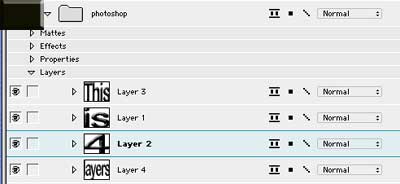
PhotoShop Layer Imports
Another new feature included in 4.0 is the ability to import PhotoShop files with their layers intact. In the past, Commotion could only import PhotoShop files that had been flattened, or Rasterized. A multi-layer PhotoShop file is basically multiple PhotoShop still images that are stitched together into one file to allow greater flexibility in building an image, much like the way that layers work in any compositing application. Unfortunately, Commotion could never make sense of the separate layers in the PhotoShop format, so the user had to create a separate PhotoShop file for each layer they created. This isn't difficult, but it is time-consuming, bothersome and a real hindrance to the average workflow.
With 4.0, Commotion can now import a multi-layer PhotoShop file. The Commotion project decomposes the PhotoShop image and creates an individual image based on each layer. To boot, it retains blend modes, the original layer name and actually carves out the image data from the layer, eliminating the excess transparency area of the layer. Thus if the original PhotoShop image were 640x480, but the only non-transparent layer content was a few small sections of text, the imported layers would be only the sections of text, not the entire 640x480 PhotoShop image area.
When it imports these PhotoShop layers, it is actually creating new images in the Commotion project rather than affecting the original, so the import process can be a little confusing at first. When you choose Import>PhotoShop Layers and select the file, all of a sudden all the layers appear in the Commotion project window. To be retained, they must be saved before quitting the project, since as we said, they are actually new files created by Commotion rather than links to the original.
One nice workflow tweak that was added to this process is that you can import PhotoShop layers directly into a Group nest that already exists in your Commotion composition.
Since most PhotoShop graphics destined for a Commotion project are likely to be text elements, and since text elements generally need to be handled and animated in a group, the Commotion crew added the ability to select a Group in the composition, Import PhotoShop Layers and have the subsequent layers stream directly to the Group in which you want them organized. It's just another example of the way this product combines workflow and functionality enhancements to save you time without sacrificing functionality.
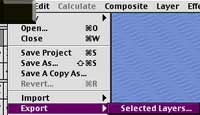
Layer Import and Export
Another new feature that really rocks is the Layer Import and Export function. Although Commotion is not a true editing application, this function comes close to the way that non-linear editing applications share resources among different projects. In the past, each Commotion project was limited to itself. Although you could save templates of rotosplines, motion tracks and other resources you frequently used, you were limited to the masks and tools presets, and you couldn't access any part of a composition outside of a project. This meant you could re-use a mask in many projects, but not the mask and the thing it was masking, nor how it was masking the thing it was masking. To do so would require setting up a new composition in a new project and building it up again from scratch by copying all the settings and pasting.
This was kind of annoying because many times, you need to use not only the same tools in many different projects, but sometimes even the same media clips with the same effects. Once you get the animation and the timing down, you really don't want to have to set the whole thing up again from the ground up. If you've ever had to put an animated bug in the bottom corner of a screen doing ALMOST the exact same thing 100 times, you'll know how annoying and time-consuming this can be.
Since you can't have more than one project open at a time, the easiest way for Pinnacle Systems to address this was to allow you to export a layer from one project and import it to another.
Now, instead of having to start from scratch or render and re-composite things like this, you can take a layer you want to re-use and slip it right into another project's composition. The layer will be exactly as it was in the originating project. And if for some reason the media it was linked to goes off-line, you can simply use Replace Footage to hook it back up. This flexibility is very close to the non-linear editor's ability to juggle parts of projects around and will really cut out a lot of repetitive fooling around and rendering.
New Interface Stuff
Pinnacle made some changes to the interface that are quite welcome. The company seems to have realized that they are generally dealing with film and video editors, rather than PhotoShop artists, and have adapted some of the windows to be more intuitive to our motion- and timeline-based perspective. Some of these things aren't even well documented and are natural things that just seemed weird in previous versions.
For instance, the preferences now allow you to view the frame numbers throughout the application in the Timecode standardization of "00:00:00:00" rather than as merely consecutively numbered frames.
How many times have I had to stop and do the short mental math? Its just one of those things you take for granted until you don't have it. And Commotion finally has it. Although, sadly, this Timecode is not the source Timecode of the associated media clip (wouldn't THAT be nice?), its still easier to deal with than "Let's see, 250 divided by 29.97 plus X and minus Y�"
Another bonus is the inclusion of timeline controls and data in the window of each clip or the composite.
In past versions, all Player controls were on a single little palette that served whichever clip was active. That single palette did its job just fine, but it was never obvious WHICH window its transport controls were affecting until you hit Play. To scrub through a clip, you had to activate the Clip or Composite window, and then scrub by dragging in another window. It worked but it involved two steps for what intuitively should only require one. Now each window has its own timeline, complete with Active Selection, In and Out markers, Loaded into RAM indicators and all that other good stuff.
Pinnacle also did some re-tooling of the Timeline window. Since you can now Group nest layers, they had to come up with a way to view the Master Composition broken down into the tree-like structure of its nests and layers. This had to be a separate window from the layer window itself, since it would be too easy to confuse each layer's attributes and parameters with the tree structure of the project. But it had to be close and easily accessible to the Timeline, since that is where it would be relevant. And, jeez, does this application really need ANOTHER window to add to the clutter?
The emphasis with Commotion is always "More information and control, but less confusion�" The answer was to add a collapsible tree-structure view to the left of the Timeline that you can pop open if necessary, then close back up.
The tree-structure view allows quick structural changes to be made to the Master Composition, which may contain far more layers and nests than can possibly be displayed in the Timeline window.
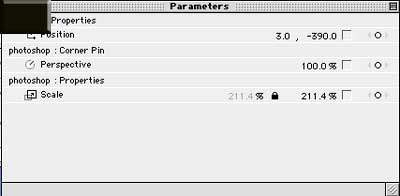
Another nice, frequently valuable window that is new is the Parameters window. It used to be the Effects Controls window, a small and relatively useless window that only functioned when a plug-in had specially designed parameters that you could access there. These were few and far between, and most of Commotion's plug-in parameters were only adjustable at the level of the Timeline window. Ugh, what a mess� Well, with 4.0, this window has been renamed the Parameters window and now you can drag ANY effect you've applied to a layer into the window for convenient adjustment.
And the effect stays there in the Parameter window until you remove it. This means that you can load up the effect being applied to one layer, then continue to tweak it in this window long after you have stopped working directly with the layer the effect is applied to in the Timeline.
These last two developments are probably most indicative of Pinnacle's attention to the needs of their user base. Compositors need wide ranging access to their projects and when you have up to thirty layers in a composition, it can be difficult to change three attributes at a time and keep them all in view on the desktop. Commotion 3.1 made some great leaps in interface design towards this end and the above are only a few examples of how 4.0 continues that tradition. There are many more, but this review has to end somewhere.
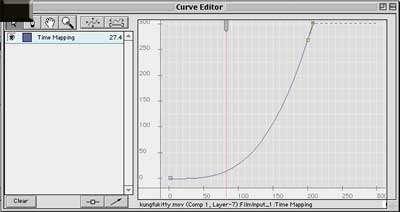
Time Remapping!!!
Yep, you got it. Time Remapping (Commotion Pro only, not DV).
You can change the duration and speed of any layer in the Master Composition by simply adjusting its Time parameter. And this time, it's actually set up as a usable parameter of a layer and not a buried menu item, as in other applications. The ability to change the speed of a video clip in the past has always been tricky in compositing applications and has been treated as an effect indirectly applied from a menu setting. This always made it difficult to configure the way you wanted it to work. Commotion 4.0 treats the speed of a layer as a physical attribute, just like anything else you would adjust (with the exception of Group nested layers, understandably), and it puts those controls right in the layers' attributes in the Timeline window.
When you want to speed up or slow down a clip, you just enter the values right on the Timeline window. The Time parameter indicates the new duration based on the remapped time value, taking away the guesswork involved in getting your timing down cold. And because Time Remapping is treated as a true attribute of the clip, the keyframing is very intuitive and easy to master. I have never encountered Time Remapping this easy to understand and apply.
Even better, as an attribute, you can adjust the remapping in the Curve Editor window, which allows hyper-precision in aligning speed changes with other keyframes using full bezier control for curvilinear speed changes as well as static jumps in speed.
I was expecting some sort of Time Remapping support with this version of the software, but I hadn't expected it to be as flexible as this. Folks who cut a lot of short trailers and fast-paced commercial sequences will drool over the ease with which you can now contour the action speed in your clips. If you need another example of how the development team put some thought into the inclusion of new features, this is one to look at. Time Remapping itself isn't a new functionality, but the way that Commotion allows you to control it is.
Now for the Kvetching
If it sounds like I'm impressed with this upgrade, you better believe it. The above new features alone make it worth the relatively small upgrade cost. And if you didn't own it before, you're now missing out on more feature sets than you could imagine. Still there's some stuff to mention that ain't perfect or wasn't addressed. One of the features that some users have been clamoring for was support for audio tracks. This feature was not included in the 4.0 upgrade.
The reasoning for not adding audio support is fairly comprehensible. Commotion, while probably the most flexible rotoscoping application on the market (at least for less than 10,000 clams) is still ultimately just that: a rotoscoping application. The ability to cut audio sync with any degree of accuracy is really stretching beyond what Commotion does best: paint, mask and composite. Although no sane person I know would say "no" to adding audio to Commotion's impressive feature set, I can't think of a feature I'd trade for it either. Audio mixing and syncing is a function that is really best handled in an editing application; that is the one thing Commotion does not do and should not be asked to. I'm not begrudging the lack of audio support, although I can imagine that some folks will be unhappy that it is not there.
There have been claims that Commotion's Compositing and Rendering engines have been improved, yielding speed increases as high as 50%. I have to say that I haven't seen much evidence of these speed increases. I am running 4.0 on the same G4 (PCI Graphics) Mac that I ran the 3.1 version on and I haven't noticed any improvement on the rendering speeds. The processor-heavy effects still tend to have large render lag times as they update and produce the frame. The paint actions can be a little jumpy at times depending on the combinations of brush, composite layer situation, grouping, etc. This is to be expected when you consider the calculations the application is doing to produce the frame.
I did notice that some painting operations that occur within nested Groups can to produce some funky redraw artifacting at times, particularly if you really push it. I will qualify this with the fact that I saw no such artifacting when using a hardware codec like the Media 100 Vincent card as the rendering codec and only when using the Apple software DV codec, a notoriously slow processor-intensive juggernaut. Perhaps the processor-intensive rendering operations tax the system a bit much, making some of the software codec operations a little inconsistent. I have no doubt that a fat, new Dual G4 would rectify this situation. As usual, Commotion runs much more happily with oodles of extra RAM, and it appears that it is a little more RAM hungry even than its predecessor, 3.1, was.
I have not used 4.0 with Mac OS 9.2.1, but apparently it has been tested by Pinnacle Systems and runs superbly under that version of the OS. Several weeks of rigorous testing under OS 9.1 demonstrated it to be solid as a rock with not one crash to report. It seems more stable in regards to purging the caches and freeing up RAM while loading frames, an issue I had noticed as sometimes problematic in the previous versions of the application. Apparently the application gets along better with the RAM management of the Mac OS these days. Mac OS 9.2.1 might offer some speed increases to the application, since in general, performance under that OS appears to be much more efficient and speedy. This remains to be seen and tested. It will be interesting to see how Commotion's new streamlined coding performs under the super-fast hardware solutions currently cranking out of Cupertino.
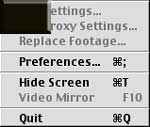
One thing to be mentioned is that the Video Mirror function that is so important to being able to preview your compositing on an external video monitor has been tweaked. Its performance is DEFINITELY snappier and the live screen updating is very fast -- as fast as your processor can pass the frame out to video. Unfortunately, the speed increase is due to a priming action that takes place when the Video Mirror is initially enabled. So in order for Video Mirror to work, you have to go into the Preferences each time you start Commotion and tell it where to send the Video Mirroring. After you set that Preference, the Video Mirroring is unbelievably fast, but until you set it, Video Mirroring is disabled.
This was not the process in the previous version, so it comes as kind of a surprise to the experienced user, since there is no mention of this behavior in the new documentation. A spokesman for Pinnacle Systems assured me that by the next batch of installer CDs on the shelf, obvious mention would be made of the fact in the documentation.
The Bottom Line
Taken in a lump, Commotion is still the most impressive rotoscoping application on the market, pretty much at any price. If you aren't sure what you can do with it, take a stroll though the list of feature films and television programs it has been used on at the Pinnacle Systems Commotion Pro Web site. It's the best thing an artist can have at their disposal, a nearly infinitely flexible paintbrush for motion film and video.
Keep in mind that the features I described in this review are without exception WORKFLOW enhancements. The primary painting, masking and motion tracking tools are essentially unchanged because their functionality is so robust it is difficult to improve on them. The hammer is still perfect for getting the nail into the wood, but the handle is getting more efficient and intuitive all the time. Hat's off to Pinnacle Systems; you made a good thing better.
Charles Roberts AKA Chawla teaches Digital Video and Audio Production at Fitchburg State College in Fitchburg, Maryland. He is a freelancer, DV consultant and video artist who can't understand why in a world of so many digital video possibilities there are so many bad television commercials. On second thought, yes, he can.