
Software Review
Feburary 3, 2001
Commotion Pro from Pinnacle Systems
$2,000.
Review by Charles Roberts
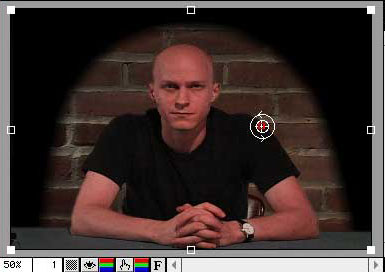
Its Gonna Take Two Monitors, Folks...
This review will focus on Pinnacle Systems' and Puffin Designs' Commotion Pro, which retails at +/- $2,000. There are currently three versions of Commotion available; Commotion Pro 3.1.1, Commotion DV 3.1.1 and Commotion DV 1.0. The DV 1.0 version should be passingly familiar to FCP'ers as the free version bundled with Apple's Final Cut Pro. This version can be upgraded to either 3.1.1 version for a charge. The DV 3.1.1 version, which retails at about $895, is very similar to the Pro version in most respects.
The most important differences are; 1) it does not come bundled with the Primatte Keyer, Composite Wizard or the Image Lounge, three effects bundles with some real nice whiz-bang features, 2) it does not contain the Motion Tracker and 3) the ability to apply motion blurs to Rotosplines (relax, we'll get to Rotosplines in a moment). The price/feature difference between the two verions is very similar to the difference between Adobe After Effects Standard and Production Bundles, for those familiar with that package.
Although the present advertisements for Commotion 3 limit the DV version to DV resolution/frame sizes (DV PAL being the largest), the unlimited frame size feature was added to the DV version with 3.1.1. Commotion's feature site on the Pinnacle System's web page could do with some updating, since even the manual shipping with Commotion does not mention this. A white page listing the 3.1.1 upgrade features would be nice. Such does not seem to exist. Since I have the Pro version and not the DV, its hard to spec what features live where.
As we will see in a discussion of the features, I'm pretty stoked about certain features and effects that are not available with the DV edition. I'm really glad I have the Pro version, because I do an enormous amount of green screening and rotoscoping (about which, more later) and I need the goodies available in the Pro version. Judge for yourself, though, and balance what you have to do and what you want but can't afford. As I mention a few paragraphs down, Commotion users will likely augment their system with a second monitor and video card as well as more RAM, so the price of the software alone might not be the end of the damage to your wallet.
Think about what is more appropriate for your system. If you make money compositing for a living, then you probably couldn't afford NOT to own the Pro version, which would pay for itself quickly in time-savings. If you just like to goof around with software toys (that's not perjorative, that's what I do when I'm not trying to earn a buck), then the DV version may be more than enough.
Enough About the Money, Tell Us About The Application
Commotion is quite an application. It's rare to find an application that offers superior functionality as well as an intuitive interface. After what seems like a lifetime of struggling with multiple software packages to get the compositing results that I want, its nice to know that one exists that combines all the most necessary functions with an ARTIST friendly workspace.
Too many times, digital video applications appear to have been organized by folks with only a limited interest in the artistry of compositing. Any number of programs give great tools, but are organized in ways that put limitations on how the artist does their thing. Commotion has been designed with the specialized tasks of compositing in mind, and I would find it hard to improve on the interface. Not impossible, but hard. After all, Commotion was originally put together by famous fella Scott Squires, a visual effects super at Industrial Light & Magic. That's a pretty strong endorsement in my book. Apparently, the first version of Commotion was being used in production prior to After Effects 1.0. So its been around for a while and it's benefited from the perspective that only perfectionism and tight deadlines will deliver.
My copy of Commotion Pro was easy to install. It comes with a USB dongle about the size of a stick of Juicy Fruit, which is necessary to prevent software piracy. I have couple of design beefs with that dongle. On the older Macs with ADB ports, software dongles were largish chunks of plastic or at least had a bit of cable identifying them. The new USB dongle that ships with Commotion Pro is a little piece of plastic and metal that very nearly got tossed with the wrapper. That's pretty scary when you know your $2,000 application can't function without it. To be fair, Commotion is not the only application using this little keychain dongle; most expensive apps are using pretty much the same thing. But there's gotta be a better way. C'mon, folks, be on my side. You've innovated the tools of the trade, now let's figure out a solution to the age-old dongle annoyance issue. I'm aware that the issue is low on the totem pole for most software designers, but if you talk to users, especially multi-user lab people, you'll hear GROANS and ANGUISH when you mention dongles. USB may be groovy, convenient and space saving, but I'd feel a little safer with a more substantial object.
That aside, after installing the application (without the dongle attached), rebooting (with the dongle attached) and then registering, Commotion took off and hasn't come down since. As Puffin Designs admits, Commotion is a very RAM intensive application, so I took advantage of the moment (and the temporary drop in RAM prices) to boost my G4 up to a respectable 700+ MBs, and set the RAM allocation for Commotion up to 650. As we'll see later, Commotion can work much more efficiently at intensive operations when video is actually loaded up into RAM, so the more you have, the better. If you find yourself swayed by this review, I'd think about kicking up your RAM when you purchase. It's worth the little bit of money RAM is costing these days.
I'd also consider looking into a second monitor, if you don't presently have one. Commotion takes up a lot of desktop space with menus, more so even than After Effects or Final Cut Pro. You'll really need a nice 17" monitor just for the menus so you can focus your primary monitor on the image windows. Don't be cheap, Commotion deserves RAM and that extra monitor. Do right by it and you'll love it.
Say, this looks familiar...
Anyone who's spent any time at all with Adobe After Effects will immediately feel at home with the project flow and tool/window configuration of Commotion. This should be very reassuring to the throngs of After Effects-trained folks out there who are looking for new possibilities but who are afraid of losing weeks of work time internalizing a different relationship between media and application, tool-set and functionality, or source and destination applications. Commotion takes the best traits of the After Effects paradigmatic interface and embellishes them in ways that really satisfy the effects artist's soul
The After Effects Barebones Project
The Commotion Barebones Project: "See any similarities?"
To pay homage is necessary here. Adobe After Effects, from day one of the digital film and video experience has been the watershed. What Adobe PhotoShop did for the world of printing (essentially making limitless the possibilities of manipulating and re-presenting the still image), After Effects has done for the world of film and video. Although the advertisement says, '2-D animation,' any skilled After Effects artist will tell you that, with the right know-how and creative imagination, there is no effect that cannot be pulled off, with or without fancy plug in accessories. Although Commotion has been around for as long as After Effects, you have to concede that After Effects is HUGE in its user population and influence of the way most film/video effects folks work. That's not always a good thing, but there it is. I cut my compositing teeth on After Effects and I've been working happily with it for a long, long time.
But just because you are mammoth in your user base and are arguably the standard in working methods and project flow doesn't mean you can't get your chops busted by another product that does the job better. To be fair, the most recent upgrades of Adobe After Effects have been welcome quantum leaps beyond their previous versions. But, like the man said, use the right tool for the job. And sometimes Adobe After Effects doesn't offer straightforward options to what would seem like simple tasks. I found that Commotion addressed some of these issues in truly innovative ways. As I'll explain later, it seems to me that the biggest difference between After Effects and Commotion is that After Effects' visual interface more directly resembles a cut-n-dried editor interface based on numbers, lines and the cold, hard, digital facts. Commotion, while also capable of processing and producing all manner of video and film media, is all about the craft and vision of the composite and not the "workbench". After Effects may be a solidly built house, but Commotion is a solidly built house that is also a comfortable home. While it would be difficult to say that either application is 'better', it is apparent that they are focused towards different approaches to creative production.
Excuse me, what exactly IS compositing?
For those of you new to this sort of thing, let's first get clear what a compositing application is. As 2-Pop Monsieur Tom Wolsky likes to put it, compositing is everything above Video layer 1 on the timeline. In other words, it is a composite, or merging together, of more than one video layer. The media on each discrete layer of a composition can vary depending on the limitations of the application, and can extend to video clips, still images or any other bitmapped piece of digital media. The primary function, and the criteria we should best judge the application by is the degree of control we artists have over what is seen when the composite is complete.
When you look at it this fundamentally, there are many applications which perform the act of compositing; Macromedia Flash and Director, Apple Final Cut Pro, Avid, Adobe Premiere, Media 100, etc. Hell, even Microsoft PowerPoint performs this to a certain extent. But Flash, Director and PowerPoint are all web/CDROM/presentation-authoring applications, and their specialization lies in interactivity, not in the high bandwidth, full-frame, full-motion modes of film and video compositing applications. Final Cut Pro, Avid, Premiere and Media 100 offer some support for compositing, but their main focus is the cutting tools. Really rambunctious effects artists soon feel a little cramped by the inflexibility of the built-in tool-set. Very quickly, the creative artist out-grows the possibilities of these applications and begins looking for something that realizes their vision.
Enter Commotion. Commotion is an application built from the ground up to allow literally ANY possible vision to be committed to digital video. Think of it as a blank canvas onto which you may slop as many layers of paint as you wish, with a seemingly unending set of variables that allow the layers to affect, obscure and reveal each other. To extend the metaphor, think of this canvas not as a finished painting, but one in process, so that our painting takes place over time, rather than as a static piece. If this begins to make sense, then prepare to step into a new world of what is possible in film/video post-production.
The Project flow...
I like the canvas metaphor for Commotion, because it seems to follow that particular model in organization. The Commotion project is one single composition. You can bring in as many clips as you want and put them together however you wish in the timeline, but there is only one composition per project. This may be the biggest stumbling block for old-hand After Effects users, who are used to creating as many compositions as they want and then nesting, or layering these together in one final composition. This creates a kind of a mirror within a mirror-project flow that allows for some interesting flexibility in putting your work together. Indeed, my first "Huh?" in Commotion was from an attempt to create a second composite to do just such a thing. Without having read the effing manual, of course...
So, no nesting of compositions. Wahhhh... But for the loss of this ability, Commotion makes up in the degree of flexibility within the one composition you do have, and in the extremely well designed and intuitive tools, palettes and preview options included. Using the timeline, composite window, path, tracking data and the project window, its possible to craft a composited digital video clip with an astonishing degree of control. Let's step through the basic windows and have a look around.
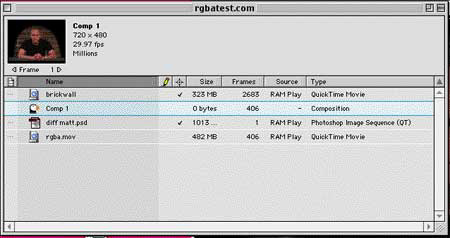
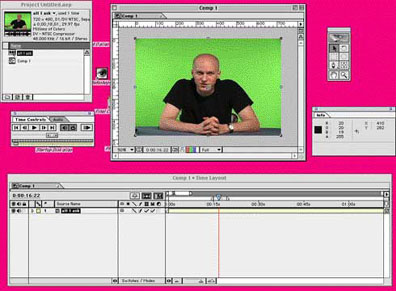
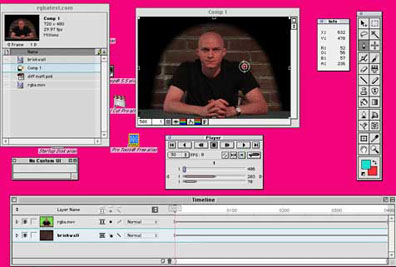
On opening the project, you have the project window, which is simply a housing for the collected materials that you may access in the course of your composition. As is usual for this sort of window, every pertinent factor of the media, including thumbnail preview, is displayed spreadsheet style and is easily accessible. It is here that your clips live until you choose to access or include them in your composition. Next, on creating a new composition to work in, you will receive a composite window and a timeline. These next two elements also follow the After Effects project interface metaphor.

The timeline is a linear timeline composed of media arranged in stacked layers (top-to-bottom is front-to-back), with each layer containing individual attributes that may be adjusted for the desired manipulation. The video preview window shows the various layers in the timeline as they appear, dependent on what is on top of what and how you have set the various attributes for each layer. Any change in the timeline is reflected in the preview window and vice versa.
Next, there is the playback controller/transport. This is the straightforward play/rewind/frame-advance controller that anyone who has used a deck will figure out in about five seconds. For After Effects folks, this corresponds to the Time Controller window. But don't be fooled by the familiar interface. There's a lot of power in this little box. In addition to playback buttons, you also have access to how Commotion deals with your media and how certain windows interact. For instance, using the 'Match Comp to Clip' button match-frames the clip you are working with to the Composite it is in so that you can watch your actions to the clip update the Composition window the clip is a part of. The 'Load into RAM' button loads as much of a clip into RAM as possible so that certain processes, such as playback, tracking and automation can benefit from the higher access speed of RAM. Using the 'Match Selection to Live', you can automatically set the selection of what will be processed to only what is loaded into RAM, and hence, only test process the most quickly accessible material, rather than what is already selected.
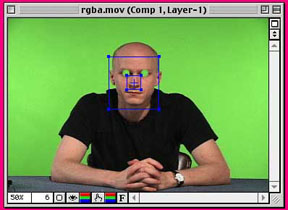
Finally, there are specialized tool palettes for the fun stuff that I find unique to Commotion Pro. In addition to a really handy, accessible toolbar and tool feature tweaker, the Rotospline tool, the Motion Tracker and the Super Clone palettes offer solutions that I haven't been able to find anywhere in an automatable application. These special tools are where Commotion Pro really shines and where you see all the possibilities get realized. Let's talk about these specialized tools for a second. The first tool, the Rotospline Tool, is the basis of precise masking and the last word in Rotoscoping. When you need to create transparencies with very complex shapes, the Rotospline tool is the only option. The Rotospline tool uses the same conventions as Adobe PhotoShop's and After Effects' Pen Tool. You establish defining points in a closed geometrical pattern and then fine-tune the resultant lines into controlled curves with a choice of either B-splines or Natural Splines, the two most popular conventions in curve determination. You can create an unlimited number of these splines, or discrete transparency paths, and you have total control over how each spline interacts with other splines as well as the clip it is a part of.

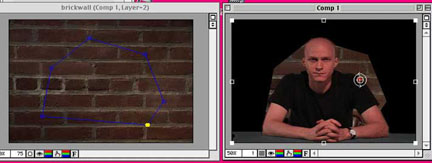
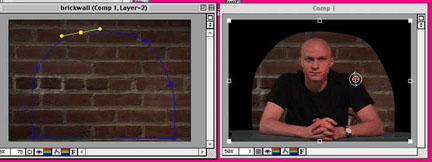
The shapes created by the Rotospline tool are automatically applied to the alpha channel as transparency information. This means that when you complete a closed spline, whatever is inside the spline will be transparent or masked. You can also invert the mask, meaning that everything outside the spline is transparent, and you can feather the edges of mask however much you want, making the edge as soft or sharp as you want. And best of all, the points are keyframeable. This means that you can animate the geometric shape over time, moving and re-shaping it however you wish. For many, who like me are stuck with the low resolution of DV footage but who wish to make the most of green screen effects, the Rotospline in Commotion, like the mask in After Effects which came before it, are essential in cleaning up poorly lit key footage.
There is an added benefit to using Commotion's Rotospline feature. Although the Rotospline is a function of a layer in a composition in a Commotion project, it is really treated as an object in Commotion. Unlike After Effects, which limits your access to masks to the timeline or clip windows, Commotion gives nearly everything its own special palette. Rotosplines, as well as the other tools we will look at, have a special palette from which you can apply them wherever you want without having to copy/paste. You can adjust your spline's characteristics there as well. Centrally locating splines in a special window/menu is one of the innovations I dig most about Commotion's organization. You can save spline path information in a file as well, thus making it available to any other Commotion project. This is especially valuable for use in text and motion path data, or anywhere that you need to utilize trademark motion or stylistic accoutrements.
The next really fabulous tool included in the Commotion toolkit, which I can find nowhere else, is the Superclone tool. This tool should make us all feel slightly guilty about producing less than perfect work. It's about seamlessly and automatically removing unwanted material from any set of frames in your footage and replacing it with anything else that suits you.
The same way that, you could remove that cold sore from your father-in-law's upper lip using Adobe PhotoShop, you can eliminate him altogether from the video footage using Commotion's Superclone tool (which of course depends on how well you get along with him). The PhotoShop tool we were talking about was the Rubberstamp tool, which allows you to paint material from one area of your canvas onto another. If you've ever done any re-touching in PhotoShop, you'll know how much easier it is to eliminate dust and scratches by simply Rubberstamping similar looking material over the specks from elsewhere in the frame. Wouldn't it be nice if a video compositing application could do that? Frankly, I always wondered why After Effects never got this as a feature.
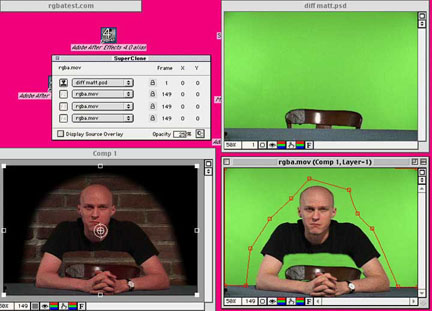
Well Commotion DOES do this. Not only can you Rubberstamp from material elsewhere in the frame, you can Superclone from any frame from anywhere in your project. Only got one good take of that footage you wanted as a background, but your father-in-law was in the whole thing drinking beer? No problem, just make up a Superclone setting for a frame where he wasn't on camera (known as a 'clean plate') and then paint away. When you're done, it was as if he never walked into the frame.
Wow, paint over 300 individual frames of a man drinking beer in a lawn chair? Sound tiring? Rotoscoping is. By rotoscoping, I mean the process of altering each individual frame so that it looks exactly the way you want it. That's the way to get the best results every time. But is that the way it has to be? Let me clue you to a fact of compositing life. Although we always strive for the absolute best quality, we are always gonna look for a quicker, less stressful way to do things. There's always more than one way to skin a cat.
But sometimes we get lucky and someone designs the perfect tool for the job.
In this case, the perfect tool is actually two tools, the Superclone combined with the Autopaint function. Autopaint is a sort of batch operation tool which can record paint strokes as you perform them, then play them back over a pre-determined range of video frames. Why paint out all 90 frames of a telephone pole sticking out of your sister's head when you can paint out just the first frame and then have Autopaint clean up the other 89 for you. Just record the paint strokes for the first frame, then have Autopaint repeat the same strokes on the frames you select. Between Superclone's ability to seamlessly insert clean plate background patterns over boo-boos and Autopaint's efficiency at performing this function over many frames, there are few excuses left for delivering less than perfect final cuts.
"But it ain't that easy," I hear some of you say. Anybody who's put in time rotoscoping and cleaning up frames will tell you that in the real world, neither telephone poles nor your sister will stay still. So, to paint in corrections, you've got to adjust where you paint in each frame. That's why rotoscoping is so painful and intensive. But once again, Commotion has an option. Enter Motion Tracking.
What is Motion Tracking? It is simply the function of tracking the movement and/or rotation of a set of pixels on one video layer, generating the actual motion path of those pixels as X and Y coordinates and then using the coordinates to make an adjustment of some kind to another layer. Now the most common usage of motion tracking is attaching an object (say, a VW Beetle, for instance) on one layer of a composition to another object on another layer (your three-year-old's hands). Your three-year-old lifts up the VW as if it's weightless. In reality, your three-year-old lifted up a green tennis ball. Using Motion Tracker, you tracked the motion of the tennis ball's pixels across the screen from frame to frame. This track generated X and Y position coordinates of the tennis ball, which you applied to the layer containing the VW Beetle. Presto, your child grunts and lifts, the VW sags and jumps.
You can also use it to stabilize shaky-cam footage using the same pixel tracking technology, although with camera resolution lower than Betacam, you may end up with more shaking than you started with. Yet another usage is what makes this valuable to us with the example of our sister and the telephone pole, though. Since we are trying to paint over a telephone pole that moves across the screen with each passing frame, we'll track its position across the set of frames where it is a problem. Now if we use the Motion Tracker to generate a motion path from the movement of the telephone pole and apply that subsequent motion path data to the Superclone and/or Autopaint tools, we can watch as Commotion magically follows and paints out the telephone pole (or your sister), all the while adjusting for X & Y position, rotation and corner pinning. This is truly an elegant solution for complex retouching.
Admittedly, no Motion Track in any application I've ever used has been perfect, and Commotion is no exception. This is especially true with media originating from lower resolution DV where you may end up with some tough tracking situations. Since the precision of the track data relies on the amount of chroma or luma differentiation in the tracking area, you'll always end up going in and cleaning up a few inconsistencies if the resolution of footage is low and detail is murky. But, if you ask me, fixing four or five frames is much better than rotoscoping 300, as my carpal tunnels will vouch for. I originate everything in DV, and I was able to get pretty good results with Commotion's Motion Tracker right off the bat. I found it more predictable and less quirky than After Effects Production Bundle version, and far easier to set up or correct and continue a good track gone bad.
Now where Commotion's Motion Tracker really shines is in the fact that a Track, like a Clone setting or an Autopaint stroke order, is treated as an object. Once you have achieved an acceptable track, you can apply the data anywhere, not by onerous copy-and-pasting keyframes, but simply by applying that data to whatever tool you want. This is a big difference from After Effects Production Bundle. With After Effects' Motion Tracker, you track position on the one layer and then apply it directly to the physical attributes of the other layer from the Motion Tracker dialog box. To apply this data elsewhere, you must copy and paste from wherever you applied it to originally. Use of Motion Track data other than strictly position, rotation and corner pinning adjustment in After Effects always feels more like workaround than functionality, whereas Commotion understands that such data would also be supremely useful in every area of the composition, (as well as exported for use in After Effects, etc. Yes, it can do that).
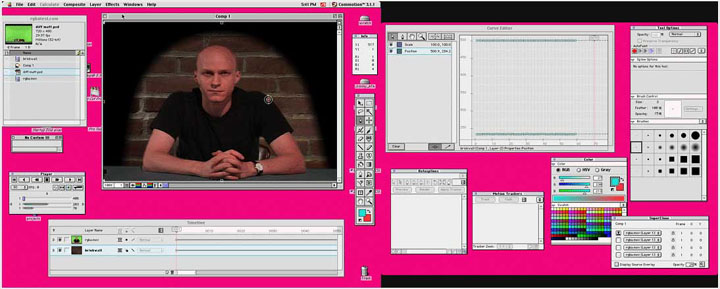
Finally, there is another really important feature we should look at. This is the Curve Editor. Commotion is an animation application, like After Effects. This means that you can have any setting mutate through interpolation, or values changing over time. This is keyframing, and it is the basis of Animation. Keyframes establish what happens and when and how it happens. What an animation application does is automate the process of determining the values between keyframes, and how refined it is at performing this function determines how useful it is in animation.
There are two main types of interpolation between keyframes that applications use; linear and non-linear. For those using FCP, Avid or Media 100 editors, you have likely experienced linear interpolation in setting keyframe perimeters in these applications, or at best, very limited non-linear interpolation. Commotion and After Effects offer very robust controls for setting non-linear interpolation.
Bear with me, the math will end soon, but it is important math. The difference is this. Say your keyframes are at 0 and 1. Now, in linear interpolation, your value at the halfway point would have to be exactly .5, because, shortest distance between two points being a straight line, halfway must be exactly half of the end value. With non-linear interpolation on the other hand, the halfway point could have any value we want, including far exceeding the end value. If say our values were position coordinates (implying that the change over time was in position, and therefore represented movement), this can give a natural speed-up/slow-down effect to the interpolation as opposed to the rigid motion path that linear interpolation would have given us.
Most applications, if they give any support to non-linear interpolation, give little flexibility. Some apps call it 'ease in/ease out' and insert a standard curve in the interpolation. Some applications may even give you a little Bezier handle (similar to the one we saw shaping curves in our Rotosplines) to give limited control to the shape of the curve in the timeline. After Effects, up to this time, has been pretty much the standard for this sort of interpolation control. I have enjoyed for years the degree of subtlty that can be achieved with non-linear interpolation in the After Effects timeline. That is until I started investigating Commotion's Curve Editor.
I probably sound like a school girl going weak in the knees over some bad vocal act, but I am completely floored by the quality of design and the efficiency of the workspace in the Curve Editor. Once again, they came up with an elegant solution to problems that have plagued After Effects' set up for years.
The problem with After Effects curves were that they are located sometimes up to three drop-down menus deep into a layer in a composition timeline. If you've got thirteen layers and you need to sync up the curves for six keyframes on the top, middle and bottom layers, it can take several minutes of arranging just to get the window set up so you can look at them. And even then, the ceiling and floor of your values can get lost between the layers and difficult to adjust, bezier curve or not. It isn't the end of the world, but is a pain if you're in a hurry and your composition is a little unruly.
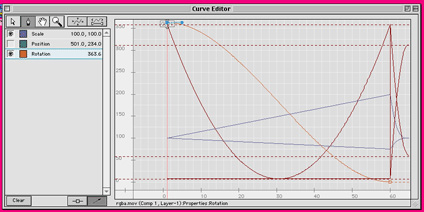
Commotion's solution, predictably, was to put the interpolation keyframing in its own window. If you need to set a curve in a layer's keyframing, you simply drag that layer into the Curve Editor window and instantly you get a nice, wide space to build elegant precise curves between your keyframes. And what's even better, this is true non-linear, because instead of seeing all these curves stacked top to bottom in layers, they are displayed simultaneously. Though this sounds messy, in practice it is far easier to see the relationship between, say, six different converging curved lines in the same graph than if they are viewed separately.
How does look...in mid project!!!
One of the nicest features built in to Commotion is the video preview support. This is really an integral component of any effects application. When you are concerned with the timing and motion of render-intensive effects, you can't assume that your timing is always right. You have to see it happen in real time. But we don't have real-time capability on the Mac yet, and even when we do get it, it'll be mostly cheesy clock wipes and very few, if any, of the processor intensive effects that we want a compositing application for in the first place. So we have to continue doing our render tests.
In the old days of After Effects 3.1 (a few years ago), this meant doing about thirty million test renders until you got what you were looking for. That meant opening and shutting down applications, doing output settings about a thousand times, a real pain in the tuchis. Not that we wouldn't do it, because we want perfect results, but really a pain. When Adobe released After Effects 4.0, they included a neat little feature called RAM Preview. The RAM preview basically renders your selected frames up into the RAM that you've allocated to After Effects (or whichever application you're using). This is MUCH faster than rendering to disk, because RAM is physically faster media, and upon completion of the render, you can see the results immediately in your composition window. So with the RAM preview, you could really quickly see the timing of your composition and make any changes without leaving the window you were working in.
Its also worth mentioning that it was Commotion, and not After Effects, that first developed and included realtime playback from RAM. While most of us think of this as an Adobe innovation, it is yet another example of how Commotion has been ahead of the curve in every development of film/video effects and animation software development. Although we may like to think IBM created the desktop computer and OS, it was the guys in the garage burning up their evening and weekends that came up with the machine you're surfing with now.
Of course, the RAM preview has some serious limitations that keep a lot of us from using it all that frequently. RAM previews in After Effects must be played back on screen, and not sent out to video, meaning that you can only see the RGB version and not the YUV or television monitor version. That can be a serious problem if you are at all concerned with what the broadcast version of your masterpiece is going to look like. Also, the RAM preview is limited by how much RAM you have. That can go in either of two predictable ways. If you try to preview a composition at full D1 (720x480) screen size, you are liable to get a stunted frame rate of around 15 fps, which is not acceptable for precise work. And if you select a smaller frame size for preview, you will see resizing-type artifacting as the RAM preview throws away valuable data in the render process. Further, since the render is in RAM space, there is no way to retain the preview by saving to disk or permanently caching it. Although the rendered frames stay in RAM until they are changed, there is no way to access them. This can be an awful waste of time, because although RAM preview is faster than regular renders, it still takes time, and after waiting to see the results, its painful to see that render evaporate with the tweak of one setting.
Neither option is acceptable, really, and after the initial thrill of having this RAM preview, the feature fell into disuse as I returned to doing short full-frame-full-motion test renders. There just wasn't any other way to see it full-frame full-motion. Recently, Synthetic Aperture created a plug-in for PhotoShop and After Effects called Echo Fire which adds Firewire preview and disk caching to the preview process. Essentially, for the $275 asking price of the Echo Fire plug in, you gained the ability to see on an NTSC monitor what you were doing in After Effects or Photoshop (in addition to some other quite handy little features that I won't go into here). Thank God for the third party developer, right?
But that's really sad, frankly, because this is a feature that Adobe should have built into After Effects, instead of letting a third party take the lead. Commotion may have taken heed to this situation, because they built DV preview into the application, as well as a SuperCache preview system that is constantly storing away frames on a drive in case you ever want to see it play back full frame full motion. So, without resorting to third party solutions like Echo Fire, you have the ability to render and playback DV quickly and from INSIDE of Commotion. You can do so either as a complete selected clip or by having the DV preview update constantly through what is called Video Mirroring, which sends out what is currently active in the RGB monitor via Firewire to an NTSC monitor. Either way, Commotion understands that we need to know what our stuff looks like, how it works over time and we need to know this without leaving either the application we are working in or the creative state of mind we have while working on the composition. A quick integrated preview is the answer, and Commotion offers it.
As a final note to this section, Apple's recent release of the QuickTime 5 Public Beta broke the Echo Fire plug in. At this point (until either Apple patches QuickTime or Synthetic Aperture patches Echo Fire), there is no way to Firewire preview out of After Effects. Commotion's DV Preview seems to have no trouble at all with QuickTime 5 and is trucking along delivering DV preview and mirroring. Lucky chance or clever code? All I know is that to use After Effects with Echo Fire and QuickTime 5 Beta right now, I'd have to reboot as well as restart applications, but Commotion is fully functional.
There's so much else to cover.
Commotion is such a mammoth application. And a lot of its functionality isn't the big tools like the Motion Tracker or Superclone. It's the little things that Commotion offers that save the most time. In the short time I've been using it, I've gotten addicted to a few little items that will have you turning fairly green with envy as I describe them, even if you've never composited in your life. Like I said, this interface was designed by people who actually have to use machines for a living. And they addressed a lot of user-gripes and frustrations here.
First of all, let me congratulate the Commotion team on the development of 'rub-text' click-and-drag control. This is probably the best example of good interactive design. With Rub Text, you can alter any changeable value by simply clicking/holding the text of the name of the attribute and dragging in the intuitive direction of the change you want. Instead of the old system of clicking a number value, typing a new one in and then hitting OK, you can simply grab the attribute name and change its value by dragging. You can always resort to clicking on the value and entering it specifically, but at least you have the option.
Speaking of 'Option', if you hold down the Option key while rubbing-text, you get a dynamic preview of your changes in the Composition window, so that you can visualize your adjustment. The intuitive direction for changing the number correctly depends on the value. Changing the value of position, for instance, involves all four cardinal directions, because you are altering X and Y coordinates. Changing the opacity value, on the other hand, is only a left-right drag, because you are only adjusting more or less opacity. It may sound confusing, but that's only because the action is SO SIMPLE. Imagine trying to explain balancing a bicycle in text. This control feature gets my vote for best control feature development for the decade (and its still a very young decade). Puffin, please sell this idea to the rest of the world.
While we're on the subject of control and precision, it's also important to mention that the Commotion team built in some really important third party integration. First of all, the Wacom Tablet is totally supported. Those of you who have not done a lot of retouching do not yet know that you need one. The Wacom tablet is a USB device that allows you to use a pressure sensitive pen and a flat tablet along with a standard mouse for input to your system. Even bozos like myself (I couldn't draw my way out of a paper bag) can substantially increase retouching speed, quickly create beautiful graphics and, once again, relieve that carpal tunnel of the evil Rodentus Desktopus, bubonic plague of the wrist. Think I'm being hyperbolic? Then you haven't had the pleasure of using a Wacom tablet yet. Try one out at your local Computer Geek Outlet and you'll see what I mean. The 5'x 7' board only costs about 100 bucks and the big one is less than 300. And Commotion allows you to fully realize that tool in Film and Video. Its beyond luxury.
Secondly, and this will appeal to After Effects and Final Cut Pro folks, Commotion seems to support all those third party plug-ins written for After Effects. Which means that if you have third party plug in suites for Final Cut Pro or After Effects, such as Studio Effects' Final Effects or any of Digiffects fine products, you can bring those in and use them with Commotion as well. This also extends to the import/export plug ins that come with After Effects. And there is access to the usual file format suspects; PICT sequences, Cineon (although not full 10 bit versions yet), and, happily, OMF (although open only, not save) as well as the many formats available to the QuickTime system.
It should also be remarked that Commotion allows you to remove and apply 3:2 Pulldowns with your footage. If you are working with film source footage that has been transferred to video, this is an indispensable tool. Because of the difference between the frame rates of film and video (24 and 30 respectively), the fields of the video must be interpreted correctly, both for field dominance and for the distribution of 24 film frames per second over 30 video frames per second. When film is transferred to video, the 24 frames of film are distributed along the 30 frames of video in a 3:2 ratio that must be accounted for in processing the footage. Commotion can locate and remove this Pulldown. The bonus, of course, is provided for those video folks trying to achieve the 'film look' in video-sourced media.
No matter how much you texturize and no matter how many scratches you put into the footage, video will always appear to be video because of the high frame rate (not just 30 frames per second, but 60 discrete FIELDS per second). So how can you drop the apparent frame rate to 24 fps without throwing away essential original frames? By applying a 3:2 Pulldown to your footage. This will map 30 fps to the same field/frame relationship that film gets when it is telecined or transferred to video. Now your video will have a telecined look that is only possible through film transfer. Adobe After Effects is the only other budget priced software application that performs this function.
In Conclusion...
So, how would I rate this thing? You've got to be kidding me. I love it!!! It's a ten out of ten, baby, and I am hard pressed to find fault (with the Commotion Pro base application anyway). This is a really excellent and well-organized application. Everything I pursued using it was easy to pick up, based on my previous experience with After Effects, Photoshop and Commotion DV 1.0. I'm fairly sure that anyone with experience with at least two of those three applications could snap it up fairly quickly. Its not an EASY application, though, and it would be a mistake to assume so. Similar to After Effects, you are dealing with some pretty incredible tools, so you have to learn them before you can fly. Beyond that, like I said in the beginning, it seems put together by folks who have had to struggle with their tools and who know the value, in both time-savings and frustration, of the simple solution.
Another thing that I really like about Commotion is its emphasis on the tools themselves and the streamlining of image correction and manipulation. The Toolbar itself is about six times more packed than After Effects. What used to require hours can now be both faster and automated. Unbelievable. I've left so many features out that simply don't exist in any other application, such as 1) the ability to actually apply paint effects directly to the composite window instead of applying to clip windows and watching them update the Composite window, 2) the amazingly adaptable FX brushes that basically turn anything concievable into a type of brushstroke, 3) the ability to stroke a Rotospline, giving you true keyframeable vector animation IN A BITMAP VIDEO APPLICATION, the list goes on and on. And we didn't even start talking about the effects filters. Remember, Commotion Pro comes bundled with Primatte Keyer, Composite Wizard and Image Lounge, three neat suites of plug ins (these will be reviewed separately since they exist as standalone plug ins for After Effects and FCP as well). And for the Commotion DV customers, the built in effects suite is no slouch either.
I mentioned at the beginning that I wouldn't want to say either Commotion or After Effects was a 'better' application and I stand by that. For all my gushing about how great Commotion is, I'm not gonna tell you to put After Effects on the shelf and forget about it. Notwithstanding what Adobe includes in their next major upgrade, After Effects still clearly has usefulness in the land of compositing. And I will not hesitate to use it. But where it is best made use of has dramatically changed with the introduction of this version of Commotion.
I see After Effects' chief usefulness in projects where the render order is so complicated that it requires nested compositions, something I pointed out that Commotion cannot perform. It is also conceivably easier to set up and bang out simple compositions with few elements and limited interpolation, especially instances where simple numerical keyframe entry will speed up the production process. Where a paint roller is more effective, After Effects will come in handy. Where a complete set of fine to coarse bristle brushes are more useful, you know where I'm gonna be working.
Admittedly this may just be force of habit, loyalty and familiarity with an old friend (not a product). Its hard to put away a tool, regardless of how great its replacement is. And as we will see in the Primatte Keyer, Composite Wizard and Image Lounge reviews, I think Adobe may still give Pinnacle quite a run for its money in the effects filters department, if not in the market share of the host application.
But there is no questioning Commotion Pro's superiority at the rest of the game. About the only complaint I have, beyond the inability to create and nest multiple compositions, is the fact that there is precious little documentation about the changes from 3.0 to 3.1.1. And even the 3.0 manual is a little bit quick on some topics that need digression. Although there are some good tutorials on the installer CD, and I hear that the man Squires is currently putting together a Visual QuickPro guide to it (as well as hanging out on 2 Pop; how many software authors of products THIS good hang out and answer questions about their baby? We all owe the man a beer-float), we could do with more. You can't use tools that you don't know are there.
The toolset, functionality and design are just TOO good. Beyond my piddling complaints in the preceeding paragraph, I'm satisfied in full. Commotion is an honest-tamale paintbrush of nearly infinite flexibility, which is something I would not have said about After Effects even during my most rabid AE-cheerleading back in the BC times (Before Commotion). Things I have wanted for years in After Effects are now there in Commotion. Let's see how Adobe takes the heat...
For more info and a downloadable demo users can check this web site at: http://www.commotionpro.com/
Examples of Commotion's use in feature films and commercials: http://www.commotionpro.com/products/user_stories/
Other things you can do with Commotion (some companies are using it for film restoration among other things) http://www.commotionpro.com/why_commotion/
Charles Roberts AKA Chawla teaches Digital Video and Audio Production at Fitchburg State College in Fitchburg, MA. He is a busy freelancer, DV consultant and video artist who can't understand why in a world of so many digital video possibilities there are so many bad television commercials. On second thought, yes, he can.
copyright © Charles Roberts 2001
All screen captures, images, and textual references are the property and trademark of their creators/owners/publishers.