
Book Review - Final Cut Pro Editing November 26, 2001
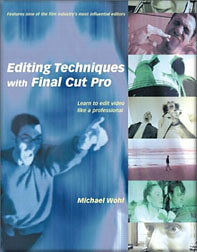
Editing Techniques with Final Cut Pro
Peachpit Press
Book Review - Final Cut Pro Editing November 26, 2001
Editing Techniques with Final Cut Pro
Peachpit Press
ISBN 0-201-73483-4 © 2001
When I began using Final Cut Pro exactly two years ago there was not a single FCP book on the market. In the past two years a number of new books have come out that teach the basics of FCP including large sections on setting up the Mac for FCP. These new books do an excellent job of teaching FCP to the uninitiated. Step by step they take you through every aspect of FCP; Viewer, Canvas, TimeLine, Browser and the myriad of tools that FCP provides. From set up, to log and capture, building Sequences and final output/export, they cover the gamut of what FCP has to offer and they do it well. These books also move the reader to the intermediate level with comprehensive sections on compositing. There are now also a number of tutorial CD rom, VHS tapes and computer software that cover the same material.
Over the past two years, a community of users have grown up around
Final Cut Pro. One would think that this community would be comprised of editors migrating to FCP from other NLEs or from film. Indeed many who now use FCP are editors who simply need to learn how FCP works differently from their old NLEs. But it's an eclectic community of people and a large number in this community are not experienced editors at all. Many come from various other disciplines; writers, directors, producers, musicians, audio, DPs, and a whole new generation of film makers. I myself am a still photographer and while after two years I consider myself to be proficient in FCP, when it comes to the 'Art' of editing I don't have a clue. I know no more now about this craft than when I first started.
Until now all the FCP books have dealt with how to use the software, the mechanics of FCP the application. "Editing Techniques with Final Cut Pro" by Michael Wohl is the first book to approach FCP as an editing tool. It deals with the 'art of editing'. The book is a bit of a hybrid. The book jacket clearly states that this book is written for the 'intermediate' and 'advanced' user and this is true. Much of the 'beginner' material is not present. No sections on how to configure your Mac, no FCP settings nor any of the fundamentals about getting started with FCP. So in this respect it is not a beginner's book.
However, having said that, when it comes to the 'art of editing' this is a beginner's book. The first 133 pages (3 chapters) deal with what Michael Wohl calls 'The Invisible Art' (of editing). Starting with the script then moving through all the pre production stages of film making, we learn the roll that an editor can play and his or her involvement in the movie even before the first frame is shot.
We move on to post production and the start of the editing job. 'Choosing The Shot' starts our education into editing. Composition, headroom, point of focus, action, background elements, lighting, audio and the other factors will determine which shots will be used and which ones won't. We are provided with a 'Film Language' chapter that teaches us the proper terminology critical to the process. CU (close up), MCU (medium close up), LS (long shot), WS (wide shot), the list goes on. Camera angles, Dutch angle, Camera movement, Pan and Tilt, Tracking, Follow Shot, Pedestal Shot, Zoom. Critical elements; POV (point of view), Reaction Shot, Two Shot, Group, Cutaway, and Insert to name just a few more.
Most importantly in this first section we are taught the rules of editing. Not just which shots to use but how to put them together in such away that each clip or cut moves seamlessly to the next, how to construct entire scenes and then how to create smooth transitions from scene to scene. We learn about scene construction and the different rules that apply to the different types of scenes included in the story such as; action, chase sequences, dialog (cutting between two characters), soliloquies, group shots and more. Building interest in a scene and maintaining it, perserving momentum, adding tension, providing clues and insight, are all tools that the editor employs to tell the story.
As the book progresses we move to the 'intermediate' and 'advanced' levels of editing. Each new editing technique is first explained then illustrated with excellent art that clearly demonstrates the theory being discussed and is further enhanced with captions. There are three excerpts from the book below, taken from different sections that demonstrate Michael Wohl's approach to teaching the 'art of editing'. At the end of each chapter is a brief interview with some of the most respected editors in the business. As the lessons progress we learn powerful new ways to use FCP to aid us in our efforts to tell our story, to tell it in such a way that the editing is, indeed, invisible.
For me personally this is an excellent book. It has open doors into the 'art of editing', an area I know so very little about. This book is an easy read and is well written. If you are new to FCP and editing this book is a must. 'Editing Techniques with Final Cut Pro' along with one of the other 'Basic' FCP books will provided you with an excellent library that will go a long way to helping you learn your craft. If you have a basic understanding of FCP and are at the 'intermediate' or 'advanced' level but are learning the art of editing, or trying to improve your editing skills this book is for you.
My only complaint; why wasn't this book out when I first started two years ago.
--ken
The Film Language
The metaphor works for film because film is a language, and the editor-even more than the director or cinematographer-must be a poet. The editor must choose the most compressed, economical, and precise forms of expression she can, while conveying a theme through the many different dimensions that this unique medium affords. As in any language, combining sentences creates meaning and carries themes.
Parts of Speech
Reverse Shot
A POV shot is a common way to justify a strange angle-for instance, a shot peeking out from behind a wall or the extreme high- or low-angle shots described earlier in this chapter.
Standard editing technique calls for bracketing a POV shot with a matching reverse single to indicate whose POV it is. So in the bell tower example above, if the low-angle shot of the tower was intended to be a character's POV, you would follow it with a shot of someone in the quad looking up at the tower. (Figure 2.20).
List price: $44.99 U.S.
480 pages
Review By Ken Stone
The three Excerpts below are taken from different sections of the book and are only a small sampling of the lessons offered and how they are presented to the reader.
Before you can speak the language of film fluently, you need to understand its rules. What are the nouns? What are the verbs? How about punctuation? How do you combine all these "parts of speech" to construct meaningful sentences?
Bear with me as I extend this metaphor a bit. It will prove very helpful in understanding how to edit. Think of shots as nouns and the transitions between shots as verbs. You might say that in cinematic language, sentences are constructed in a noun-verb-noun-verb arrangement and are punctuated with fades, freeze frames, and other graphical elements.
A reverse shot (or "reverse angle") is a relative term for any shot taken from the opposite angle of the previous shot. It often serves to explain the source of the preceding shot-such as a high-angle shot of a college quad following a low-angle shot of the bell tower. It can also be used in the simple case of reciprocal OS shots (as in "Follow the OS of Trey with a reverse of Dana.")(Figure 2.19)

A reverse shot is always a reciprocal angle of the shot that preceded it. Here are two examples.
Point-of-View (POV) Shot
A point-of-view shot lets us look through a character's eyes and shows us exactly what she's seeing. If she's in a conversation with her brother, for instance, a POV shot might show the brother speaking directly into the camera lens.

|
|
|
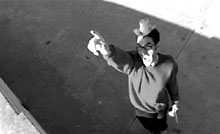
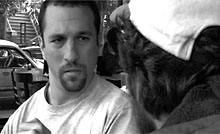
Figure 2.20
The point-of-view (POV) shot is commonly used in conjunction with a reverse shot. Here, the shot on the left is Trey's POV, showing what he sees when he peeks out from behind the curtain. The shot on the right is the reverse, which reveals whose POV it is. |
Follow the Reactions
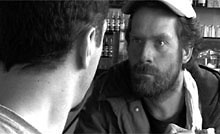
People's feelings are far more important to the audience than their moving lips. Your protagonists' reactions to what others say tell a much more important story than the words themselves. Rather than simply cutting back and forth to focus on the character who's speaking, you should edit to show important reactions.
For example, in the sequence above, as soon as Trey begins his confession about the job, both he and the audience are wondering how Mom is going to take it.
His whole line is: "Mom... I'm not working there anymore. I quit... Well, actually I got fired..." I might have stayed on him for the entire line, but instead, as soon as he says, "Mom..." I cut to her reaction and the rest of his line is heard off screen. This works nicely because when he calls her name, he elicits her eye contact-which gives us a physical action to cut on (her looking up). Even more important, it allows us to see her reaction as he stumbles through his line. Because her next line is still part of her reaction, I stay on her until she finishes the line. Then I cut back to Trey to show his reaction to her.
Use Split Edits
"Editing Dialogue Sequences"
Once you get the hang of it, cutting dialogue scenes is fairly easy. The only trick is understanding when to make the cuts. One good way to figure that out is to follow the characters' reactions.
As I've already said several times, successful dialogue editing requires offsetting your audio and video cuts. This technique carries the viewer past dialogue cuts so smoothly she never notices them. Almost every editor uses lots of split edits when editing conversations. Those are edits where the audio and video begin and end at different times. In fact, in most dialogue sequences you see, every cut is an L or J cut (Figure 3.7). (For more information, see "Split Edits," Chapter 2.)
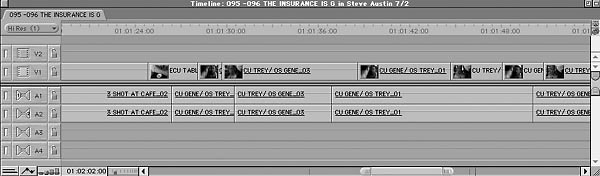
Figure 3.7 Most dialogue scenes look something like this in Final Cut Pro. Note that nearly every cut is a split edit. |
Don't Cut on Pauses
It's tempting to make your cuts exactly on the beginnings or endings of phrases. Resist the temptation. These cuts become painfully apparent, especially when you're taking the audio from different shots. Since your goal is usually to make your cuts invisible, avoid cutting at these natural pauses.
Better yet, you can turn one of these "natural pause" edits into an invisible L or J edit after laying down the basic shots by rolling the video edit to take it off the audio cut point. (For more information on the roll tool and how to use it, see "Trimming Edits," Chapter 6.) Rolling: Moving an edit point forward or backward in time by lengthening one clip while shortening another.
Find the Best Performance
To make your dialogue scenes as effective as possible, you should use the best performances for every line in the show. This brings sequences to life and keeps the dramatic action at a high level.
A lazy editor cutting a two-person dialogue scene may pick one take of each shot (i.e., two matching CUs) and simply cut back and forth between them for the duration of the scene. This is easy, but it runs the risk of missing a gem hiding in another take. Every time you cut, you have the opportunity to go to a new take (unless continuity problems make that impossible). The only thing to watch out for is that sometimes the energy in a particular take will be so consistent that dropping in a moment from another take can destroy its subtle continuity. In any case, a skilled editor will look at all the footage and mark every good line reading for possible use.
"Trimming"
Extend Edit
Because editors use the Roll edit so frequently, there's a way to do it in one step. The Extend Edit command will roll the currently selected edit point to the playhead position
(Figure 6.7).
|
|
|
Figure 6.7
You can roll an edit without using the Roll tool by using the Extend Edit command. |
This has essentially the same effect as selecting the edit point with the Roll tool and dragging it to the new position, but can be done from the keyboard by hitting the E key. Professional editors tend to use this feature while playing the sequence-or just after stopping.
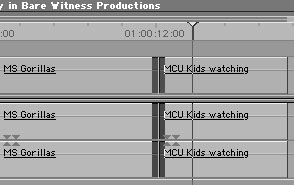
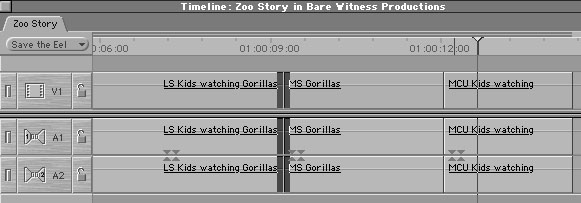
For example, suppose you've got a sequence of kids in a zoo looking at gorillas. You rough in a couple of edits:
1 . LS kids looking at gorillas.
2 . MS gorillas.
3 . MCU kids faces.
But there's a problem with shot 3: The MCU of the kids is supposed to show them looking interested in the gorillas, but in the beginning of the shot one kid is staring at the ground, bored as a stick. After a moment he glances up and gets mildly interested to the point where he might pass as engaged, especially surrounded by the other excited kids. You decide to fix the problem by extending the gorilla shot to cover up the undesirable frames of shot 3. (Who could complain about a few extra frames of gorillas?) Here's how you might use Extend Edit to accomplish that very quickly.
1 . Select the edit point between shots 2 and 3.
2 . Play the sequence.
3 . At the moment where the kid stops looking bored, hit the E key.
That's it! No setting markers, no dragging, no calculating how many frames you want to trim. If you do this while playing, Final Cut Pro will even extend you the courtesy of backing up a few seconds and playing over the new edit point-all before you can say "Stop."
Extend Edit works in reverse, too, either by letting you extend the edit while playing backward, or by allowing you to position the playhead upstream from the selected edit and hitting E.
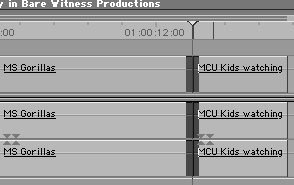
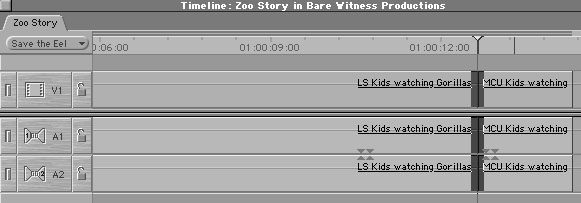
Delete Shots With Extend Edit
You can even extend your edit right past another edit point, completely eliminating a clip. This is another efficient, high-speed strategy.
Let's say you'd like to try the zoo scene without gorillas-you want to extend shot 1 (the LS of the kids looking) right past shot 2 (the gorilla shot) and past the bored kid in shot 3, so you'd end up with two shots of kids, no gorillas, and no bored kid.
Select the edit between shots 1 and 2, place the playhead at the right spot in shot 3, and perform an Extend Edit (Figure 6.8). This will eliminate the gorilla shot from the sequence entirely, along with the bored brat.
|
|
|
Figure 6.8
As long as there's enough media in the underlying clips, you can extend an edit as far as you like. In this example we completely overwrite the second shot. |
Michael Wohl is an accomplished director, winning the coveted CINE Golden Eagle award for his 1993 Fictional Documentary: 'Theatereality' and has worked as a professional film and video editor for 12 years. He has taught Film Production, Editing, and Production Management courses at institutions including American Film Institute (AFI), SF Academy of Art, University of GA, and DV Creators.net. He has also acted as Software Designer and Technical Consultant for various film and video editing software products including Adobe Premiere, Adobe AfterEffects, and was one of the principal designers for Apple's Final Cut Pro.
Editing Techniques with Final Cut Pro
copyright © 2002 by Michael Wohl and
published by Peachpit Press
You can purchase 'Editing Techniques with Final Cut Pro' from the LA Final Cut Pro User Group Store.
Review copyright © www.kenstone.net 2001