
Book Review - Digital Video 
April 8, 2002
Final Cut Pro 2 Bible
Book Review - Digital Video April 8, 2002
Final Cut Pro 2 Bible
ISBN 0-7645-3602-8
Review By Ken Stone
Before I look at this book there is an issue that I would like to address. Recently a number of FCP books have been published. They were publish just months after the release of FCP 2 and state that they are for FCP 2 on their covers. As FCP 3 has now been released the question could be asked, do these FCP 2 books have value, are they still relevant. The answer to this question is yes. They are still relevant. FCP 3 does offer new features and these new features are covered in the manual that ships with FCP. Aside from new features the FCP interface has not changed and the wealth of information that these books contain is still applicable and relevant.
The Final Cut Pro 2 Bible, first and for most, is a huge FCP and Video reference book. It covers beginner, intermediate and advanced levels of FCP as well as a host of other relevant video topics. It is not like most FCP tutorial books, it is organized a bit differently.
The first half of the book, some 553 pages, is devoted to instructional fare for FCP. The first section, 'Up and Running with FCP', starts you off with very brief basic exercises. You learn how to create a Sequence, place clips on the Timeline, trim clips on the Timeline, work with Transitions, Compositing and Audio. This gives the beginner a taste of the basic functions available in FCP. The material need to do these exercises is supplied on a DVD ROM that comes with the book. An excerpt from Final Cut Pro 2 Bible follows this review.
After this brief introduction to FCP, the book then moves on to the following chapters.
I mention that this book is organized differently then most FCP tutorial books. I say this because most books are targeted at only one level of competence, despite what the book cover says. A beginners book will be very basic in nature throughout, with some intermediate information towards the end of the book. With FCP 2 Bible each chapter contains both basic and advanced information about it's topic. Each chapter is fully self contained. There is instructional material and exercises for the beginner, but then each chapter continues on with a wealth of information, histories and explanations about its subject. All of this information is supported by excellent art, screen shots of all FCP interfaces, dialog boxes and windows. In addition, diagrams, drawings and photos help the reader understand the subject matter.
From this point on the book move on to subjects that are deffinately FCP centrec but beyond the day to day functions of FCP editing.
There is a complete appendices at the end of the book that includes; FCP installation, keyboard shortcuts, Effects and Transition Tables and FCP Resources. The accompanying DVD contains all the material needed for the books exercises, demo software applications such as After Effects, Photoshop, Peak VST, Video Spice Rack and more. There are also sample plugins like CGM and Utilities programs.
The Final Cut Pro 2 Bible is a virtual warehouse of information. It is well written with clear and easy to follow instructions and exercises. This book truly runs the gamut from beginner to advanced. It is a complete reference book for all things Final Cut Pro, DV and Video.
Enjoy,
--ken
Book Excerpt from Final Cut Pro 2 Bible
"Slipping Edits"
The Slip Edit tool allows you to "slip" a shot's in and out points without changing its duration. The media for the clip slips backwards or forwards, but the overall duration of the edited sequence and the clip is not affected. Slipping a shot is illustrated in Figure 13-17.
List price: $40.00 U.S.
1,094 pages
And in this corner, weighing in at 3 pounds 4 ounces and standing 1,094 pages high is the Macworld Final Cut Pro 2 Bible. If you have ever seen a Macworld Bible book you'll know what I am talking about. These books are huge.
By Zed Saeed
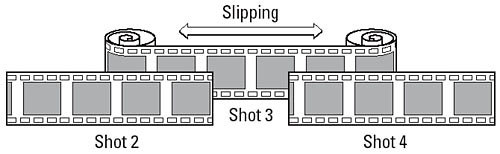
Figure 13-17 - Slipping a shot allows you to change its in and out point selection without changing its location in the Sequence in relation to the other clips.
When slipping Shot 3 in Figure 13-17, it is as if the shot moves behind Shot 2 and Shot 4. The in and out points of Shot 3 change, but not the distance between those points. The overall duration of the edited sequence remains the same as does the location of the edit points on Shot 2 and Shot 4. To perform a slip edit:
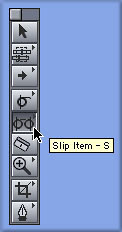
1. Edit Shot 1 into the Timeline with no in or out points set on it.Figure 13-18 The Slip tool can be selected in the Tools palette.
2. Edit Shot 2 into the Timeline with no in or out points set on it.
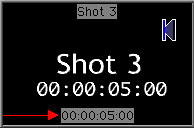
3. Double-click Shot 3 to load it into the Viewer window. Set its in point at 3 seconds and its out point at 6 seconds.
4. Edit Shot 3 into the Timeline.
5. Edit Shot 4 into the Timeline without setting any in or out points on it.
6. Select the Slip tool from the Tools palette as shown in Figure 13-18. If the Tools palette is not visible, choose Window > Tools to bring it up.
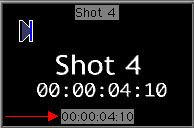
7. Click on Shot 3 with the Slip tool and drag it to the left or the right. You will get a small yellow box indicating the amount of slip and the two-up display in the Canvas window will show the current frames, names, and timecode in the window (see Figure 13-19). Note that during a slip edit the two-up display will show you the new in and out points for Clip 3 only, since that is what's being changed.
8. Release the clip to complete the slip edit.
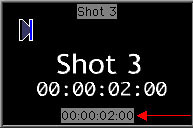
New in point and frame for Shot 3 |
New out point and frame for Shot 3 |
Red Arrows - Visual boundary indicates the amount of media you have on either side of Shot 3
Blue arrow - Amount of slip
Figure 13-19 Dragging to the left or the right on Shot 3 with the Slip tool indicates the amount of slip in the small yellow box in the Timeline. The two-up display in the Canvas window shows the frame, clip name and the current timecode of the new in and out frames for Shot 3.
![]()
You can also select a clip with the Slip tool and enter + or - followed by a number to slip the clip by the amount you type in either direction.
"Sliding Edits"
The Slide tool moves a shot between two others that are adjacent to it. It does so by adjusting where the middle shot places itself in relation to the clips around it. In our example, Shot 3 will move between Shot 2 and Shot 4. The duration and the in and out points of Shot 3 will remain unaffected. The durations of Shot 2 and Shot 4 will change, but without changing the overall duration of the sequence. In this respect, you could think of a slide edit (Figure 13-20) as the opposite of a slip edit.
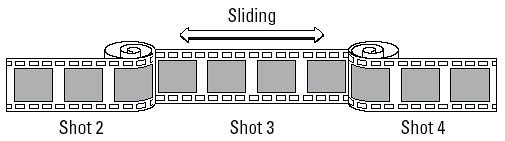
Figure 13-20: The theory behind the sliding process.
To perform a slide edit:
1. Edit Shot 1 into the Timeline with no in or out points set on it.
2. Double-click Shot 2 to load it into the Viewer. Set its in point at 3 seconds. Set its out point at 6 seconds.
3. Edit Shot 2 into the Timeline.
4. Double-click Shot 3 to load it into the Viewer. Set its in point at 3 seconds and its out point at 6 seconds.
5. Edit Shot 3 into the Timeline.
6. Double-click Shot 4 to load it into the Viewer. Set its in point at 5:00.
7. Edit Shot 4 into the Timeline.
8. Select the Slide tool from the Tools palette as shown in Figure 13-20. If the Tools palette is not visible, choose Window > Tools to bring it up.
You can also select the Slide tool by pressing the letter S on your keyboard twice.
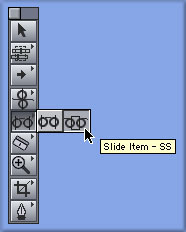
Figure 13-21 The Slide tool can be selected in the Tools palette.
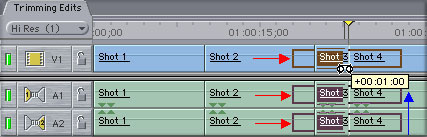
9. Click on Shot 3 with the Slide tool and drag it to the left. You will get a small yellow box indicating the amount of slide and the two-up display in the Canvas window will show the current frames, names, and timecode. Figure 13-21 illustrates. Note that during a slide edit the two-up display will show you the new out point for Shot 2 and the new in point for Shot 4, since that is what's being altered.
10. Release the clip when you are satisfied with your change. Shot 3 will have moved to its new location while modifying the adjacent points for Shot 2 and Shot 4.

New out point and frame for Shot 2 |
New in point and frame for Shot 4 |
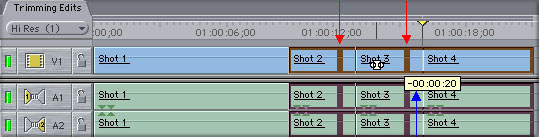
Red Arrows - Visual boundary indicating the new in and out points for Shot 3
Blue arrow - Amount of slide
Figure 13-22 The Timeline and the two up display in the Canvas during a slide edit.
![]()
It is usually easier to do a slide if you have snapping off and you use the Command key while dragging to gear down your mouse movements.
You can purchase 'Macworld Final Cut Pro 2 Bible' from the lafcpug store.
Review copyright © www.kenstone.net 2002