
Book Review - Final Cut Pro 
June 3, 2002
Final Cut Pro 3 and the Art of Filmmaking
Book Review - Final Cut Pro June 3, 2002
Final Cut Pro 3 and the Art of Filmmaking
ISBN 0-7821-4027-0
Review By Ken Stone
The book is well organized and the edges of each page are color coded for each of the five main sections.
This book is written for the FCP beginner. The introduction includes information on some of the hardware involved and the basic set up of FCP. The book then moves through all the basics elements. There is a complete tour of the FCP interface and all of its attending dialog boxes; each is clearly noted and explained. One thing I noticed is that while the authors demonstrate a good understanding of NLE, some of the terms used in the book are more NLE oriented as opposed to FCP specific.
Each lesson in the book is written in a step by step fashion, each step illustrated. All of the basic elements of FCP are touched on. Written for the beginner these lessons do not go into great depth about each topic but rather offer simple explanations.
The Book comes with a companion DVD. The DVD supports the lessons of the book, providing you with footage used in the exercises found in the book. There are also several different Project files, for different lessons, included along with the footage that belongs to the Project. This can be very helpful if you do not yet have your own footage. There is also a short video documentary 'Coney Island Memories' with the supporting clips for you to work with.
Starting with chapter 12, the book is interspersed with a number of interviews with video editors and artists, what the authors call 'Real World' profiles.
I feel that I need to point out that the book that is now shipping (the book that I am reviewing here) is a reprint. I did find a number of errors in the first version of this book and waited until this new version was released before I reviewed the book. Most of the errors were corrected. On page 139 there are two shots of the TL depicting FCP editing tools. The tools shown in the photos are incorrect, the 'Roll' tool is shown when the book is talking about the 'Ripple' tool.
All in all, this is a good beginner's book. Its strength comes from the excellent layout along with the full color printing. It really is helpful to have color photos of the TL and other FCP boxes as you can see the different colored elements that act as strong visual guides when actually working in FCP. The pictures in the book look like FCP on the screen.
Enjoy,
--ken
List price: $60.00 U.S.
Street Price $42.00
Companion DVD
396 pages
Book excerpt follows review.
Final Cut Pro 3 and the Art of Filmmaking is a handsome book. It is printed in 'landscape' layout and features full color images throughout. Having Timeline shots, dialog boxes, overlays, Viewer and Canvas windows in color helps visualize what is being demonstrated in the accompanying lessons. Showing the Color Corrector 3-way filter in color is also very helpful.
Book Excerpt from Final Cut Pro 3 and the Art of Filmmaking
Part II - Editing Your Movie - Making Smart Edits
By Jason Cranford Teague and David Teague
HTML re-creation
Making Roll Edits
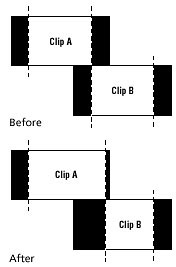
A Roll edit keeps every clip at exactly the same position in the Timeline, but it adds or subtracts frames from the beginning of the incoming clip to accommodate the trimming of the outgoing clip. In the example shown here, if you add a few frames to the end of clip A, the first few frames of clip B on the same track in the Timeline will be subtracted to make room. Likewise, if you decided to take ten frames off the end of clip A, clip B would start ten frames earlier. In other words, you are moving the cut itself backward or forward. Compare this to the diagrams of other edit types you'll see later in this chapter.
The Roll edit is especially helpful in music videos or other projects where you have to keep precise synch with the audio.
2.
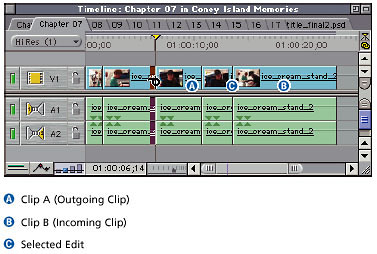
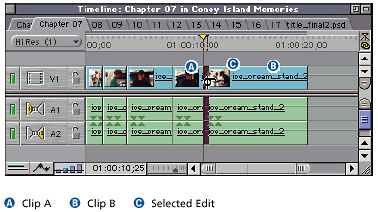
With the Roll Edit cursor, select the edit you want to trim by double-clicking between the two clips (which we will refer to as A and B). This will bring up the Trim Edit window with Clip A (outgoing clip) on the left and Clip B (incoming clip) on the right.
1.
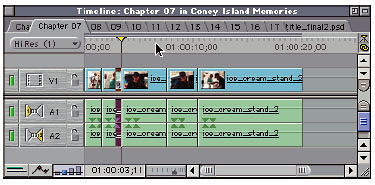
After adding the clips that you want to edit to your Timeline (see Chapter 6) choose the Roll Edit tool (R) from the Tool Palette. This changes your cursor to the Roll tool and allows you to select an edit point to roll.

3.
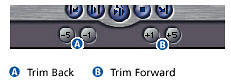
In the Trim Edit window, to "roll" the edit back and forth, click the Trim Back or Trim Forward buttons to add or subtract in increments of 1 or 5 frames at a time. For every frame increment that you add, clip A will increase and clip B will be cut by the same number of frames. As with other types of editing, however, this depends on how many frames clips A and B have available as trim. If you try to roll an edit past the beginning or end of the clip's original media file, Final Cut Pro will inform you that there is not enough media to perform this edit.
In the Trim Edit window, you can also specify an exact number of frames to add or subtract, by typing either the plus or minus key and then the number of frames followed by the Return key. For example, entering +27 adds 27 frames to the selected clip at the point of the selected cut.
4.
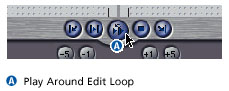
Now preview your revised edit in the Trim Edit window by clicking the Play Around Edit Loop button (or pressing the spacebar). You can continue to adjust your edit as desired by repeating steps 3 and 4.
5.
Once you've finished fine-tuning your edit, close the Trim Edit window either by clicking the Close button in the top-left corner of the window or by simply clicking in the Timeline. The clips in the Timeline will reflect the changes you've just made.
The Trim Edit window gives you microscopic control over your roll edits. However, you can also control roll edits directly and more quickly (although more roughly) in the Timeline. Starting after step 1 of the Making Roll Edits procedure, do the following:
Alternate Steps: Roll Edits in the Timeline
3.
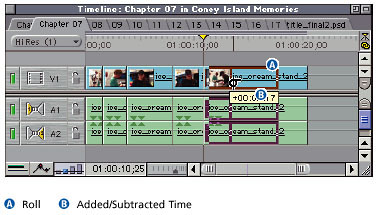
Click and drag the clip add or subtract frames from the two clips. This will change the In or Out Points of both clips. You can also click on the cut, type + or Đ followed by the number of frames you want to ripple, and then press Return. Remember, though, that the clip needs to have trimmed frames available at the edit point in order to be added using the roll. Remember, you cannot add frames past the Media Limit, which is the first or last frame you captured from the source tape.
Text excerpted and abridged from Final Cut Pro and the Art of Filmmaking by permission of SYBEX Inc. Copyright 2002, SYBEX Inc. All rights reserved.
You can purchase 'Final Cut Pro 3 and the Art of Filmmaking' from the lafcpug store.
Review copyright © www.kenstone.net 2002