Software Review- Film Look Plugins December 30, 2002
The Quest For Film-Look
Two Surprising Plug-Ins for FCP and After EffectsDissolve Factory
Buena Software
www.buena.com
$29.95 (before January 15; $39.95 thereafter) download
Available for FCP or AE55mm
Digital Film Tools
www.digitalfilmtools.com
$195
Available for FCP or AEReview by Ned Soltz
Since the earliest days of DV, the question will never go away: "How can I make DV look like film?" So enter Cinelook/Cinemotion, Magic Bullet, Grain Surgery, Fields Toolkit and a whole host of component plug-ins to give your video that "film look" in motion, grain, depth and even specific film-stock appearance. These products and others have made significant strides in adding that certain "je ne sais quoi" which tells the viewer "this was shot on film."
Yet this is much more to film than the visual characteristics above. The two plug-in packages that I will highlight for you can bring aspects of film even to DV, even if you do not intend to create a total film look.
Dissolve Factory
One of the earliest critiques of FCP was its lack of a true film dissolve. Those coming from a film background will immediately know what I mean. There is just a different look which came from physically drawing lines on two pieces of film and utilizing techniques which just created that very rich dissolve. If you are not from a film background, well, you just know it when you see it. CGM MovieFX, included in the CGM Filters Volume 2 approaches a true film dissolve with its ability to specify layers, much as the film editor would work with layers of film.But Dissolve Factory really achieves the film dissolve and does so for $30!
Buena Software has produced the superb set of plug-ins entitled Effect Essentials, which I also had the opportunity to review (and favorably, I must add). Effect Essentials allows fine control over values within the image, often at the pixel level. So, it only seems logical that Buena would be able to go to the next step to achieve a filter which relies upon the pixel values of clips to achieve a dissolve.
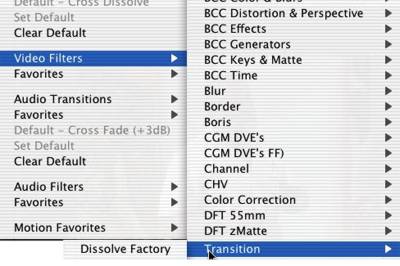
Note that I say "a filter." One would expect that a dissolve would naturally be a transition, in FCP terminology, rather than a dissolve. But Dissolve Factory is a filter which works as a transition. In fact, it is installed in the FCP hierarchy under Video Filters -> Transitions -> Dissolve Factory.
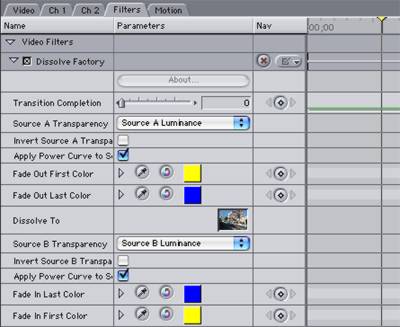
Nevertheless, Dissolve Factory is as easy to apply as if it were a transition between clips. Essentially, a dissolve is nothing more than the outgoing clip fading out while the incoming clip fades in. Hence, the only time parameter which needs to be set is the point in the outgoing clip at which the dissolve begins.
So, the workflow is a simple one. Apply the Dissolve Factory filter to the outgoing clip. Drag the incoming clip either from the FCP timeline or browser into the well marked Dissolve To on the clip parameters window of the Filters Tab. Set a keyframe of 0 at the point at which you wish the transition to begin and 100 at the end of the clip. Hence, if you want a one second dissolve, set the beginning keyframe 1 sec before the conclusion of the outgoing clip.
Now, here is where the fun begins.
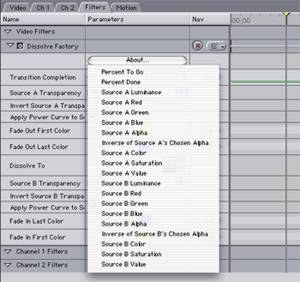
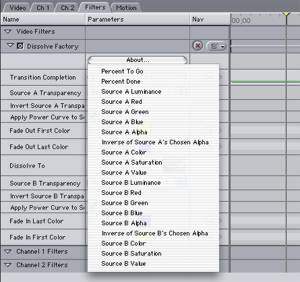
Dissolve Factory, in true film style, allows the dissolve to be based on the luminance, red, gree, blue, alpha or inverse of chosen transparency for both the incoming and the outgoing clip. The plug-in determines the transparency value for each clip depending upon what is selected in a mathematical formula which roughly combines the transparency values of incoming and outgoing clips with the inverse of the transition (percent) complete parameter. The output is then determined by multiplying incoming and outgoing by their respective transparency values and adding them together.
Source A Pop Ups
Source B Pop UpsA few simple graphic representations here cannot do justice to the effects that you can create merely by basing the dissolve on a combination of these parameters. When you go to the Buena web site to enter your credit card number to download the software, make certain to take a look at the QuickTime movies illustrating the possibilities.
Luminance Value Transition
Alpha Value Transition
Blue Value TransitionNote that I say "when". Buy this one. You can't live without it. The dissolve is one of the truly-essential editing transitions. Now FCP (as well as AE) have a true optical dissolve and at a price that even starving editors can handle.
55mm
Digital Film Tools
From the very name of this collection, one would assume something related to camera optics. Indeed, a significant element of the film process (some might even say the most essentially component of the film process) lies in the filtration at time of shooting and in variations in process.55mm contains 20 filters each designed to simulate various filters (which, granted, you could achieve in shooting video by dropping the appropriate filter over the camera lens) and one process (which by definition could only be simulated electronically).
First, to that process: Bleach Bypass is a technique from the film lab for which its devotees pay dearly. Essentially, when the film is processed, skipping the bleach stage retains silver together with the film's color dyes. Effectively, a black and white image is then superimposed over the color image. This allows for increased contrast along with reduced saturation. The three parameters of the filter control amount (intensity of effect), amount (image saturation) and contrast (higher or lower).
Bleach Bypass Before
Bleach Bypass AfterIn no particular order, I'll turn next to the Faux Film filter, giving the video a "film look" in reduced contrast, glow around highlights and added grain. Parameter adjustments include Glow (brightness, blur and color), Grain (by RGB, both size and color), color corrections and matte. The excellent accompanying PDF documentation includes a step-by-step How To in achieving the Faux Film look.

Faux Film Before
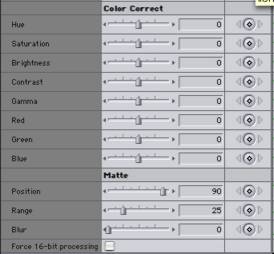
Faux Film AfterCommon to just about all the filters are several general controls, the understanding of which is crucial to using the plug-ins. There is a choice of final or draft rendering. Rendering times can be long, so a draft render at least helps in visualizing the final output. Composite modes give a choice of add or screen mode. Most of the filters have their own color correction controls which include hue, saturation, brightness, contrast, gamma and RGB controls.
But what is most crucial here is understanding the matte concept. In many of the plug-ins, the plug creates a matte which generates the ultimate effect. The matte has parameters of Position, Range and Blur. The Position parameters does not mean physical position, as we are accustomed to thinking in motion terms (this is a hard-one to grasp at first) but rather selects the values to be included in the matte. The higher the value, the more white values from the source image are included in the matte. Once this luminance position has been selected, range allows the selection of literally the range of values included in the matte.
Fortunately, any filter operating via a matte has the option to view just the matte. This matte view is essential for determining the matte which influences the entire effect.
Matte View of Image
Output View of ImageFinally, one little check box sets this collection apart from many others-Force 16-bit processing. By processing in 16-bit as opposed to 8-bits, the gradations of pixel values are proportionately smoother, virtually eliminating any banding. Of course, that increases rendering tie significantly but it is well worth the processor cycles.
Let me just highlight a few of my favorite filters from this collection:
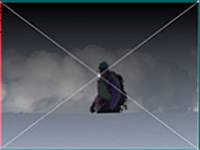
Mist-
Mist Before
Mist AfterThis creates an effect similar to a Black Pro Mist filter on your lens. Play with the parameters for effectively the value of the Black Pro Mist Filter.
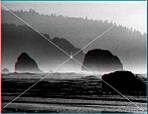
ND Grad
I recall being in a "learning shoot" where we were lighting a narrow corridor and had a few hotspots which were very difficult to control. And we needed a wide shot of that corridor. The experienced DP had in his arsenal a graduated ND filter which he placed in a matte box over the camera lens. By manually moving the position of that graduated ND filter, he was able to even out the values in the shot. Of course, there is no solution for badly-shot, blown out parts of video. But the application of this ND Grad filter in post can help balance widely-diverse differences within the shot.
ND Grad Before
ND Grad AfterPolarizer
Apply the Polarizer filter and adjust the parameters to help achieve that darkened, blue sky with lots of cloud contrast. Don't think you will totally restore a blown out sky, but it can make a well-exposed shot even more dramatic.
Polarizer Before
Polarizer After
Bad Shot Before Polarizer
Bad Shot Slightly Improved By Polarizer
Skin Smoother
I produced a PSA some 25 years ago in which the talent in one scene, a very vain 50-ish woman insisted that the camera operator "put something on that lens to make me look twenty years younger." The result, of course, was such a mismatch of shots that I am thrilled I no longer have a U-Matic player to view that tape I have been schlepping around most of my life, it seems. But, a little Pro Mist effect combined with the shot-matching possible now in our digital world would have made her happy and would have even produced something pleasant for the viewer. I really like this one.
Skin Smoother Before
Skin Smoother After
Digital Film Tools is a division of a film service company and they truly understand film. These excellent filters provide the FCP and AE user a means of bringing film-like camera filtration and process to the desktop in a stable package which functions consistently without crashes or surprises. If you require this kind of look in your video, 55mm is a well-invested $195. Check out the web site for additional examples and, take my word for it-their advertising claims are true.
copyright © Ned J. Soltz 2002-2003
[Top]
Ned J. Soltz Ned Soltz is passionate about the uses of technology to enhance the creative process. He only wishes that he were more creative. Now that he has a mobile FCP studio on his Powerbook G4, you can catch him on the road at nsoltz@aol.com.
This article was originally published at LAFCPUG and is reprinted here with permission.
All screen captures, images, and textual references are the property and trademark of their creators/owners/publishers.