April 4, 2005
Roll Your Own SATA Raid with the
MacGurus Burly Box and the
Sonnet Tempo SATA Card

April 4, 2005HDV Editing With FCP HD
Roll Your Own SATA Raid with the
MacGurus Burly Box and the
Sonnet Tempo SATA Card
Review By Ned Soltz
I
have been deluged with so many questions about the various "teasers"
I have been posting on various forums and in communications with
my clients that I decided it is time to go public with some very
preliminary conclusions, opinions and yes-the very first recipients
of the Ned Seal of Approval.

Well, the Ned Seal of Approval concept started several weeks ago over a gathering in the wilds of Plano, Texas where a few users suggested that I needed a way to indicate my seal approval of products which I have not only tested but also formed some favorable opinions. So, if Circle U or Circle K can indicate kosher foods which I can eat, I suppose that Circle N should designate products which are "kosher" (meaning fit and proper) to me.
So here are some of my preliminary conclusions of testing in progress along with a few of the first Circle N's which I am awarding. Stay tuned next week for my conclusions, along with some photos and screen shots.
Let's Start With HDV
As I began to write this piece, I was discussing with a documentary filmmaker a project on which I am doing some consulting. He is just getting to the shooting stage and told me he was just about to follow my advice offered about six months ago to buy a DVX100A. "Whoa", I said. Six months ago the DVX was the best option in the price range with the greatest flexibility owing to both 29.97 and 24p possibilities. The world has changed a bit now and HDV is becoming the new DV. "But I really don't want to deliver in HD. DV is fine for this project", he replied. I had no choice but at that very moment to award the first Circle N. It goes to DV footage downconverted from Sony HDV material. No visuals available yet, but I shot a PD150 and an FX-1 side by side. The downconverted FX-1 material simply blows away the DV-originated material. More about that process, though, when I get into workflows.
I have had only a few days with an FX-1 and just some fondling-time with a Z1U. I do have a Z1U arriving the first week in April courtesy of my friends in the Irving, Texas Sony office. My first assessment is that these cameras are a pleasure to use. I found them well-balanced and easy to hold in a variety of shooting positions. The manual zoom ring had a great feel and I found myself preferring it to the still consumerish-feel of the automated zoom. The controls were easy to access, particularly the iris. I never tested JVC's entry into the HDV world, and I anxiously await the new offerings at NAB 2005.
But I would offer an opinion that even for DV use, I would recommend shooting the Sony HDV cameras. I would be hard-pressed to recommend purchasing anything before NAB, but I would borrow or rent as needed.
The questions are still basic to the HDV transition, though, are how do we edit, how do we monitor and how do we deliver? Are we going to shoot and edit HDV and then present a broadcaster a mini-dv tape and say, "Here's my documentary in HD." How do we edit in FCP considering that Sony, Canopus and Pinnacle already offer native HDV editing on the PC side?
We will no doubt learn the answers to most if not all of these questions at NAB 2005. What I present now is a very basic summary of my experience and other users' experiences just distilled into a few points. Please feel free to contact me with any other workflows you might have found successful or with any questions, for that matter. The more philanthropic of you might even wish to contact me with large donations of cash to sustain the Circle N certification process.
Here we go.
It still amazes me that even as of mid-March 2005 I still find users who don't know that FCP 4.5 HD does not edit native HDV. So, I repeat- FCP 4.5 HD does not edit HDV. You need to find other means to get that HDV footage into FCP.
The iMovie or Final Cut Express HD
Workflow
iMovie5 and FCE HD do capture HDV natively and lay
back to tape in HDV. Installing either of these applications
installs the Apple Intermediate Codec (AIC) which decodes the
MPEG2 encoding performed by the camera. You can capture, edit
and lay back to tape in either of these applications with all
of the limitations that FCE HD and iMovie entail. They have their
place but they are scarcely professional tools.
This workflow in FCP HD involves importing the captured footage into FCP HD and creating a custom sequence based upon the Apple Intermediate Codec. FCE HD will capture footage to a folder as does FCP. That's easy footage to find. To find the clips in iMovie5, control-click on the iMovie5 project file and select Show Package Contents. Within in that package you will see folder entitled Media. Copy that folder (don't drag because it will remove the footage from the project) wherever you like. You can then import those clips into FCP HD.
Create a custom sequence in FCP HD with a custom aspect ratio, check anamorphic, frame size 1440x1080, upper field, 29.97 editing timebase. For a codec select Apple Intermediate Codec. You can then edit in FCP and apply any filters/transitions/keyframes, etc which you can do in FCP. The problem that I discovered is that the Apple Intermediate Codec looks terrible in FCP. There are interlacing artifacts galore and it just looks bad. No Circle N here. If, however, you then export a Quicktime movie and bring that back into FCE HD or iMovie HD, it looks fine. That, I believe, is because Apple has already optimized these apps for HDV while we still await the next stage in FCP's development. Remember that laying back to tape requires a re-encoding and this takes time.
The Third Party Capture Solutions
Here we have software only solutions and combination hardware/software solutions. In all of these instances, we are going to capture the HDV footage on tape but transcode to a higher codec, generally DVCPRO HD 1080i. This gives us the ability to work in FCP HD and because of the data rates of DVCPRO HD, not to require a raid. Raids, of course, are better, and that comes in the next part of this work in process.
Hardware solutions add HD monitoring and even capturing capabilities as well as accelerated rendering times depending upon the hardware used.
Let's start with software.
DVHSCap
Apple has a utility on its developer's site entitled DVHSCap which allows capture of material from HDV devices (or even the DVHS deck) and also the ability to lay back to these devices. It is free. To use it to its best ability, combine that with another freeware application, MPEG Streamclip. Capture in DVHSCap, open the file in MPEG streamclip and convert to the codec of your choice. You can upconvert to a higher HD codec or downconvert to DV. I recommend letting the camera downconvert, however, since that is totally real time.
LumiereHD and HDVxDV
LumiereHD first appeared at NAB 2004 to allow users of the JVC HDV camera to capture MPEG2 from the camera and then convert to a different codec. After the appearance of the FX-1 and the announcement of impending support across the whole Apple line for HDV, Lumiere recommended that users not purchase the product and just go native. After seeing some of the problems with HDV footage that I mentioned above, the developer believed that there was still some life in his product, so he produced a beta update to LumiereHD which support the FX-1/Z1U cameras and the HDV deck as well.
LumiereHD beta did a credible job of capturing from the FX-1 and converting to DVCPRO HD quickly. Screenshots of all of these UI's to follow.
LumiereHD, though, lacks a major feature found in HDVxDV - timecode. HDVxDV will capture the m2t stream from the camera along with timecode. This proved to be a problem since FCP continued to report timecode breaks in the downsampled HDV footage during capture. HDVxDV failed to take any action, but merely ceased writing the output file where it thought there was a timecode break. Interestingly enough, that is the exact same spot on the tape where FCP reported the DV-downconverted timecode break. LumiereHD has a wonderful XML export feature which gets you right into FCP- very nifty implementation of XML.
In their testing, TM Television of Dallas noted to me that they encountered reports of timecode breaks as well. Our initiail speculation is that this might be more related to the current version of QuickTime or even of FCP. I am going out on a limb to relegate these timecode breaks to 10.3.8, since FCP is reporting timecode breaks on my capture system even on strictly DV footage.
Back to HDVxDV, this $80 utility, like LumiereHD, gives you no preview window when capturing. After completing the capture, HDVxDV does provide a preview window with the ability to mark in/out points. Those points will define the range transcoded to a higher codec. I recommend DVCPRO HD 1080i.
The Hardware Option
For the hardware option, I am using an AJA Kona 2 with the K-box breakout box and a HDP SDI to DVI converter box. I will be receiving in the near future the HD10A component to SDI converter as well as a M-Audio Flying Cow audio converter.
The Kona 2, or your favorite capture board for that matter (mine just happens to be the Kona 2) really isn't essential. You can edit in a DVCPRO HD timeline in FCP HD from this upconverted material. Monitoring, though, is another story and the capture card helps you out here.
Since AJA gives some hardware boost to DVCPRO HD in the Kona 2, I chose to edit in a Kona DVCPRO HD 1080i timeline. It did require rendering the material brought into FCP, but it was a very quick render.
![]() To
monitor with the Kona 2 card in HD, you could either go out component
to a monitor (made very easy by the K Box which has component
out connections). This could be a broadcast or reference HD CRT
or LCD panel (such as the Sony 14/20L5 or the new LCD panels in the
LMD series), or a flat panel monitor such
as an Apple Cinema display, HP2335 or (my new favorite but no Circle
N since I have not tested it yet), the Dell 2405. Going component to these monitors
(the HP or Dell, since the Cinema Display does not have component
inputs) produces a distorted pixel ratio (see Adam Wilt's comments
on the HPL2335 on www.adamwilt.com).
Here is where the AJA HPD comes in. Connect SDI output from the
Kona 2 to the HDP and then a DVI cable to the monitor. While
this works best with a 1920x1200 monitor, the Kona 2 board will
scale the image to the resolution of the monitor. It is not optimal
monitoring for HD, but it is at least a way of viewing your image
in HD. The Kona 2 K-Box has an analog audio out which allows
audio monitoring without a D to A converter. That alone makes
the K Box worth the $300 and earns it-you heard it here-the first
add-on product to receive the Circle N Ned seal of approval.
To
monitor with the Kona 2 card in HD, you could either go out component
to a monitor (made very easy by the K Box which has component
out connections). This could be a broadcast or reference HD CRT
or LCD panel (such as the Sony 14/20L5 or the new LCD panels in the
LMD series), or a flat panel monitor such
as an Apple Cinema display, HP2335 or (my new favorite but no Circle
N since I have not tested it yet), the Dell 2405. Going component to these monitors
(the HP or Dell, since the Cinema Display does not have component
inputs) produces a distorted pixel ratio (see Adam Wilt's comments
on the HPL2335 on www.adamwilt.com).
Here is where the AJA HPD comes in. Connect SDI output from the
Kona 2 to the HDP and then a DVI cable to the monitor. While
this works best with a 1920x1200 monitor, the Kona 2 board will
scale the image to the resolution of the monitor. It is not optimal
monitoring for HD, but it is at least a way of viewing your image
in HD. The Kona 2 K-Box has an analog audio out which allows
audio monitoring without a D to A converter. That alone makes
the K Box worth the $300 and earns it-you heard it here-the first
add-on product to receive the Circle N Ned seal of approval.
There is one acquision stage I have not attempted as of this writing since I still await the converter. And that is capturing directly into the Kona 2 going from the analog component output of the camera to SDI to the Kona 2, in either DVCPRO HD or 8-bit uncompressed HD (my drives will barely handle 8-bit compressed HD so I will not even attempt 10 bit). This requires going component from the camera to the AJA HD10A component to SDI converter and then SDI into the Kona 2. Since component does not include audio, it is then necessary to convert the analog audio of the camera to AES audio for the Kona. This is accomplished by routing the analog audio out from the camera to the Flying Cow and the digital output from the Flying Cow to an AES input in the Kona. Finally, in capture, connect the firewire port of the camera to the Mac and specify firewire as device control. You may need to set a 3 frame offset in FCP. The result here is goreous HD footage which you could then lay back to DVCPRO HD or potentially even HDCAM or D5.
Again, for this summary article, I really am not dealing with all of the details-just am outlining some workflows.
More will follow before NAB 2005 as I conclude this phase of testing.
But here are the preliminary conclusions so far:
HDV is the new DV and the FX-1/Z1U is to HDV as the VX1000 was to DV. This is the first serious generation of 3-chip cameras in a new flavor of HD. It is not for everyone and it is not to be compared to a Sony CineAlta or a Panasonic Varicam. HDV has its niche as DV still has its niche. DV will not have that niche very long and I really caution extreme care in purchasing any camera at this point until things shake out a bit. But I can unequivocally favor downconverted DV or native DV. Take that as you might.
At the moment, I prefer capturing in HDVxDV and transcoding to DVCPRO HD 1080i, editing there in FCP. I recommend the capture card as well as an ability to monitor the HD signa. I still prefer the Sony 14/20L5 CRT's over LCD panel monitors, but I know that the world is also moving away from CRT monitors.
I would by-pass the iMovie or FCE HD approaches completely and concentrate at the moment on those secondary applications which allow us to capture HDV and then transcode.
Stay tuned for more.
Storage Solutions
Let's welcome the arrival of the SATA raid!
For under $1000, I was able to roll my own 1 TB SATA raid with only a little frustration and a little humiliation to show for it. This was to be a quick process of assembling the MacGurus 4-drive Burly Box www.macgurus.com with 4 Hitachi 250 gig SATA drives and using the Sonnet Tempo-X 4+4 SATA card to control the drives. So, I put together a volunteer crew to do a 2-camera shoot to post on the web site. Four hours and many tapes later, I got it together. I have since swapped the Tempo 4+4 card for the Tempo-X eSata 8 card, with 8 external connections.The Burly Box is a wonderful metal enclosure with a heavy-duty fan, heavy-duty power supply and a sturdy feel. MacGurus bundles mounting brackets for the drives as well as all necessary cables both for creating the enclosure and connecting to the Mac. The problem arose with my general inability to assemble anything. I find now that if I merely had a magnetized screw driver and had used some petroleum jelly or soap on the screws, the multi-hour multi-cursed enterprise of screwing the brackets into the drives would have taken no time at all. So, let's assume that the typical do-it-yourselfer is smarter than I am when it comes to assembly. The Burly Box is then a snap to assemble. Start running the tab: $254 plus $11 shipping for the 4-enclosure BurlyBox. MacGurus also supplies 2, 5 or 8 drive enclosures. Additionally, there are hot-swap enclosures but they will not do you much good with the Sonnet as of yet since the Sonnet does not yet support hot swapping. Sonnet engineers are looking into this and plan to deliver a firmware upgrade which will allow hotswapping.
Newsflash-On April 13, 2005, Sonnet released version 1.1 of the Tempo-X firmware which updates both the SATA 4+4 and the eSata 8 cards to include hot swapping drives!
Now, back to the construction of the boxes.
Along with the introduction of the Tempo-X eSata 8 card, I added another identical Burly Box and four more Hitachi drives. Installation was somewhat smoother this time since my purchase of the screwdriver magnetizer. In fact, getting the screws in the holes was a snap. The only problem was identification of the screws and it is in this area that the Burly Box packaging needs improvement. Assembly requires drive screws to attach the brackets and bracket screws to mount the drive/bracket assembly in the box. The two types of screws are mingled in the hardware bags. It would be very simple, I think, just to include one bag of drive screws and one bag of bracket screws.
In constructing the second box, my only gaffes consisted of destroying one 250 gig drive by breaking off the SATA data connector on the drive and then in the assembly of the unit, breaking one of the drive to external port connectors. The first problem was solved by begging the vendor to swap the drive (they did) and the broken connector was solved merely by connecting the Burly Box to eSata 8 cable internally in the Burly Box directly to the drive and then running out of the box directly to the card. Not very elegant, I note, but I did work.
I chose to use the Sonnet Tempo 4+4 card to control my raid since that was what was available in early February when I built the first raid, and it receives a Circle N seal of approval. Unlike other products on the market, the Sonnet requires no drivers. It is true plug and play. You can also configure the Mac with multiple Sonnet cards. The 4+4 card ($199) has 4 external and 4 internal ports. My Burly Box is connected, of course, to the 4 external ports. Each drive occupies a separate channel, so there are 4 external SATA cables between card and box. It is possible to add 4 internal drives to the card using any of the internal products for G5 (such as ProMax solution, Wiebetech or Transinternational products). Personally, I think that is too much heat for the G5, but others have not reported problems. The other option is to use a slot on the Mac and add the $25 internal to external connector from MacGurus. That would allow 8 drives.
I now have installed the Tempo-X eSata 8 card. If there is such a thing as a 2-N seal of approval, this card gets it. It is hard to imagine running eight external drives from one card occupying one slot.
My test G5 system now includes a Kona 2 board occupying the PCI 133 slot and the Sonnet Tempo-X eSata8 card in Slot 3. Note something about the eSata8 card. It requires different external connectors, called eSata connectors. They are only available from one manufacturer at the moment, so they are a few dollars more per cable than external SATA cables. Both Sonnet and MacGurus sell the eSata cables and, since the release of the eSata8 card, MacGurus offers the BurlyBox with an option of cables. Sonnet maintains that the eSata cables provide a more reliable connection and are rated at a greater number of insertions than standards SATA cables.
Also note that the eSata8 has a slightly raised daughter card to handle the extra ports. It cannot be used in Slot 4 (the PCI-X 133) slot of the G5. That makes little difference, in my opinion, since most likely you would want to put a capture card in the 133 mhz slot.
Creating the raid with Apple Disk Utility is as simple as just clicking raid and dragging the 4 drives into the raid window.
Below are benchmarks for this 4 drive raid using AJA's Test Utility and the eSata8 card. The Tempo 4x4 card returned similar results. My own tests have given me 6 layers of realtime in DVCPRO HD 720p from footage captured from the Varicam as well as the ability to playback 8-bit 1080i HD. Granted this is from footage which was supplied to me and not captured on this system form HDCAM deck. It also was tested on a relatively empty drive. I would not recommend 8-bit uncompressed HD on this configuration. Based upon these benchmarks for a 4-drive raid, I do believe that an 8-drive raid would handle HDCAM.
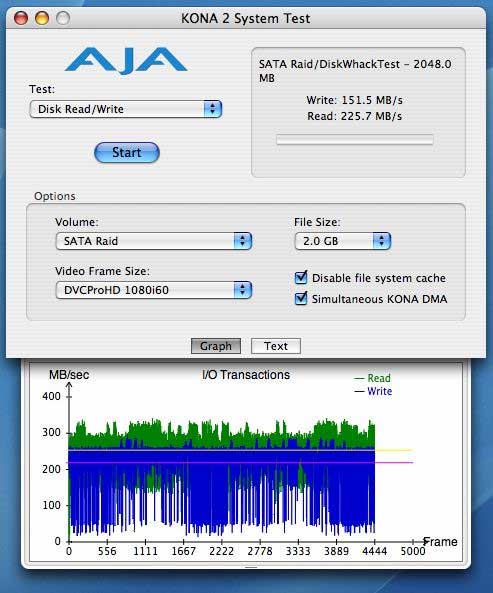
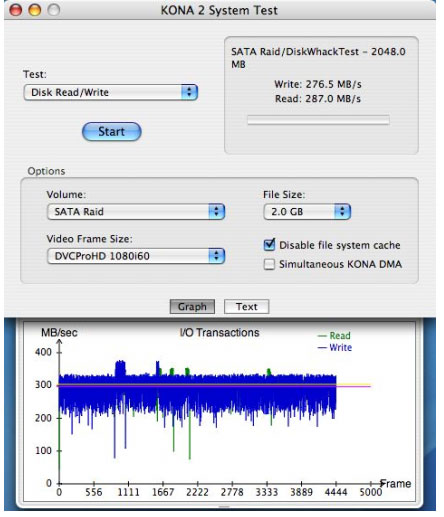
The difference between a four drive and an either drive RAID is apparent. The data rate which exceeds 200 mps with 8 drives makes this array able to handle 8-bit and quite possibly 10-bit HDCAM.
The downside here is something to note very strongly. We are talking raid 0 configurations. There is no parity as in raid 5 meaning that losing one drive takes with it all of the data. When dealing with a higher end raid with a dedicated controller, that raid controller allows a hardware-based raid 5 as well as hardware-based integrity checks on the media. Sometimes the least expensive solution is not the best. So, I offer this solution of the inexpensive roll it yourself raid as an example of where the technology is taking us.
In addition, I suspect that performance will decrease as the drives fills up. As a result, I would avoid filling the drive to more than 66.33% capacity, the amount recommended by SoftRaid as constituting the largest suggested video partition.
The absence of parity requires careful backup procedues. While it is sound FCP procedure anyway, make certain not to store project files on the media drive. Store those on your system drive (and back them up, of course). With regard to the raid, back up any graphics, music, or other files which have been created on the drive. In that manner, the worst case scenario in the event of losing the RAID is just to restore the files and recapture from original tapes.
Both Sonnet cards can be used to control individual drives or drives configured as a raid. They are solid worthy performers and can form the basis of this inexpensive raid for both the capacity and the speed that raid storage provides us. At $299, the eSata8 is $100 more than the Tempo 4+4. It is worth the difference if you wish to create an 8-drive raid and still use only one slot. And the whole exercise led me to my nearest home improvement warehouse to buy a screwdriver magnetizer. Even if I break connectors, I still get the screw in the hole.
In terms of practical tests, I have been able to edit 1920x1080 8-bit HDCAM on this raid without dropping a frame. It integrates well with the Kona 2 card currently in my machine, courtesy of my good friends at AJA. And very special thanks to Martin Muggee and others at Sonnet for the use of these two excellent cards.
Bottom line price:
Sonnet Tempo-X eSata 8 $299
8 Hitachi 250 SAYA drives $1080
2 Burly Boxes $508
Extra for SATA 8 eSata cables $120
Shipping $ 11
Total cost of 1.8 TB formatted $2018
The SATA raid is here to stay and promises to be a strong competitor to SCSI. All of the products mentioned here receive the Ned Seal of Approval and are worthy additions to your edit station.
Ned Soltz
Ned Soltz is a passionate advocate of technology which enhances the creative process. He only wishes that he were more creative. Ned is among the founders of lafcpug, as well as a published author of numerous articles and reviews on all things NLE. The author of several books and technical editor of still others, Ned is often on the road with his Powerbook G4 and mobile FCP studio. Catch him at home or on the road at nsoltz@aol.com Ned also moderates several forums on 2-pop.com
[Top]
Review copyright © Ned Soltz 2005
© 2000 -2005 Apple
Computer, Inc. All rights reserved. Apple, the Apple logo, Final
Cut Pro, Macintosh and Power Mac
are either registered trademarks or trademarks of Apple. Other
company and product names may be trademarks of their respective
owners.
All screen captures, images, and textual references are the property and trademark of their creators/owners/publishers.