Review - Plugins 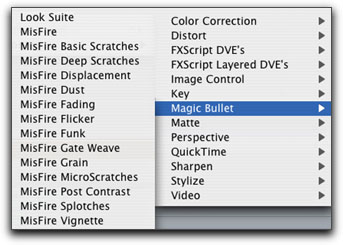
June 28, 2004
Review - Magic Bullet Editors
Review - Plugins June 28, 2004
Review - Magic Bullet Editors
MAC OS SYSTEM REQUIREMENTS
Apple Power Mac G4 or G5 (dual-processor recommended)
Apple Final Cut Pro 4.1 or 4.5 (HD)
Mac OS X 10.2 or later and 512 MB of RAM or more
WINDOWS SYSTEM REQUIREMENTS
Intel Pentium 4 single or dual-processor system or equivalent
Adobe Premiere Pro 1.5
Sony Vegas 5.0
Windows XP and 512 MB of RAM or more
Price $299.00
Review By Brian Dalton
Two years ago, a friend told me about this "amazing" piece of software that would take 60i video and convert it to 24p (twenty-four progressive frames per second) making it look "just like film." In addition, I was told that the software came with a "Look Suite" which contained customizable controls and presets that simulated different film stocks and "looks."
The software was called "Magic Bullet," and while I was no conspiracy theorist, I became a believer in the "Magic Bullet" theory after spending just a few minutes on their website Red Giant Software looking at samples. I soon grew desperate to get my hands on this miracle of technology, but found my enthusiasm crushed by the $1,000 price tag.
Two years later, having shot a dark, edgy, ten-minute short on my Panasonic DVX-100, I no longer needed the 24p conversion, but was still sold on the "Look Suite" portion of the software - convinced that "Magic Bullet" would get me the look I desired.
Fortunately, the makers of "Magic Bullet" have recently taken the "Look Suite" portion of their software and re-packaged it separately for those of us who don't need (or want?) the 24p conversion. They've also made it available as a plug-in that runs on both PCs and Macs in Final Cut Pro, Adobe Premiere Pro and Sony Vegas. In addition, the new package, called "Magic Bullet Editors," also contains a set of plug-ins called "MisFire," which allow you to add dust, scratches, flicker and just about anything else you can think of to mangle your footage. And all for the amazing low price of just $299 ($279 if you just want to download the software directly from their website)!
The CD (if you choose that option) comes with both the Mac and PC versions and includes both a tutorial project and some sample footage. My download version of the software included an installer, a Final Cut Pro project file containing the "Look Suite" presets, and a 58-page pdf manual that is well-written and even goes so far as making some well-advised recommendations about shooting video for use with "Magic Bullet Editors." (As I downloaded the software and have only Macs running Final Cut Pro, I can speak only about the Mac/FCP version of the software.)
Installation was quick and simple with the "installer" doing all the heavy lifting for me. Within minutes, I had re-launched Final Cut and was ready to start tweaking.
|
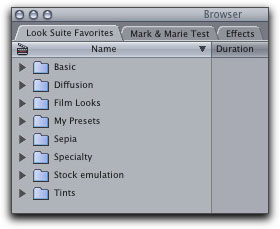
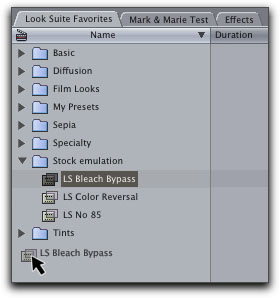
The plug-in, called "Look Suite," is a single plug-in which loads into the "Effects Bin" like any other plug-in, along with all the "Misfire" plug-ins (there are a number of them). Once loaded, you can apply the "Look Suite" filter to a clip just like any other plug-in, but the presets are not immediately available. To access the presets, you must open a Final Cut project called "Look Suite Favorites," which loads the presets into several categorized bins. At first, this annoyed me, but I quickly came to appreciate how the developers had categorized the various preset "looks" in different bins, allowing for quick navigation. The preset category "bins" that come with the suite are titled as follows: Basics, Diffusion, Film Looks, Sepia, Specialty, Stock Emulation, and Tints. Inside each of these "bins" are a number of variations on the root theme.
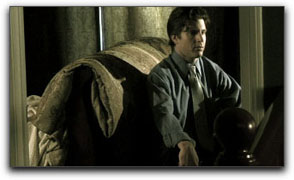
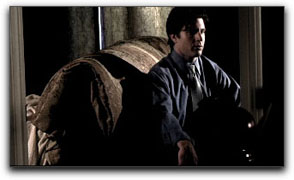
To apply one of the presets to a clip, you can either drag it directly onto a clip in the timeline, or simply double-click on one of the presets after loading the desired clip into the viewer. I do not have room here to describe each of the presets and what they will do to your footage, but a description of each is available on the Orphanage website. Suffice it to say that the developers have included a wide variety of "looks" - from the Matrix-like "Neo" which gives your footage a high-contrast, greenish-hued look, to "Mexicali," which turns everything nicely yellow and old-looking like the flashback scenes in "The Mexican."
|
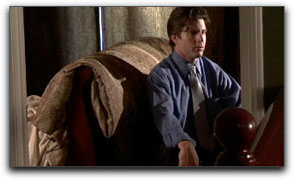
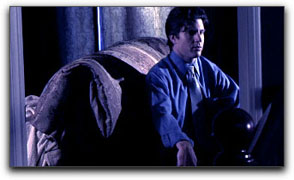
Original footage (untouched)
|
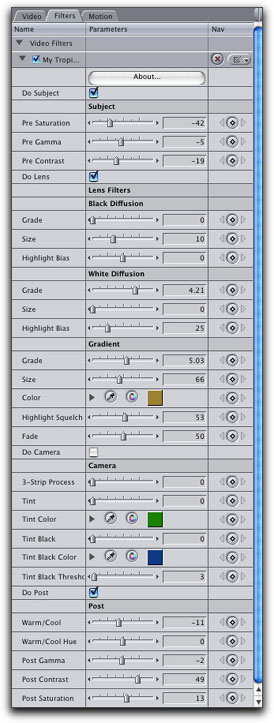
These presets range from terrific to moderately useful, and I was somewhat amazed to find that even the most subtle among them seems to have a heretofore unknown mystical power to make your footage look more aesthetically appealing and "film-like." But the real power of the software lies in the 22 controls contained in the actual "Look Suite" filter itself. These controls are divided into four sections: Subject, Lens Filter (separated into three sub-sections � Black Diffusion, White Diffusion, and Gradient), Camera, and Post. Each of these sections contains a number of customizable controls you can adjust, and, you can even turn each of the four sections on or off independently. Of course, once you've tweaked, you can also save your new creation as a preset which you can then quickly apply to other clips. Again, there is too much here to go into great detail, but the documentation that comes with the suite takes 8 pages going over these controls and what each of them do. This is nice, and I tip my hat to the developers, who've done a fantastic job with the documentation, but it's really not necessary. The controls are simple, straightforward, and, for the most part, extremely intuitive. And I say this as one who can get quickly frustrated by applications or plug-ins that are poorly designed and needlessly difficult (I'm a Mac-user for heaven's sake!). Anyone working with images will be familiar with most of the terms used (Saturations, Contrast, Gamma, Tint, etc?) and the presets provided go a long way towards giving you a sense of how the suite works thereby shortening the learning curve. I recommend taking thirty minutes and simply applying all the various looks to a couple different-looking clips (indoor, outdoor, artificially-lit, natural light, etc?). Then, take another thirty minutes and just play with the controls. After an hour, you'll have a very good idea of what each control does, as well as knowing what preset is best to start off with in order to get the look you're imagining. The down-side (you knew it was coming) is the rendering. "Magic Bullet Editors" does a lot, and gives you tremendous control over your image. But the control you gain is paid for by the amount of time you must wait for your clips to render. On my Dual 1.25 Ghz G4, with 1.25 GB of ram, and nearly half a terabyte of 7200 rpm hard drive, the roughly 7 minutes of DV video on which I applied the "Look Suite" took nearly two hours to render. This was not one clip, but a serious of perhaps 70-80 clips, many of which I'd individually tweaked in order to get a specific look. That may not matter as even individual clips take quite a while to render, but I wanted to be clear. You could probably approximate many of the "looks" using a combination of the various filters and color correctors that ship with Final Cut. But no single filter would get you anywhere near the control you have here. The "Lens Filter" section of the suite is also uniquely valuable as it gives you a tremendous amount of control over both the black and white diffusion levels, and, gives you the ability to add a gradient filter, as if you'd thrown one into your matte box before shooting. Of course, you have far more control here as you can change the color, size, diffusion and how the gradient affects highlights. In addition, the value of the presets cannot be understated as they provide both a starting block and an instruction set, allowing you to gain real functionality almost immediately. And, if all this weren't enough to recommend "Magic Bullet Editors," there's also the "Misfire" plug-ins which give you control over Fading, Funk, Splotches, Dust, Flicker, Vignette, Displacement, Micro Scratches, Grain, Deep Scratches, Basic Scratches, Gate Weave, and Post Contrast. And the "Misfire" plug-in do all of this as well (if not better) than any other plug-in I've seen! |
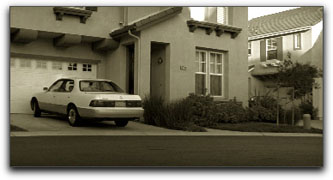
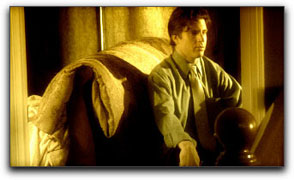
Sepia 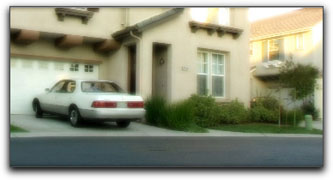
Diffusion Max |
Brian Dalton has been a freelance graphic designer since 1987 and works for a number of "Fortune 500" companies including Clear Channel Radio and Disney. In 2001, he wrote, directed, DP'd, edited, and scored the feature-length "Killing The Dream", which he shot on a Canon XL-1s. The movie won the Grand Jury Prize at the Temecula Valley International Film Festival, and has screened at film festivals from Ojai to Washington D.C. to Rome, Italy. He is currently negotiating the sale of distribution rights to "Killing The Dream" and has just finished a short called "Ennui' which he shot with his Panasonic DVX-100. He claims to be the first person to edit a feature-length movie (83 minutes) entirely from bed.
copyright © Brian Dalton 2004
© 2000 -2004 Apple
Computer, Inc. All rights reserved. Apple, the Apple logo, Final
Cut Pro, Macintosh and Power Mac
are either registered trademarks or trademarks of Apple. Other
company and product names may be trademarks of their respective
owners.
All screen captures, images, and textual references are the property and trademark of their creators/owners/publishers.