Book Review - Final Cut Pro 
May 6, 2002
Final Cut Pro 3 for Macintosh: Visual QuickPro Guide
Book Review - Final Cut Pro May 6, 2002
Final Cut Pro 3 for Macintosh: Visual QuickPro Guide
ISBN 0-321-11583-X
Review By Ken Stone
The book, 'Final Cut Pro for Macintosh' - Visual Quickpro Guide, published by Peachpit Press and written by Lisa Brenneis. I ran out and bought the book. Flipping through the book I was at first disappointed. This was not a book for beginners. In fact, it says that it is only for 'intermediate and advanced' on the back cover.
If you are new to NLE and FCP there are a number of excellent 'beginner' books for you. The manual that now ships with FCP is quite good and contains a tutorial CD with exercises to teach the basic fundamentals of editing and FCP.
For everyone else Final Cut Pro 3 for Macintosh is a must have.
For those of you not familiar with the Peachpit Visual Quickpro Guide books, these books are not formatted like other books out there. No two page long paragraphs. Final Cut Pro 3 for Macintosh is a reference book pure and simple. And a complete FCP reference book it is. Starting with hardware, installation and set up, a complete tour of the interface, through all aspects of the FCP 3, tools and techniques, output and even a final section that briefly covers the changes we face when running FCP 3 in OS X.
What makes this book so powerful is it's simple and consistent approach to conveying information. Each topic title is followed by a brief explanation, then a 'how to' by the numbers; one, two, three. Each step is accompanied by screen shots, and there are many, that illustrate the steps to be taken to acomplish a task. Each illustration is fully captioned making clear the instructions that are being presented. Important and helpful tips are offered and there are 'Final Cut Pro Protocol' sidebar sections that explain the rules and logic behind the way FCP works and why we need to do things in a certain way when working in FCP.
Final Cut Pro 3 for Macintosh is a task oriented book, clearly written. While you will probably read the book, or large sections of the book, I have found that when I am working in FCP 3 and need to do a task, I can look up the item in the Index at the back of the book which directs me to the instructions, the steps to be performed to accomplish that task. Often, looking at the screen shots, picture walkthroughs, that accompany the instructions is enough to get me going. I have included an excerpt from the book: "Working with Keyframes in the Timeline", (below). I have attempted to match the layout used in the book, but I can only come close using web formatting.
Final Cut Pro 3 for Macintosh has been completely updated for FCP 3 and includes a FCP PowerStart 2/3 Demo CD by DVCreators.net.
I have 12 different FCP books sitting on a bookshelf, I have only one FCP book sitting next to my Mac, it's "Final Cut Pro 3 for Macintosh" by Lisa Brenneis.
Enjoy,
--ken
List price: $29.99 U.S.
CD- DVCreators.net FCP PowerStart 2/3 Demo
704 pages
Book excerpt follows review.
I remember when I first got Final Cut Pro 1 several years ago. I was new to NLE, in fact, I did not even know what the letters 'NLE' stood for (Non Linear Editing). As a still photographer and graphic artist I wanted to make movies of my work so I bought FCP. For those of you who remember FCP 1 you will also remember the manual that came with it. "What manual?" I hear you ask. To be sure the manual was lacking in every regard. What made matters worse, for a complete newbie like myself, was the fact that there was not a single FCP book on the market. I spent much of my time at the FCP Discussions Boards reading everything I could. Then, after about a month, the first FCP book came out.
Book Excerpt from Final Cut Pro 3 for Macintosh: Visual QuickPro Guide.
By Lisa Brenneis
HTML re-creation
|
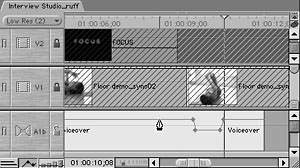
Keyframes indicate that effects parameters
are changing over time. You can think of a
keyframe as a kind of edit point: You stamp a
keyframe at the point where you want to
change the value of an effect's parameter.
This section covers Timeline functions relating
to keyframes.
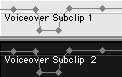
Final Cut Pro has two types of keyframes that can be displayed in the Timeline:
The Timeline's Filter and Motion bars are good places to get a big-picture idea of the relationship between keyframes on different tracks, but the Timeline view is not ideal for adjusting keyframes on a detailed level. For more precise control of keyframes, double-click the clip in the Timeline to open it in the Viewer; then select the Filter or Motion tab. Working with keyframes to create effects using the Filter and Motion tabs is covered in Chapter 13, "Compositing and Special Effects."
|
|
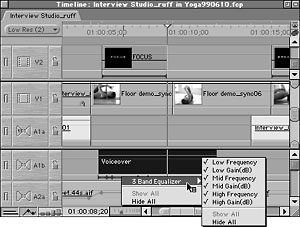
To display keyframes for individual effects parameters:
To select the effects keyframes displayed in the Timeline: 1.In the Timeline, Control-click the Filter or Motion bar to access its shortcut menu (Figure 7.113). 2.From the list of all of the parameters for each filter currently applied to the clip:
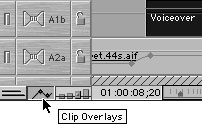
To display keyframe overlays in the Timeline:
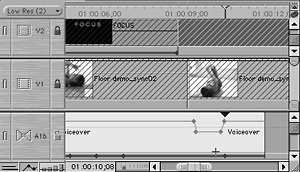
To move keyframes in the Timeline:
To add an overlay keyframe to a track:
1. From the Tool palette, select the Pen tool.
To adjust the values of individual overlay keyframes: Do one of the following:
Shift-drag the graph line between two overlay keyframes to adjust its position.
To delete overlay keyframes:
|
Final Cut Pro 3 for Macintosh: Visual QuickPro Guide, (pages 325-327) copyright © 2002, 2000 by Lisa Brenneis, published by Peachpit Press. Reproduced by permission of Pearson Education, Inc. and Peachpit Press.
You can purchase 'Final Cut Pro 3 for Macintosh: Visual QuickPro Guide' from the lafcpug store.
For a list of bookstores who carry Peachpit Press books call (800) 283-9444 or visit http://www.peachpit.com/special/bookstores.html
Review copyright © www.kenstone.net 2002