
Review - Software February 2, 2004
ProAnimator 3.0
Review - Software February 2, 2004
ProAnimator 3.0
System Requirements
Macintosh OS9 & OSX
Windows 2000 & XP
Price
$895.00
From Zaxwerks
800/549.0250
626/309.9102
http://www.zaxwerks.com/
download and/or boxed version
Review by David A. Saraceno
One of the welcome changes in the evolution
of 3D animation software has been the introduction of easier
to use software applications. Note that I said "easier"
to use, not easy to use. 3D animation still remains an art and
simply can't be manufactured. Even creating simple three-dimensional
logo animation was a two-step process requiring separate skills.
First you had to construct a three dimensional logo in a modeling
program, and then key frame the motion in a separate animation
program. This could be a cumbersome process particularly if your
skill level was firmly grounded in only two dimensions. Until
now.
With the arrival of Zax Dow's ProAnimator 3.0, for Macintosh and Windows, comes new functionality and ease of use in creating sophisticated animated logos. The $895.00 package (discounts are available) builds on the success and features of Invigorator for After Effects and its progeny, Invigorator for Electric Image, but introduces some interesting twists, spins, and tumbles. All things considered, this standalone logo animator can be both exceedingly easy to use, and exceedingly sophisticated once you begin to understand all it brings to the table.
Preliminaries. The ProAnimator 3.0 is standalone product compatible with MacOS 9 and OSX, and is available for Windows 2000 and XP. The boxed version comes with an installer CD, and comprehensive, illustrated 472-page manual with index and reference materials. Sample project files and Illustrator files are included in the download and box versions. The company offers discounts for existing licensees of Invigorator for AE, and for Electric Image. Telephone for the details.
Drag the ProAnimator 3.0 folder to your Applications folder, key in your license and launch the program. You are presented with an opening screen from which you can create 3D text, import an Illustrator file, create a new scene, or open an existing project. Elect to create 3D text, and you are presented with:
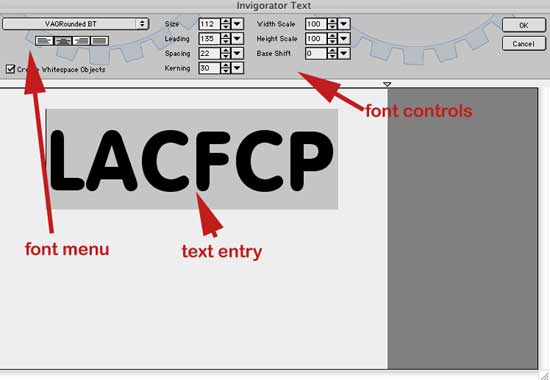
You can use TrueType or Postscript fonts to create 3D text. Leading, kerning, spacing, and font size controls exist and you can independently resize the text. Text can be edited at any time in the ProAnimator interface. Hit okay, and you'll see the main interface.
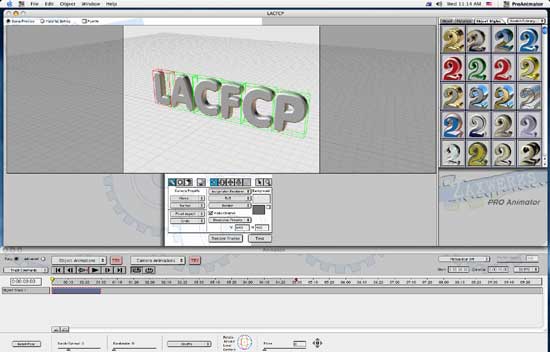
In the upper right is the Object Styles palette. Click on the style you wish to apply to the 3D text, and drag it to the whole word, or any of the individual letters. Different Object Styles can be applied to separate letters or all the text. The manual explains how to make and save your own styles.
The center of the interface has controls for animating the camera, the objects in your 3D logo or text, and the lighting. Click on the individual icons for these items, and the controls for each item are alternatively displayed.
Note the resolution preset drop down menu in the lower right. ProAnimator can output resolutions up to Cineon Full at 3656x2664. Stock presets for HD, NTSC DV, Pal, DV, and Film are also included. Alpha channel output is controlled by a check box.
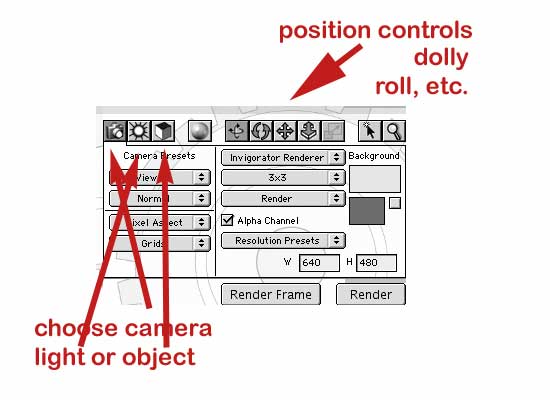
Camera, objects and lighting are changed using roll, tumble, track, and dolly tools. For example, you can reposition the camera, objects, or lightning by clicking the corresponding icon on the left of the interface, and then selecting the movement tool on the right.
The animation timeline is located at the bottom of the screen. It is a timeline-based interface with a singular difference. Click on the "advanced radio" box, and more sophisticated controls are provided to control the animation of objects, transitions, and camera. More on that later.
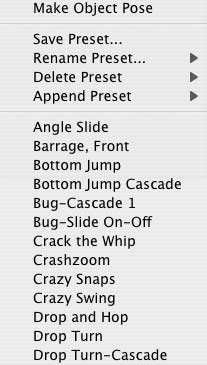
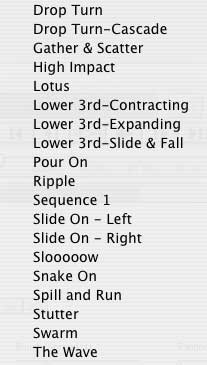
To create a quick "down and dirty" animation of our 3D text logo, click on the "try it" button and dozens of "template" animations of text or AI files are presented. These stock object and camera animations can be tweaked and changed according to your client's requirements.
 |
 |
Suppose your client likes the stock "Crashzoom" animation but its 5-second duration is too short for the spot. Shift-click on the two darker blue "object" pose color bars at either end of the timeline, then click on the option key on a Mac and drag the last dark colored bar to the desired length you wish. It's that easy. You can also "append" different animations end to end.

As I stated earlier, any stock 3D animations can be endlessly tweaked to your satisfaction. Similar stock template animations exist for camera movement, and can be combined with the object animations with impressive results. You can apply stock animations to whole words or individual letters by simply selecting the word, and selecting the appropriate animation from the pop up menu. Controls exist to separate individual or groups of letters or objects into distinct animatable tracks.
Workflow is straightforward and intuitive, and the program responds crisply on a dual processor G5. Animations are previewed at any time using the "play" button, and individual frames can be rendered using the ProAnimator render engine or OpenGL.
The Concept. ProAnimator is not keyframe based like most animation programs. Instead, it relies on "posing" objects or the camera, and then animating the transitions between the two or more poses in the timeline.
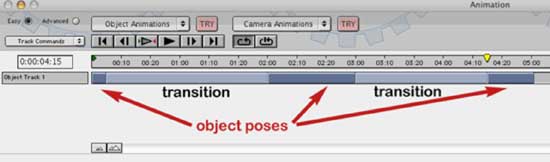
The dark blue bars represent the "poses", and the transitions appear as lighter blue bars. Either bar can be lengthened, shortened, or repositioned by selecting and moving it. Longer transition bars represent more time for the transition to complete between poses. Concomitantly, AI files and text objects remain in a pose represented by how long the blue bar is in the timeline. Nothing can be easier.
Custom Animation. Creating a custom animation consists of creating 3D text or importing an AI file, applying an object style to it, and setting various poses in the timeline to represent camera views of the object at that time. Establish a default, initial pose, move the yellow time indicator to a different point in the timeline, and choose the command "Make Object Pose" from the drop down object animation menu. Then "tweak" the position of the object or AI file in the main window at each pose.
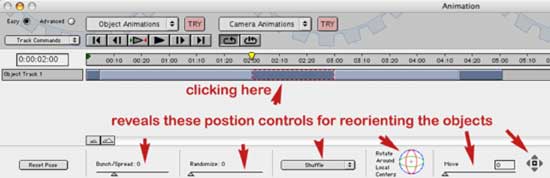
You can reposition each pose of the objects using these controls many ways. Again, the interface is responsive, so you'll get immediate feedback on how the animation is progressing.
Once you've established your new object pose, click on the lighter transition blue bars to tweak how the object moves from one position to the next. Ease in/out controls are available for each transitional segment.
![]()
Advanced controls. Many people may need only the basic animation controls. But ProAnimator includes additional controls to further augment your animation. Although the additional controls are characterized as "advanced," the word is a misnomer. They aren't hard to use; there are just more of them. Click on the "advanced" radio button in the timeline windows, and the advanced controls become available.
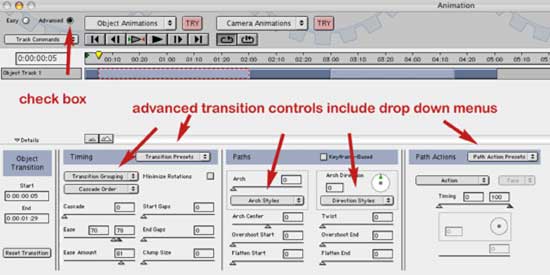
There are literally dozens of controls, and combinations of controls to tweak the transitional paths between object or 3D text poses. Controls establish the "arch" of the movement between poses, its timing, the order in which the letters move individually, as a full word, or in groups, and their position relative to 3D space and the camera. Any of the timing, paths, or path action animations can be saved as a preset for use in another animation. Again, the options are endless, and the included presets will be augmented in feature revisions.
Similar controls govern camera animation as well. Remember, you may animate the objects, the camera, or both using separate tracks in the animation timeline.
It's impossible to detail every option available in the advanced controls. What is important is that all are invoked with easy-to-use sliders and drop down menus. And that's one of the best features of ProAnimator its functionality and responsiveness. For example, as objects move from pose to pose, they are controlled by the order and grouping in which they move, the arch they follow when moving, and the action of spinning, tumbling, and pitch while moving. Quite obviously, this can be overdone, and these controls may become the new "fonts" to be abused in logo animation. But that's where the artist in you should take control. ProAnimator simply provides the easy-to-use tools.
Object Styles. The second major element to the ProAnimator interface is the object palette. It controls the appearance of your 3D text or Illustrator file. It includes Object, Materials, and Object Styles Tab, along with a Swatch Library that can save custom swatches.
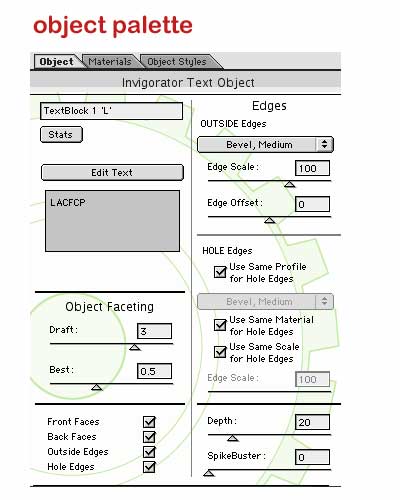
The object palette controls the beveled
edges of the text or Illustrator file. A drop menu provided dozens
of alternatives styles for the object or text. You can also edit
the text from this palette.
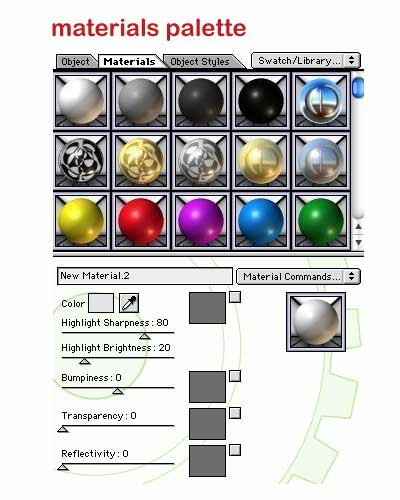
The Materials palette controls the style or look of the text or Illustrator file. Simply select which style you wish to use for each or every letter or element of the 3D model, and drag the style from palette to the element to apply it.
ProAnimator also supports basic texture
mapping utilizing either PICT or Targa images, although this
type of mapping is fairly basic in this release. The company
intends to support .mov texture mapping in a future release.
The Materials palette also controls transparency, reflectivity
and other attributes. Existing materials can be modified and
saved for future use.
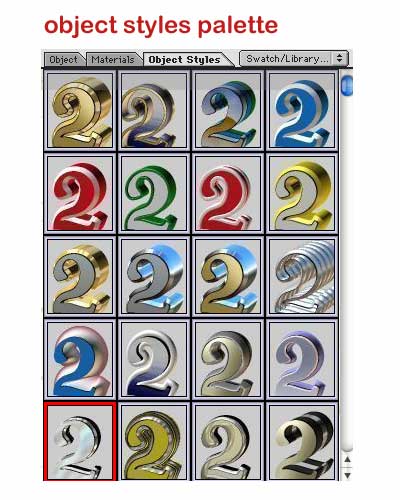
In the Object Styles palette are thumbnail descriptions of every aspect you create as a setting for the appearance of 3D text or Illustrator files in ProAnimator. These include material, edges or bevels, edge scale and profile, color, transparency, reflection, etc. Thus, if you tweak the appearance of a model using the various materials and settings in ProAnimator, your new "style" can be saved for future use. A notes section allows you to record how, why, and for what it was created.
The Rest. Beyond the three workspaces of ProAnimator main window, palettes, and animation timeline/controls are a wealth of other controls to further refine, tweak, augment, and control the appearance of your 3D text or Illustrator file. Needless to say, you can be a sophisticated or as simple as you elect in controlling the appearance of both the elements of your animation and the animation itself.
The instructional materials are good, with reference guides for constructing objects in Illustrator, and other helpful tips. Other information, such as the use of Layer Cycling in ProAnimator, is included. Layer cycling, which cycles vector art in a layered Illustrator file, can be used to create highly sophisticated animations within this program and other 3D programs. 3D models can be imported, and exported in FACT, OBJ, C4D, DXF, 3DS, and LWO formats.
ProAnimator is characteristic of the many fine products that have originated from Zaxwerks over the years. What it does, it does exceedingly well in a simple to use, responsive, and intuitive interface. The strongest selling point for ProAnimator, in my view, is its ease of use in creating simple and complex or sophisticated packages for beginner and experienced animators.
Copyright ©2004 David A. Saraceno
David
A. Saraceno is a motion graphics artist located in Spokane,
Washington. He has written for DV Magazine, AV Video, MacHome
Journal, and several state and national legal technology magazines.