
Software Review
December 2, 2000
ReelSmart Shade/Shape
FCP plug in for 3-D type.
Works in programs that support After Effects plug-ins.
After Effects, Final Cut Pro, Commotion and Combustion.
$89.95
Review by Ken Stone
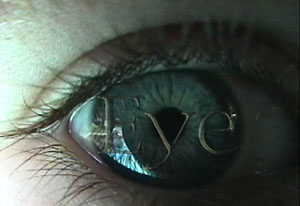
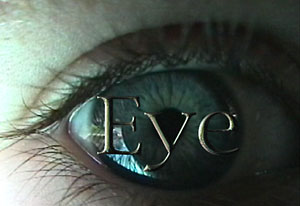
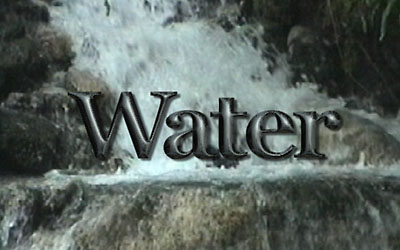
ReelSmart Shade/Shape is a 3-D modeling plugin for FCP that creates 3-D effects on Text and other models (images) that have an Alpha channel (transparent background). One of Shade/Shape's most incredible technologies (especially for the price) is the shading-from-shape. You can do some really incredible things with it.
Imagine for a moment that you are looking at a deflated inner tube in front of you. S/S generates 3-D by 'inflating' this inner tube. As the tube is inflated it rises out towards you creating a 3-D image. Bevels, and 3-D lighting are added to the effect. You can add another image to your art for texture and detail by using 'bump mapping'. Just drag an image into the 'bump map' well. You can map a reflection on to your image by dragging another image to the 'Reflection' well. This can be used to create the look of metallic objects. There is also the ability to add color to both ambient and highlights and to vary the intensity.
Installation of Shade/Shape is easy. Click the installer and then drag the S/S plugin into the FCP Plugins folder, done. You also get a three page manual that explains each of the controls settings. It's quite adequate.
In FCP you open a Text Generator and place it on the TimeLine and select. From your Video filters menu > AE effects > RE:Vision Plug-ins > ReelSmart Shade/Shape.
In the filters tab in the Viewer you get the S/S controls dialog box. We can divided this control box into sections. The first group of controls is for the basic design of your object. For demonstration purposes I chose the 'textile' font as it is thick and shows the effects of each S/S control. I placed the text on a plain black background for easy viewing.
'Inflation' controls how far from the edge of your object the inflation occurs, the higher the setting the further in from the edge the effect is applied. At a low setting the bevel is a hard edged, as you move the slider higher the beveling becomes more rounded.

'Flatness' scales the height of the object, moving the slider controls how far the images moves out towards you. This control does not change the width of the edge that is set with the 'inflation' control. It is used to raise or lower the height of your object.

'Softness' is used to soften the details of the object, smoothing out the applied effects. This control should not be used until 'inflation', 'flatness', and 'lighting' have been done. At full 'softness' all the details are completely reduced.

'Bump Mapping' controls are used for adding detail and texture to your text or art work. You drop any image into the 'Bump Source' well. Your text will now take on the texture of the art that you dropped into the well. As I don't have any 'bump maps' I simply dropped a PhotoShop file, 720 x 480, of a sunset landscape created in a graphics art program. It worked just great. You can further control the 'bump map' effect.
'Bump Amount' use this control to vary the degree that the bump map affects the shape detailing.
'Bump Intensity' controls the variations in shading affect generated by the 'bump map'.
'Bump Softness'. This control is use to set the amount of blur that is applied to the 'bump map' image before it is added to the text or artwork.

Lighting Positioning.
'Z direction' controls the angle that the light shines on the art, from flat (rim lighting) to perpendicular to the image (over head).
'XY direction' controls the angle, through a circle that the light is shone. Left, right, top bottom or settings in between.

Controlling Materials.
'Ambient Intensity' is much like a brightness control. I discovered that when I use the S/S plugin, my text got a bit darker then the original so I use this control to lighten my art work.
'Diffuse Color' colors the light that is shinning on the text.
'Diffuse Intensity' controls the amount of light contrast between the shadow and highlight areas of the text.
'Shininess' controls the amount of shininess of the text.
'Highlight Color' colorers the highlights of the text.
'Highlight Intensity' controls the amount of color added to the highlight of the text.

'Reflection mapping'
'Reflection Source' art work that is dropped into this well will be reflected on the surface of your art work, with texture and color. It wraps the 'reflection' bump map around your image.
'Reflection amount' controls the amount or intensity that the art is reflected on the surface of the text. With a value of 1 the surface of your text will be like a mirror completely reflecting the bump map.
Other controls.
'Anti-aliasing' controls the quality of the art work, set to 'best' before rendering. I forgot to do this setting before I grabbed my screen shots. Typical.
'View Normals'. Used for analyzing the shape and bump of your art.
Using RE:Vision Effects Shade/Shape. This is a great FCP plug in. I found it to be very straight forward and intuitive, easy to use. I set some type at a large size, 108 pixels and then moved each control slider one at a time. Subtle changes in the sliders produces smooth results and it is quite easy to see what each controller does. This filter opens up with default settings that will get you started. You can tweak each control to get some great 3-D type. I also set some type in Photoshop (.psd) with a transparent background and dropped the S/S filter on it. Works exactly the same as text generated by FCP. I can see creating artwork in Photoshop such as logos and then applying S/S to the artwork. As this plug in works with any image that has an Alpha channel some interesting special effects can be achieved by using 'reflection mapping'. For example, you can make a 'clean plate' of your background and then 'reflection map' it onto your subject. Then use keyframing to change the plug ins effects over time.To get some really great sculpted 3-D type using S/S it is best to use large type sizes. I tested with different fonts and found that by changing fonts that I got very different looks. The samples above are screen shots which were Jpegged. The type looks much better on NTSC with no alaising, better coloring, detail and depth.
The real power of the S/S plug in is the fact that all of these controls, are keyframable. You can morph your type over time. Change the 3-D shape, style, quality, color, bump mapping, etc. and have your light source swing across the face of your type like the sun moving overhead. Couple this with all the keyframable settings you have in the Control and Motion tab and you can do some exciting stuff.
I am on a B &W G3/400 and when changing settings in the S/S filters box there was up to a 10 second delay before the change was reflected in my Canvas and on NTSC and I got control of my cursor back.
I found the S/S plug in easy to use, creative with good control and produces truly great 3-D type. At $89 it is a great deal. Reflection mapping is very cool.
Sample QT Movies using the Shade/Shape filter can be found at RE:Vision Effects' web site.
copyright © Ken Stone 2000
All screen captures, images, and textual references are the property and trademark of their creators/owners/publishers.
[Top]