Book Review - OS X 
June 17, 2002
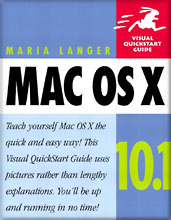
Mac OS X: Visual QuickStart Guide
OS 10.1

Book Review - OS X 
June 17, 2002
Mac OS X: Visual QuickStart Guide
OS 10.1
ISBN 0-321-11631-3
Review By Ken Stone
After reading the proceeding announcement from Apple I headed out to my local book store and purchased several OS X books. To be honest, my main concern was how does OS X deal with Final Cut Pro, what has changed from OS 9 and what do I have to learn in order to manage FCP properly. One of the books I purchased was the Peachpit Press 'Mac OS X (10.1) Visual QuickStart Guide by Maria Langer.
This book is true to the Peachpit Press Visual QuickStart Guide tradition, coming in at under 300 pages. No excess verbiage here. The book is written in a brief, clear and clean style that is typical of VQG books. The book is structured in a step by step fashion and walks the reader through each lesson by the numbers. There are also a number of helpful 'tips' as you progress through the material. This book covers OS X in an introductory manner.
With Mac OS X VQG open on the desk next to me and OS X running on my Mac I worked my way through the book in a short amount of time. The book did exactly what I wanted, it introduced me to OS X. I was able to customize my Finder window the way I wanted and to explore those facets of the operating system that had changed from OS 9. This is not an in depth OS X book nor is it meant to be. This book offers a comfortable route to getting started with OS X and has a comfortable street price of $13.99.
Enjoy,
--ken
Book Excerpt from Mac OS X: Visual QuickPro Guide.
List price: $19.99 U.S.
280 pages
Book excerpts follow review.
"With the release of version 3.0.2 planned development for Final Cut Pro under Mac OS 9 has ended. All future development will be under Mac OS X". Quote from Apple on the FCP 3.0.2 updater page.
By Maria Langer
HTML re-creation
Page 83

|
Burning CDs
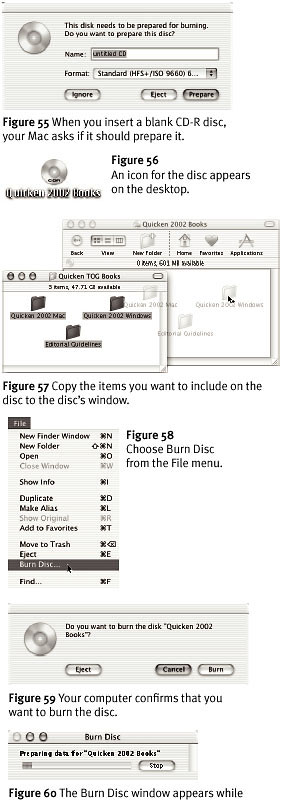
If your Macintosh includes a CD-R drive or SuperDrive,you can write,or burn,files onto blank CD-R media.This is a great way to archive important files that you don 't need on your computer 's hard disk and to share files with other computer users.
To burn a CD 1. Insert a blank CD-R disc into your com- puter 's CD-R drive or SuperDrive. 2. A dialog like the one in Figure 55 appears. Enter a suitable name for the disc in the edit box and click Prepare. 3. Wait while your computer prepares the disc. When it is finished,a CD disc icon appears on the desktop (Figure 56 ). 4. Drag the files you want to write on the disc onto the disc icon or into the open disc window (Figure 57 ). 5. Wait while your computer copies the files. 6. Repeat steps 4 and 5 until all files you want on the disc have been copied. 7. Choose File >Burn Disc (Figure 58 ). 8. A confirmation dialog like the one in Figure 59 appears. Click Burn. 9. Wait while your computer prepares, burns and verifies the disc. A Burn Disc window (Figure 60 )reports its progress. When it disappears, the disk is ready.
|
Pages 88-89
|
Customizing the Toolbar
The toolbar,which is discussed in Chapter 2, can be customized to include buttons and icons for a variety of commands and items.
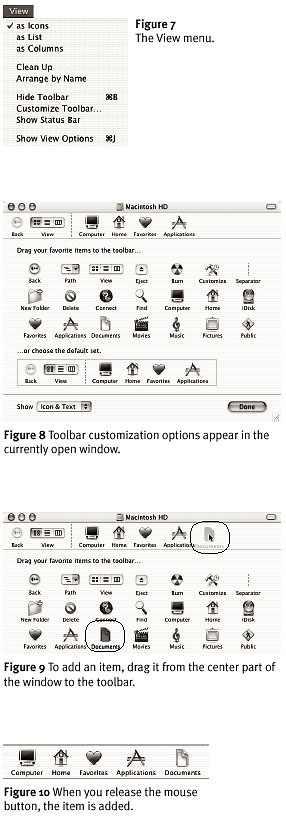
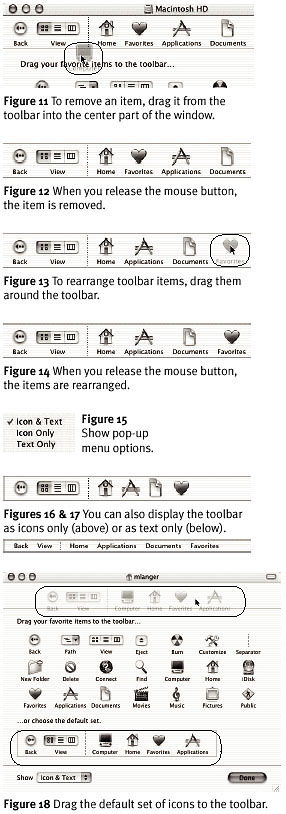
To customize the toolbar 1. With any Finder window open and the toolbar displayed,choose View >Customize Toolbar (Figure 7 ).Toolbar customization options appear in the current window (Figure 8 ). 2. To add an item to the toolbar, drag it from the center part of the window to the position you want it to occupy in the tool- bar (Figure 9 ). When you release the mouse button the item appears (Figure 10). 3. To remove an item from the toolbar, drag it from the toolbar into the center part of the window (Figure 11 ). When you release the mouse button, the item disappears (Figure 12 ). 4. To rearrange the order of items on the toolbar, drag them into the desired position (Figure 13 ). When you release the mouse button, the items are rear- ranged (Figure 14 ). 5. To specify how items should appear on the toolbar, choose an option from the Show pop-up menu at the bottom of the window (Figure 15 ):
|

|
|
6. When you are finished making changes, click Done to hide the toolbar customi- zation options and return to your view of the window.
default settings 1. With any Finder window displaying the toolbar open, choose View >Customize Toolbar (Figure 7 ). Toolbar customization options appear in the window (Figure 8 ). 2. Drag the group of items in a box near the bottom of the window to the toolbar (Figure 18 ). When you release the mouse button, the toolbar's default items appear (Figure 8). 3. Click Done to hide the toolbar customization options and return to your view of the window. |

|
Mac OS X: Visual QuickStart Guide, (pages 83 and 88-89) copyright © 2002, by Maria Langer, published by Peachpit Press. Reproduced by permission of Pearson Education, Inc. and Peachpit Press.
You can purchase 'Mac OS X: Visual QuickPro Guide' from the lafcpug store.
For a list of bookstores who carry Peachpit Press books call (800) 283-9444 or visit http://www.peachpit.com/special/bookstores.html
Review copyright © www.kenstone.net 2002