Studio Pro 2 - Photoshop Spetember 22, 2003
Shapes, Drop-Zones, Styles and Templates
with DVD Studio Pro 2
Creating these Assets in Photoshop.
By: Alex Alexzander
Studio Pro 2 - Photoshop Spetember 22, 2003
Shapes, Drop-Zones, Styles and Templates
with DVD Studio Pro 2
Creating these Assets in Photoshop.
By: Alex Alexzander
2.Importing Shapes into DVD Studio Pro 2
5.Creating Styles and Templates
Shapes and Drop Zones are exciting new features for DVD Studio Pro 2 (SP2). With SP2 we now have the capability to create buttons on the fly on our menus. These buttons can be customized with stylized objects you can create and reuse. Customizing occurs with the use of an exciting wrapper known as shapes. Shapes are containers in the form of graphical icons, such as a picture frame or any graphic you create. Assets such as pictures or movie files can be wrapped into these icons and reused at a later time.
Further adding to our menu customizing we also have Drop Zones. Drop zones are any picture objects you import, which can be logos or photos or any shape object and its contained asset such as photos and movie files.
Styles and templates allow us to save options assigned to buttons, drop zones and menus so that we may use entire defined menus complete with a pre-made button shape, background audio, highlight color settings and many other menu functions.
What you are about to read is a basic tutorial designed to quickly teach you how to create shapes and use them with your buttons as well as create drop zones. You will learn how to reuse assets with styles and templates.
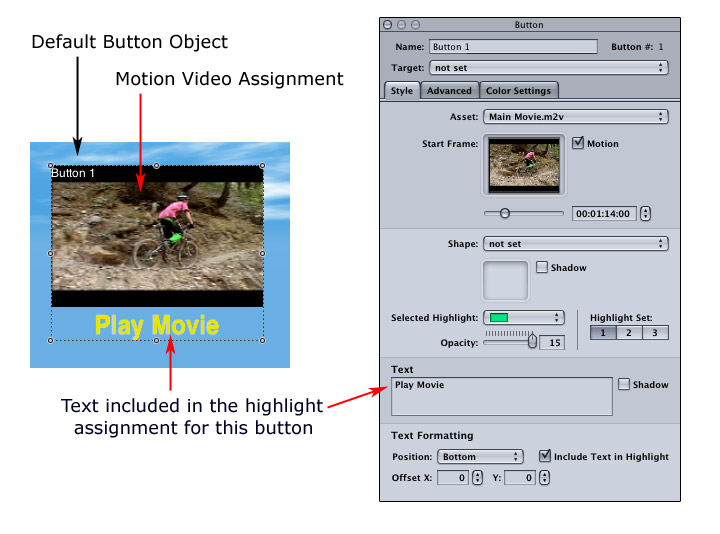
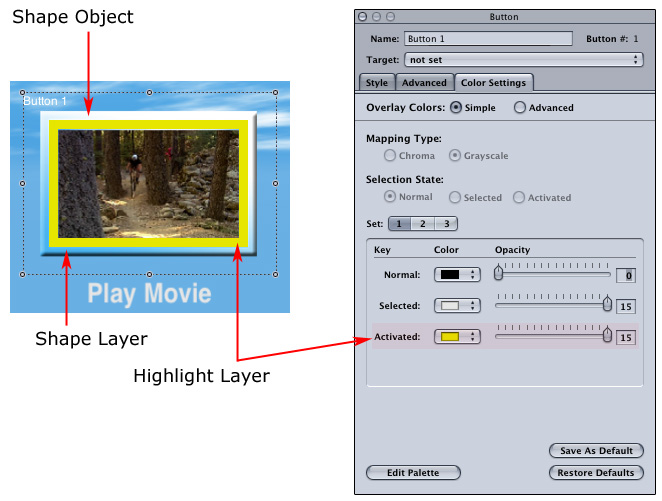
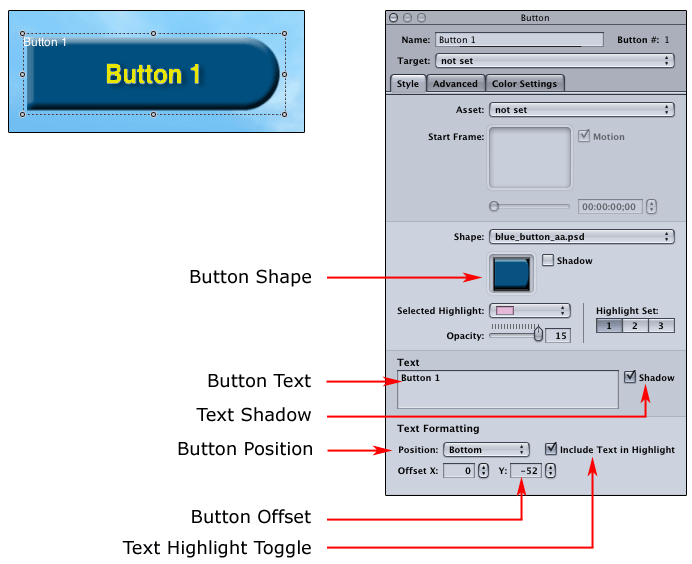
Take a look at the button in the above graphic. It is a motion button. In prior versions of SP2 the use of motion buttons carried with it a task of pre-compositing a single background using a composite of multiple video tracks and a button assignment that hovered over that area. This is no longer the case with SP2. What we have is a button created directly on the menu and a movie assigned to that button as an asset in the button property inspector. Our example button is simply the rectangular shape of a standard button. If you look carefully at the center of the property inspector, you will see a property called Shape, which has no assignment in our example.
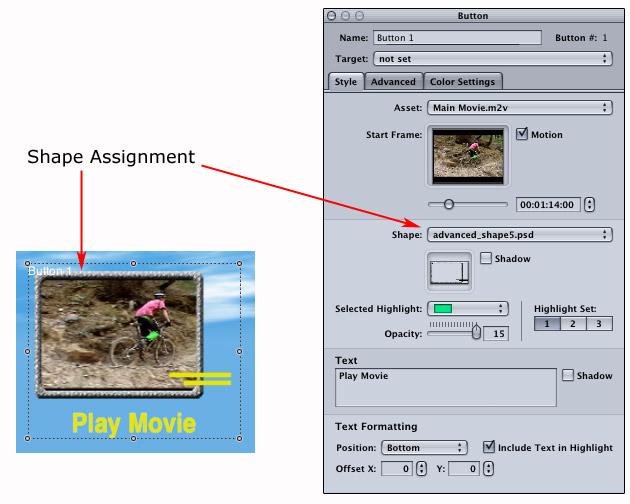
Here is the same button with a shape asset assigned to it. Note the changes in appearance. We have a more creative button instead of the simple rectangular defined area. This shape is also customized to act on our simple highlight settings. In the coming sections, you will learn to create a basic shape and import it into SP2.
[top]
Importing Shapes into DVD Studio Pro 2
Download my shape if you would like to try this yourself.
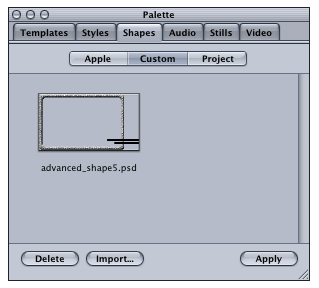
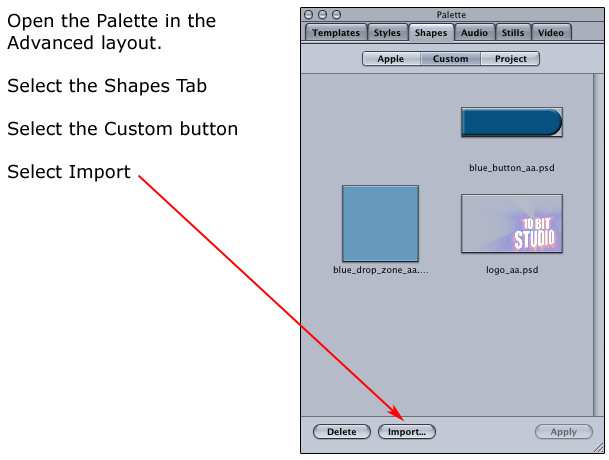
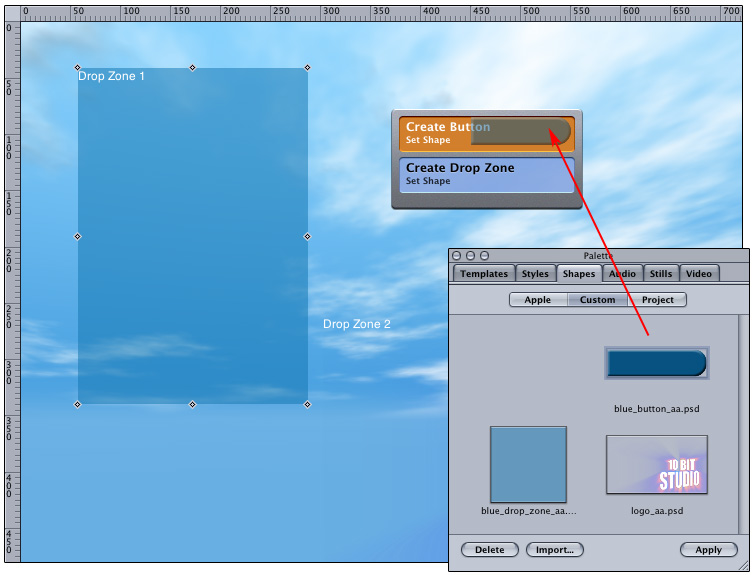
Open the Palette inspector
Choose Shapes / Custom
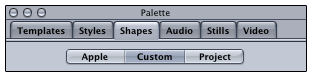
Choose import, and choose your shape object from your file folder.
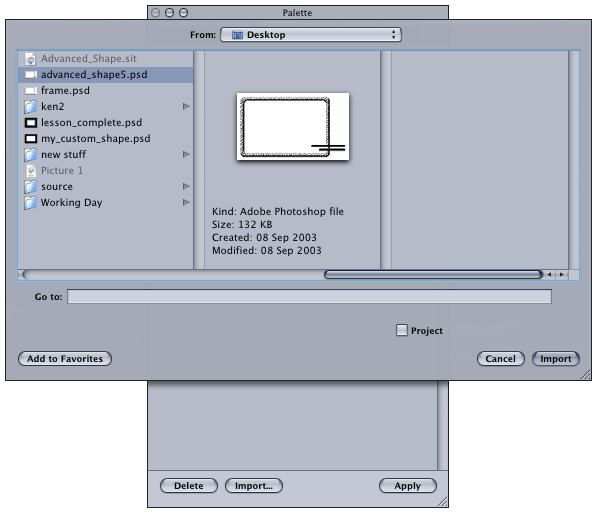
Once you select the object and imported it, you will see an icon of the shape object in the custom shapes palette.
What are shapes?
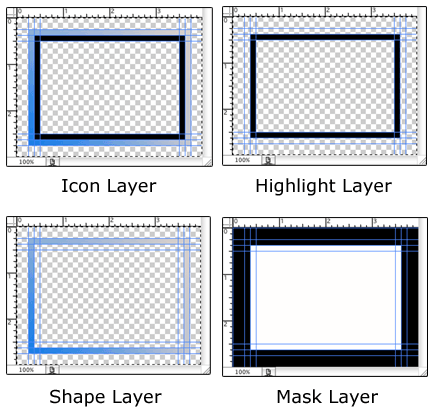
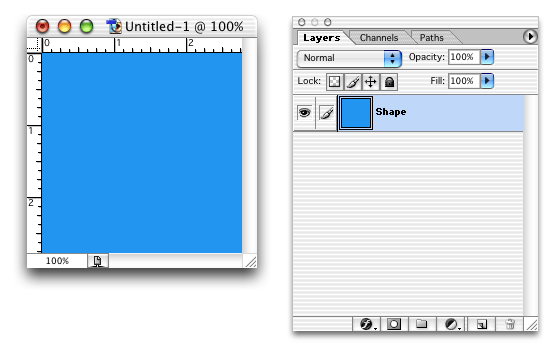
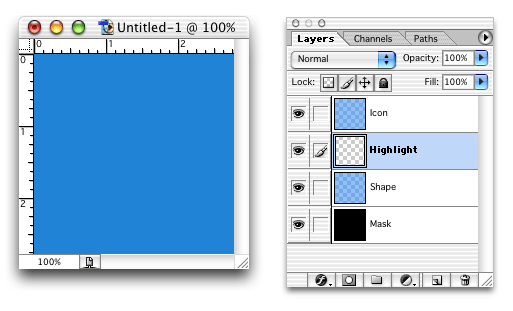
Shape objects each consist of a 4-Layer Photoshop PSD document. We will be creating a simple shape object in this section. Examine the following sets of images. On the right side we have our Photoshop layers palette and on the left side, our Photoshop document. I have only three layers showing in the first image. The outer box with the blue and white gradient is our Shape layer. The inner black box is our Highlight layer. The Icon layer is a copy shape and highlight layers merged into one layer named Icon.
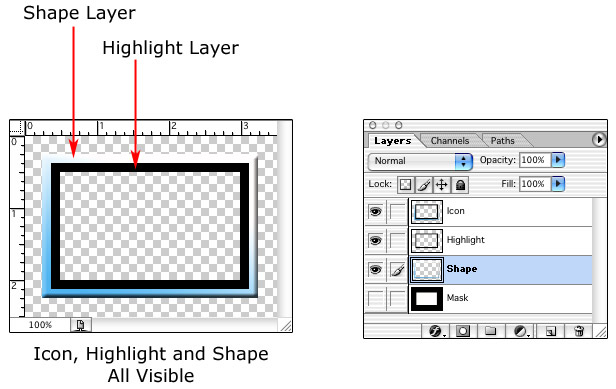
Shape and Highlight Layer
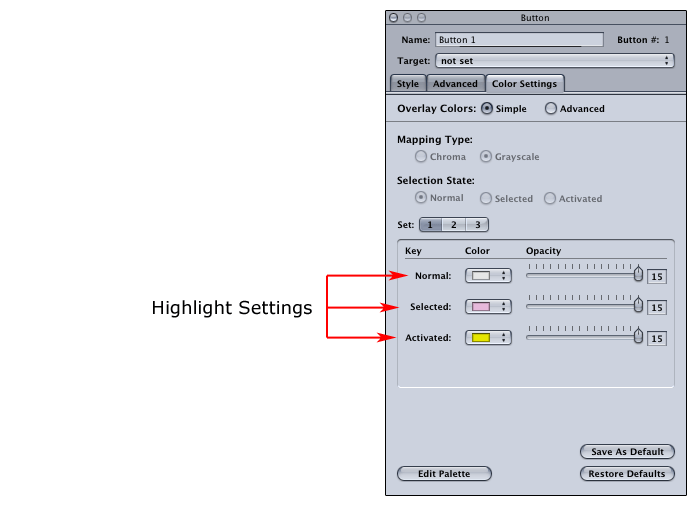
Take a look at the second set of images here. The Shape object is assigned to a button. The activated highlight state is yellow and the button object itself is the shape layer. The shape layer doesn't change in our example, however the highlight layer does. The highlight layer takes the settings set forth in the color settings tab of the button property inspector.
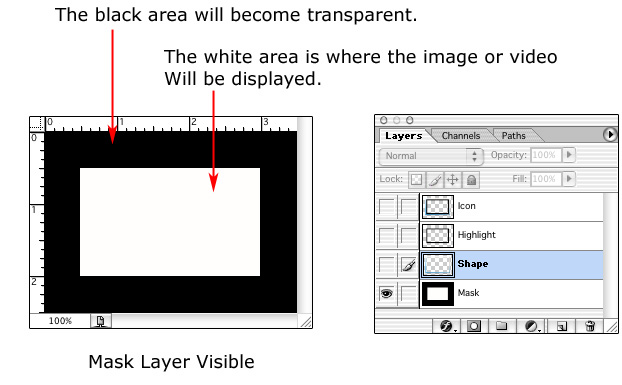
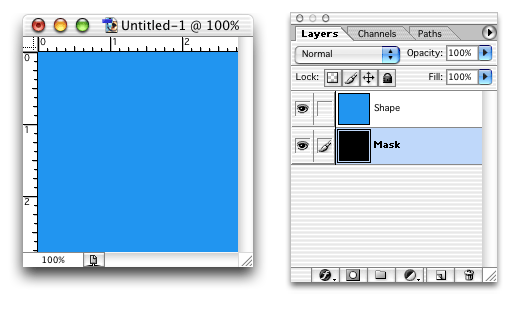
The Mask Layer
The mask layer defines where the video or still image of the button will and won't appear. The white area of the mask layer will contain the video or still image, and the black area of the mask layer will define what area will be transparent. Notice that the mask black area is on the bottom of our 4-Layer shape object and starts exactly after the white area. If our shape layer held a round shape or a lumpy shape, the black mask area under the shape layer allows for the shape layer to appear to float on the menu. Otherwise, we would only have rectangular shapes to play with. By masking slightly beyond the shape layer we are allowed to create odd shapes, such as a lumpy rock or a picture frame.
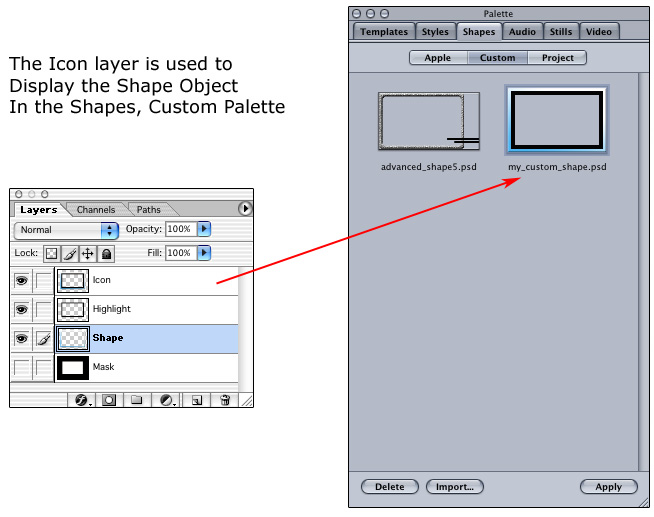
The Icon Layer
The icon layer is used simply to display the icon of your shape object inside the SP2 application's shape palette.
[top]
This next section is a highly detailed walk through for creating a shape object. This section will help reinforce how a shape works within SP2. This process will be broken into four sections, one for each of the four layers. At the start of each of these steps you may download the finished version of the step. If something is not clear enough, you can inspect the layer yourself. If you do not finish a layer correctly, you can download the next step finished asset so that you may continue on.
Creating a shape object will follow a certain order. When you are finished, each of the layers must be in their correct order before importing the object into SP2. The order in which you create the layers of the shape object differs from the actual layered order.
We will create layers for our shape object in this order:
Our finished shape however must be in the following order starting with the top layer:
Step One:
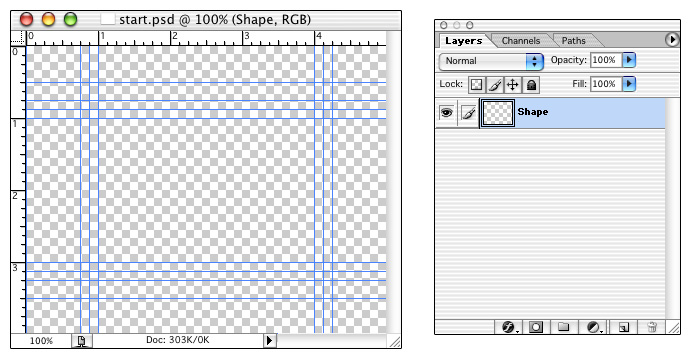
Photoshop Project: start.sit.
This is a blank Photoshop document with the guides already pre-set for you to follow along.
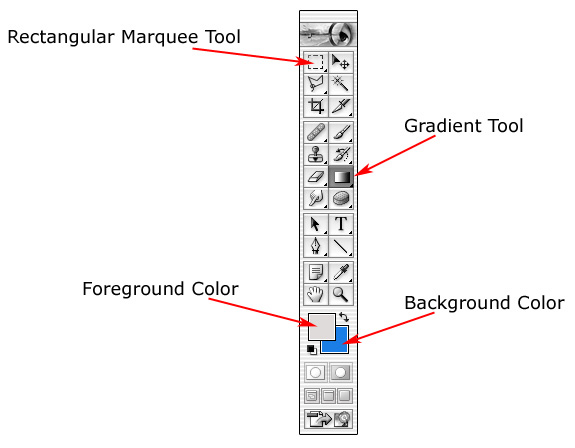
I am going to refer to the following tools by name going forward, although I refer to the rectangular marquee tool as "Selection Tool".
After downloading the photoshop Project file, you should be in Photoshop 7 and have the following document.
I have the guides pre-formatted for you.
You will notice that the first layer is already named for you.
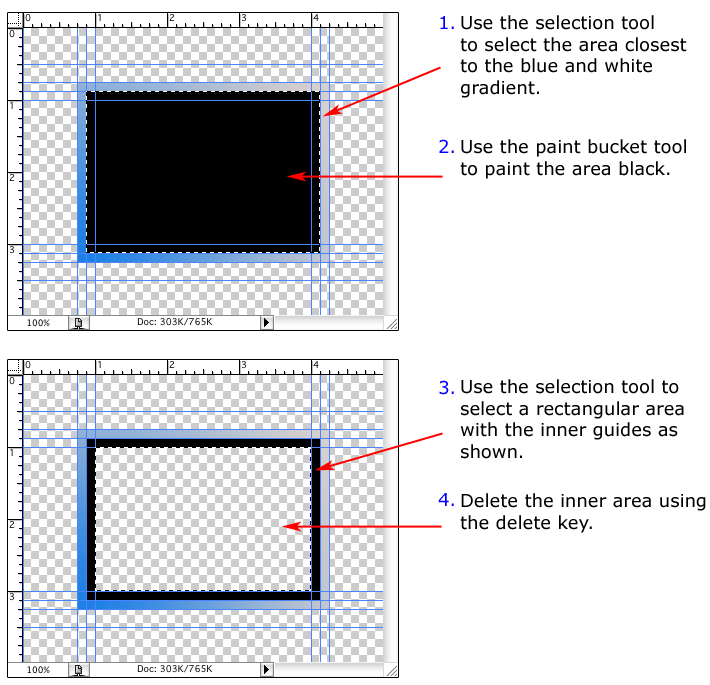
Use the selection tool to create a rectangle around the outer guided area as shown here.
Then use the gradient tool to create a blue and gray gradient across the selected area.
Use the selection tool again to de-select and then select the inner area using the next closest guides.
Press the delete key to subtract the inner area of the gradient.
The object here is to create our first shape which is a simple rectangle using the outer set of guides as shown.

Step Two:
Optional Download: Highlight Layer
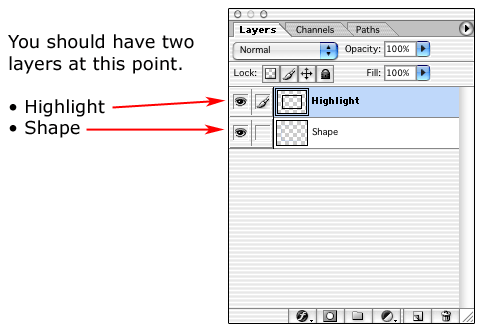
Create a new layer and name it Highlight.
Use the selection tool to select a rectangle just bordering the blue and grey gradient you made before.
Check your layers. You should have two layers at this point. The top layer is Highlight, and the bottom layer is Shape. Turn visibility on and off for each layer. The shape layer should only have the blue gradient and the highlight layer should only have the black rectangle.
Step Three:
Optional Download: Icon Layer
The Icon layer is perhaps the easiest one to create. The icon layer is simply a copy of the highlight and shape layer. It can be anything you like; however, choosing the highlight and icon layer will give you an accurate visual representation of the Shape inside DVD Studio Pro's Shape palette.
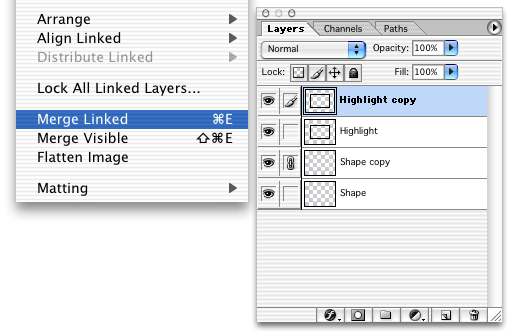
Right-mouse (Control-Click for one-button mouse users) click on the layer, Highlight in the layer palette and select duplicate.
Right-mouse (Control-Click for one-button mouse users) click on the layer, Shape in the layer palette and also select duplicate.

After duplicating Highlight and Shape, you link Highlight Copy to Shape Copy.
Merge Highlight Copy and Shape Copy.
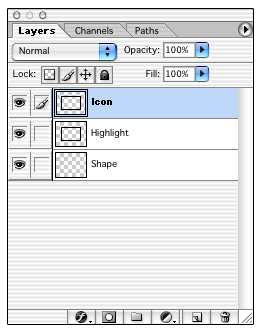
Rename the combined layer to Icon.
This new Icon layer should be on the top of your layers palette now.
Your layers palette should like this.
Step Four
Optional Download: Mask Layer
The final layer is creating the mask layer. The mask layer should always be on the bottom.
Create a new layer and label it Mask.
Move this layer to the bottom of the layers palette.
Turn off all layer visibility with the exception of the shape and mask layer.
Select the Mask layer in the layers palette.
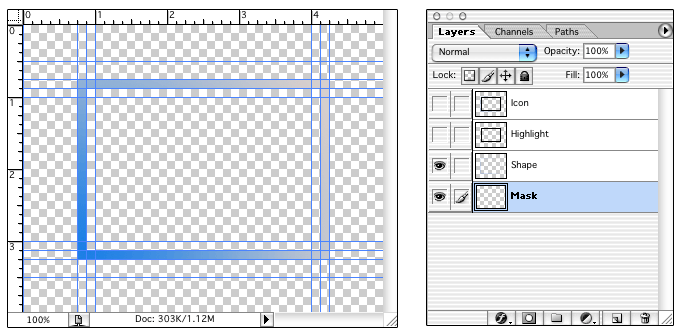
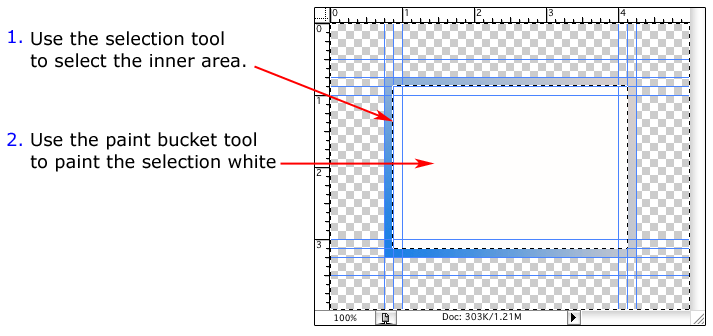
Use the selection tool to selection tool to create a selection that borders the inside of the blue gradient.
Use the paint bucket tool to paint the selection, white.
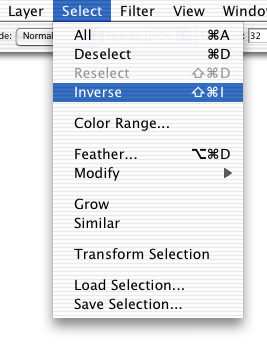
With the selection still in effect, reverse the selection by using the pull down menu and selecting Select, Inverse.
Use the paint bucket tool to paint the selection (outer area) completely black.
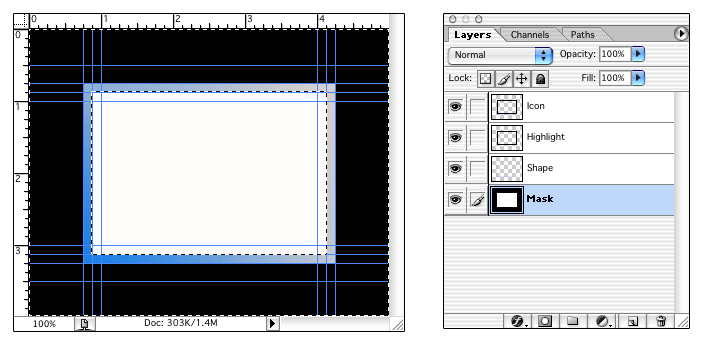
This completes creating a shape object.
You can download the final shape as well as a more complex shape we will use in the next section.
[top]
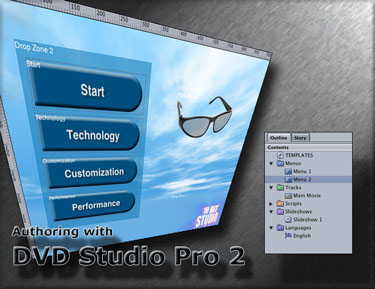
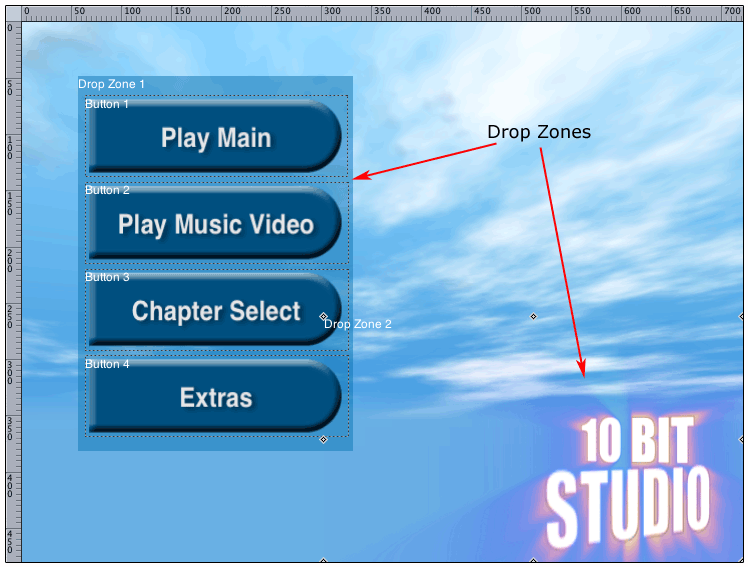
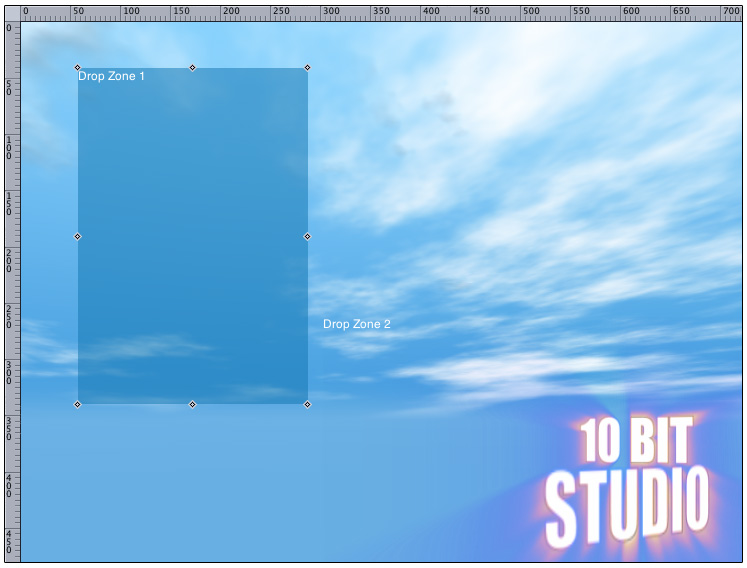
Take a look at the graphic below. I want to give you a brief taste of what drop zones can do for your DVD creations. I have created two simple drop zones using exactly the same process we already learned when creating the shape object. In this case, both of these drop zones are 4-layer PSD documents. As an option, you may download the drop zones and examine the structure of the layers as we go through them here. In this sample screen shot, the two drop zones have added an extra flare to my menu. Drop Zone 1 serves as a simple background to my button menu and Drop Zone 2 is a more advanced creation used for my logo.
Drop zones break into two basic categories. Items you import, such as image files and mpeg video and shapes that created using the 4 layer PSD method. Image files such as tiff-based files are perfect for basic logos where as shapes offer more customizing within DVD Studio Pro 2 itself. There are a few ways to create a drop zone. We will focus on two types of drop zones: One being a tiff file based logo and the other a shape based drop zone.
Let's get started now with creating a very simple logo and importing it into DVD Studio Pro 2.
Download the DropZones file and open it.
You have the following files:
Drop zones can be assets you imported into your project or shapes imported into the custom palette. These objects have the option of being converted into drop zones from the SP2 menu interface. We will be importing assets and shapes and then converting them into drop zones.
Open Photoshop and create a new document.
Make the file an RGB file and set the background to transparent.
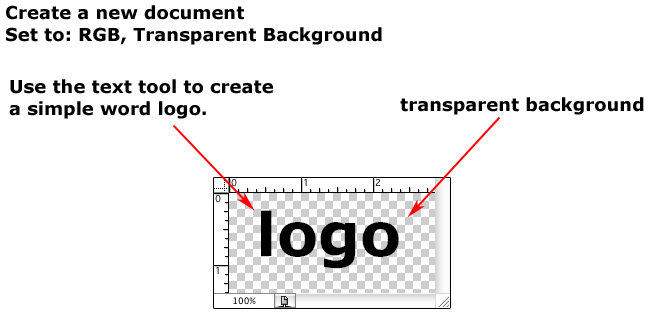
If you have any additional layers in the layer palette, merge them into a single layer.
Save this as a tiff file and note the following settings:
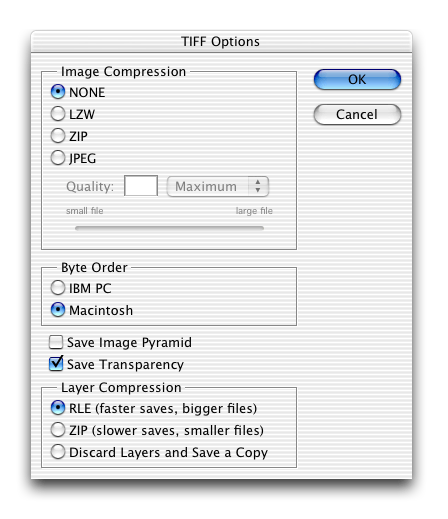
Where you see Save Transparency, if the option is greyed out, you did not start with a transparent background. This option is what allows a single layer tiff file to float on your menu with nothing behind it such as a rectangular white background.
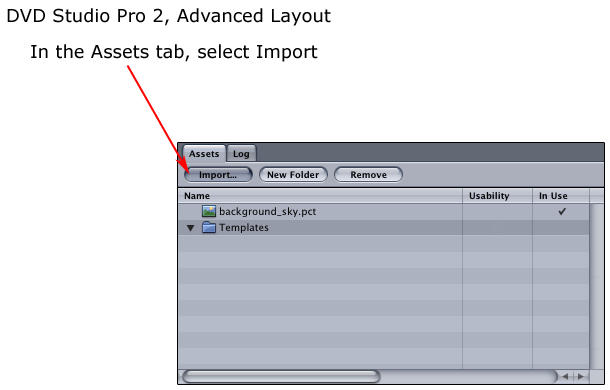
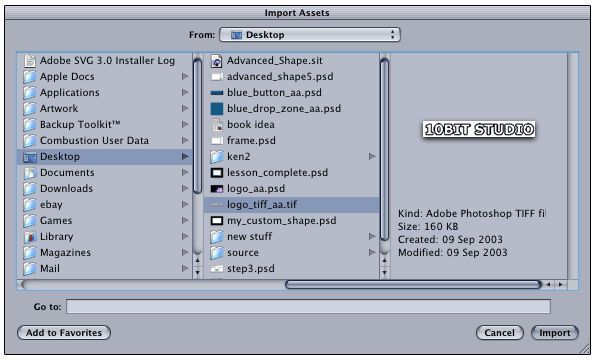
Import the file: logo_tiff_aa.tif from the download set.
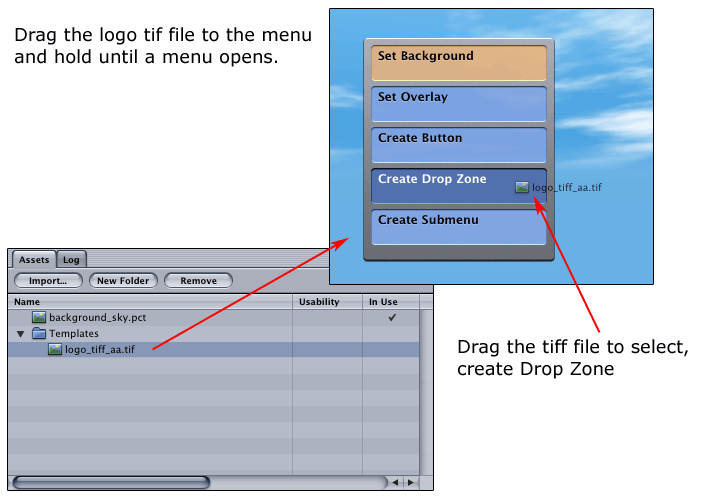
Once the file has been imported into the Assets tab, drag the tiff file to the menu window and hold the mouse button until an options menu pops up. Select the Create Drop Zone option.
Once you import of a tiff file, you may have to re size the logo.
Select the handle of the drop zone and re size while holding down the Shift key.
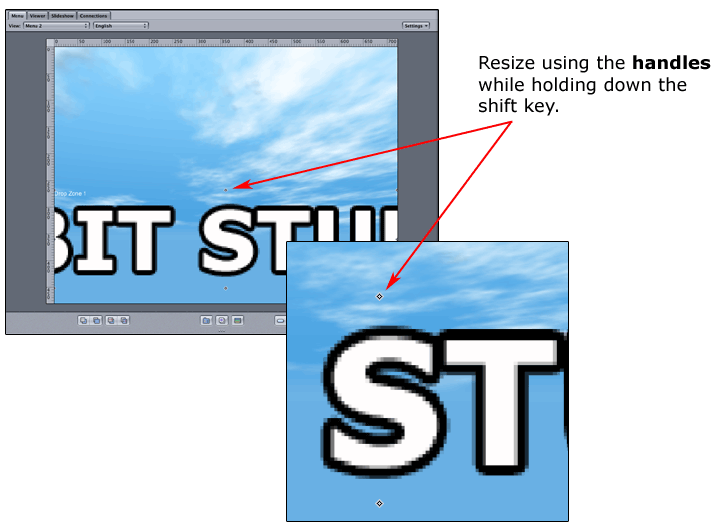
You have just created a Drop Zone!

Now you have learned how to create a simple drop zone. Let's take a look at what another drop zone has in common with the shape object. Shape objects can be converted into a drop zone object; however, you may have special ideas for logos that shape objects are not perfect for. The 10BIT Studio logo for example was created with a 4-Layer PSD much the way the shape object with one minor difference. The highlight layer is completely empty because there is no need for a highlight property in drop zones. Let's take a look.

In the shape object we learned that the image or video would be placed in the white area of the mask layer and the black area would be transparent. We also created a Highlight for the shape object that functions with the buttons highlight states. A drop zone can be created with a mask that requires the white area in the mask layer if you intend to use the drop zone to hold a video or picture file. In this drop zone I will leave the logo exactly the way it is, so the mask layer may remain completely black.
The logo above was created with Adobe After Effects. I created this logo to illustrate a complex issue concerning shapes and drop zones where opacity is concerned. The file you downloaded at the start of this lesson has two PSD files. Open the logo_aa.psd file and examine it. Compare it to the layers palette above and take note that the Shape and Icon layers have a complex opacity where the light bleeds through the logo text. Now open the blue_drop_zone_aa.psd file. Though this file is far more simple to create it follows the exact same rule. We are going to create this file next. In the opening graphic I created a transparency background drop zone for my buttons. You are going to learn how to create that same transparency. Once we have finished that drop zone object we will learn our final method of importing and converting items into drop zones.
Lets go back to Photoshop now.
Create a new document and make it 200 x 200 pixels, RGB with a transparent background.
Use the Paint Bucket tool to paint the first layer completely blue.
Name this layer, Shape.
Create a new layer, name it Mask.
Now paint the Mask layer completely black.
Get ready, here is the big secret!
Select the blue shape layer.
Adjust the opacity setting of the blue layer to 65%.
Create a new blank layer and place it under the shape layer.
Link the new blank layer to the shape layer above it.
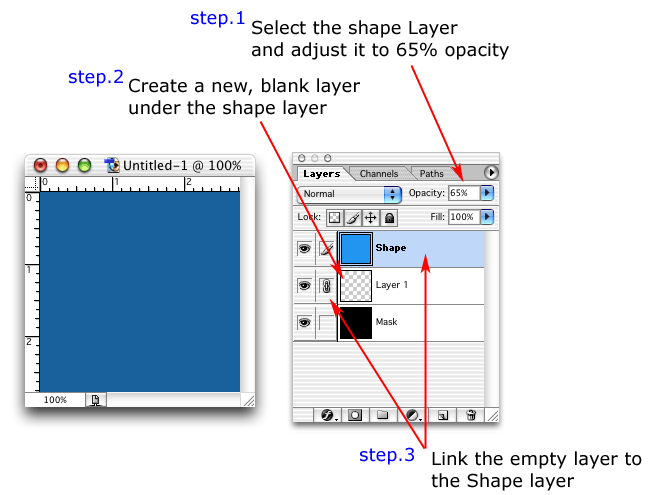
Merge the linked layer with the shape layer.
This creates an opacity layer that DVD Studio Pro 2 will understand.
Now duplicate the Shape layer and rename this copy as Icon.
Create a new layer, name it Highlight and move it between Icon and Shape.
Take notice that the Icon and the Shape layer are both semi-transparent now.
This is the same as the blue_drop_zone_aa.psd file you downloaded.
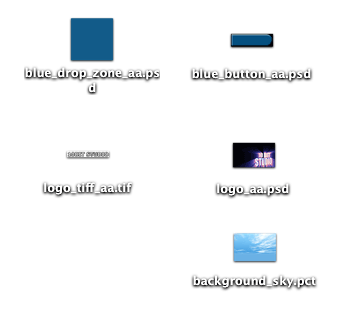
Now, we are going to create drop zones with theses. These PSD files are not like the tiff files you imported into the assets tab earlier. These are shape objects that need to be converted into Drop Zones. For this final example, we will use all three of the PSD files and a background file you downloaded to create the menu you see at the top of the lesson.
Locate the following four files from the download:
Put them someplace where you can find them easily.
Open SP2 into the advanced layout. Open the palette shapes tab, then go to the sub menu option of custom. This is where our shapes must be imported. Select import and grab the three PSD files you downloaded. Your custom tab should now look as mine does.
Let's also bring in our background_sky.pct file.
Go to the Assets tab, select Import and bring in background_sky.pct.
Now, we are going to create a menu as I am sure you know. The background_sky.pct file is our background.
Drag the background PICT file to the menu and drop it.
We are now going to convert blue_drop_zone_aa and logo_aa into drop zones.
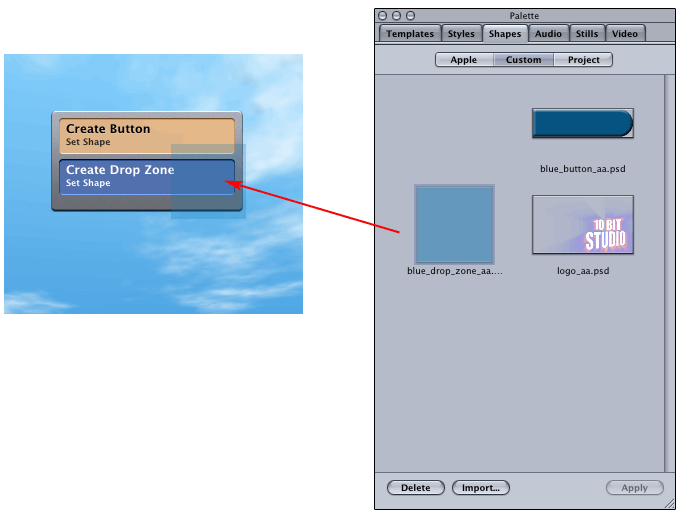
Drag blue_drop_zone_aa to the menu and hold until the pop-up menu appears. Select Create Drop Zone.
Repeat this same process for the logo_aa file.
You have just converted shapes into Drop Zones!
You can re size the blue drop now. We are going to add buttons on top of it and dress this menu up a little bit.
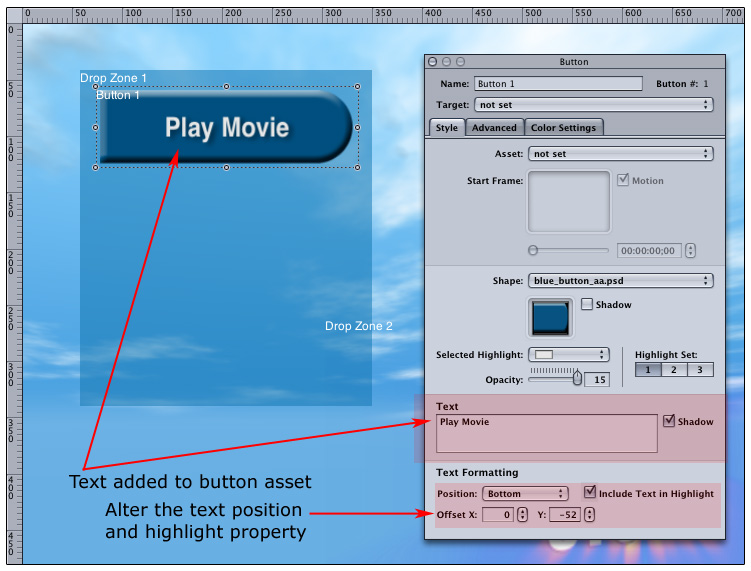
I have adjusted mine and I am ready to add a few buttons. We will add just a couple for show and conclude this lesson. From the custom palette, move the blue_button_aa.psd shape onto the menu and wait for the pop-up menu. Select Create Button, set shape, which is the default. Let's configure our button a little bit so it looks a lot more like the start menu you saw at the top.
You can see I added text from within the button property inspector. You should examine the layers of this button asset. You will note that the Mask layer is pure black and the Highlight layer is empty. In this button's case, you can add the added text to the highlight state of the button property and only the text will highlight. There is simply nothing in the Highlight layer for SP2 to highlight.
Examine the layers of the objects you have downloaded. You now can see how you can control many aspects of your look and feel with some planning. You have learned how to prevent the highlight state of a button shape and how to create various kinds of drop zones. You can create your own customized transparency drop zones and logos.
[top]
Wrapping things up now, lets spend a little time on customizing SP2 with shapes, styles, and templates. You now have a pretty good idea of what shapes are. Shapes are used to enhance the appearance of buttons and can be used to create complex drop zones. Styles customize these buttons and drop zones. For example, I might re size or tilt the axis of a drop zone. I might also create a button and decide to place button text inside or outside the button and set other parameters of text such as shadows and font type. Those settings may then be saved as a style, which then contains the asset and the settings combined. Beyond styles we have templates. As styles are to buttons, templates are to menus. Templates contain settings in menus, such as all the assets in a menu, like audio background, button style and layout, drop zones and more.
Creating a Shape Style
Our button has quite a few settings and rather than repeat them over and over again, we will configure this button once and the simply set the style for the button. Once we set a style, we are prompted to save the style. Take notice that shapes and drop zones are saved in different locations to help keep us organized.
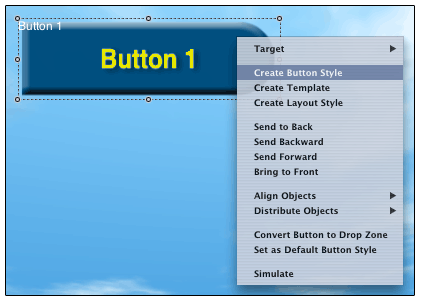
Right-mouse (Control-Click for one button mouse users) click on our button and select Create Button Style.

When you create your button style, you will have the option of making the style project wide or self-contained. Project-based styles are stored in Project \ Buttons where as Self-Contained are stored in Custom \ Buttons. If you plan to re-use the button style outside of the project you are currently working on, select self-contained.
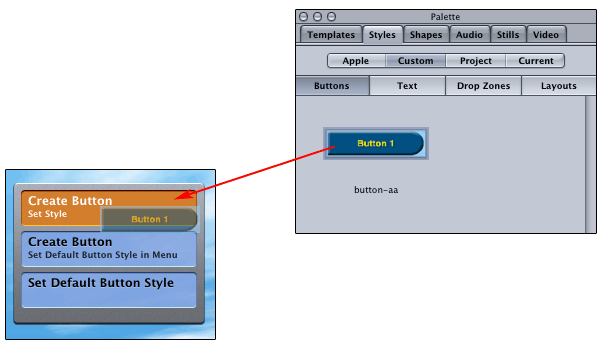
Drag the button style you have created directly on the menu and notice three options:
1. Create Button, Set Style
This default action creates a button on the menu and accepts the style of the button. The word set in this button is a misleading. You are really accepting the settings already defined when you created the style.
2. Create Button, Set Default Button Style in Menu
This option is a little more complicated. Here you are setting the default button style to match the style settings of the button you are creating. So this performs two actions. Not only are you creating a button here, but the next time you simply draw a blank button, you will see that you are really drawing this button style instead of the normal blank button.
3. Set Default Button Style
This option is exactly the same as the one above without actually creating a button. You are simply setting the default style.
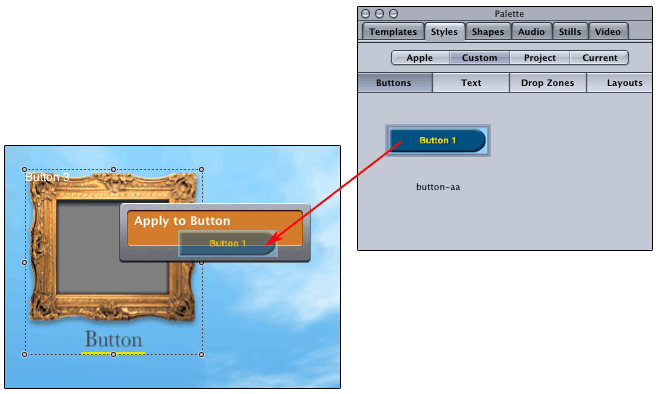
Styles may also be used to set the style of existing buttons, blank or otherwise.
Drop Zone Styles
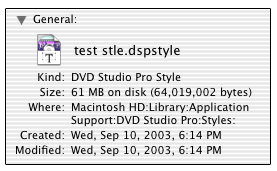
Drop zone styles have far fewer settings to play with. You can use drop zones to set styles for rotation and size and where shape-based drop zones are concerned, your style settings can be made to contain still images and of course video. Take special care when creating drop zones with embedded (self-contained) video, as the drop zone will grow to contain the entire video file size as shown below.
Creating Templates
Templates are styles on steroids. Templates take into account an entire menu of assets. Templates also have a very special function when using MPEG2 assets that will help you create DVDs far faster than ever before.
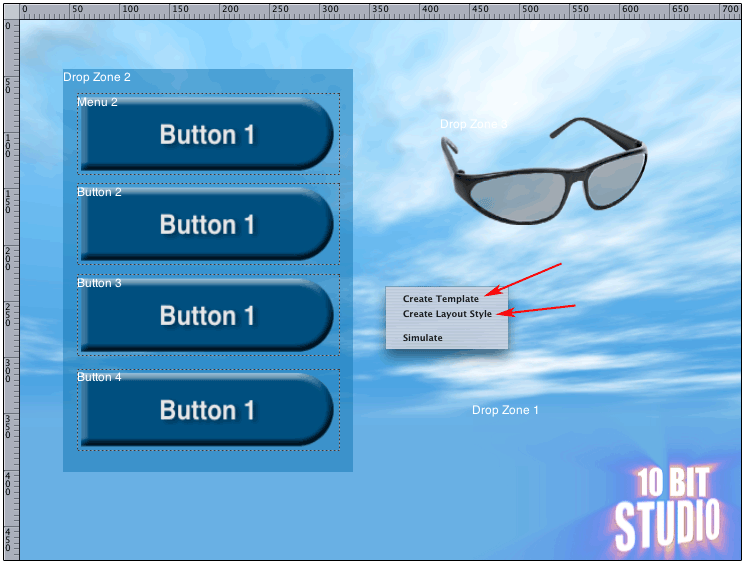
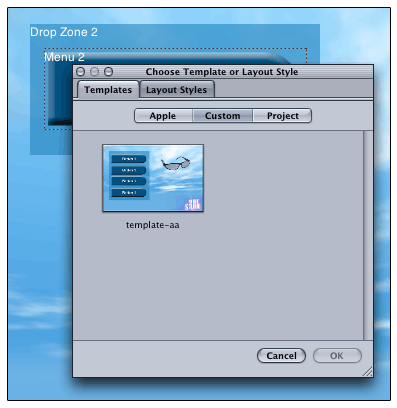
Here we have created our menu and we are going to create a template. Take notice of the option when control-clicking or right-mouse clicking. You can choose to either create a template or a layout style. Choose one, then come back and repeat the process and choose the other. You want and need both.
Layout Style
A layout style contains your buttons size and position, guides and default text. Layout style can make button layout for multiples that will have the same basic layout.
Templates
Templates on the other hand contain the button size, position, background settings as well as audio, text objects, drop zones and even highlight settings wether they be advanced or simple. Time code loop information is also stored in templates. Creating a template means, doing a lot of the basic work first and being able to re-use that work again later on. When creating menus, we can easily drag-and-drop our template into a menu, set our track assignments, and complete the menu that quickly.

Besides dropping templates into a menu and defining tracks, templates can also be called upon by dragging an mpeg asset onto a button. This will result in a pop-up menu where one of the options is to set that mpeg asset to that button and create a chapter index. In this example, my template which contains four buttons is perfect for the chapter index of the tutorial mpeg asset, which happens to contain four chapters. Notice above in the outline that no tracks yet exist. SP2 from this single action will add a track and assign the jump to variable to that track on the button here in my title menu. In addition this same single action will continue to create a second menu based on the template, assuming layout, backdrop, drop zone, and button style in a single action.
You have the option of selecting any prior created template. In my template, each button is labeled button 1. Using the template in this way will cause SP2 to examine the chapters set in the mpeg track and assign each button in my template to the start of each chapter marker. In addition, the chapter marker names will become the names of the four buttons in exactly the same order.
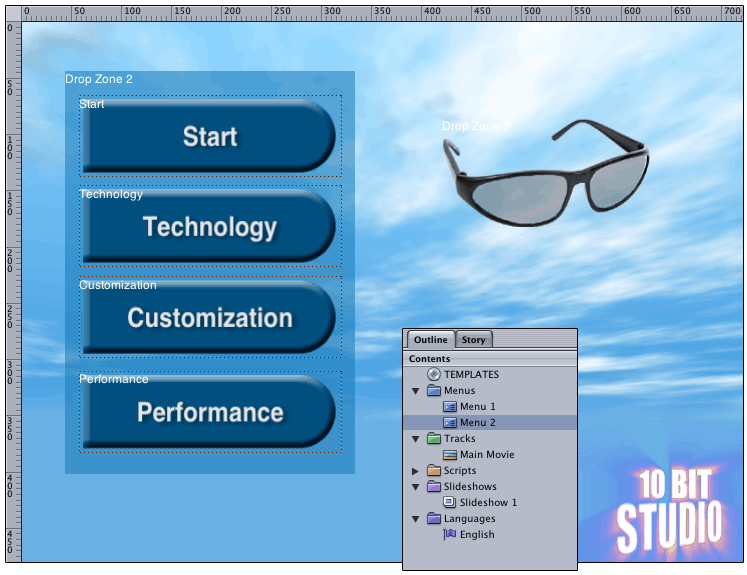
This is the result of that action. Our outline has a new track added and named for us. A new menu has been automatically created. Take a look at our button names; Both the button name itself and the text assigned to the button have been configured automatically.
copyright © www.kenstone.net 2003