Spetember 26, 2001

Spetember 26, 2001
The Sliding Filter Trick
That's a fantastic story, but its true. Using the techniques in this article, you will be able to do the following:
Every filter will have its own start and end points. By default, they will encompass the range of the clip. To change these start and end points, follow the steps below.
1. Apply a filter to a clip in the Timeline.
2. Open the clip into the Viewer and go to the Filter tab.
3. At the top of the Keyframe graph will be a Filter Start/End bar. There are two thin vertical black lines that show what part of the clip the filter is applied.
By Andrew Balis
Video clips with video filters. Its an old tale of rendering and more rendering. But there is a new tale to tell. A story of filtering only part of a clip, and rendering only the part of the clip that has the filter.
Filter Start/End Points
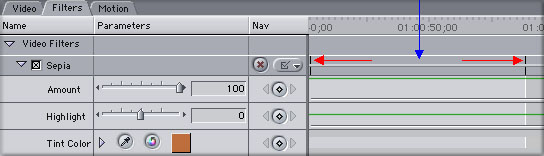
Blue arrow denotes Filter Bar - Red arrows show Start and End points |
4. With the cursor, drag these lines left or right. The dark grey part of the bar is the section where there is no filter. The light grey part of the bar is the section where the filter is applied.
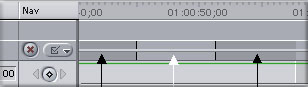
White arrow shows section with Filter Black arrows show sections without Filter |
Sliding The Filter
The section of the clip that is filtered can also be shifted, so that the filter can be used on an earlier or later section of the clip.
1. Drag the cursor over the light grey section of the filter bar. The cursor will become a Slide tool.
2. Click and drag left or right to move the filtered part of the clip.
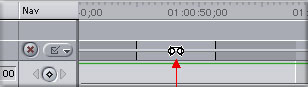
Red arrow shows Slide Tool |
Animated Effects
At this point, you may be saying to yourself, "Ok, this seems kind of interesting, but when would I apply a filter to only part of a clip?"
Sometimes, you will want to Keyframe the settings of a filter so that the effect of the filter 'ramps up' from no effect to the effect, or 'ramps down' from effect to no effect.
When a filter is keyframed, FCP will still require you to render the entire clip, even if the part of the clip is keyframed to a setting where the filter has no effect.
We can still limit the amount of the clip that is rendered, by changing our filter start/end points so that they encompass the keyframed section of the clip that have the effect. The start/end points will not cover the section of the clip where the filter is keyframed to a setting of no effect.

Only the section within the boundaries of the Filter Start/End Points will need to be rendered.
Multiple Filters/Multiple Sections
Another idea for using filter start/end points is to place multiple filters on a clip, each with its own start/end points. These filters can overlap one another, but some interesting results can be accomplished when they don't overlap. You can have one filter start where another filter ends. And this can happen multiple times over the span of the clip.
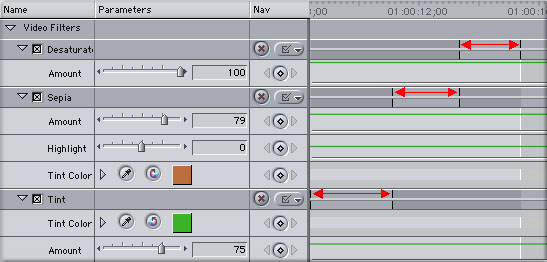
Each filter on the clip has its own unique set of Start/End points. |
Now that you know the Sliding Filter Trick, you can go out into the world with your bins of filters and enjoy.
Written by Andrew Balis
copyright © www.kenstone.net 2001
[Top]
All screen captures, images, and textual references are the property and trademark of their creators/owners/publishers.